Scan Pick
The 'Scan Pick' option provides the ability to implement a paperless scan-pick process using wireless RF devices to scan all parts on a sales order.
Note: This function requires selection of a sales order from a list of all open sales orders, and does not assign any open sales orders to a specific user based upon any type of criteria (e.g. users currently working ("picking") that day, zone locations, or order types of emergency versus regular).
Hidden Switches

Access Scan Pick by clicking the 'Scan Pick' button on the 'Main Menu' screen.
The 'Scan Pick' menu screen displays.
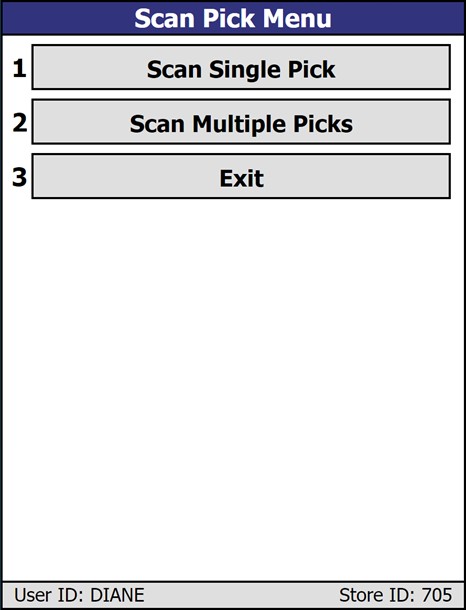
Click 'Exit' to return to the main menu.
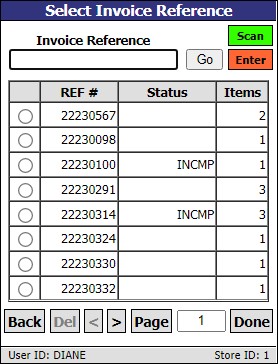
When the 'Scan Single Pick' option is selected, the 'Select Invoice Reference' screen opens, displaying a list of all open pick tickets.
When the 'Scan Multiple Picks' option is selected, the 'Select Invoice References' screen opens, displaying a list of all open pick tickets, to select multiple at once.
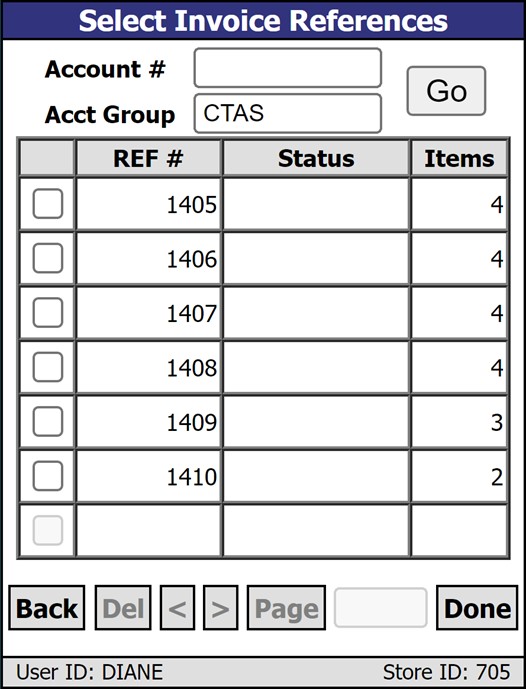
Account #
Enter an account number and click 'Go' to filter the open pick tickets by that account number. Alternatively, delete the data in the field to re-sort the list and bring back the unfiltered list of open orders for all accounts and account groups.
Account Group
Enter an account group and click 'Go' to filter the open pick tickets by that account group. Alternatively, delete the data in the field to re-sort the list and bring back the unfiltered list of open orders for all accounts and account groups.
Indicates the 'REF #' of from the 'EXISTING INVOICE REFS' pop-up at Point-of-Sale.
Indicates the 'Status' of the scanning, either 'INCMP' for incomplete, or 'INPRG' for in progress.
Indicates the number of different part numbers from the sales order.
Tap to return to the 'Main Menu' screen.
Always disabled on the screen.
Tap to go forwards or backwards one page in the list of open orders.
Indicates the page number of the current page. Enter a new page number and tap the button to jump to that page.
You are able to select a ticket to scan by entering a sales order number ('REF #'), scanning a bar code form a printed sales order, or selecting a row in the list.
When you have selected an order, click the 'Done' button to open the 'Scan Items' screen.
When selecting multiple invoices, all references selected must be from the same 'Account #'. If not, the buzzer sounds and a message displays stating: “When selecting multiple invoice references for aggregated picking, all references must belong to the same account.” With an 'OK' button. The 'OK' button will close the error and return to the previous screen.
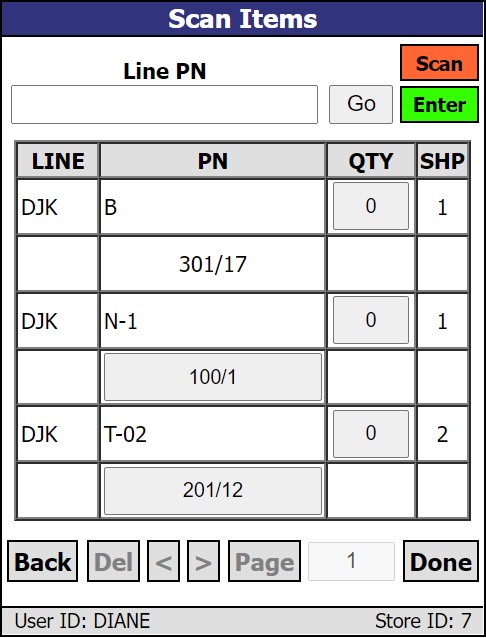
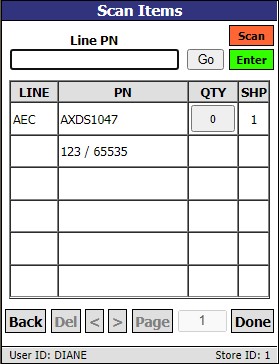
The text above the part entry fields dynamically changes based on the mode of the screen.
When in 'Scan' mode, where the screen is expecting a scan, the text displayed is "UPC / SKU", the 'Scan' button is green and 'Enter' button is red.
When in 'Enter' mode, where the screen is expecting data entry, the text displayed is "Line PN", the 'Scan' button is red and the 'Enter' button is green. Enter the Line and Part number (separated by a space) and click 'Enter'.
Click the 'Scan' button for Scan mode and click the 'Enter' button for data entry mode.
If multiple references were selected, parts and quantities will be aggregated on the screen based on the tickets selected.
Displays the line code of the scanned items.
Displays the part number of the scanned items.
If the scanned part has a UPC code instead of a part number, the program will attempt to match the scanned item against any of the first 3 UPC codes listed in the part file. If a match is found, the scan will process. If a match is not found, the program will prompt, "Item Not Found".
Displays the quantity sold of the scanned items.
Displays the ship quantity scanned of the scanned items.
The 'SHP' quantity will be blank until the part is scanned and will increase as each quantity of the same part is scanned. The 'SHP' quantity cannot be greater than the 'QTY' sold.
Once an item is scanned, additional quantities of the same item can be entered in the 'SHP' field without scanning each one. The 'SHP' field is not accessible until the item is first scanned.
Tap to return to the 'Scanned Items Summary' screen.
The 'Scan Items' screen is the electronic pick ticket. Use the list on the screen to gather and scan parts. The parts listed will be the same parts that appear on the printed pick ticket. If the 'Pick Resequence' checkbox is checked in the customer's 'INVOICE & DELIVERY SETUP' window, the list will be in ascending order of zone/bin. If the 'Pick Resequence' checkbox is unchecked, the list will be in the same order as they appear on the sales order.
Each part on the pick ticket is represented by two lines. When the 'Scan Items' screen opens, the first line displays the 'LINE', 'PN' (part number), 'QTY' (quantity scanned) and 'SHP' (quantity ordered) displays per item. The second line displays the part's assigned Zone/Bin, centered in the cell under 'PN'. If there is no zone or bin assigned to the part, the cell beneath the 'PN' is blank. If there is a zone assigned, but no bin assigned to the part, only the zone appears as centered text. If there is a bin assigned, but no zone, the bin appears as centered text preceded by a '/' character such as '/5'. If there is a single zone and bin assigned to the part, the display shows the zone and bin centered as text separated by a '/' such as '301/17'. If the part has more than one zone/bin assigned to it, the primary zone/bin is displayed on a button.
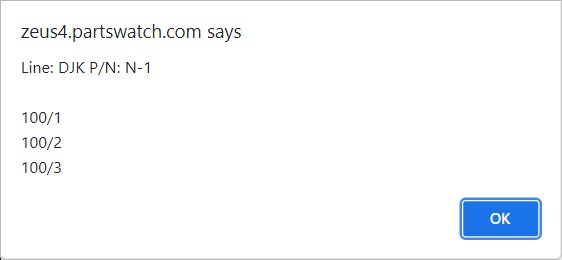
To view additional zone/bin locations, tap the button displaying the zone/bin. A pop-up appears, along with a buzzing sound, that displays the Line and Part Number of the part and then up to three locations for zone/bins, including the primary location. This provides you with guidance for additional locations to find the part. Tap 'OK' to clear the pop-up.
If the scanned part has a UPC instead of a part number, the system attempts to match the scanned item against any of the first 3 UPCs listed in the part file. If a match is found, the scan processes. If a match is not found, the system prompts, "Part Not Found". If a recognized part is scanned but is not on the sales order, a pop-up with a header of 'Scan Item Error' appears with the text: "This part is not on the sales order and should not be picked."
The 'QTY' quantity will be zero until the part is scanned and will increase as each quantity of the same part is scanned. The 'QTY' quantity cannot be greater than the 'SHP' quantity sold. If the 'QTY' quantity is greater than the 'SHP' quantity, a message prompt with the following text appears: "Picking this quantity of this part would exceed the sell quantity of the invoice. This quantity of this part should not be picked" with an 'OK' button. Tapping 'OK' clears the message and returns you to the 'Scan Items' screen.
Once an item is scanned, additional quantities of the same item can be entered in the 'QTY' field without scanning each one. The 'QTY' field is not accessible until the item is first scanned.
The items are ordered by Zone/Bin.
The system validates that each part scanned exists either in the store's inventory (parts table) or the store's virtual inventory (nonsku table). If the part number is not found in either table, the application displays a prompt "Part not found".
The Line, Part Number, Scan Quantity, 'User ID', and the 'LAST UPDATE DATE' for each part scanned is saved in the table, but does not display in the RF device.
The application aggregates the Scan Quantity ('QTY') and saves only one row in the table for all items scanned multiple times. The system saves (but does not display) the 'User ID' of the last user to scan a Part Number since multiple users can scan the same Part Number within the same session.
The system displays up to three Part Numbers per page in order of the 'LAST UPDATE DATE' in ascending order so the last Part Number scanned displays at the bottom of the list. The system does not display the 'LAST UPDATE DATE'. If more than three Part Numbers are on the order, use the '>' to navigate through the list.
If you set the scan quantity ('QTY') of any Part Number to zero, the application removes the part from the screen and moves any Part Numbers below that Part Number up.
The system compares the scan quantity of each part to the order quantity of each part in the sales order. If the scan quantity is less than the order quantity, it then performs an audible beep and allows you to continue scanning.
If the scan quantity ('QTY') is greater than the order quantity ('SHP'), a message prompt with the following text appears: "Picking this quantity of this part would exceed the sell quantity of the invoice. This quantity of this part should not be picked." with an 'OK' button. Tapping 'OK' clears the message and returns you to the 'Scan Items' screen. The 'QTY' amount is not changed.
If the scan quantity is equal to the order quantity, the system performs an audible beep and allows you to continue scanning another part.
While scanning, if the scan quantity ('QTY') becomes equal to the order quantity ('SHP') for all parts on the order, the application automatically displays the 'Scanned Items Summary' screen.
At any point during the process, you may elect to discontinue scanning items by tapping the 'Done' button.
If the 'Done' button is clicked, the system will prompt you, "Entry of quantities complete?" with an 'OK' and 'Cancel' button.
-
If you tap 'Cancel', the system saves the scanned quantities in the database, and issues another message prompt with the text: "Continue with item scanning?" with an 'OK' and 'Cancel' button.
-
If you tap 'OK' you will return to the 'Scan Items' screen and can continue scanning.
-
If you tap 'Cancel' the system will save the session and return you to the 'Select Invoice Reference' screen. The session will have a status of 'INCMP' and will remain on the list for future scanning.
-
-
If you click 'Ok'
-
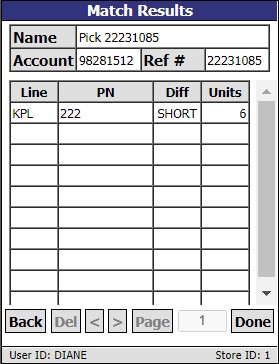
And the scanned quantity 'QTY' does not equal the order quantity 'SHP', the system displays the 'Match Results' screen.
-
At the top of the 'Match Results' screen, a 'Name' field identifies the pick reference number.
-
When multiple pick tickets were selected for scanning and the 'Match Results' screen is displayed, in the 'Name' field, the application lists the store number, account number, and all reference numbers selected, separated by a tilde ~ character. In the 'Account' field, display the account number for the selected references. In the 'Ref #' field, display the text 'Multiple' if more than one reference was selected. Display the reference number if only one reference was selected.
-
-
The customer 'Account' number is displayed.
-
The 'Ref #' for the order is displayed.
-
When starting a new session, before any items are scanned, if you tap the 'Done' button, the system displays a message with the following text: "Entry of quantities complete?" with an 'OK' and 'Cancel' button.
-
If you tap 'OK' another message appears: "Scan session has no scanned items." with an 'OK' button.
-
Tapping 'OK' clears the message and returns you to the 'Scan Items' screen.
-
-
If you tap 'Cancel', the message "Continue with item scanning?" appears with an 'OK' and 'Cancel' button.
-
Tapping 'OK' clears the message and the screen remains.
-
Tapping 'Cancel' returns you to the 'Select Invoice Reference' screen.
-
-
-
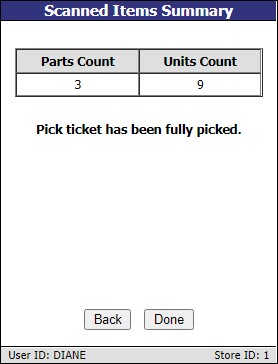
When done, the 'Scanned Items Summary' screen displays the 'Parts Count' (total quantity of unique parts scanned) and the 'Units Count' (total number of units scanned). The message: "Pick ticket has been fully picked." also appears.
If the scanning session was short by any parts (for single or multiple picks), display new text "Pick ticket has been partially picked."
You can tap the 'Back' button to return to the 'Scan Items' screen without refreshing the 'QTY' quantities, the session status remains 'INCMP', and you can continue scanning items.
You can tap the 'Done' button to change the session status to 'CMP', and delete the scan session.
If there is any system or database error during processing, the system undoes any parts scan validated on the sales order, retains the scan session, does not trigger the finalization of the sales order, displays a prompt with error message text and returns you to the 'Main Menu'.
If the scan quantity is less than the order quantity, the RF device performs an audible beep and allows the ability to continue scanning.
If the scan quantity is greater than the order quantity, the RF device performs an audible buzz and prompts, "Scanned quantity is greater than sell quantity. Increase sell quantity?". Answer 'Yes', and the system updates the sales order with the increased order quantity. Answer 'No' to continue scanning.