Custom Cataloging
The Custom Cataloging screen allows the creation of unique Groups and Subgroups to display while using the Catalog Lookup function.
Menu Path: Controls, System, Catalog Setup, Custom Cataloging, Custom Cataloging screen
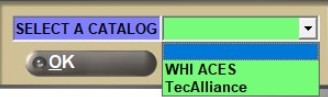
Select a Catalog Pop-Up
If more than one catalog is set up, the application first presents a pop-up to choose the catalog that will be used for custom cataloging.
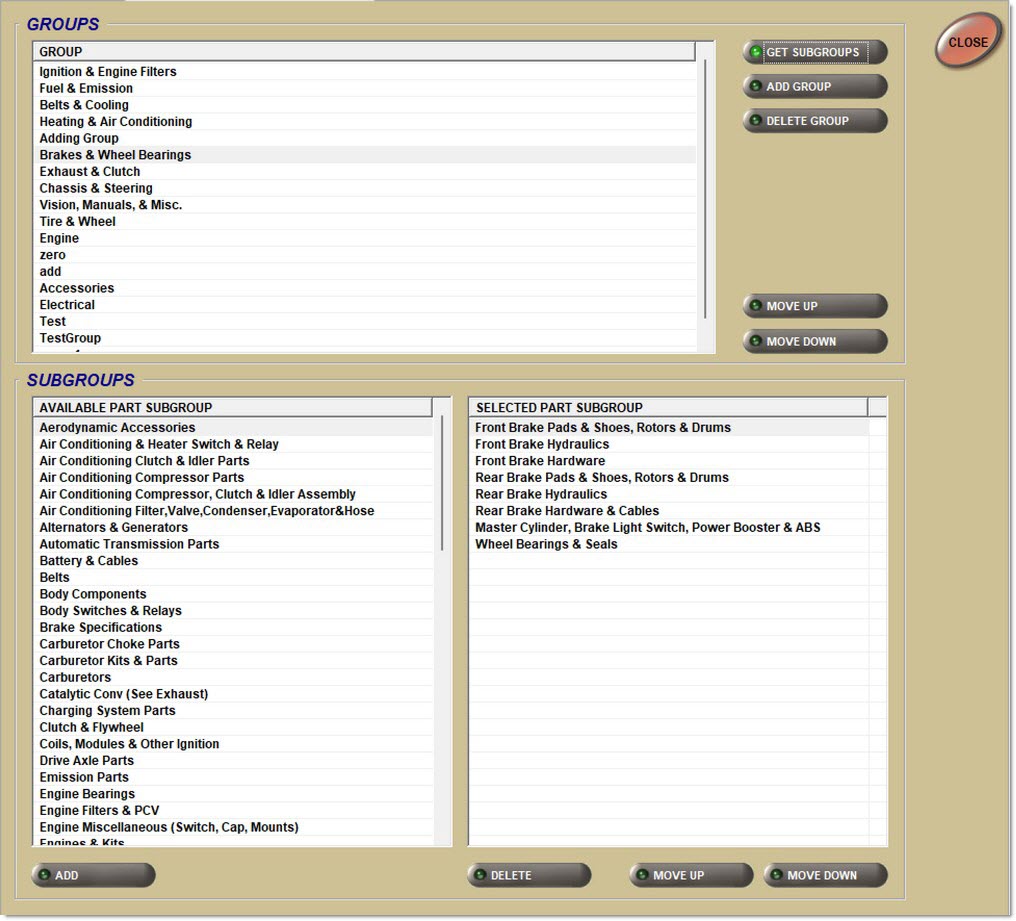
Groups
Displays each 'Group' selection in the order in which the selection appears on the catalog display of the group.
Get Subgroups
Displays all the available subgroups in the 'Available Part Subgroup' list.
Add Group
Displays a window to enter a new group. Once entered, the new group is added to the 'Group' list.
Delete Group
Deletes the selected 'Group'.
Move Up / Move Down
Repositions the 'Selected Group' into a desired order for display in Catalog Lookup.
Subgroups
Available Part Subgroup
Displays all the available part subgroups for selection.
Add
Adds the selected available part subgroup to the 'Selected Part Subgroup'.
Selected Part Subgroup
Displays the subgroups that will display in Catalog Lookup.
Delete
Deletes the 'Selected Part Subgroup' from the 'Selected Part Subgroup' list.
Move Up / Move Down
Repositions the 'Selected Part Subgroup' into a desired order for display in Catalog Lookup.
Get Labor
Retrieves all the labor available in the 'Available Labor Subgroup' list and any 'Selected Labor Subgroup' for the 'Selected Part Subgroup' in the 'Select Part Subgroup' list.
Available Labor Subgroup
Displays a list of the available labor subgroups for placement in 'Selected Labor Subgroup' list.
Add
Adds the selected 'Available Labor Subgroup' to the 'Selected Labor Subgroup' so the selected labor can be looked up at the same time the parts are looked up in the catalog.
Selected Labor Subgroup
Displays the labor items that will display as part of the subgroup in which it is included.
Delete
Deletes the labor line selected in the 'Selected Labor Subgroup' list.
Move Up / Move Down
Repositions the 'Selected Labor Subgroup' into a desired order for retrieving the labor and eventual display in Catalog Lookup.
Map Catalog to Store Line Codes Window
This window allows the mapping of brands from catalogs to the store line codes already set up.
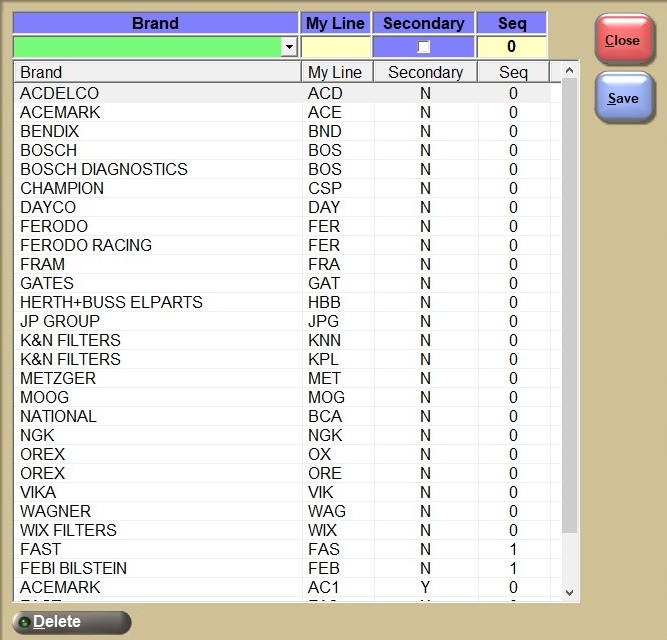
A drop-down menu that lists brands (populated from the chosen catalog) to select from.
The brand selected here is the brand that will be mapped to the user entered line in the 'My Line' field.
My Line
Text box to enter their PartsWatch Line Code.
The line entered here is the line that will be mapped to the catalog's brand that was entered in the 'Brand' field.
Checkbox that determines whether or not the line will be displayed as secondary on the Catalog screen, controls whether a line is primary or secondary.
-
Checked - The line will only be displayed when 'Secondary' is chosen on the Catalog screen.
-
Unchecked (default) - The line will display whether or not 'Secondary' has been chosen on the Catalog screen.
Text box that determines the sequencing of the chosen line with other lines on the Catalog results screen.
If left blank, the sequencing is determined by the 'Brand' field instead.
Grid
Rows cannot be edited once they are entered into the grid. To populate the grid, press the 'Enter' key with the cursor in the 'Seq' field. The entered information will appear in the grid, and it is possible to see the mapping between the 'Brand' from the catalog and the system set up 'Line Code'.
Delete
Deletes the highlighted mapped line.
Procedure to Add a Group and Subgroup
To add a group and subgroup, follow the steps below:
-
From the Menu, select Controls, Store, Catalog Setup, Custom Cataloging. The Custom Cataloging screen displays.
-
Select a 'Group' name from the 'Group' grid.
-
Click 'Get Subgroups' (or double-click the 'Group' name). The 'Subgroups' display.
-
Click 'Add Group'. The 'Subgroups' display in the 'Selected Part Subgroup' grid.
-
Continue to add 'Groups', as needed.
-
Indicate the order in which the 'Groups' are to display during Catalog Lookup by using the 'Move Up' and 'Move Down' buttons located below the 'Selected Part Subgroup' grid.
-
Click 'Get Labor' to select one of the 'Selected Part Subgroups' that will get a Labor Subgroup.
-
Select a Labor Subgroup from the 'Available Labor Subgroup' grid.
-
Click 'Add' located below the 'Available Labor Subgroup' grid. The Labor Subgroup displays in the 'Selected Labor Subgroup' grid.
-
Continue to add 'Subgroups', as needed.
-
Indicate the order in which the 'Subgroups' are to display during Catalog Lookup by using the 'Move Up' and 'Move Down' buttons located below the 'Selected Labor Subgroup' grid.
-
Click 'Close'. The information is saved and the screen closes.
Procedure to Delete a Group or Subgroup
To delete a group or subgroup, follow the steps below:
-
From the Menu, select Controls, Store, Catalog Setup, Custom Cataloging. The Custom Cataloging screen displays.
-
Select the name of the 'Group' to delete from the 'Group' grid.
-
Click 'Delete Group' to delete the entire 'Group'. All related 'Subgroups' are deleted. Or, to delete only a 'Subgroup' from a Group, proceed with Step 4.
-
With the 'Group' selected, click 'Get Subgroups' (or double-click the 'Group' name). The 'Subgroups' for the 'Group' display.
-
From the 'Available Part Subgroup' grid, select the 'Subgroup' to delete. The 'Subgroup' displays in the 'Selected Part Subgroup' grid.
-
To delete an entire 'Subgroup', click 'Delete' located below the 'Selected Part Subgroup' grid. All related 'Subgroups' are deleted.
-
To delete only a Labor Subgroup from the 'Selected Part Subgroup' grid, select the 'Subgroup' to be deleted.
-
Click 'Get Labor' (or double-click on the 'Subgroups' name). The Labor Subgroup displays.
-
From the 'Selected Labor Subgroup' grid, select the Labor Subgroup to delete.
-
Click 'Delete' located below the 'Selected Labor Subgroup' grid.
-
Continue to delete 'Subgroups', as needed.
-
Click 'Close'. The information is saved and the screen closes.