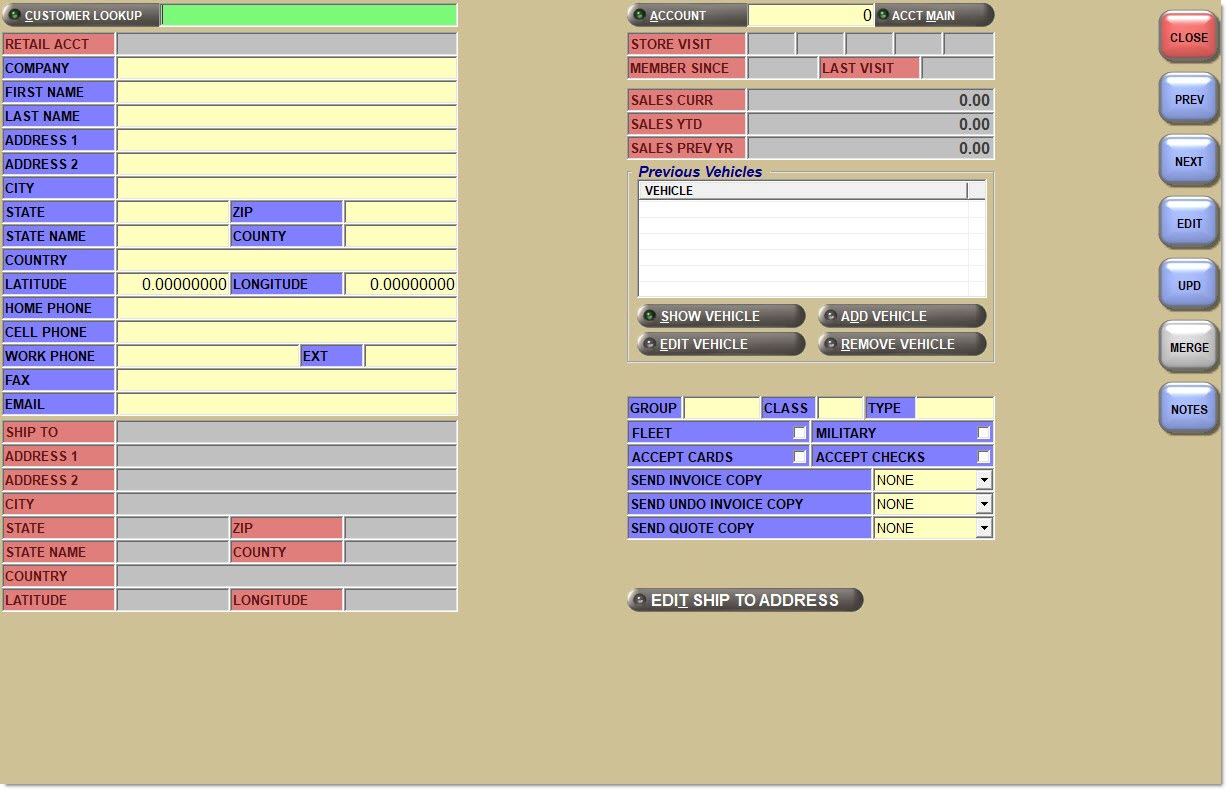
Retail Customer
The Retail Customer screen is used to set up a retail or mail order customer's profile information.
Menu Path: Customer, Accounts, Retail Customer, Retail Customer screen
![]() Adding Retail Customers - 5 minutesAdding Retail Customers - 5 minutes
Adding Retail Customers - 5 minutesAdding Retail Customers - 5 minutes
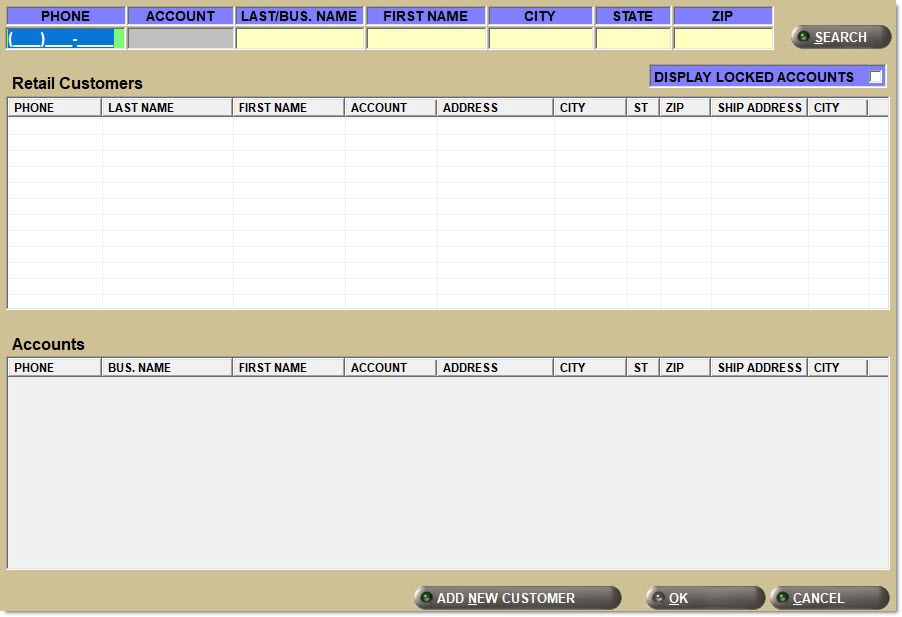
Enter a customer name. Or, click the button to display the 'Find Customer' window to search for a customer.

Account
Displays the account number. Click the button to display the 'Find Account' window to search for a customer number.

Acct Main
Displays the Main Account Entry screen.
Retail Acct
Displays the internal, system-generated retail account number. Number is always preceded with an 'R'.
Company
Displays the company's name.
First Name
Displays the first name of the customer.
Last Name
Displays the last name of the customer.
Address 1 / 2
Displays the customer's street address.
City
Displays the customer's city address.
State
Displays the customer's state address.
Zip
Displays the customer's zip code.
Home Phone
Displays the customer's home telephone number.
Cell Phone
Displays the customer's cell phone number.
Work Phone / Ext
Displays the customer's work telephone number and extension, if applicable.
Fax
Displays the customer's fax number.
Email
Displays the customer's e-mail address.
Allows the retail customer to tender checks, when checked. The retail customer cannot tender checks, when unchecked.
When the 'Accepted' field under the Checks section in the Tender Setup screen is checked, the system uses the value of the 'Accept Checks' field to determine whether retail customers can tender checks in the 'Tender' window. When the 'Accept Checks' field is:
-
Checked in the Main Account Entry screen for an account with the 'Account Type' of 'Retail Main' and the 'Accept Checks' field is checked for customers under the 'Retail Main' account, the 'Check' icon is available and checks can be accepted at Invoice Tender.
-
Checked in the Main Account Entry screen for an account with the 'Account Type' of 'Retail Main' but the 'Accept Checks' field is unchecked in the Retail/Internet Customer screen for customers under the 'Retail Main' account, the 'Check' icon is available, but if clicked, a prompt informs that "Checks cannot be accepted from this customer" at Invoice Tender.
-
Unchecked in the Main Account Entry screen, the 'Accept Checks' field in the Retail/Internet Customer screen is ignored and checks are not accepted at Invoice Tender.
When the 'Accepted' flag under the Checks section in the Tender Setup screen is unchecked, the 'Accept Checks' field is ignored in both the Main Account Entry and Retail/Internet Customer screens.
Accept Cards
Checkbox that determines whether or not payment cards are accepted as tender during point-of-sale.
-
Checked - If any of the credit (combined or individual), debit, or gift card icons are selected on the 'Tender' pop-up, cards can be used as tender for the sale.
-
Unchecked - If any of the credit (combined or individual), debit or gift card icons are selected on the Tender pop-up, cards cannot be used as tender for the sale, and a pop-up informs the user.
If the 'Military' discount is selected at Point-of-Sale, the checkbox on the screen is updated, checked, and saved with the customer record upon invoice finalization.
Indicates that the vehicle is a fleet car, when checked.
Determines the delivery preference for customer account invoices.
Options are:
-
'None'
-
'Email'
-
'Fax'
An error message displays when 'Email' or 'Fax' is selected and an email address or fax number is not stored in the customer profile in the Store General Setup screen. Applies to invoices that are automatically emailed or faxed upon finalization; does not apply to "on-demand" invoices.
The user-entered value that determines the name of the loyalty program.
The user can set the 'Loyalty Program ID' value to any text of any length as this text is not displayed anywhere throughout the application screens, reports and forms.
As long as any text exists in this field, along with a value for the 'Cell' number, invoice information (e.g. points earned and redeemed) is sent to the loyalty program (via eOffice) after an invoice transaction is finalized.
Establish different 'Loyalty Program IDs' for retail versus commercial customers.
PartsWatch recommends the use of very short IDs (e.g. "RR" for retail customer rewards) so that the enrollment process is easier and more reliable at Point-of-Sale because the ID must be entered at Point-of-Sale to enroll a customer.
Note: This setting is only visible if the hidden switch 'LoyaltyProgram' is set to 'eRewards'.
Group
Displays a user-entered code used to group customers. Up to eight alphanumeric characters.
Class
Displays a user-entered code used to group customers. Up to two alphanumeric characters.
Type
Displays a user-entered code used to group customers. Up to eight alphanumeric characters.
Store Visit
Displays the store location numbers of the store(s) visited by the customer.
Member Since
Indicates the year that the customer first became a member.
Last Mailing
Indicates the date that the customer last received a mailing.
Last Visit
Displays the date of the customer's last visit to the store location.
Sales Curr
Displays the customer's current sales total.
Sales YTD
Displays the customer's current year-to-date sales total.
Sales LYTD
Displays the customer's last years' year-to-date sales total.
Previous Vehicles
Show Vehicle
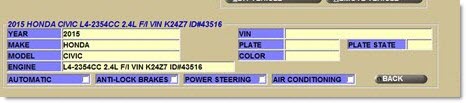
Populates the lower left of the screen with the vehicle information of the highlighted vehicle in the 'Previous Vehicles' grid.
Click the 'Show Vehicle' button to populate the Retail / Internet Customer screen with the vehicle information entered in the 'Vehicle Setup' window. The information displays in the lower left corner of the screen, replacing the Ship To information, and is not editable. However, click the 'Automatic', 'Anti-Lock Brakes', 'Power Steering', and 'Air Conditioning' checkboxes to further define the vehicle. Click 'Back' to toggle back to the Ship To information.
Edit Vehicle
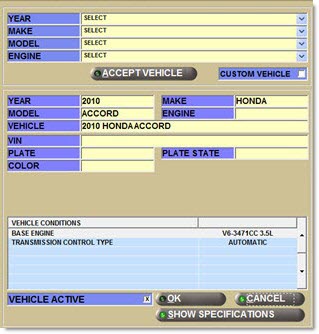
Displays the 'Vehicle Setup' window used to revise the vehicle setup information.
Add Vehicle
Displays the 'Vehicle Setup' window used to add vehicle information.
Remove Vehicle
Removes the vehicle from the 'Previous Vehicles' grid.
Shipping Information
Displays the name used for shipping purposes.
Address 1/2
Displays the street address used for shipping purposes.
City
Displays city used for shipping purposes.
State
Displays state used for shipping purposes.
Zip
Displays zip used for shipping purposes.
Auto Send Invoice Copy
Provides email and fax functionality. Sets the delivery preference for customer account invoices to automatically send an invoice copy. Options are 'Email', 'Fax', and 'None'. An error message displays if 'Email' or 'Fax' is selected and an email address or fax number is not stored in the customer profile in the Store General Setup screen. Applies to invoices that are emailed or faxed upon finalization; does not apply to "on-demand" invoices.
Displays the 'Ship To Address' window used to change the 'Ship To' address.
Function Buttons
Displays the 'Find Customer' window, when clicked, to locate a commercial or retail customer to merge with. Note: A retail customer must be looked up first to enable the button.
The 'Retail Customer Merge Button' security proc, located under 'Customer', 'Retail / Internet Customer' in the User Security Setup screen allows/disallows access to the 'Merge' button.
-
When set to 'Not Visible', the 'Merge' button does not display.
-
When set to 'View Only', the 'Merge' button displays but is unavailable.
-
When set to 'Allow Edit', the 'Merge' button displays and is available and the 'Find Customer' window displays if selected.
After selecting a valid commercial account or another retail customer to merge with, a confirmation message displays. Note: An error displays when the account being merged from is selected.
Click 'Yes' to run the merge process. The merge event is written to the audit tables and is output on the Audit Report.
Click to display the 'Account Notes' window. Used to enter a customer note and/or invoice notes concerning the account.
Click 'No' to return to the Retail / Internet Customer screen with no changes made.