Part Creator/Editor
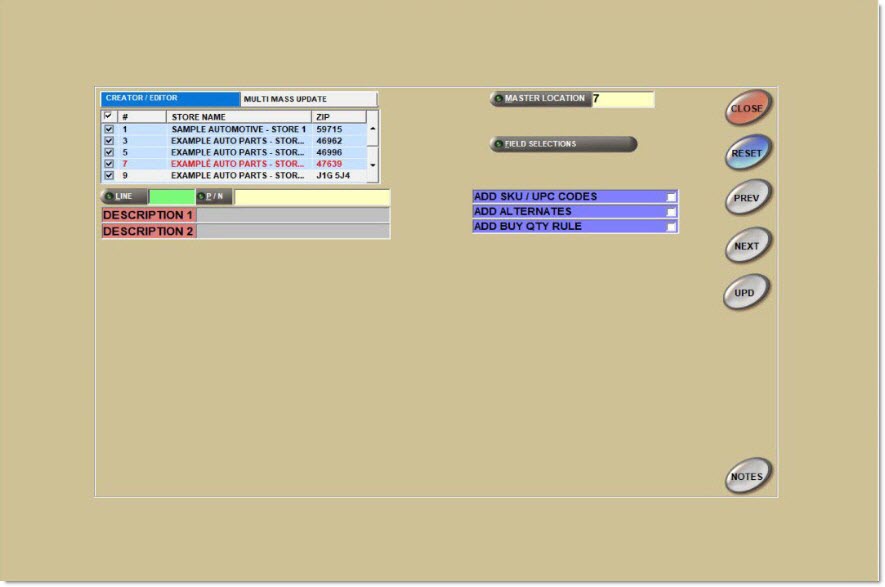
The Multi-Location Part Part Creator/Editor screen is used to create parts and to optionally add/edit part record information, one part at a time, across a multi-store environment. The screen is also used to edit part record information across a multi-location environment.
Note: Sales Histories are not copied to another store during the multi-location create/edit process.
Menu Path: Inventory, Multi-Store, Part Creator/Editor, Part Creator/Editor screen
Part Creator/Editor
Displays the Multi-Location Part Part Creator/Editor screen. Creates/adds a single part number to all stores. When adding new parts to the selected stores and the line code does not exist in the stores, the line code is added but the line code information is not copied.
Multimass Update
Displays the Multi-Location Mass Update screen. Copies/inserts a line or range of parts, and optionally adds prices and part information, including UPC codes, from the Master Store into other stores.
Grid
Header [Checkbox]
Selects all locations, when checked. Deselects all locations, when unchecked.
Store Name
Displays the active stores in the database.
Zip
Displays the store's zip code.
Grid [Checkbox]
Selects individual stores in the store grid, when checked. Deselects individual stores in the grid, when unchecked.
Filters
Line
Allows the entry of the 'Line Code'. Click the button to display the 'Browse Line Codes' window to search for a line code.
When a line code is entered that does not exist in the Master Location, the system prompts, "Line not found in master location." Select a new 'Master Location' where the line code exists or enter the line code in the desired 'Master Location'.
P/N
Allows the entry of the Part Number. Click to display the 'Find Part' window to search for a specific part. Press 'Enter' after entering the 'Line' to display the first part in the Line.
When a part number is entered that does not exist in any store, the system prompts, "Part not found. Would you like to add it?" If 'Yes', the part is added to the selected locations when 'Upd' is clicked. If 'No', the part is not added.
Upon selecting a part number, a grid displays with two tabs - 'Each Location' (default) and 'Master Location'. The Each Location tab displays all selected store locations, in numeric order by store number, with that part. The 'Master Location' tab displays the Master Store first followed by the selected stores, in numeric order by store number.
Description 1
Displays the description of the part from the Master Location, for information purposes only. The 'Description' fields support up to 255 characters.
Description 2
Displays the alternate description of the part from the Master Location, for information purposes only. The 'Description' fields support up to 255 characters.
Master Location
Displays the 'Master Location'. Click the button to display the 'Browse Locations' window to search for a location.
Field Selections
Displays the 'Part Creator/Editor Field Selections' section.
Add SKU/UPC Codes
When checked, when 'Upd' is clicked, any SKU/UPC Codes that exist for the part are added when the part is added to the other locations. When unchecked, the SKU/UPC Codes are not added.
Add Alternate
When checked, when 'Upd' is clicked, any Alternates that exist for the part are added when the part is added to the other locations. When unchecked, Alternates are not added.
Add Buy Qty Rule
When checked, when 'Upd' is clicked, any Buy Qty Rules that exist for the part are added when the part is added to the other locations. When unchecked, the Buy Qty Rules are not added.
Each Location / Master Location
The 'Each Location' and 'Master Location' tabs are used to determine how part fields are updated across the locations. The system defaults to 'Each Location'.
Upon selecting a line code in the 'Line' field and a part number in the 'P/N' field in the Multi-Location Part Part Creator/Editor screen, the 'Each Location' and 'Master Location' tabs display in the lower portion of the screen. When editing part record information in the 'Each Location' or the 'Master Location' mode, use the arrow keys to navigate around the grid. Press 'Enter' to put the field into edit mode, enter the new data. Press 'Enter' again to take the field out of edit mode.
The grid displays the 'Part No' and several default part fields. Click the 'Field Selections' button to select additional fields to update. When 'Qty Avail' is selected and the part displayed does not exist in the selected locations, and the 'Upd' is clicked, the 'Qty Avail' from the 'Master Location' is not copied into the selected locations when the part is added. In order to copy the 'Qty Avail' to the selected locations the part must exist in the selected locations and the system must be in the 'Each Location' mode and edit the field value or in the 'Master Location' mode with the field selected to be updated.
Each Location Grid
The 'Each Location' tab is used to add parts or edit part record information per location. The fields in the grid can be edited individually across the selected locations. Enter or edit the part information per location and only the data added or edited changes when 'Upd' is clicked per part. Only the fields that have been edited are affected. The part data is not copied from one location to another. If any of the 'Add SKU/UPC Codes', 'Add Alternates', 'Add Supersedes', or 'Add Buy Qty Rule' flags are checked, the data is added to the selected stores from the 'Master Location'.
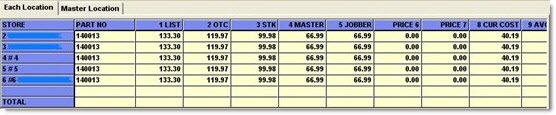
Master Location Grid
The 'Master Location' tab is used to add or edit part record information across the selected locations, using the 'Master Location'. Although part data from all locations display, only the 'Master Location' can be edited.
All values in the 'Master Location' are copied to the other locations. If a value should not be copied, deselect the location from the location grid and the grid will refresh without that store or deselect the field in the 'Creator / Editor Field Selections' section by clicking 'Field Selections'. Click 'Back' to no longer see the deselected field without saving the field selection change or 'Save Settings' to no longer see the field when the screen is again opened. The grid refreshes and the deselected fields no longer display.
Part Creator/Editor Field Selections
The 'Field Selections' button displays the 'Part Creator/Editor Field Selections' section that lists the fields from the part record that are available for adding or editing.

Displays all the fields that can be edited/updated. Click on individual fields to select. Click again to deselect. 'Part Number' is permanently selected.
Back
Closes the window and returns to the Multi-Location Part Part Creator/Editor screen with the checked fields displayed.
Save Settings
Saves the settings. If settings have not changed, the button is grayed out.
Load Settings
Loads the settings selected.
All Prices / No Prices
Selects all the price field selections (displayed in green) only, when clicked once. The button name changes to 'No Prices'. 'No Prices' deselects all price related field selections.
All History / No History
Selects all the history field selections only, when clicked once. The button name changes to 'No History'.
'No History' deselects all history related field selections.
All / None
Selects all field selections boxes, when clicked once. The button name changes to 'None'.
'None' deselects all field selections. 'None' updates parts only, without updating part record information. When no fields are selected, only the parts are added in each location.
Kits
It is not possible to change the 'Sub Type' value for a kit part, the application ignores attempted update changes.
It is not possible to copy kit parts present in the master store to other stores where the kit part is missing. An error message displays e indicating that the Kits Setup screen is the only function that can add kit parts into other stores.
When a 'Kit' part is displayed in the master store, and the other stores are displayed, "Not in File" displays instead of 'Adding Part' for the 'Kit' part numbers in the stores where the 'Kit' part number is missing.
It is not possible to change the 'Sub Type' value for a non-kit part to a value of 'Kit' or 'BOM'.
Procedure to Create a Part Number Across Multi-Location Environments
To create/edit a part across a multi-location environment, follow the steps below:
-
From the Menu, select Inventory, Multi-Store, Creator / Editor. The Multi-Location Part Part Creator/Editor screen displays. A grid displays a list of all locations available for updating. All locations default to checked. The 'Master Location' displays in red, is unchecked and cannot be checked.
-
Select the desired store locations(s) by checking the appropriate check box.
-
Change the Master Location. (Optional)
-
Enter a Line Code in the 'Line' field.
-
Enter a part number in the 'P/N' field. The 'Each Location' and 'Master Location' part record grid displays.
-
Select the 'Add SKU / UPC Codes', 'Add Alternate / Supersedes', and/or 'Add Buy Qty Rule' flags, as appropriate.
-
Click 'Field Selections'. (Optional) The 'Creator / Editor Field Selections' section displays.
-
Select the appropriate fields to update. (Optional)
-
Click 'Save Settings'. (Optional) The selected fields are saved.
-
Click 'Back'. The 'Creator / Editor Field Selections' section closes.
-
Edit the part information for each selected location, as needed, in the 'Each Location' mode, and click 'Upd' to add the part/edited part information to the selected locations.
-
Edit the 'Master Location' part information, as needed, in the 'Master Location' mode, and click 'Upd' to add the Master part/part information across the selected locations.
-
Click 'Next'/'Prev' button to display the next/previous part in the 'Line' or enter the next part in the 'P/N' field until done. (Optional)