Inventory Mass Update
The INVENTORY MASS UPDATE UTILITY is a powerful feature used to quickly and easily add, edit, and clear part attributes across a selected range of parts per store, thus eliminating the time-consuming job of entering the same information part by part.
Menu Path: Inventory, Part Utility, Inv Mass Update, INVENTORY MASS UPDATE UTILITY screen, UPDATE MODE
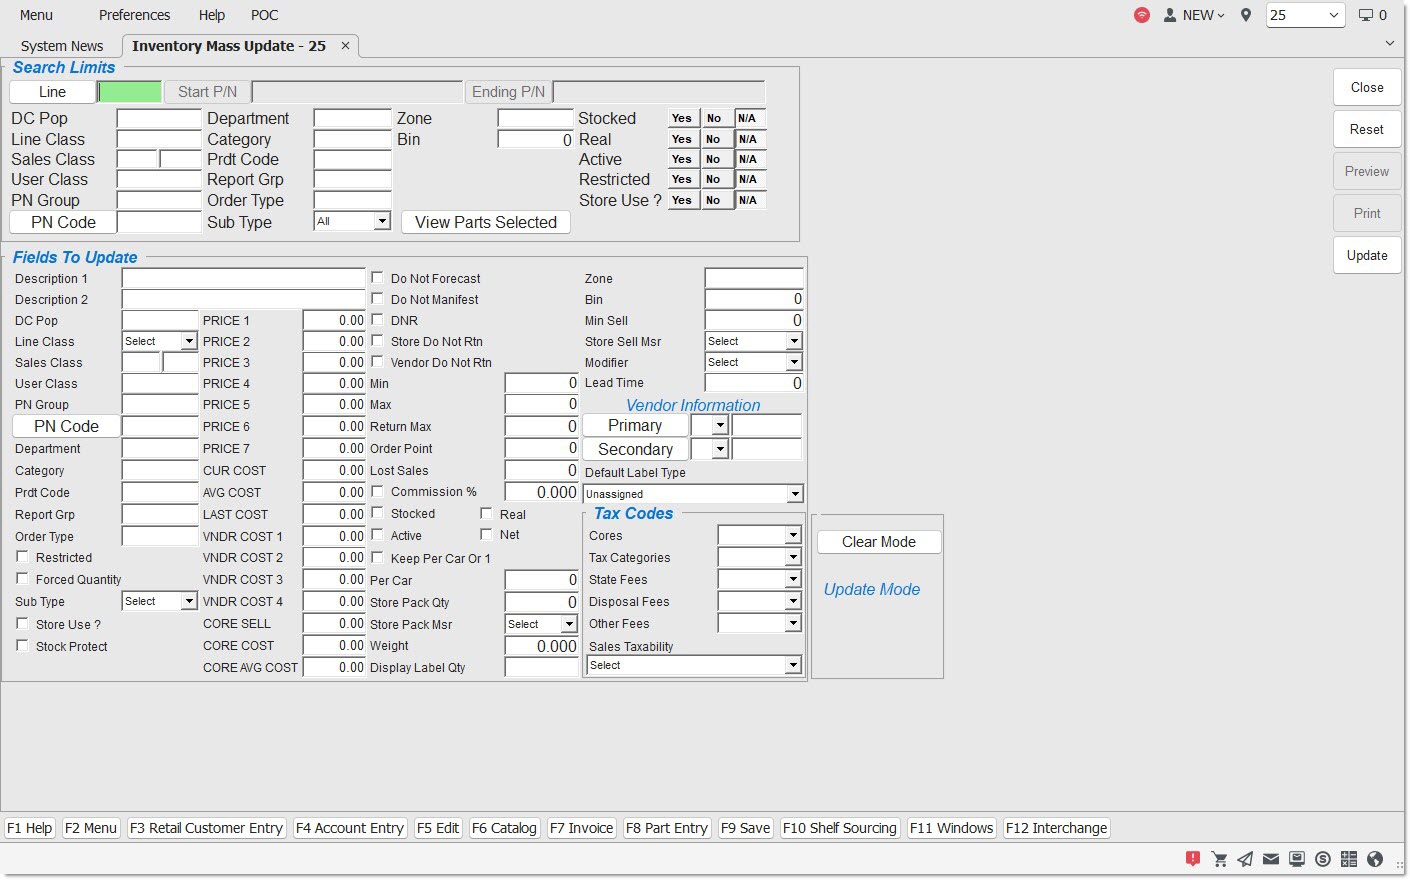
Optionally select the accounts that will be affected by the update or clear process. Only parts that match all the conditions are updated.
- 'LINE'
- 'START P/N' and 'ENDING P/N' range
- 'DCPOP'
- 'LINE CLASS'
- 'USER CLASS'
- 'PN GROUP'
- 'PN CODE'
- 'DEPARTMENT'
- 'CATEGORY'
- 'PRDT CODE'
- 'REPORT GRP'
- 'ORDER TYPE'
- 'SUB TYPE'
- 'ZONE'
- 'BIN'
- 'STOCKED'/'REAL'/'ACTIVE'
- 'RESTRICTED'
- 'STORE USE?'
Use caution and narrow the parts affected before changing or clearing the attributes for the selected parts. Click the 'VIEW PARTS SELECTED' button and all the parts that will be mass-updated display in the 'Parts Selected' grid for review.
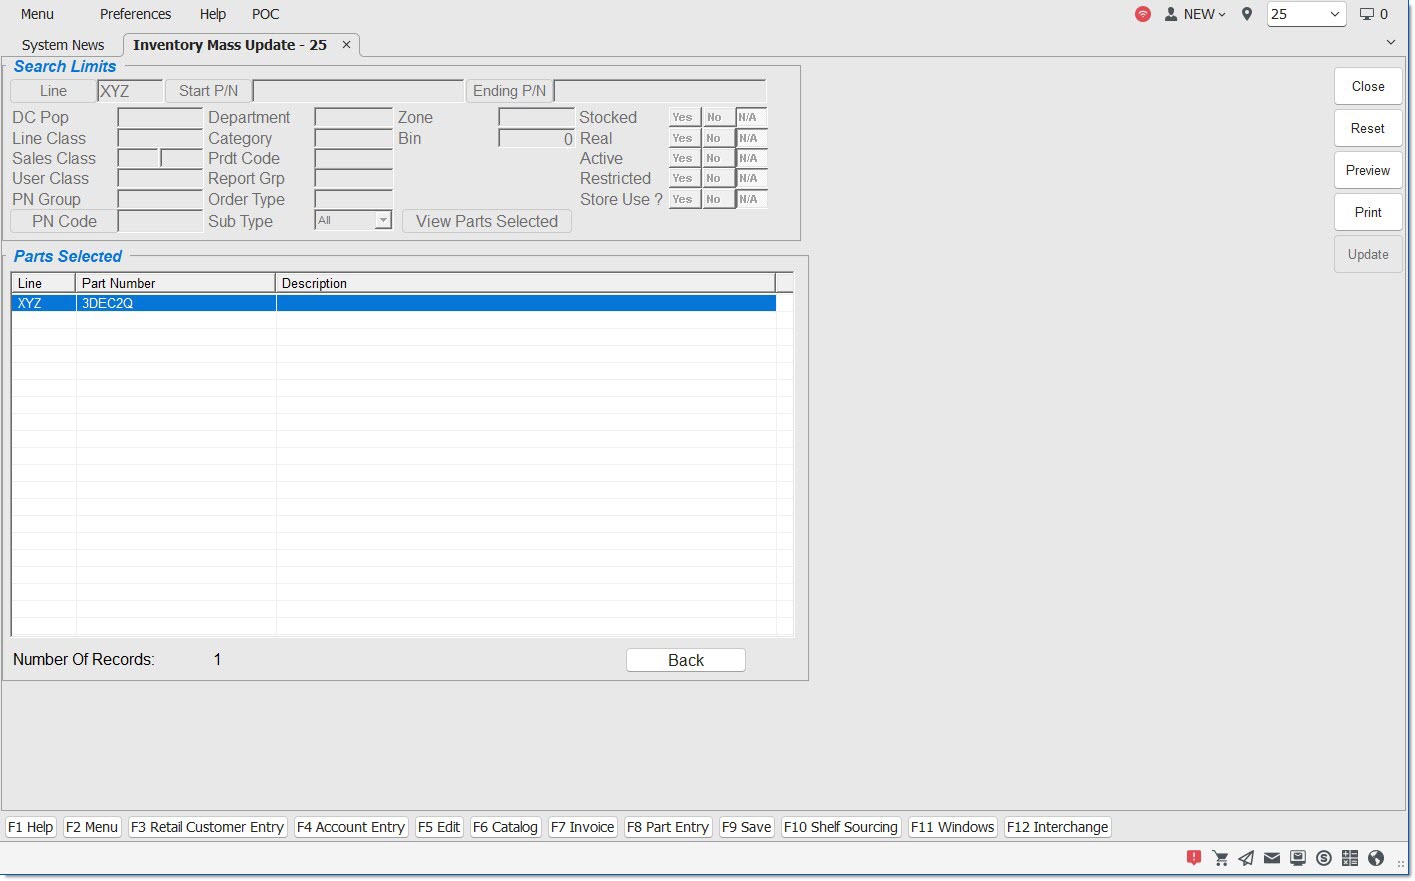
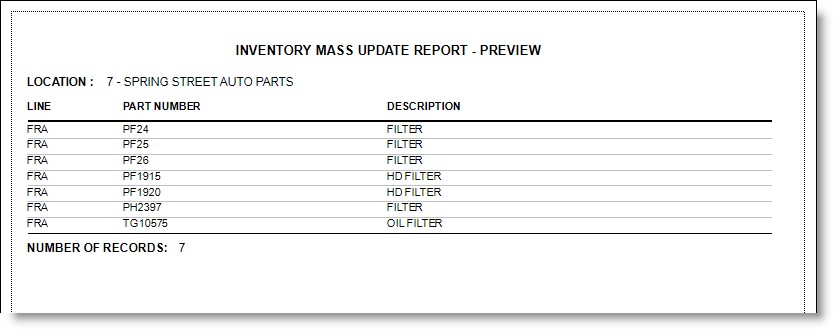
Optionally click the 'PREVIEW' button to view or the 'PRINT' button to print the list of parts before updating. The list can also be printed after the update if needed.
Click the 'BACK' button to close the list.
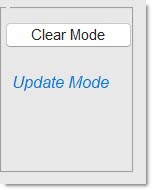
The screen defaults to 'UPDATE MODE' when opened. If 'Search Limits' and/or setting fields are selected and the 'CLEAR MODE' button is clicked, the system prompts "Switching modes loses entered values. Continue?" Answer:
- 'YES' and the 'Search Limits' remain, however, the setup fields are reset.
- 'NO' to continue in the 'UPDATE MODE'. The same prompt opens when changing from 'CLEAR MODE' to 'UPDATE MODE'.
With 'UPDATE' displayed, unless affecting all accounts, select the 'Search Limits' that will define the accounts that will be updated and set the attributes in each field that will be changed.
For example, to assign all FRA parts under 'PN CODE' "002" as 'FILTERS', first enter '002' in the 'Search Limits' 'PN CODE' filter, then enter 'FILTER' in the 'DESCRIPTION 1' field under the 'Fields to Update' section.
Make sure that the right parts will be updated, by clicking the 'VIEW PARTS SELECTED' button in the 'Search Limits' section to display a list of every part that meets the 'Search Limits' criteria.
If the correct parts display, click the 'UPD' button and the system will prompt "Selected Fields will be Updated. Continue with Mass Update?" Answer 'YES' and the update process with start.
The update will be run in the background and the system will prompt when finished, stating "Update Complete!"
Once the 'UPD' completes, the 'PRINT' and 'PREVIEW' buttons are available to optionally output the list of parts affected. The attributes that have been changed are not displayed or reported.
CLEAR MODE
Click the 'CLEAR MODE' button and 'UPDATE MODE' changes to 'CLEAR MODE'.
Small checkboxes display to the right of each setting and if checked, the value in that field will be cleared when the 'UPD' button is clicked.
'ALL' and 'NONE' buttons are available to check all or uncheck all fields.
![]()
The same functionality defined for the 'UPDATE MODE' is available in the 'CLEAR MODE', with the following exception:
When the screen is in 'Clear Mode' the 'Cores' and 'Tax Categories' fields in the 'Tax Categories' section frame are disabled to prevent clearing the tax values for all parts selected. If the 'All' button is clicked, these disabled fields are ignored. Note: When a part has no tax value, the part cannot be sold at Point-of-Sale.
Menu Path: Inventory, Part Utility, Inv Mass Update, INVENTORY MASS UPDATE UTILITY screen, 'CLEAR MODE'
![]()
When the 'Update' button is clicked, the application saves the changes in the current location.
When a database contains multiple locations, and access is granted to more than the current location, regardless of whether in 'Update Mode' or 'Clear Mode', and the 'Update' button is clicked, or the 'F9' 'Save' button is clicked, or the 'Ctrl' + 'S' keys are pressed:
-
If the value of the 'Insert/Update Parts' drop-down is 'Current Location' only parts within the location displayed on the upper-right border will be updated. Note: This is the existing functionality of this screen.
-
If the value of the 'Insert/Update Parts' drop-down is 'All Locations', parts with the same 'Line' and 'Part Numbers', within all of the locations that the logged-in user has security access to, will be updated.
-
If a part is updated in the current location, but does not exist in any of the other locations, it will not be inserted and updated in any of the other locations.
-
If a part is within the filter criteria selected, the part will be updated in any of the other locations where the part exists, even if the part does not exist and is not updated in the current location.
-
If a PN Code is selected to update, that PN Code value will be added to any of the other selected locations where it does not presently exist.
-
If a Line Class is selected to update, that Line Class value will be added to any of the other selected locations where it does not presently exist.
-
Note: You must have security access to the current Location's inventory in order to update parts within that location. If you only have security access to the current Location, then only that Location's parts will be updated.
-
The application always processes the current location first.
-
If there is a failure processing the current location, the application displays an error message and does not continue to process any other locations.
-
If the current location is processed successfully, then the application processes all remaining selected locations, whether each additional location succeeds or fails. If any locations fail, the application displays an error message.
-
The 'Parts Changed' results grid displays for the current location only.
-
-
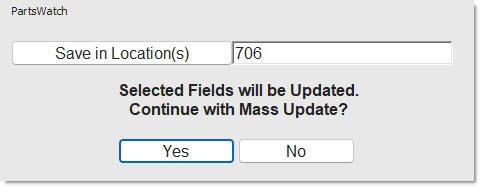
If the value of the 'Insert/Update Parts' drop-down is 'Select Locations', an 'Update Confirmation' pop-up will be displayed, see sample pop-up below:
-
The pop-up contains the same text as the existing 'Update Confirmation' pop-up but also contains a 'Save in Location(s)' button and a textbox displaying the current location at the top of the pop-up.
-
When the 'Save in Location(s)' button is clicked, a list of all locations that the user has security access to is displayed. Choose from the list which locations will have their parts updated.
-
The current location must always be selected.
-
When a database contains multiple locations, and access to more than the current location has been granted, regardless of whether in 'Update Mode' or 'Clear Mode', and the 'Update' button is clicked, while both the 'Ctrl' and 'Alt' keys are being pressed:
-
Regardless of the value of the 'Insert/Update Parts' drop-down (found on the Controls, System, Inventory Options screen), the 'Save in Location(s)' button and also a textbox are both displayed on the 'Update Confirmation' pop-up.
-
Note: This allows selection of a list of locations to be updated, overriding the default value of the 'Insert/Update Parts' drop-down (which might be 'Current Location' or 'All Locations'). If the default value is 'Select Locations', there is no reason to ever press the 'Ctrl' and 'Alt' keys.
After the update is completed, the Utility Options, Audit Report is updated (per existing functionality for the current location), and then additional entries will be recorded on the Audit Report for each additional location that had the part updated.
Differences Between the Part Multimass Update screen and the Inventory Mass Update Screen:
