Review Update Setup
The Internet Pricing Review screen is used to:
-
Review the Price Update Setup selections
-
View current and new (to be loaded) prices before or after the update is run
-
Adjust new prices before loading them into the 'Current' inventory file
-
Load the prices from the database into the 'New' (temporary) file or directly into the 'Current' inventory file
Menu Path: Inventory, Part Utility, Price Updating, Review Update Setup, Internet Pricing Review screen.
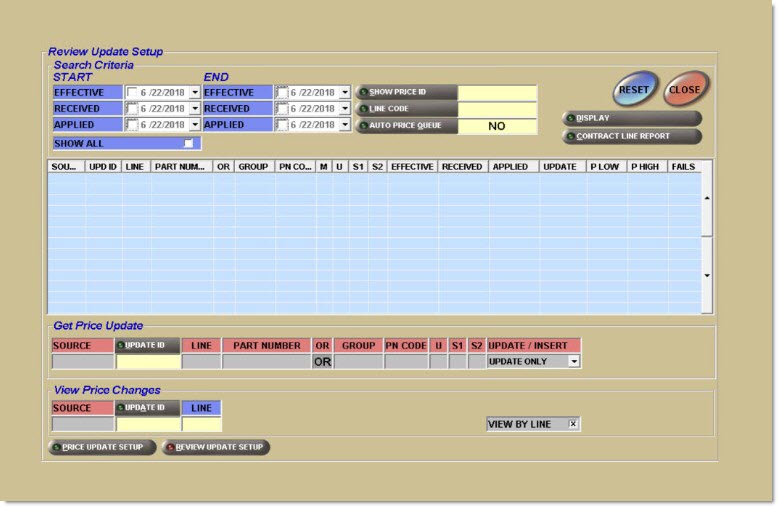
Search Criteria
Narrows the search to locate the lines that are under the Internet Pricing Review screen.
Start/End Effective
Displays only the lines with a particular Effective Date, from and to the dates indicated. To use the current date, check the checkbox. If a different date is needed, click the down arrow to the right of the date and select the appropriate date from the calendar. Leave unchecked to use all dates.
Start/End Received
Displays only the lines using a Received Date, from and to the dates indicated. To use the current date, check the checkbox. If a different date is needed, click the down arrow to the right of the date and select the appropriate date from the calendar. Leave unchecked to use all dates.
Start/End Applied
Displays only the lines using an Applied Date, from and to the dates indicated. To use the current date, check the checkbox. If a different date is needed, click the down arrow to the right of the date and select the appropriate date from the calendar. Leave unchecked to use all dates.
Show All
Indicates that all lines that have been set up will display in the blue grid located in the center of the screen, when checked.
Show Price ID
Displays the Price ID number. Click the button to display the 'Find/ Edit Price Update ID' window to search for a specific Price ID. All setups for the Price ID display.
Line Code
Displays the Line Code from the application file. Click the button to display the 'Browse Line Codes' window to search for a specific Line Code. All setups for that Line Code displays.
Auto Price Queue
Enables the auto update process to be turned on and off. When enabled, prices update on the Effective Date or Received Date, depending on what is specified in the rules.
Display
Displays the selections matching the specified date criteria.
Contract Line Report
Displays the Contract Line Report.
Displays the lines that have been set up that match the 'Search Criteria'.
Source
Indicates the source from which the pricing was obtained, such as industry pricing or private lines pricing.
Upd ID
Displays the Price Update ID from the pricing database. When an ID in the grid is clicked, the ID information populates the 'Get Price Update' section.
Line
Displays the Line Code from the application file.
Part Number
Displays the Part Number that was used in a setup.
Or
Indicates that either the 'Part Number' or any/all of the codes, such as 'Group', 'PN Code', 'Line Class', 'User Class', 'Sales Class', are to be used.
Group
Displays all instances of the Group Number used in a setup.
PN Code
Displays all instances of the Part Number Code used in a setup.
M
Displays all instances of the Manufacturer (or Line Class) Code used in a setup. PartsWatch allows a list of class codes to be set up in the Line Code file, which can then be selected in the inventory file for individual parts. When M is selected at 'Class', the 'Line' field displays the class codes that are set up in the Line Code file for this line. To only update parts of a specific class, select one of the codes.
U
Displays all instances of the User Class Code used in a setup.
S1
Displays all instances of the Sales Class Code used in a setup. This Sales Class Code is from the first position in the 'Sales Class' field from the Part Entry screen.
S2
Displays all instances of the Sales Class Code used in a setup. This Sales Class Code is from the second position in the 'Sales Class' field from the Part Entry screen.
Effective
Indicates the date that the price becomes effective from the Manufacturer.
Received
Indicates the date that the price was received for the line.
Applied
Indicates the date that the price was applied to the line.
Update/Insert
Indicates whether or not to update prices or insert new part numbers, or both.
Options are:
-
'Update Only' - Updates prices and specified fields.
-
'Update & Insert' - Updates prices and specified fields, and inserts new parts.
-
'Insert Only' - Inserts new part numbers (parts that exist in the pricing file but not in the inventory file.) Only parts that match the popularity codes (A, B, C) specified in the setup screen are inserted. If 'New Numbers Only' was checked in the Internet Pricing Review screen, then only parts flagged as 'New' numbers in the pricing file are inserted.
Get Price Update
Updates the prices, moving from the pricing database, either to the 'New' (temporary) file or directly to the 'Current' inventory file.
'Get Price Update' is the function that actually updates the prices. Depending on how a particular line is set up on the Internet Price Update screen, prices move either into the 'New' (temporary) price file or directly into the 'Current' inventory file.

Click on a line in the grid and the 'View Price Changes' fields populate accordingly.
Source
Indicates the source from which the pricing was obtained, such as industry pricing or private lines pricing.
Update ID
Displays the Price Update ID from the pricing database. Click the 'Upd ID' button to display the 'Find / Edit Price Update ID' window to search for a Price Update ID.
When the 'Update ID' field is clicked in the 'Get Price Update' section of the screen, the 'Find / Edit Price Update ID' window displays to search for Price Update IDs. A list of Price Update IDs that have already been set up displays. This window enables selection of a line to edit. Default sort is by 'Source', then by 'Update ID'.
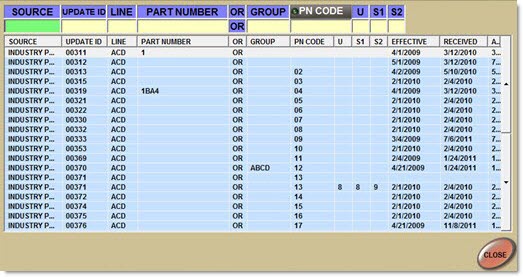
Dates indicate whether or not the 'Get Price Update' function needs to be run on a line.
When a date appears in the 'Applied' field, the update has already been applied to the application 'Current' inventory file. There is no need to run 'Get Price Update'.
When a date appears in the 'Received' field but not in the 'Applied' field, the update has been applied to the 'New' (temporary) price file, but not to 'Current'. Click 'View / Move Prices' to move the prices from the 'New' to the 'Current' file.
When no dates appear in any of the fields, the line was set up in the Internet Price Update screen but prices were not yet applied to 'New' or 'Current'. Run 'Get Price Update' to load the prices into either the 'New' or 'Current' fields.
Line
Displays the Line Code from the application file.
Part Number
Displays the Part Number that was used in a setup.
Or
Indicates that either the 'Part Number' or any/all of the codes, such as 'Group', 'PN Code', 'User Class', 'Sales Class', are to be used.
Group
Displays all instances of the Group Number used in a setup.
PN Code
Displays all instances of the Part Number Code used in a setup.
U
Displays all instances of the User Class Code used in a setup.
S1
Displays all instances of the Sales Class Code used in a setup. This Sales Class Code is from the first position in the 'Sales Class' field from the Part Entry screen.
S2
Displays all instances of the Sales Class Code used in a setup. This Sales Class Code is from the second position in the 'Sales Class' field from the Part Entry screen.
View by Rule
Enables prices to be viewed, as updated by the Price Update process, by Rule.
View by Line
Enables prices to be viewed, as updated by the Price Update process, by Line.
View/Move Prices
Moves the prices to the 'New' (temporary) file or the 'Current' inventory file. Also, allows the report to be previewed or printed.
Move Prices is a required step when the application line is set up to copy prices into the 'New' (temporary) fields. The 'Get Price Update' function copies prices into the 'New' fields and then manual intervention is required to move the prices into 'Current' inventory fields using 'Move Prices'.
When an Update ID is selected in the View Price Changes frame of the Internet Pricing Review screen, the 'View/Move Prices' button displays.
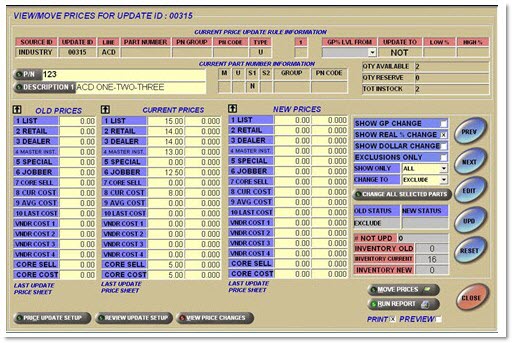
The 'View/Move Prices' button displays the 'Move Prices' window overlaying the 'Price Update Review' (VIEW/MOVE PRICES FOR UPDATE ID: XXXXX) screen.
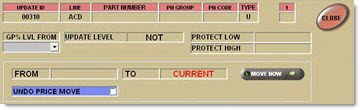
To move prices, click 'Move Now'. To view prices, click 'Close' on the 'Move Prices' window. The 'Price Update Review' (VIEW/MOVE PRICES FOR UPDATE ID: XXXXX) screen displays for review.
Procedure to Get Price Update
To update a price, follow the steps below:
-
From the Menu, select Inventory, Part Utility, Price Updating, Review Update Setup. The Internet Pricing Review screen displays.
-
Click on 'Update ID' in the Get Price Update frame. The 'Find / Edit Price Update ID' window displays.If a date appears in the 'Applied' field, then the update has already been applied to the application current inventory file. There is no need to run 'Get Price Update'. If a date appears in the 'Received' field but not the 'Applied' field, then the update has been applied to the 'New' (temporary) price file, but not to 'Current'. The 'View / Move Prices' must still be clicked to move the prices from the 'New' to the 'Current' file. If no dates appear, then the line was set up in the Price Update Setup screen but prices were not yet applied to 'New' or 'Current'. The 'Get Price Update' must be run to load the prices into either the 'New' or 'Current' fields.
-
Double-click on the lines that need to be updated or enter search criteria below the blue headings. The window closes and the Internet Pricing Review screen displays with the 'Get Price Update' frame populated with the selected line information and the 'Get Price Update' button displays.
-
Click 'Get Price Update. A window displays with the message, "Are You Sure?" with 'Yes' and 'No' buttons.
-
Click 'Yes' .A window displays with the message, "Request for Price Update ID: XXXXX Sent. Check System Messages for Completion."
-
Click 'Ok'. System Messages contains a message indicating whether or not the update was successful.
Procedure to Move Prices into Current Inventory File
To move prices into the 'Current' inventory file, follow the steps below:
-
From the Menu, select Inventory, Part Utility, Price Updating, Review Update Setup. The Internet Pricing Review screen displays.
-
Click on 'Update ID' in the View Price Changes frame. The 'Find / Edit Price Update ID' window displays.
-
Double-click on the line to be moved or enter search criteria below the blue headings. The window closes and the Internet Pricing Review screen displays with the 'View Price Changes' frame populated with the selected line information and the 'View / Move Prices' button displays.
-
Click 'View / Move Prices'. A window displays with the message, "There are NO EXCLUSIONS for This Internet Update ID: XXXXX", if no exclusions exist. Click 'Ok'. The 'Move Prices' window displays.
-
Click 'Move Now'. The prices are moved to the 'Current' inventory file.
Procedure to View Prices
To view prices, follow the steps below:
-
From the Menu, select Inventory, Part Utility, Price Updating, Review Update Setup. The Internet Pricing Review screen displays.
-
Click on 'Update ID' in the View Price Changes frame. The 'Find / Edit Price Update ID' window displays.
-
Double-click on a line or enter search criteria below the blue headings. The window closes and the Review Update Setup screen displays with the 'View Price Changes' frame populated with the selected line information and the 'View / Move Prices' button displays.
-
Click 'View / Move Prices'. A window displays with the message, "There are NO EXCLUSIONS for This Internet Update ID: XXXXX", if no exclusions exist. Click 'Ok'. The 'Move Prices' window displays.
-
Click 'Close'. The Price Update Review (VIEW/MOVE PRICES FOR UPDATE ID: XXXXX) screen displays for review.