Paid In/Paid Out From Drawer
The PAID-IN TO DRAWER and the PAID-OUT FROM DRAWER screens are the basically the same screen and opening one allows the functionality of both.
When PAID-IN TO DRAWER is selected, the screen is used to add cash to a drawer and when PAID-OUT FROM DRAWER is selected, the screen is used to remove cash from a drawer.
Either way, the paid-in and paid-out transactions impact the cash drawer and are tracked for end-of-day reporting.
Menu Path: Invoicing, Cash Drawer:
-
Paid-In To Drawer, PAID-IN TO DRAWER screen, or from the VIRTUAL DRAWER MANAGEMENT screen by clicking the PAID-IN button.
-
Paid-Out From Drawer, PAID-OUT FROM DRAWER screen, or from the VIRTUAL DRAWER MANAGEMENT screen by clicking the PAID-OUT button
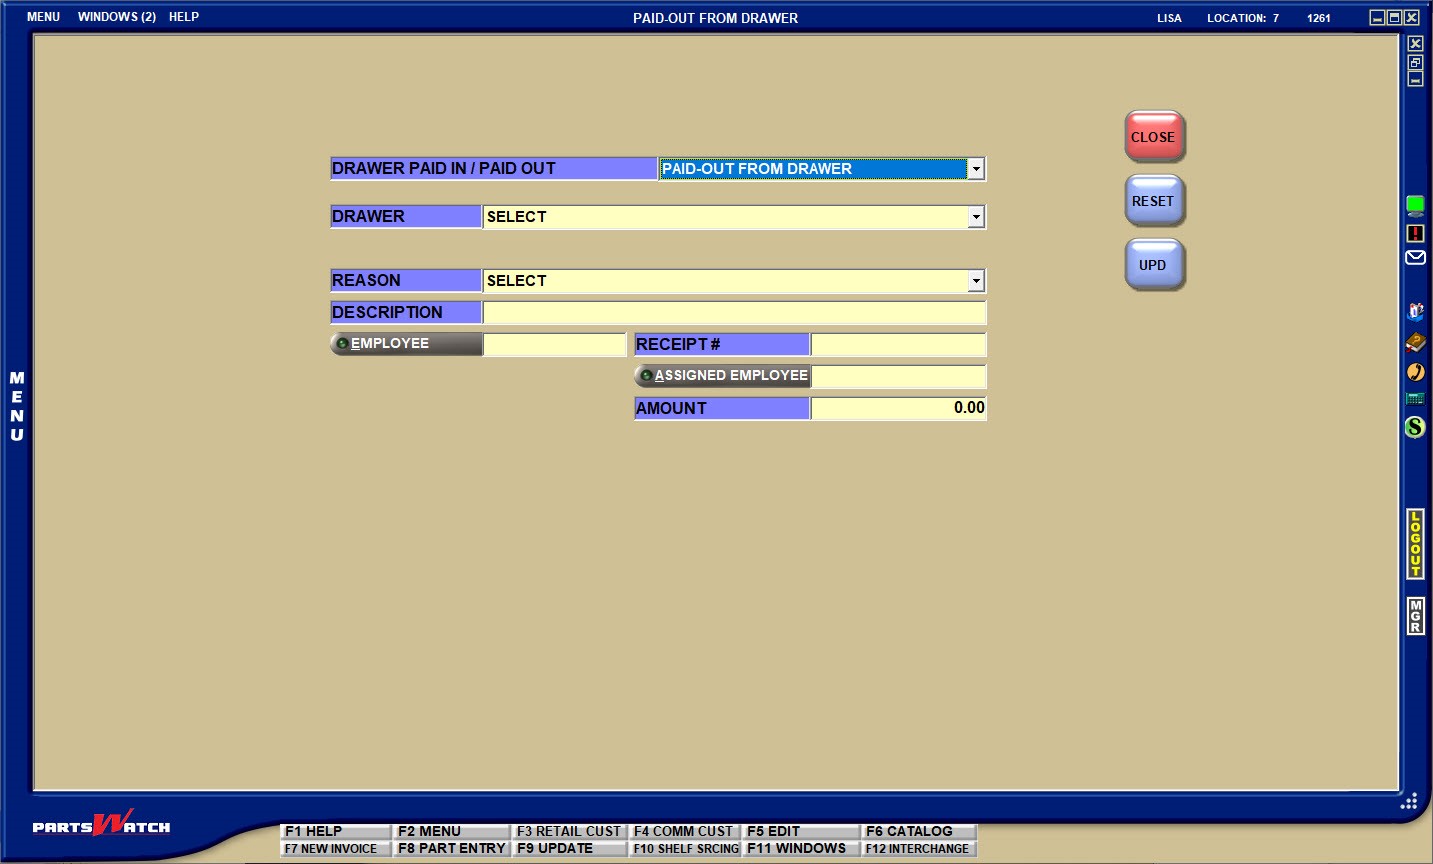
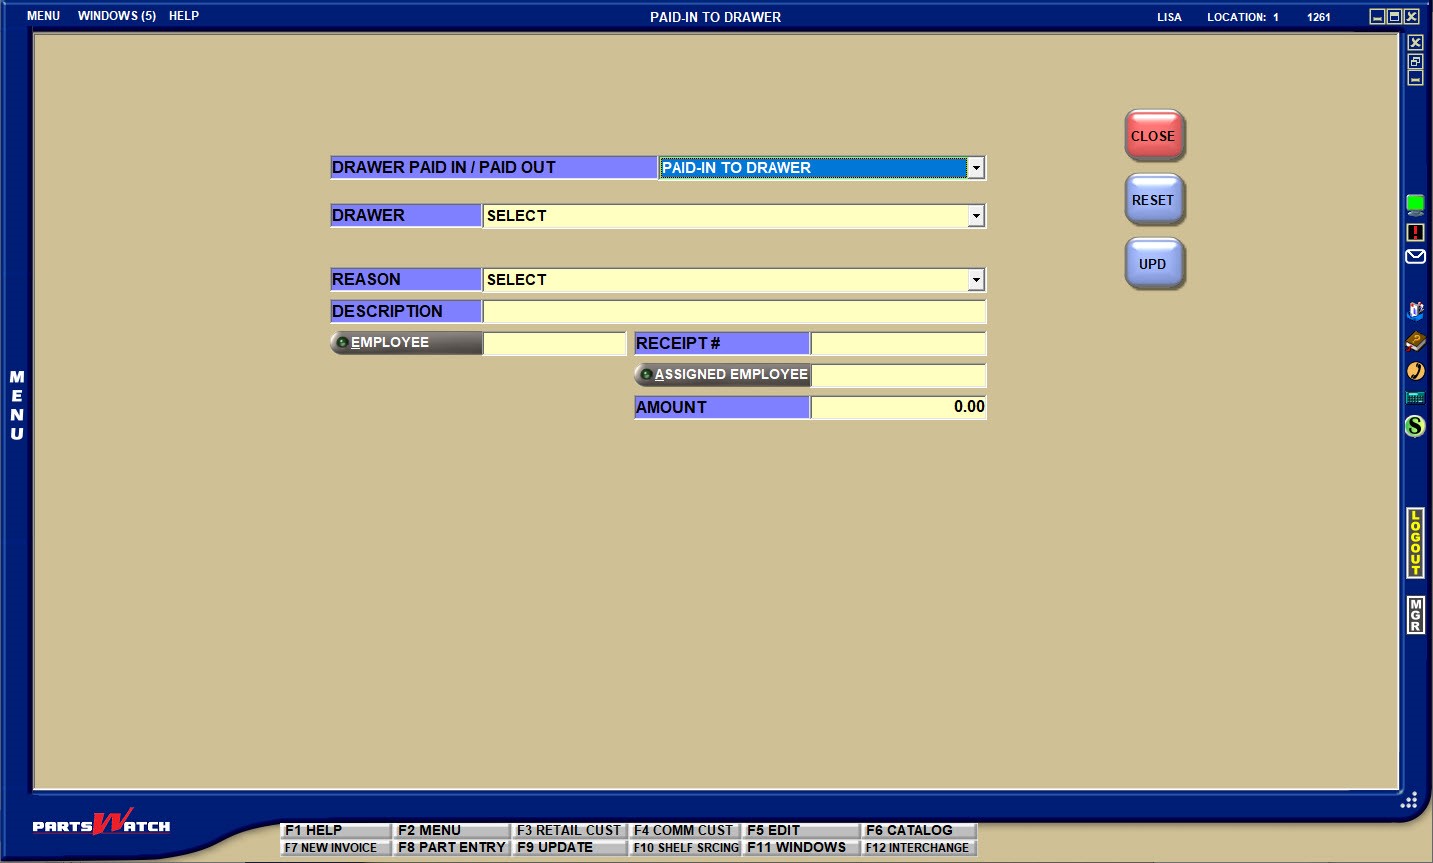
DRAWER PAID IN / PAID OUT
Identifies the transaction that will be created. Select PAID-IN TO DRAWER or PAID-OUT FROM DRAWER to change the transaction type regardless which menu path opened the screen.
-
If the screen is opened from the PAID-IN TO DRAWER menu or PAID-IN button, when the transaction is complete, a paid-in transaction will be tracked for reporting and the cash will be added to the drawer. Change the field to PAID-OUT FROM DRAWER to create a paid-out transaction.
-
If the screen is opened from the PAID-OUT FROM DRAWER menu or PAID-OUT button, when the transaction is complete, a paid-out transaction will be tracked for reporting and the cash will be removed from the drawer. Change the field to PAID-IN TO DRAWER to create a paid-in transaction.
DRAWER
Virtual Drawers: Depending on the DRAWER TYPE, if the screen is opened from the VIRTUAL DRAWER MANAGEMENT SCREEN, then one or more drawers will be available for selection.
If opened from the Invoicing, Cash Drawer menu, all available drawers will be available for selection.
Real Drawers: Only the drawer the employee is assigned to is available for selection.
REASON
Select the reason why cash is being paid into or paid out from the drawer from the pre-defined REASON CODE SETUP list.
DESCRIPTION
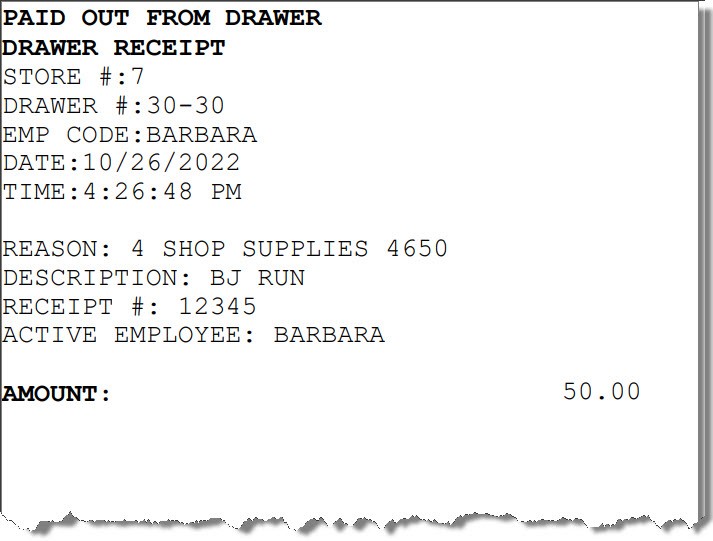
Optionally enter up to 32 alphanumeric and special characters that describe the transaction. The first 27 characters print on the receipt.
EMPLOYEE
Enter the ‘active’ employee or manager who is accepting the cash for a paid-in or receiving the money from a paid-out. Click the EMPLOYEE button to display the BROWSE EMPLOYEES window to search for a specific employee. Only employees from the current store group display in the window. If the store group is not set for an employee, the employee’s default / current location is used to determine what employees display in the window.
RECEIPT #
Optionally enter up to 27 alphanumeric and special characters if a receipt is available for the transaction.
ASSIGNED EMPLOYEE
Enter the employee assigned to the drawer. Defaults to the employee logged into the screen. Click the button to display the BROWSE EMPLOYEES window to search for a specific employee.
AMOUNT
Enter the amount that will be added to the drawer for a paid in or removed from the drawer for a Paid-Out.
UPD
Click the UPD button to create the transaction. The drawer is adjusted by the amount of the Paid In or Paid-Out.
A receipt prints on the designated receipt printer. The PAID IN/PAID OUT RECEIPT # FONT SIZE setup determines the size of the text on the Paid In/Paid Out receipt form.
Receipt example: