PO / ASN Receipt
The PO/ASN Receipt option matches part numbers that are physically received with those listed on POs or ASNs previously generated with the PartsWatch Purchasing module. Select the PO/ASN Receipt option on the Main Menu screen to display the PO/ASN Receipt screen.
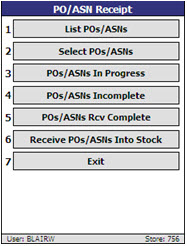
List POs / ASNs
Tap to either list all POs or ASNs that are available for receipt, or search for POs or ASNs containing a particular part number. These functions query all POs in the selected store that are open and have a PO 'Status' of Final (FIN), On Order (ORD), On Back Order (OBK), or ASN (ASN) for that store.
Select POs / ASNs
Tap to select by PO or ASN the orders to received via the PO receipt function.
POs / ASNs In Progress
Tap to list all the POs/ASNs that currently are in the process of received quantities being entered or scanned by an RF user.
POs / ASNs Incomplete
Tap to list all PO/ASNs where the entry of received quantities has not been completed, but no parts are currently being entered or any scanned quantities updated for that PO and ASN.
POs / ASNs Rcv Complete
Tap to list all the POs/ASNs that have been designated as having their received quantities completely entered or scanned. This status only indicates that the quantities on the PO or ASN are ready to be received into stock, not that they have actually been received into stock. Once a PO or ASN is received into stock, it no longer shows on the RF Device.
Preliminary Receiving Report
Tap to print the 'Receiving and Exceptions Reports' before actually receiving the purchase order into stock.
Receive POs / ASNs Into Stock
Tap to receive the PO/ASN into stock and update inventory quantities.
Exit
Tap to return to the 'Main Menu'.
List POs / ASNs
The 'List POs / ASNs' option, accessed from the 'PO/ASN Receipt' menu, displays the 'List/Search' screen that lists all POs on the PO that are open and have a status of Final (FIN), On Order (ORD), On Back Order (OBK), or ASN (ASN) for that store.
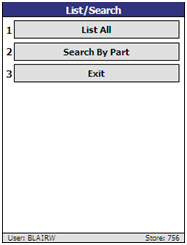

List All
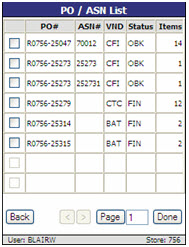
The 'List All' option displays the 'PO / ASN List' screen that displays all POs and ASNs.
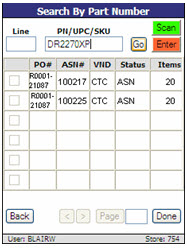
Search By Part
The 'Search by Part' option displays the 'Search By Part Number' screen used to search POs and ASNs that contain the user-entered line code and part number, or UPC, or SKU.
If only one match is found on the part number in the part file, the following 'Search By Part Number' screen displays.
If multiple matches are found on the number in the inventory file, the 'Part Lookup' screen displays with a list of matches.

Tap 'Go' to select the applicable part, or tap 'Cancel' to cancel the selection and return to the 'Part Lookups' screen.
Select POs/ASNs
The 'Select POs / ASNs' option can be accessed in either of the following ways:
- By choosing 'Select POs/ASNs' from the 'PO/ASN Receipt' menu. This method can be used to bypass the 'List POs/ASNs' function if the PO or ASN number is known. Indicate the specific POs/ASNs to be received on the RF Device. The screen also lists the current receiving status of the selected POs/ASNs. POs/ASNs previously received are not accessible for display on the RF Device; they are, however, accessible through the PATI function in PartsWatch.
- By choosing the 'List All' or 'Search By Part' option from the 'List POs/ASNs' menu, selecting POs/ASNs from there, and tapping'Done'. If the screen is accessed using this method, the selected POs/ASNs display in the grid upon accessing the screen. More POS/ASNs may be manually added to the list.
Note: When all of the ASNs have arrived from the same vendor, the RF GUN ITEM RECEIPT screen will auto-select the PO / ASN combinations. The auto-selection for multiple ASNs performs exactly like the rule for a single ASN associated to a single vendor.
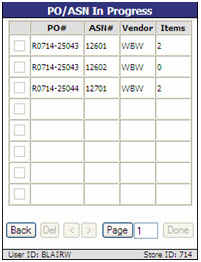
PO/ASN In Progress
The 'POs/ASNs In Progress' option displays a summary of all the POs/ASNs that currently are in the process of received quantities being entered or scanned by an RF user. These have a status type of In Progress (INPRG). POs/ASNs are not accessible to the user.
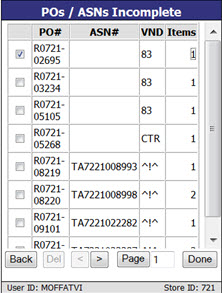
PO/ASN Incomplete
The 'POs/ASNs Incomplete' option displays a summary of all POs/ASNs where the entry of received quantities has not been completed, but the user is not currently entering or scanning quantities for that PO and ASN. These have a status type of Incomplete ('INCMP'). When PO(s)/ASN(s) are selected, the 'Item Receipt' screen displays.
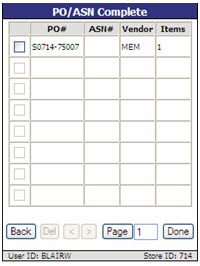
PO/ASN Complete
The 'POs/ASNs Rcv Complete' option displays a summary of all the POs/ASNs that have been designated as having their received quantities completely entered or scanned. These have a status type of Complete ('CMP'). This status only indicates that the quantities on the PO or ASN are ready to be received into stock, not that they have actually been received into stock. Once a PO or ASN is received into stock, it no longer shows on the RF Device. When a PO/ASN is selected, the 'Receive PO/ASN Into Stock' screen displays. Note: Only one PO/ASN can be selected at a time.
Beep and Buzz
A successful scan of the bar code produces a "beep". (It does not, however, indicate that the transaction successfully recorded against the PO or ASN.)
A "buzz" plays when:
- 'RECEIPT SHORTAGE' warning screen displays.
- Scanned/entered part is found on more than one PO/ASN that is currently being received/processed by the user.
- Any Alert or Confirm pop-up occurs.
When an alert or confirmation pop-up is encountered, an Alert/Confirm pop-up displays when:
- Logging in (Confirms Store ID is correct)
- Logging out (Confirms that you are sure that you want to log out)
- An attempt to receive a part but not bar code is scanned and no 'LINE'/'PN' is entered
- A part is scanned but its UPC code is not found
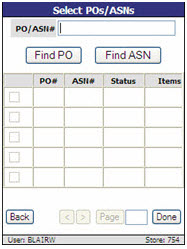
Select a PO/ASN to Receive
To select a PO/ASN to receive:
-
Tap 'POs / ASNs' from the 'PO/ASN Receipt' screen. The 'Select POs / ASNs' screen displays.
-
Enter a PO or ASN number in the 'PO/ASN #' field or tap 'Find PO' or 'Find ASN' to select a PO/ASN to receive.The PO/ASN displays in the grid.
-
Tap the desired POs/ASNs in the grid.
-
Tap 'Done'. The POs/ASNs are no longer accessible by another RF Device or PartsWatch user. The 'Item Receipt' screen displays for scanning or entry of items that are being received for the selected POs/ASNs.
Received Stock Location Screen
The 'Received Stock Location' screen is used to process parts received on a PO or ASN and place these parts into their respective zone/bin.
Select the desired PO(s) and/or ASN(s) from the 'Received Stock Location' screen using one of several methods:
- The desired POs or ASNs can be selected from the 'PO/ASN List' accessed from the 'List All' option on the 'Received Stock Location' screen.
- The desired POs can be selected from the 'PO List' accessed from the 'List POs' option on the 'Received Stock Location' screen.
- The desired ASNs can be selected from the 'ASN List' accessed from the 'List ASNs' option on the 'Received Stock Location' screen.
- If the PO# or ASN# is known (all or partial), the 'Select POs/ASNs' option can be used to open the 'Select POs/ASNs' screen. The PO# or ASN# should be entered in the top field and either 'Find PO' or 'Find ASN' should be tapped. From the resulting list, select one or more rows and tap 'Done' to proceed.
- If a part number is known but not the PO# or ASN#, the 'Search By Part' option may be used. On the 'Search by Part Number' screen, the UPC/SKU can be scanned or the line and part number can be entered of a part. The search will result in any PO or ASN that contains that part. Select the POs and/or ASNs from the checkbox in the first column and select 'Done'.
- In all cases, if the displayed list is longer than the existing screen, the navigation buttons '>' and '<' can be used to page through the list. If the page number is known, it can be directly entered adjacent to the 'Page' button.
Multiple POs and/or ASNs may be selected. POs and ASNs displayed are those received within the last seven days or as otherwise configured.
The 'Received Stock Location' screen is used to inform the user of the location where received parts should be placed. It is an informational screen only. Once parts are placed in a zone/bin, there currently is nothing to indicate this and the PO or ASN used does not update. The PO/ASN remains in the system until it ages out. The default is seven days.
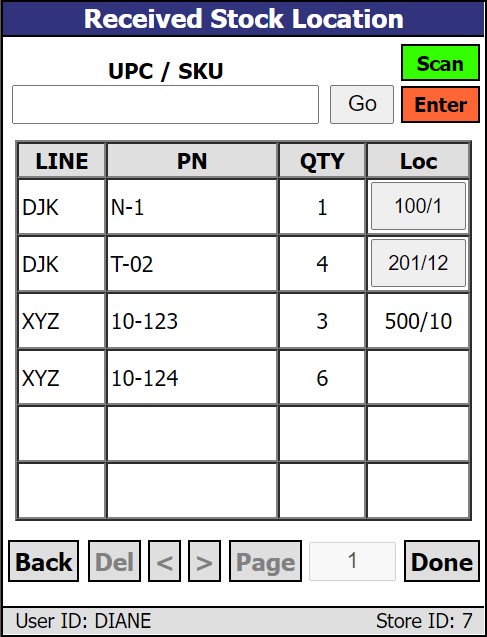
LINE/PN (Enter Mode) UPC/SKU (Scan Mode)
Allows the lookup of a part on the purchase order.
If a part is entered or scanned in this field that is located on another page of the selected PO(s) or ASN(s), that page is brought into focus with the part shown.
If a part is entered or scanned in this field that is not found on the selected PO(s) or ASN(s), an Error message displays.
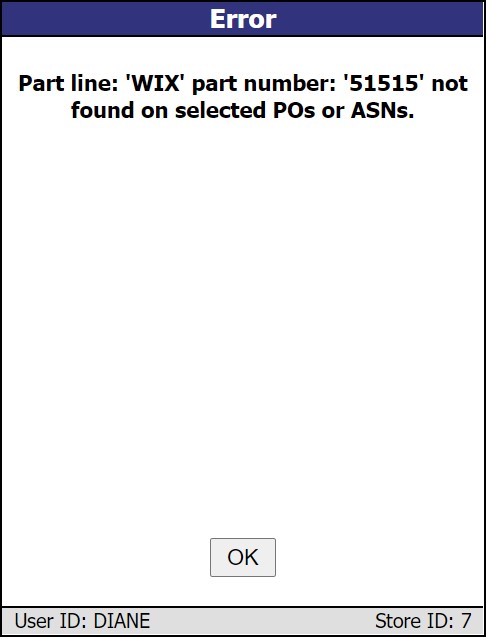
Click 'OK' to clear the message and return to the previous screen.
Go
Tap to start the search entered in the 'LINE/PN' or 'UPC/SKU' textboxes.
Scan
Indicates that the RF Device is in "scan" mode, when green.
Enter
Indicates that the RF Device is in "enter" mode, when green.
LINE
Indicates the line code of the part.
PN
Indicates the part number of the part.
QTY
Indicates the quantity received in the shipment.
Loc
Indicates the zone / bin assigned to the part. This is where you should place incoming parts.
-
If there is no zone or bin assigned to the part, the 'Loc' cell is blank.
-
If there is a zone assigned, but no bin assigned to the part, only the zone will appear as centered text in 'Loc'.
-
If there is a bin assigned, but no zone, the bin will appear in 'Loc' as centered text preceded by a '/' character such as '/5'.
-
If there is a single zone and bin assigned to the part, the display will show the zone and bin centered in 'Loc' as text separated by a '/' such as '500/10'.
-
If the part has more than one zone/bin assigned to it, the primary zone/bin is displayed on a button.
-
Click the button under 'Loc' to see additional storage locations for that part.
-
A pop-up appears, along with a buzzing sound, that displays the Line and Part Number of the part and then up to three locations for additional zone/bins, including the primary location.
-
This provides guidance for locations in which to shelve the part.
-
Click 'OK' to clear the pop-up.
-
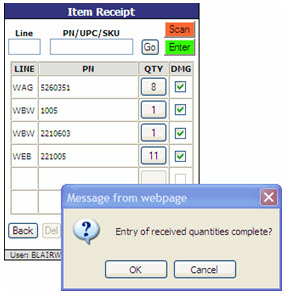
Item Receipt
The 'Item Receipt' screen displays when 'Done' is tapped on the 'Select POs / ASNs' screen after all the applicable POs/ASNs for receipt have been entered or selected. At this point, the POs/ASNs are in 'INPRG' status. Begin to scan or enter the items. An additional beep sounds when a part is successfully added to the list of entered/scanned parts.
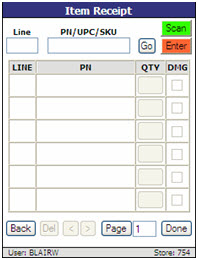
Line
Indicates the line code.
While in 'Enter' mode, the next part is automatically brought up in sequence when a part and quantity are entered.
PN/UPC/SKU
Indicates the part number, UPC, or SKU. Multiple entries of the same 'PN/UPC/SKU' lists individually and not combined into a single item row.
"Stripdash" logic is used to strip out dashes, slashes, and other special characters before searching for a match. For example, if 12345-A is entered, the part will be found even if PartsWatch or the PO store the number as 12345A or 12345/A.
If a single match is results, the line code and part number in the database display in the grid.
If multiple matches result, all valid line codes/part numbers in the database display in the 'Part Lookup' screen for selection.
If no matches result, a message displays stating, "Item not found in part file."
Go
Tap to place the received part in the information grid.
Scan
Allows for scanning, when enabled. (Screen defaults to 'Scan' when opened.) As the items are scanned, they are added to the bottom of the list in the grid.
Enter
Allows for manual entry, when enabled.
LINE
Indicates the line code of the received part.
PN
Indicates the part number of the received part.
QTY
Indicates the received quantity.
To change the received quantity, select the field for the desired part number. A pop-up displays allowing entry of the new quantity in the 'Enter receive quantity' field.
DMG
check to indicate that a part is damaged. When a part is identified as damaged, a damaged quantity must be entered in the 'QTY' field.
Damaged batteries require entry of serial numbers.
Back
Tap to return to the 'POs/ASNs Receipt' menu.
Del
Unavailable on this screen. If an entered quantity needs to be cleared, click 'Qty' and enter zero (0).
< or >
Tap to move ahead or back in the listings when multiple pages exist.
Page
Indicates the page number of the current page. Enter a new page number and select the button to jump to that page.
Done
Completes the Item Receipt process. Checks for battery damaged/overage. Verifies with user that received quantities is complete. When yes, the 'Item Receipt' screen displays and the PO/ASN status is set to 'INPROG'.
Add Barcode
When the 'PromptToAddBarcodesInPurchasing' appswitch is enabled, and items were received by scanning bar codes or manually entering bar codes in the PO Receiving module on the RF device, and a bar code is encountered that does not exist for any part, the ADD BARCODE screen displays.
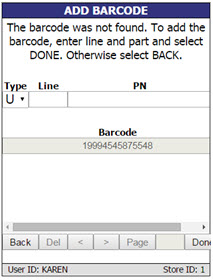
Enter the following three fields ('Type', 'Line', and 'PN') and tap 'Done' to add a bar code to the part's bar code record in PartsWatch.
Note: The bar code must be rescanned to receive the item after storing the bar code in the part record.
When creating new UPC codes via the RF device, quantities or flags associated with a part alias cannot be set up. These fields can only be set within the PartsWatch application.
Type
Indicates the item type. This determines the type that gets stored with the bar code in the UPC Setup screen.
Options are:
- U (UPC) (Default)
- S (SKU)
- P (Product Number)
Line
Indicates the line code.
PN
Indicates the Part Number.
Barcode
Displays the bar code.
Back
Tap to return to the 'Item Receipt' screen.
< or >
Tap to move ahead or back in the listings when multiple pages exist.
Page
Indicates the page number of the current page. Enter a new page number and select the button to jump to that page.
Done
Tap to add the bar code to the Barcode line when a valid 'Line' and 'PN' are entered.
Multiple Matches Found
If multiple matches are found on the part number in the inventory file, the 'Part Lookup' screen displays with a list of matches.
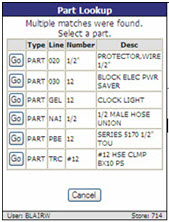
Tap 'Go' to select the applicable part, or tap 'Cancel' to cancel the selection and return to the 'Part Lookup' screen.
Item Not Found on PO/ASN
When an item is found in the part file but does not match an item on a PO/ASN, the 'Select PO/ASN' screen displays with the message, "Part not found on any PO/ASN. Select PO/ASN to add entry."
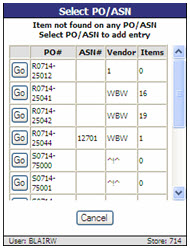
Tap 'Go' to add the part to the received items list for that PO/ASN. The 'Item Receipt' screen redisplays with the item and its received quantity.
Items on Multiple POs/ASNs
When a selected part for receiving is found on multiple POs/ASNs, the 'Select PO/ASN' screen displays with the message, "Item on Multiple POs/ASNs. Select PO/ASN For Entry."
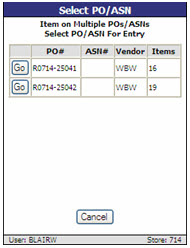
Tap 'Go' to select a PO/ASN. If only part of the quantity belongs to that PO/ASN, adjust the quantity in the 'QTY' field in the 'Item Receipt' screen.
Damaged Batteries
When a damaged battery is received during the receipt process, record its quantities in the 'Item Receipt' screen. Damaged batteries require the entry of a serial number. Therefore, once the receiving of all items for the PO/ASN is complete, and 'Done' is tapped and 'OK' is answered to "Entry of received quantities complete?", the 'Damaged Serial Numbers' screen displays.
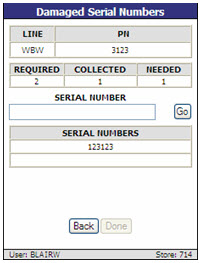
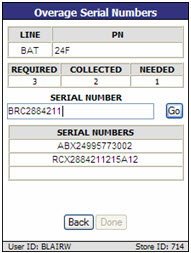
LINE
Indicates the line code.
PN
Indicates the part number.
REQUIRED
Indicates the total number of serial numbers that must be collected for this part number.
COLLECTED
Indicates the number of serial numbers that have been collected so far.
NEEDED
Indicates the number of serial numbers that still need to be collected for this part number.
SERIAL NUMBER
Indicates the battery's serial number.
Go
Tap to add the serial number in the 'SERIAL NUMBERS' grid, increase the 'COLLECTED' quantity, and reduce the 'NEEDED' quantity.
Note: Repeat the entry of damaged battery serial numbers as often as needed.
SERIAL NUMBERS
Indicates the list of serial numbers added that were damaged.
Back
Tap to return to the 'List/Search' menu.
Done
Displays the next damaged battery in the grid and allows entry of the serial number for that battery.
Returns to the 'Main Menu' if all serial numbers have been entered, and there are no battery overages.
Displays the 'Overage Serial Numbers' screen if, after all damaged batteries have been processed, there are overages to be processed.
Note: If the 'Battery Damaged' or 'Overage Serial Numbers' screen is exited without entering all of the serial numbers for the damages and overages, the PO status is set to 'INCMP'. The system prevents the process from continuing with the receipt process until the battery process is completed.
Battery Overage
After the 'Item Receipt' for damaged battery process is completed, the system checks for any overages recorded for batteries and then displays the 'Overage Serial Numbers' screen. The same information is required as the 'Damaged Serial Numbers' screen.
Cancel Item Receipt Process
At any point during the PO Item Receipt process, the user may elect to discontinue entry of items to the PO from the RF Device.
-
Tap 'Done' on the 'Item Receipt' screen. The system checks for battery damaged/overage, and when completed, displays the message, "Entry of received quantities complete?"
-
Tap 'Cancel'. A prompt displays asking "Continue with item receipt?"
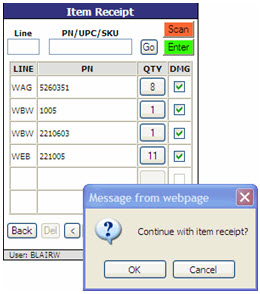
-
Tap 'Cancel'. The received quantities are saved, the 'Main Menu' redisplays and the status of the PO/ASN(s) is set as 'INCMP'.
Complete Item Receipt Process
-
Tap 'Done' on the 'Item Receipt' screen. The system checks for battery damaged/overage, and when completed, displays the message, "Entry of received quantities complete?"

-
Tap 'OK' .If any POs/ASNs that were selected to receive against had no received quantities, a warning message displays stating, "No parts have been received for PO 'X'."
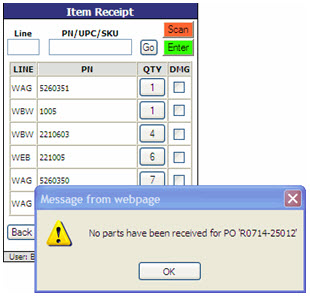
-
Tap 'OK' to return to the 'Item Receipt' screen.
Note: To avoid getting this message when selecting 'Done', either deselect the PO/ASN (from the 'Select PO/ASN' menu) that has not parts received, or scan/enter a part for that PO/ASN.
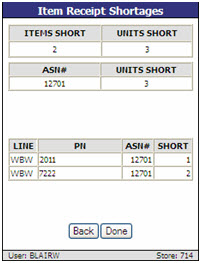
If there are any shortages (scanned/entered received quantity< inbound quantity), the 'Item Receipt Shortages' screen displays summarizing the shortage information.
-
Select 'Back' on the 'Item Receipt Shortages' screen.
-
The 'Item Receipt' screen redisplays, the status remains 'INPROG' and is able to continue receiving items or adjusting received quantities.
-
-
Select 'Done' on the 'Item Receipt Shortages' screen.
-
If there are no shortages, the PO/ASN status is set to 'CMP', and the Main Menu redisplays.
-
Now, a single PO or ASN can be received into stock.
-
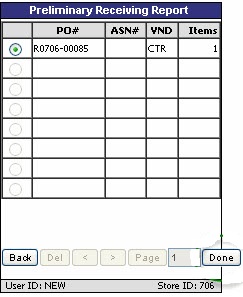
Preliminary Receiving Report
The 'Preliminary Receiving Report' option displays the 'Preliminary Receiving Report' screen used to print the 'Receiving and Exceptions Reports' before actually receiving the purchase order into stock. A list of POs with a status of 'CMP' (Complete) displays.
Select either the 'Preliminary Receiving Report – PO' or 'Preliminary Receiving Report – ASN' to continue.
If the 'Preliminary Receiving Report – PO' is selected, a list of POs with a status of 'CMP' (Complete) displays. Select one and tap 'Done' to navigate to the 'Preliminary Receiving Report – PO' screen on the RF device.
If the 'Preliminary Receiving Report – ASN' is selected, a list of ASNs with a status of 'CMP' (Complete) displays. Select one and tap 'Done' to navigate to the 'Preliminary Receiving Report – ASN' screen on the RF device.
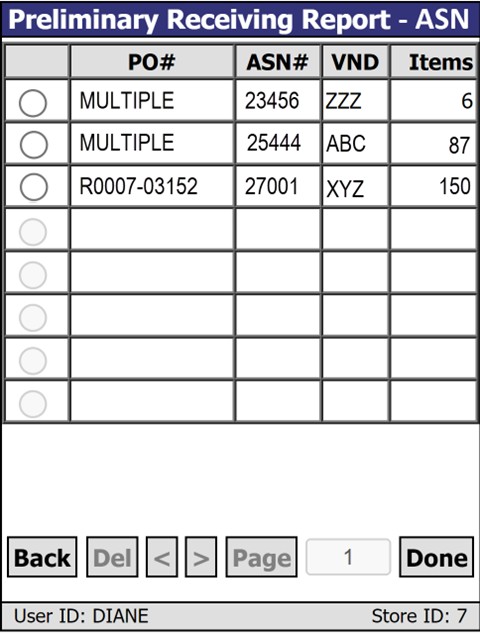
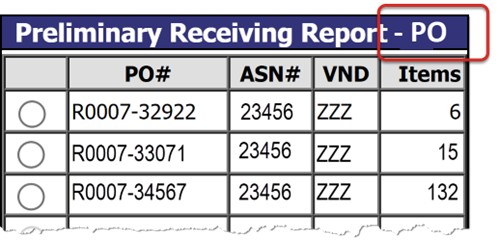
When 'Done' has been tapped, the following screen opens. POs that do not have ASNs attached to it do not appear.
PO#
Displays the PO number for the ASN. Displays 'Multiple' if multiple purchase orders are associated with the ASN.
ASN #
Displays the ASN reference number.
VND
Displays the vendor code as set up in PartsWatch.
Items
Displays the total quantity of the items scanned.
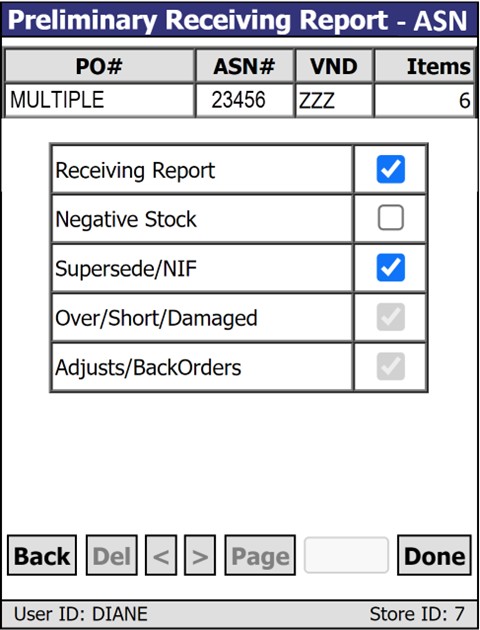
Tap in the checkbox of any of the following rows to output that report for the specified ASN. Note: Printing selected reports will apply to all POs associated with the given 'ASN#'. For example: if 25 purchase orders are applied to 'ASN# 23456', then 25 report outputs will be printed.
Receiving Report
Negative Stock
Supersede/NIF
Over/Short/Damaged
Adjusts/Backorders
Print the Preliminary Receiving Report
To print the 'Preliminary Receiving Report', follow the steps below:
-
Tap 'Preliminary Receiving Report' from the 'PO/ASN Receipt' menu screen. The complete detailed list of POs/ASNs that are in the Ready to Receive ('CMP') state displays.
-
Tap the button to select a PO/ASN to include in the report.
-
Tap 'Done'. A window with the receiving options displays. Options default based on the settings in the SYSTEM PURCHASING SETUP screen.
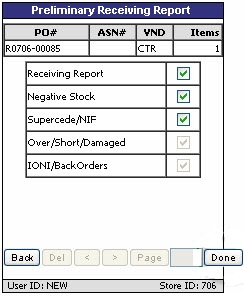
-
Check the desired report option(s).
-
Tap 'Done'. The 'Preliminary Receiving Report' prints. Note: Quantities on the report that need to be adjusted may be edited.
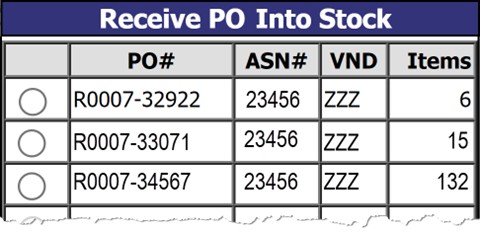
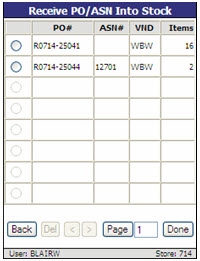
Receive POs/ASNs Into Stock
The 'Receive POs/ASNs Into Stock' option displays the 'Receive PO/ASN Into Stock' screen used to receive POs/ASNs into stock.
Only POs/ASNs with a status of 'CMP' (Complete) can be received into stock. And, although received quantities may be scanned/entered for multiple POs/ASNs at the same time, the process of receiving POs/ASNs must be done for one PO or ASN at a time.
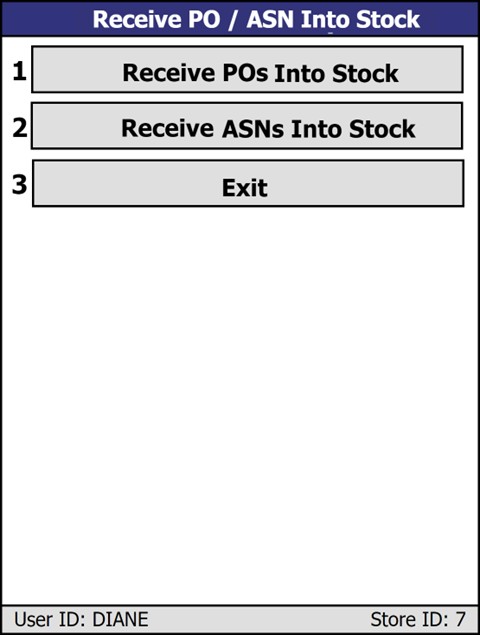
Click the 'Receive POs Into Stock' button to open the 'Receive PO Into Stock' screen.
Click the 'Receive ASNs Into Stock' button to open the 'Receive ASN Into Stock' screen.
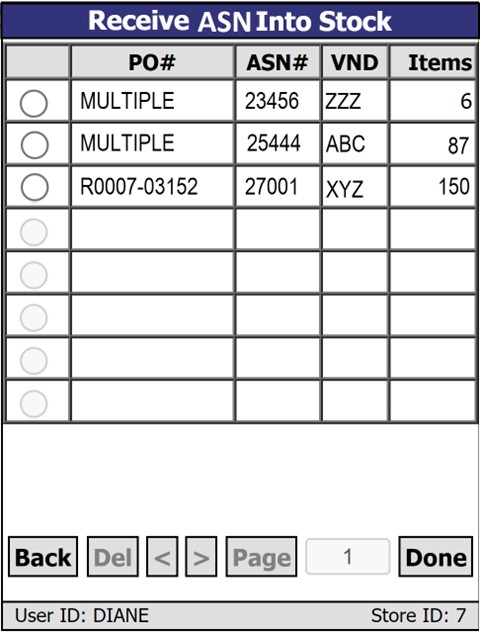
Select an ASN with the radio button and tap the 'Done' button to open the 'Receive ASN Into Stock' screen.
PO#
Displays the PO number for the ASN. Displays 'Multiple' if multiple purchase orders are associated with the ASN.
ASN #
Displays the ASN reference number.
VND
Displays the vendor code as set up in PartsWatch.
Items
Displays the total quantity of the items scanned.
Tap in the checkbox of any of the following rows to output that report for the specified ASN. Note: Printing selected reports will apply to all POs associated with the given 'ASN#'. For example: if 25 purchase orders are applied to 'ASN# 23456', then 25 report outputs will be printed.
Receiving Report
Negative Stock
Supersede/NIF
Over/Short/Damaged
Adjusts/Backorders
Procedure to Receive POs/ASNs Into Stock
To receive a PO/ASN into stock, follow the steps below:
-
Tap 'Receive POs/ASNs Into Stock' from the 'PO/ASN Receipt' menu screen. The complete detailed list of POs/ASNs that are in the Ready to Receive ('CMP') state displays.
-
Tap the button to select a PO/ASN for receiving. Note: Only one PO/ASN can be selected and received at a time.
-
Tap 'Done'. A window with the receiving options displays. Options default based on the settings in the SYSTEM PURCHASING SETUP screen. Note: The 'Over/Short/Damaged' and 'Adjust/Back Orders' options are always defaulted to checked and cannot be unchecked.

-
Check the desired report option(s).
-
Tap 'Done'.
-
A warning message displays stating, "This will receive items into stock and print receiving report(s). Are you sure?"
-
Tap 'Cancel' and the receiving report options screen redisplays with the same PO/ASN still displayed.
-
Tap 'OK' and the items on the PO are received into stock and the selected reports print.
-
-
If receiving by PO and the PO is fully received, the received PO is cleared from the PartsWatch system. If the PO is partially received, the items with 'RECEIVED' quantities are received into stock. The PO status is set to 'OBK' (on Back Order) and any unreceived quantities on the PO are kept with the remaining order quantities as the new order quantity. All future ASNs for this PO will be discarded without being applied and all receiving must be done against the PO.
-
If receiving by ASN and the 'RECEIVED' quantity is less than the 'CURRENT ASNs INBOUND', then the amount is short. If the 'RECEIVED' quantity is greater than 'CURRENT ASNs INBOUND', then amount is over. If the 'CURRENT ASNs INBOUND' is less than the 'ORDER QTY', then the items are saved as back orders.
-
If a PO created in PartsWatch and the user returns to the PURCHASING DASHBOARD screen where all POs are listed, fully receives the PO into stock via the RF Device, and then clicks on that PO in the PURCHASING DASHBOARD screen in PartsWatch, an error message displays stating, "The PO that you are attempting to load has data integrity errors. Please contact Support and report the problem."