Scan Returns
When logging in to the RF device, the 'Main Menu' screen displays.
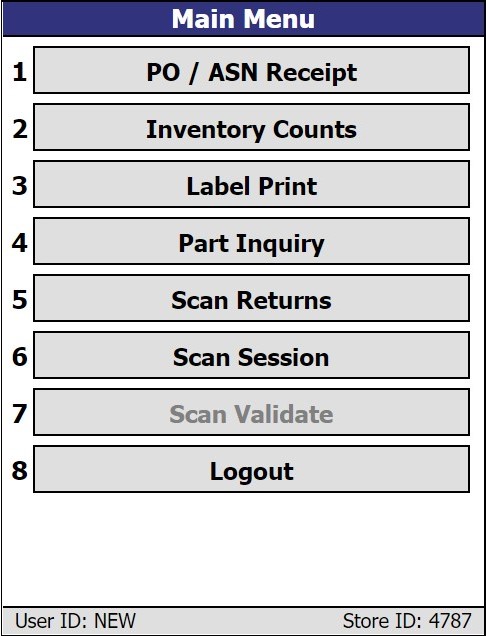
Tap the 'Scan Returns' option on the 'Main Menu' to display the 'Scan Returns Menu' screen.
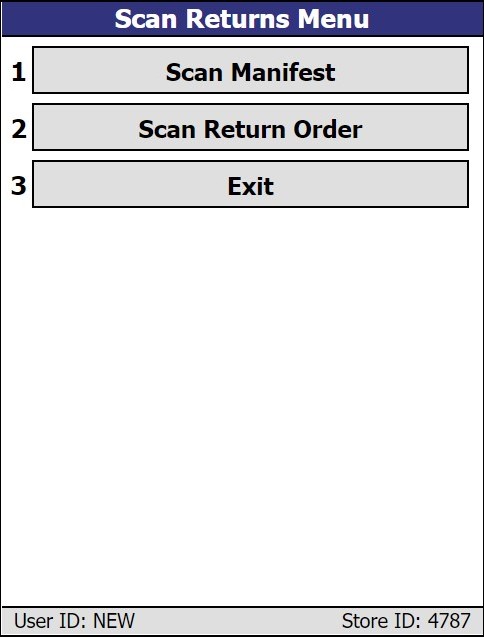
Tap the 'Scan Manifest' option on the 'Scan Returns Menu' screen to display the 'Scan Manifest Menu' screen, or tap the 'Scan Return Order' option to display the 'Scan Return Order Menu' screen. The 'Scan Return Order Menu' screen has the same options as the 'Scan Manifest Menu' screen, except for 'Finalize Open Manifest'.
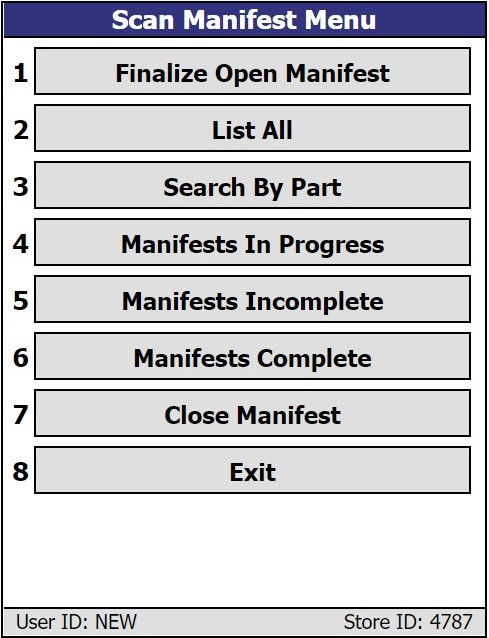
Tap to open the 'Select Manifest To Finalize' screen. Note: Not available from the 'Scan Return Order Menu' screen.
Tap to open the 'Manifest / Returns List' screen.
Tap to open the 'Item Scan' screen.
Manifest / Return Order In Progress
Tap to open the 'Manifests / Returns In Progress' screen.
Manifests / Return Orders Incomplete
Tap to open the 'Manifests / Return Orders Incomplete' screen.
Manifests / Return Orders Complete
Tap to open the 'Manifests / Return Orders Complete' screen.
Tap to open the 'Select Manifest / Return Order To Close' screen.
Exit
Tap to exit the screen and return to the 'Main Menu' screen.
Select Manifest To Finalize Screen
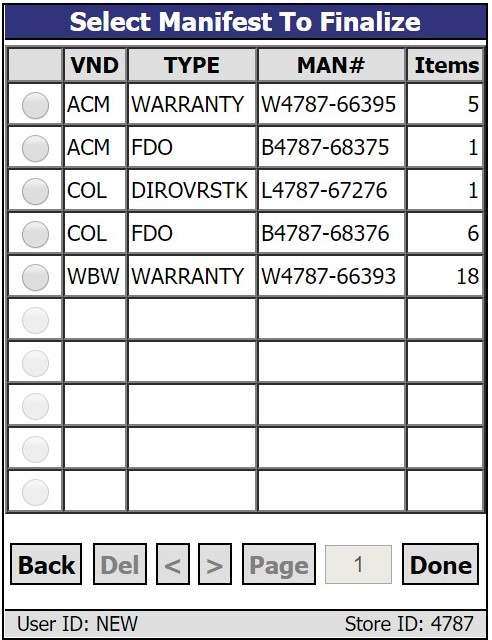
This screen lists all 'OPEN' manifests in the current store and allows the changing of the manifest status to "closed". No additional parts can be added to the manifest from Point-of-Sale once the manifest is closed. Then, the manifest can be worked on with the RF device. Multiple users can work on the same manifest simultaneously. When a manifest is selected and the 'Done' button is clicked, followed by the 'OK' button being clicked, the manifest status is changed to 'FINAL', and is removed from this screen. It can now be found on the 'Manifests Complete' screen.
Manifest List Screen

This screen lists all manifests with the status of 'FINAL' in the current store and allows the selection of a manifest and scanning of parts to be shipped. A similar corresponding menu appears for return orders. When a row is selected and 'Done' is tapped, the 'Item Scan' screen appears and the user is ready to scan items for the manifest or return order.
Item Scan Screen
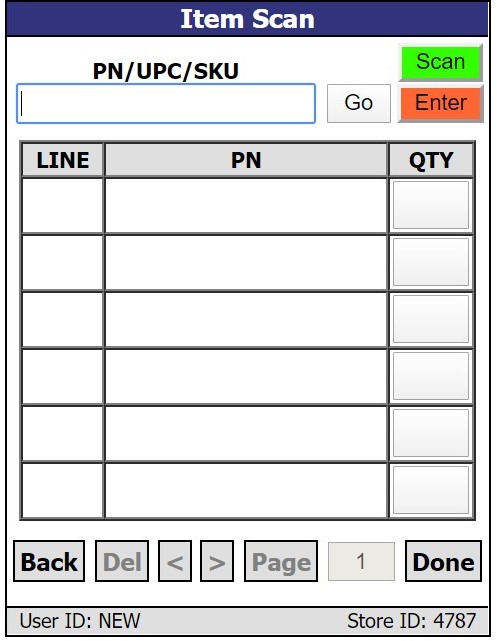
This screen is used to list a collection of parts scanned or entered for a specific manifest or return order. The quantity for an item listed may be manually adjusted by clicking the amount in the 'QTY' field. The 'Enter New Quantity' pop-up appears, and a new quantity can be entered and the 'OK' button can be tapped, or abandon the change and tap 'Cancel'. Note: The quantity entered may not exceed that which is listed on the manifest or return order. Only parts that are already on the manifest or return order may be scanned/entered. The RF device does not support adding parts to an existing manifest or return order.
Note: The RF device will not recognize a NIF part that was entered manually in the desktop application.
If more parts are scanned than are on the return order, the system issues a screen with the prompt "This exceeds the total quantity (x) of part 'XXXX' on the return order. Would you like to increase the return quantity on the return order?" with 'No' and 'Yes' buttons.
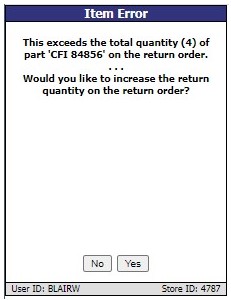
'No' goes back to the 'Item Scan' screen and abandons the scanned item quantity.
'Yes' edits the quantity on the return order and increases it accordingly.
If parts are scanned or entered and the upper limit is exceeded, a message prompt is displays with the text: "Quantity entered is greater than the warning threshold of '1000'. Are you sure?" with an 'OK' and 'Cancel' button.
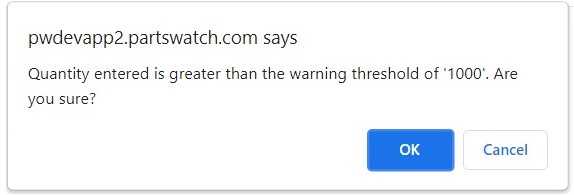
'OK' accepts the quantity and closes the pop-up.
'Cancel' abandons the changes and returns to the screen behind the message prompt.
Select Manifests to Close Screen
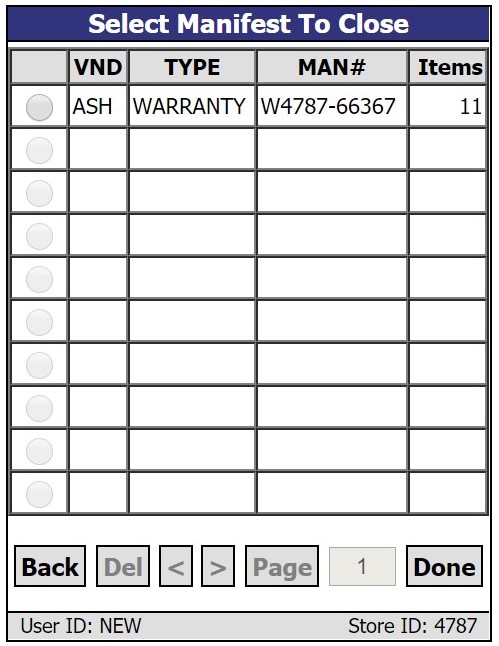
The screen lists all manifest scan sessions associated with a finalized manifest that has been marked complete for the current store. It allows the manifest to close to ship the product(s). The 'Items' column on this screen identifies the number of items scanned for the manifest, rather than the total number of items on the manifest. Manifests may not be deleted from this screen. When a manifest is selected by tapping its corresponding radio button and then 'Done' is clicked, a 'Close Manifest' screen appears.
Close Manifest Screen
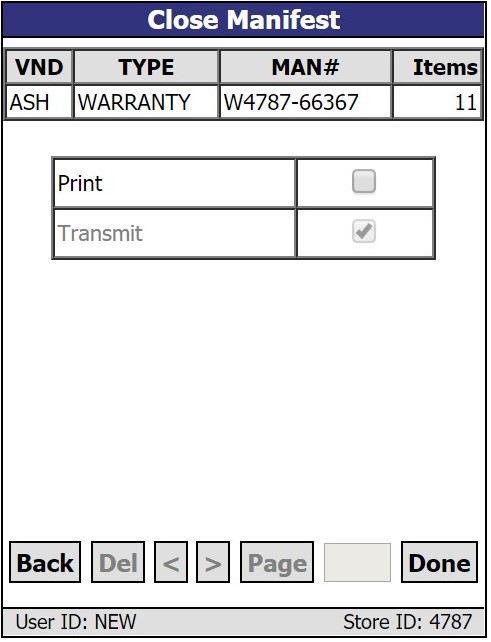
This screen is displayed when a manifest is selected and the 'Done' button is clicked from the 'Select Manifest To Close' screen. The screen lists the manifest that the user is closing.
A checkbox for 'Print' is optionally available. If checked, a 'Manifest Detail Report' (or 'Return Order Report') is sent to the configured printer when the item is closed. The default setting for this checkbox can be found in the 'DEFAULT PRINT MANIFEST' or 'DEFAULT PRINT RETURN ORDER' checkboxes on the SYSTEM PURCHASING SETUP screen.
The 'Transmit' checkbox is always disabled for manifests. It is unchecked if the supplier/return point does not support the electronic transmission of manifests. For Return Orders, the 'Transmit' checkbox is checked based on the 'DEFAULT TRANSMIT RETURN ORDER' checkbox on the SYSTEM PURCHASING SETUP screen.
Selecting 'Done', and then 'OK' in the subsequent pop-up will close the manifest/return order. A 'Manifest Detail Report' will be queued if the 'Print' checkbox was selected. For return orders, the 'Return Order Report' will print whether the scan was split or not. The item will be queued for transmitting if the 'Transmit' checkbox was selected. If only a portion of items from the manifest/return order were scanned, a split manifest/return order is created. A new manifest/return order is created of the same type, same return point and same supplier. The scanned parts will be removed from the original manifest/return order and moved to the newly created manifest/return order. This new manifest/return order is then finalized and closed. It is this manifest/return order that is printed and/or transmitted to the supplier.
Search By Part Number Screen
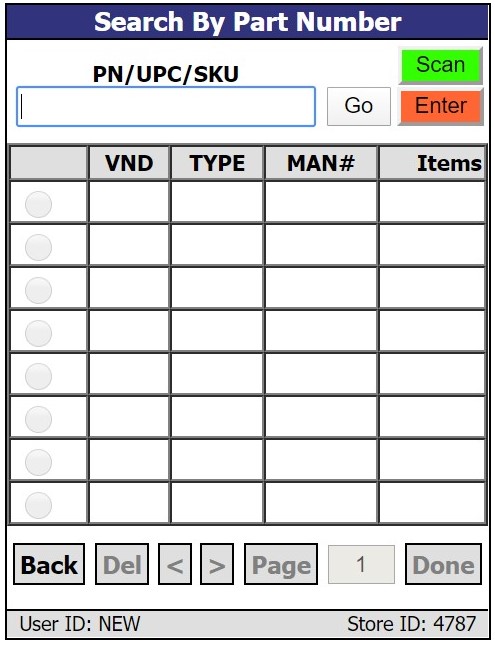
This screen is used to help locate a specific manifest or return order by providing a part number, UPC, or SKU. If the scan or data entry locates the part number, the manifests or return orders that include that part number are displayed on the screen.
Part Lookup Screen
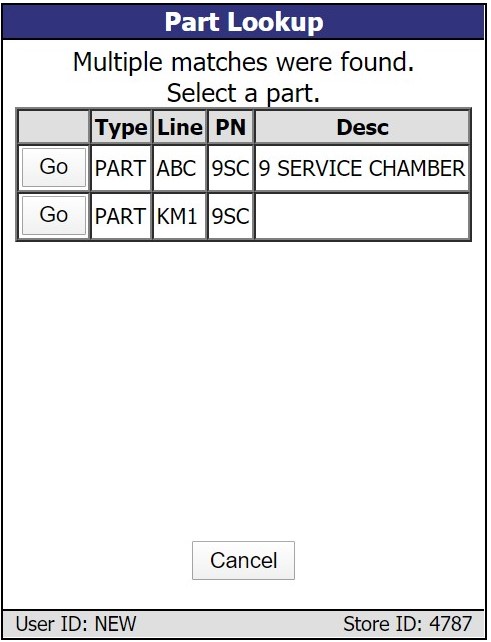
This screen is displayed when an incomplete part number is entered on the 'Item Scan' or 'Search By Part Number' screens and multiple parts match the entered text. Select the desired part and then tap the 'Go' button.
Manifest In Progress Screen
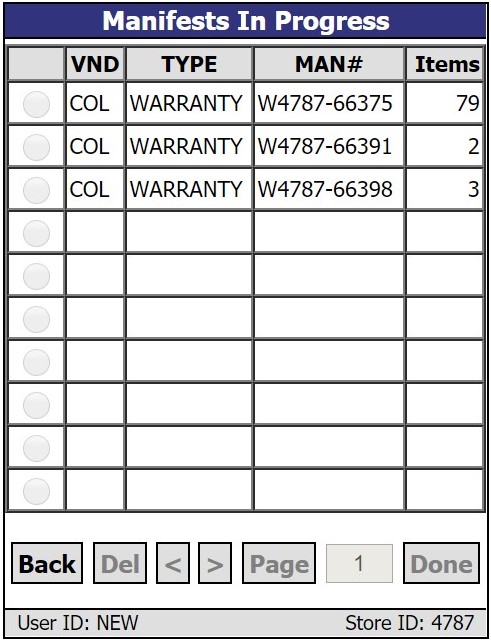
This read-only screen displays a list of items being worked on by others. The quantity in the 'Items' column reflects the number of items scanned, not the total number on the manifest or return order.
The Incomplete screens are similar in that they display a list of all manifests or return orders where items have been scanned but the user has elected to abandon scanning temporarily without closing the manifest or return order. Select a manifest or return order listed and choose to continue scanning or delete the session entirely and start over.
The Complete screens list all manifests in the current store where items have been scanned and the user has indicated that scanning is complete. Reopen the manifest or return order to add additional products.