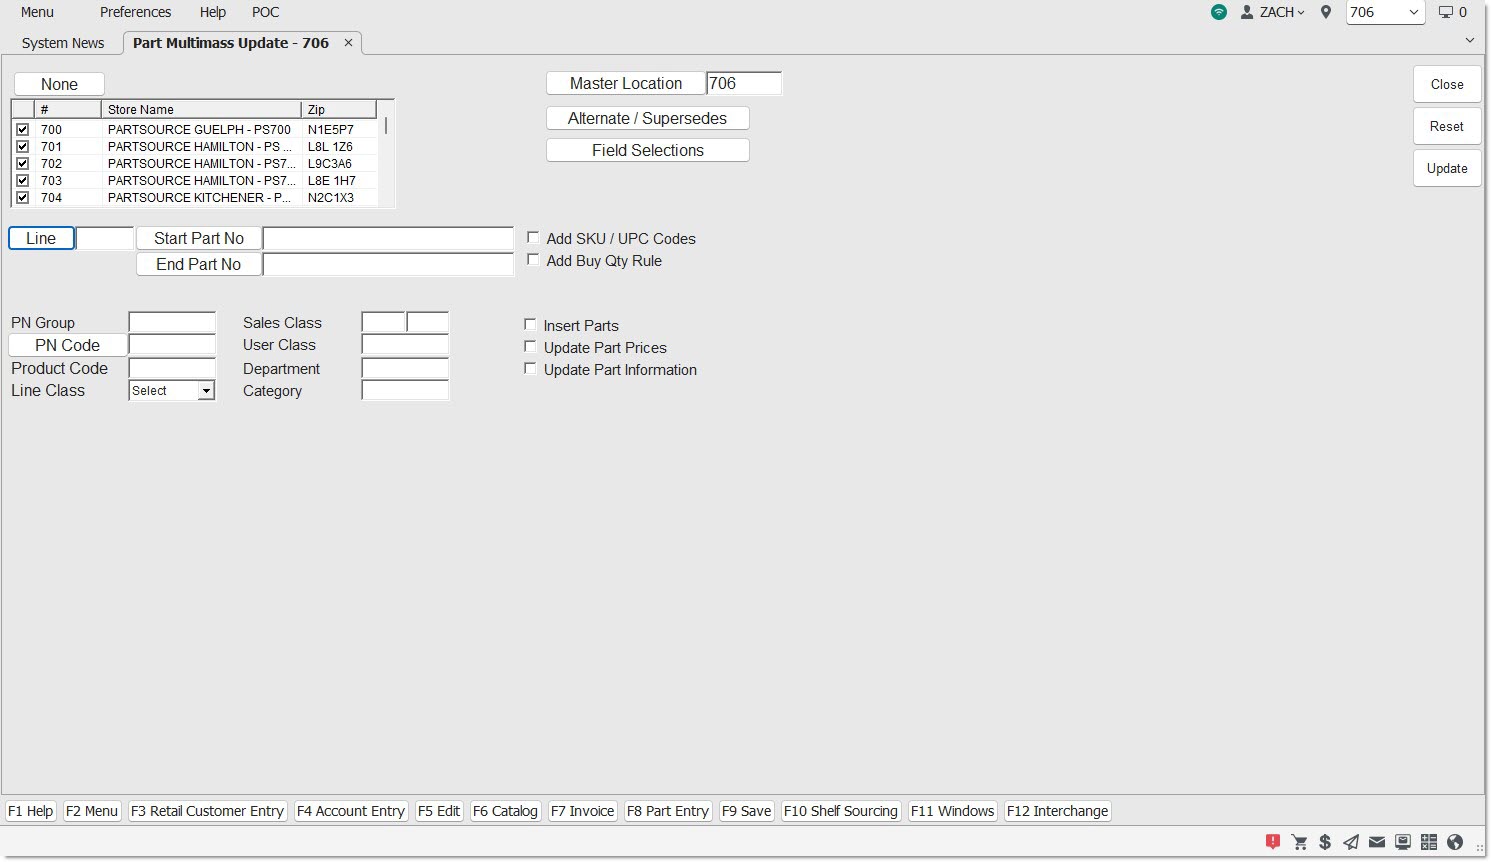
Part Multimass Update
The Part Multimass Update screen is used to copy/insert parts, prices and part information, including UPC codes, from a Master Store into other stores. The Line Code and at least one Part Number must be found in a selected location to use Multi Mass Update functionality.
Menu Path: Inventory, Multi-Store, Part Multimass Update, Part Multimass Update screen
Multi Mass Update
Displays the Multi-Location Mass Update screen. Copies/inserts parts, prices and part information, optionally including SKU/UPC codes, Alternates/Supersedes and Buy Qty Rules, from a Master Store into other stores.
Location Grid
Header [Checkbox]
Selects all locations, when checked. Deselects all locations, when unchecked.
Store Name
Displays the active stores in the database.
Zip
Displays the store's zip code.
Grid [Checkbox]
Selects individual stores in the store grid, when checked. Deselects individual stores in the grid, when unchecked.
Filters
Reports by the Line Code. Click the button to display the 'Browse Line Codes' window to search for a line code.
When a line code is entered that does not exist in the Master Location, the system prompts, "Line not found in master location." Select a new 'Master Location' where the line code exists or enter the line code in the desired 'Master Location'.
Upon selecting a Line Code, a grid displays the 'Store #' and 'Store Name' for each selected store and 'Line Code', for information purposes only. Line Codes cannot be edited in the grid.
Start Part No
Reports by the beginning Part Number to select the range of parts.
End Part No
Reports by the ending Part Number to select the range of parts.
PN Group
Reports by the entered Part Number Group Code. Leave blank for all PN Group codes.
PN Code
Reports by the 'PN Code'. Click to display the 'P/N Code Selection' window to search for a specific 'PN Code'.
Prdt Code
Reports by the entered Product Code. Leave blank for all 'Prdt Codes'.
Line Class
Reports by the 'Line Class' code. Leave blank for all 'Line Class' codes.
Sales Class
Reports by the 'Sales Class' Code. The 'Sales Class' Code is two fields, each containing one alphanumeric character, is user-defined and updated by the Popularity Rank report. The character in the first field is the current Popularity Code. This character moves into the second field when the next ranking runs. Leave blank for all 'Sales Class' codes.
User Class
Reports by the 'User Class' Code. Leave blank for all 'User Class' codes.
Department
Reports by the 'Department' Code that classifies a specific department within a store for purchasing and reporting. Used in conjunction with 'Category'. Leave blank for all 'Departments'.
Category
Reports by the 'Category' Code that classifies specific categories within a department for purchasing and reporting. Leave blank for all Categories.
Add SKU/UPC Codes
When checked, and 'Upd' is clicked, any SKU/UPC Codes that exist for the part in the 'Master Location' are added when the part is added to the other locations. When unchecked, the SKU/UPC Codes are not added.
Add Buy Qty Rule
When checked, and 'Upd' is clicked, any Buy Qty Rules that exist for the part in the 'Master Location' are added when the part is added to the other locations. When unchecked, the Buy Qty Rules are not added.
Insert Parts
Adds parts, when checked.
Update Part Pricing
Adds part pricing, when checked.
Update Part Information
Adds selected field part attributes, when checked.
Master Location
Displays the 'Master Location'. Click the button to display the 'Browse Locations' window to search for a new location.
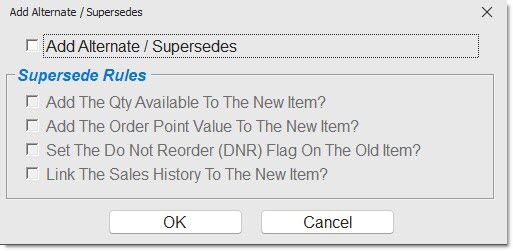
Click the 'Alternate / Supersedes' button to display the 'Add Alternates / Supersedes' window used to add alternate and supersede parts.

Field Selections
Displays the 'Multi Mass Update Field Selections' section with all the fields from the part record that are available for copying.
The 'Upd' button initiates the update. When initiated, a window displays stating that the multi-location mass update is in progress.
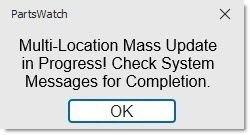
The program creates a System Message upon completion of the update. The system directs to check the System Messages on the System Messages screen for comments on the update.
Multi Mass Update Field Selections
The 'Field Selections' button displays the 'Multi Mass Update Field Selections' section, which displays all the fields from the part record that are available for copying.
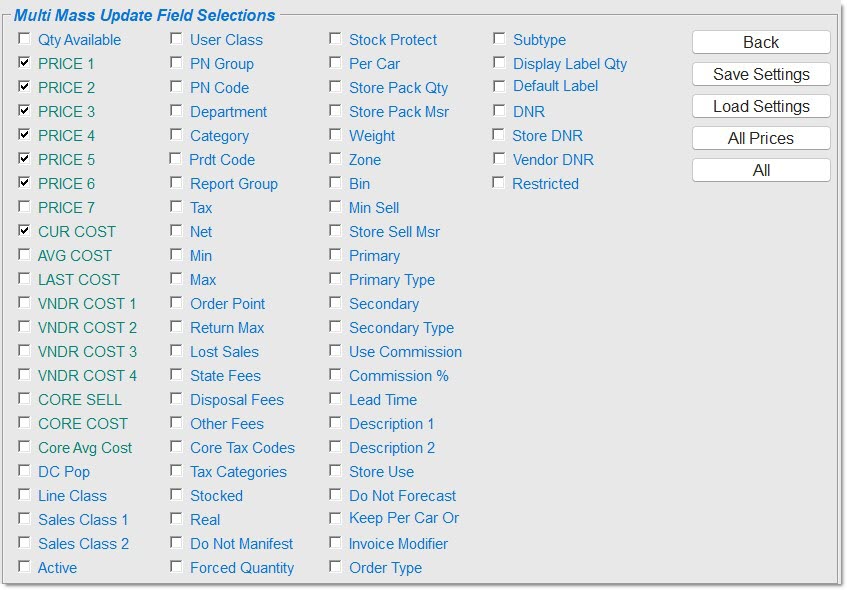
Field Selections
Displays the 'Multi Mass Update Field Selections' with all the fields from the part record that are available for copying. With the 'Field Selections' displayed, click on individual fields to select and click again to deselect.
Back
Closes the 'Multi Mass Update Field Selections' and returns to the Multi-Location Mass Update screen with the checked fields displayed.
Save Settings
Saves the selected fields. If settings have not changed, the button is grayed out.
Load Settings
Clears the new settings and redisplays the saved settings when changes have been made to the settings since they were saved. The button name changes to 'Reload Settings'.
All Prices / No Prices
Selects all the price field selections (displayed in green) only, when clicked once. The button name changes to 'No Prices'.
'No Prices' deselects all price related field selections.
All / None
Selects all field selections boxes, when clicked once. The button name changes to 'None'.
'None' deselects all field selections. 'None' updates parts only, without updating part record information. When no fields are selected, only the parts are added in each location.
Kits
It is not possible change the 'Sub Type' value for a kit part, the application ignores attempted update changes.
It is not possible to copy kit parts present the master store to other stores where the kit part is missing. An error message displays e indicating that the Kits Setup screen is the only function that can add kit parts into other stores.
When a 'Kit' part is displayed in the master store, and the other stores are displayed, 'Not in File' displays instead of 'Adding Part' for the 'Kit' part numbers in the stores where the 'Kit' part number is missing.
It is not possible to change the 'Sub Type' value for a non-kit part to a value of 'Kit' or 'BOM'.
Procedure to Copy a Line and Part Numbers from One Location to Selected Locations
To copy a line and new part numbers for a line across multiple stores, follow the steps below:
-
From the Menu, select Inventory, Multi-Store, MultiMass Update. The Multi-Location Mass Update screen displays.
-
Enter a Line Code in the 'Line' field.
-
Enter a start and end part number in the 'Start Part No' and 'End Part No' fields. (Optional)
-
Enter a single part filter to narrow the parts updated or leave blank for all part filters. (Optional)
-
Select to 'Insert Parts', 'Update Part Prices', and/or 'Update Part Information'. Defaults to 'Insert Parts' checked; one field must be checked. (Optional)
-
Add part attributes by selecting 'Add SKU / UPC Codes', 'Add Alternates / Supersedes' and/or 'Add Buy Qty Rule' as applicable. (Optional)
-
Click 'Field Selections'. (Optional) The 'Multi Mass Update Field Selections' section displays.
-
Select the fields from the part record to be copied. (Optional)
-
Click 'Save Settings' if fields were selected/deselected. The settings are saved.
-
Click 'Back'. The 'Field Selections' section closes and focus returns to the Multi-Location Mass Update screen.
-
Click 'Upd'. Based on the Line code that was selected in the 'Line' field and the parts that were selected within the Part Number range, the program copies selected parts, part information from the' Master Location' to other selected locations. A window displays stating "Multi-Location Mass Update in Progress! Check System Messages for Completion."
-
Click 'Ok'. When the Part Multimass Update completes, a System Message is logged.
Differences Between the Part Multimass Update Screen and the Inventory Mass Update Screen