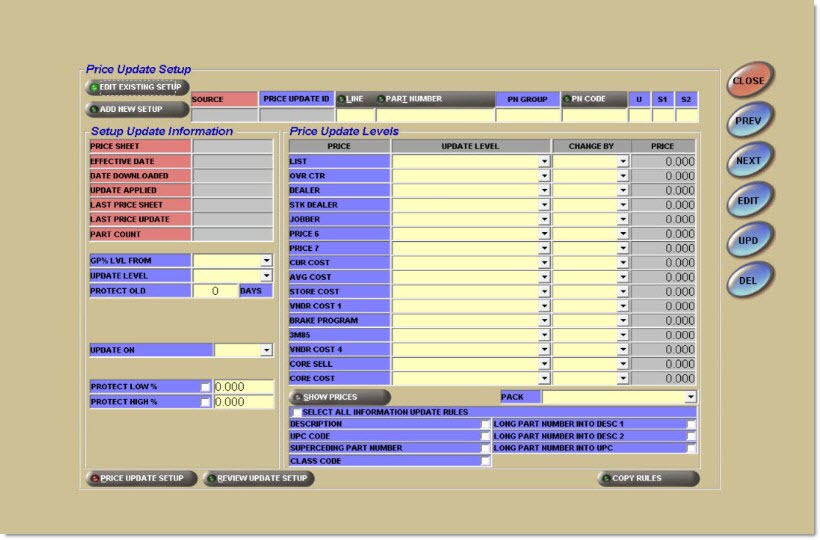
Price Update Setup
The Internet Price Update screen enables selection from all lines that are available within the pricing database to tie the selected lines to the corresponding PartsWatch line codes. Pricing rules are also established on this screen, such as which lines are to be updated and which price levels are to be affected.
Menu Path: Inventory, Part Utility, Price Updating, Price Update Setup, Internet Price Update screen
Source
Indicates the source from which the pricing was obtained, such as industry pricing or private lines pricing.
Price Update ID
Displays the Price Update ID from the pricing database.
Line
Displays the Line Code from the application file.
Part Number
Displays the Part Number.
PN Group
Displays the Part Number Group.
PN Code
Displays the Part Number Code.
Displays the Inventory Class Code.
Options are:
-
'Sales' - Used to designate the popularity of a part. When selected, two boxes display to allow the entry of one character in each. In the inventory file, the first box stores the current Class Code and the second box stores the previous Class Code.
-
'User' - A one character, user-defined Class Code entered in the inventory file.
Setup Update Information
The pink and gray fields are updated and maintained by the program and the information is for display only. The blue fields are editable to allow options to be set for updating.
Price Sheet
Displays the current Price Sheet number.
Effective Date
Displays the date that the prices become effective from the Manufacturer.
Date Downloaded
Displays the date that the prices are received by the PartsWatch program.
Update Applied
Displays the date that the prices were updated to the application parts file.
Last Price Sheet
Displays the previous Price Sheet color and number.
Last Price Update
Displays the previous date that the prices were updated to the application part file.
Part Count
Displays the total number of parts from the update for the displayed setup.
GP% Lvl From
Notifies the program that prices are being based off of an existing level so the level's setup is calculated first.

Update Level
Determines where the prices will go in the Part record once the Price Update is run.
Options are:
-
'New' - Used to enter the updated prices in a 'New' (or test) file. (Advisable to use 'New' until more familiar with the program.)
-
'Current' - Used to update the prices immediately. A copy of the current prices is made in an 'Old' file before the Current field is updated.
Protect Old/Days
Indicates the number of days the old file is to be kept by the program before being deleted or overwritten.
The 'Old' file is a copy of the prices before the update is done. If the updated prices are not correct, the 'Old' files can be copied back to the 'Current' pricing. The default for the field is two days.
Update On
Indicates that the prices were updated on the 'Received' or 'Effective' Date. 'Received' is when the Price Sheet was first obtained. 'Effective' indicates that the update will run when the Price Sheet becomes effective. Typically, the Price Sheets are distributed a month prior to the Effective Date.
Protect Low %
Prevents prices from being updated that are a specified percentage below the current prices, when checked. For example, enter 10% if you do not want any price updated if the new price is 10% less than the old price.
Protect High %
Prevents prices from being updated that are a specified percentage above the current prices, when checked. For example, enter 10% if you do not want any price updated if the new price is 10% more than the old price.
Use As Insert Part Rule
Adds new parts from the selected pricing file, when checked. When the same 'Price Update ID' is set up more than once, the 'Use As Insert Part Rule' option can only be checked on one of the setups. For example, if the 'Price Update ID' 12345 is applied to two different 'PN Codes' within a line, the 'Use As Insert Part Rule' option can only be checked for one of the two 'PN Codes' to avoid adding the same part twice.
Pricing Update Levels
Specifies which prices to pull over from the pricing database and the adjustments to make to those prices.
Price
Displays a list of the application part price levels from the part record.
Update Level
Displays the list of prices that are available from the Vendor, such as Jobber, Warehouse Distributor, or Retail.
Change By
Indicates the type of adjustment that will be applied to the next level.
Options are:
-
'None' - No change is made to the price level.
-
'Percent' - Change is made based on percentage indicated.
-
'GP' - Change is made based on GP indicated.
-
'Amount' - Change is made based on the program's database price.
If using 'GP' percent or 'GP From', the program bases the value off the entered level and performs the following calculation:
BASED PRICE LEVEL / (1 - GP) = UPDATED PRICE LEVEL
Example: Increase Level 1 based on Level 2 and adjust by a 7.0% Gross Profit.
Level 1 = 22.00 (not used on calculation)
Level 2 = 25.00
(1.0 - .07) = .93
25.00 / .93 = 26.88
Level 1 equals 26.88 after the Update.
Price
Indicates the program's database price that the change will be increased or decreased against.
For example, if a part had a Jobber price (Update Level) of $10, and a 'Change By' by 'Percent' and the price was 30, then the result would be $13.
Pack
Indicates if the selected price levels are to be multiplied or divided by the pack quantity in the inventory file, or neither.
Information Field Rules
Selects all of the following seven fields, when checked.
Description
Updates 'Description 1' in the part record, when checked.
UPC Code
Updates the first available UPC field in the part record, when checked.
Superseding Part Number
Updates the superseding part number, if available. If the Superseding Part Number is updated, then the 'Sup' flag is set in the part record and the Alternate/Supersede Line Code and Part Number fields are updated. 'S' displays in 'Sales Class 1' and the value that was in 'Sales Class 1' moves to 'Sales Class 2'.
Class Code
Updates the Line Class field in the part record.
Long Part Number Into Desc 1
Copies the long part number, if any, into the 'Description 1' field in the part record, if checked.
Note: If both the 'Description' and 'Long Part Number' are loaded into 'Description 1', and a part has both a long part number and a description, then the long part number should be loaded into 'Description 1'. If both are checked but the pricing file only has one or the other, then whichever field is populated should be loaded into 'Description 1'.
Long Part Number Into Desc 2
Copies the long part number, if any, into the 'Description 2' field in the part record, if checked.
Long Part Number Into UPC
Copies the long part number, if any, into the first available UPC field in the part record, if checked.
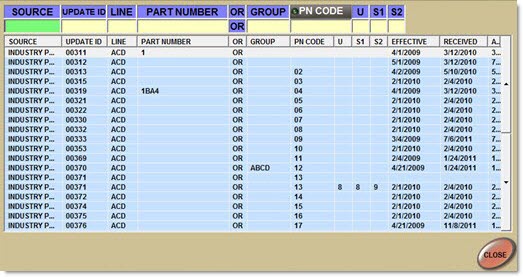
Edit Existing Setup
Displays the Find / Edit Price Update ID window with a list of existing line setups.
When 'Edit Existing Setup' is clicked, the 'Find / Edit Price Update ID' window displays. A list of lines that are already set up displays. This window enables a line to be selected to edit.
Add New Setup
Displays the Price Update ID’s window with a list of available lines from the pricing database. To narrow the search, click the Line column and enter the Manufacturer’s name to find the desired line.
When 'Add New Setup' is clicked, the 'Price Update IDs' window displays.
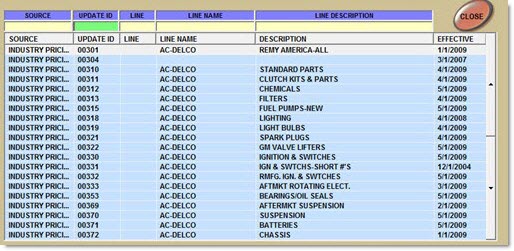
When setting up lines for price updating, make sure that the application line is linked with the same line from the pricing database. For example, the application may have the code AC that includes all the AC-Delco parts, separating the parts by group codes of 'Cable', 'Plugs', and 'Wire'. The pricing database may have the following:
00310 AC-DELCO CABLE & CASING
00321 AC-DELCO SPARK PLUGS
0380 AC-DELCO WIRE & CABLE
Three setups for AC-DELCO need to be entered. The setup might resemble this:

If the application lines and the pricing database lines are not linked correctly, the prices will not be updated for that line. Contact PartsWatch Support if problems arise in linking the lines.
If there are multiple Pricing Update IDs and one line code, the 'Part Number', 'PN Group', or 'Class' fields must be used.

If the selected 'Price Update ID' has not been added to the file of lines to be updated, then a prompt displays stating, "Price UPDATE ID not found. Would you like to add it?" Click 'Yes' to add the code to the file.
Show Prices
Displays a window of pricing from the Price Update for the entered line. While in Edit Mode, enter a part number to be viewed. If the part number is not known, click the Part Number button to display a window to search for a Part Number. Use this pricing to determine the level from the pricing file to use as the base level for updates.
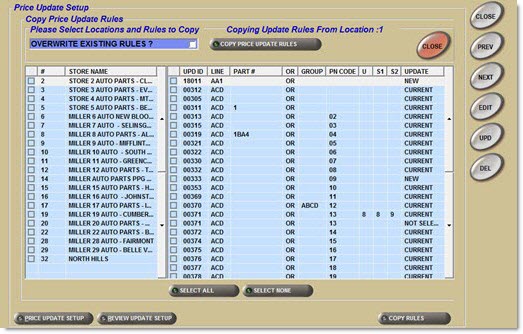
Copy Rules
Displays the 'Copy Price Update Rules' frame to allow existing Price Update rules to be copied from one location to another.
Procedure to Add New Price Update Setup
To add a new setup, follow the steps below:
-
From the Menu, select Inventory, Part Utility, Price Updating, Price Update Setup. The Internet Price Update screen displays.
-
Click 'Add New Setup'. The 'Price Update IDs' window displays with a list of lines available from the PartsWatch server.
-
Scroll through the list or enter search criteria below the blue headings. The line may be split up into several 'Update IDs', although they may all be under one line in the inventory file. Each 'Update ID' can be set up separately, but point them all to the same line.
-
Click on the desired line to add. The 'Price Update ID' for the selected line populates automatically.
-
Enter the Line Code in which the selected part is found in the inventory file in the 'Line' field.
-
Enter all other appropriate fields, as necessary. (Optional)
-
Enter the part number in the 'Part Number' field to update a specific part number. (Optional)
-
Enter the codes in the 'PN Group' or 'PN Code' fields to update parts of a specific PN Group or PN Code. (Optional)
-
Enter the appropriate class code in the 'Class' field. (Optional)
-
If not entering a PN Group, PN Code, or Class Code, press 'Enter' to key through these fields.
-
Select 'Current' or 'New' in the 'Update Level' field. (Required)
-
Select 'Received' or 'Effective' in the 'Update On' field. (Required)
-
Enter the remaining fields within the 'Setup Update Information' frame, as necessary.
-
Select an Update Level for at least one price level in the 'Update Level' field. (Required)
-
Select the desired method to update the price in the 'Change By' field.
-
Enter the amount in the 'Price' field. Prices are increased unless a minus (-) is entered before the percentage or amount.
-
Click 'Upd'. Information is saved.
Procedure to Edit Existing Setup
To edit an existing setup, follow the steps below:
-
From the Menu, select Inventory, Part Utility, Price Updating, Price Update Setup. The Internet Price Update screen displays.
-
Click 'Edit Existing Setup'. The 'Find/Edit Price Update ID' window displays with a list of lines that have already been set up.
-
Scroll through the list or enter search criteria below the blue headings.
-
Double-click on the desired line to add. The header changes to 'Edit Existing Rule' and the screen populates automatically.
-
Make changes to the appropriate fields.
-
Click 'Upd'. Information is saved.