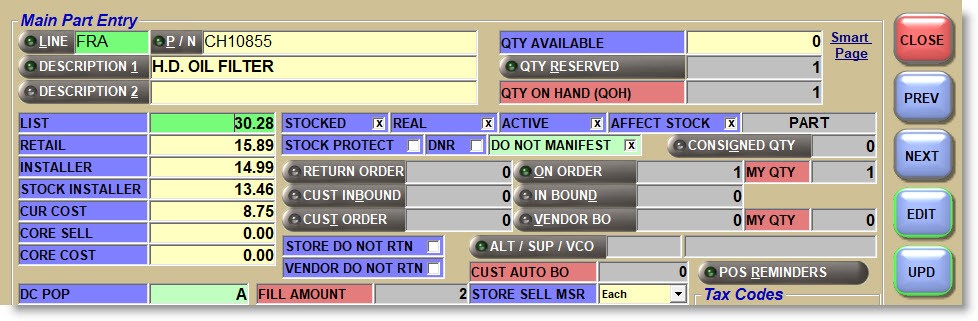
Main Part Entry
The MAIN PART ENTRY screen is used to add and maintain all inventoried part numbers by manufacturer Line Code that are used by the Invoicing, Purchasing, and Reporting modules.
Menu Path: Inventory, Part Entry, Main Part Entry, MAIN PART ENTRY screen
Stock Quantities
Price Levels
Reporting Filters
Stocking Levels
Purchasing Setups
Part Filters
Invoicing Setups
Zone / Bin
Like most PartsWatch maintenance screens, the 'EDIT' and 'UPD' (update) buttons must be used when changes are made. 'EDIT' must be "off" when entering a part number and "on" when changing the part settings. 'UPD' must be clicked to save the changes.
Therefore, to edit parts using the ‘F’ hot keys:
- (EDIT off) Enter a part number and press F5 (EDIT on)
- Make changes and press F9 (changes saved)
- Press F5 (EDIT off) and find another part
- Press F5 (EDIT on) and make changes
- Press F9 (changes saved)
If changes are not saved, pressing the F5 key, clicking the 'EDIT' button or closing the screen, a prompt opens to save the changes.

Enter 1-3 alphanumeric characters that represent a valid Line Code in PartsWatch.
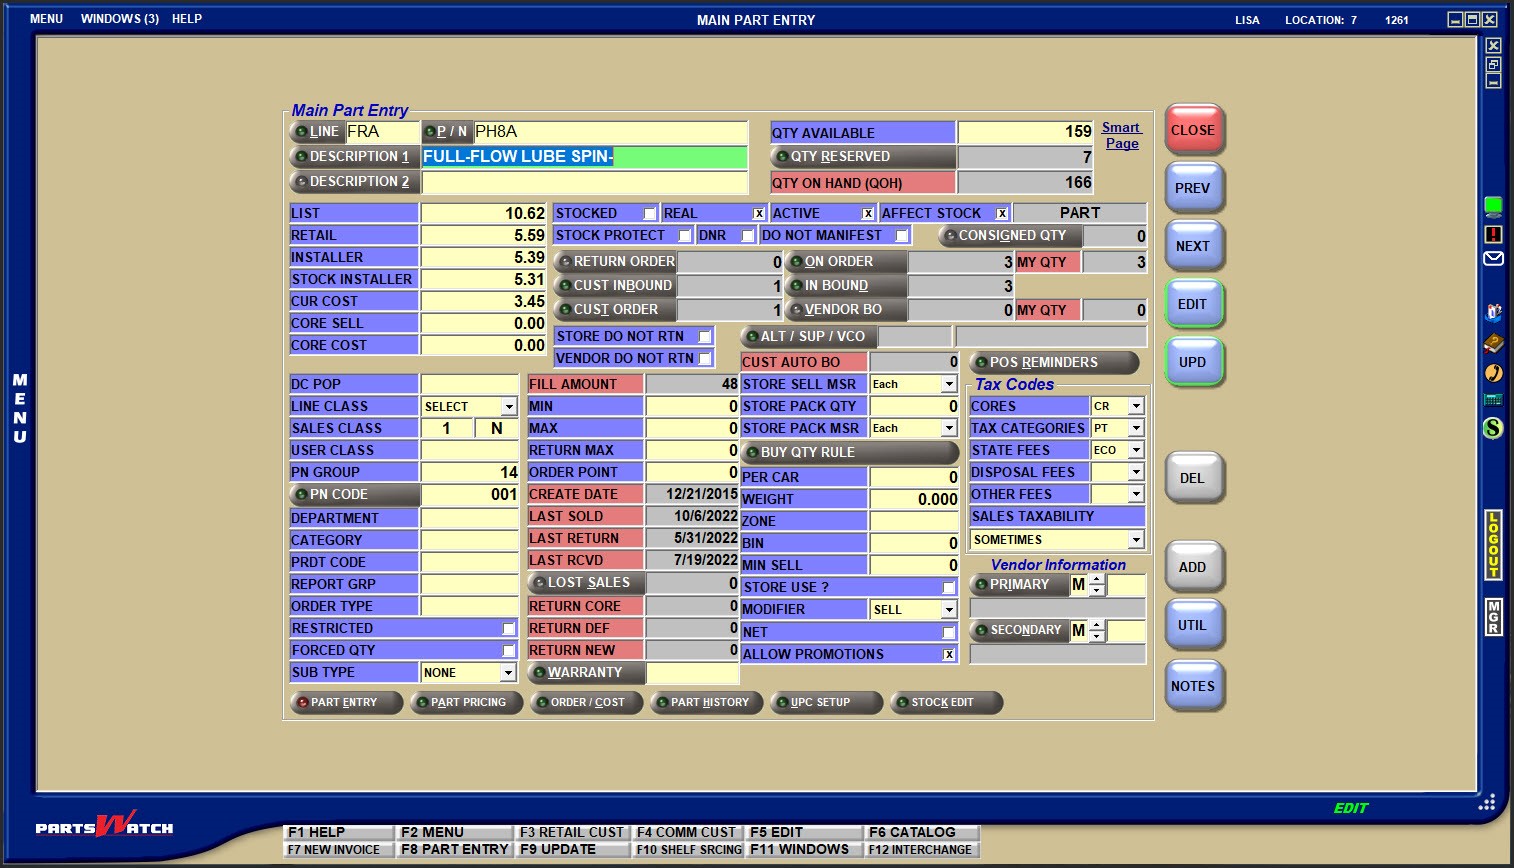
- If the value entered is not a valid Line Code, pressing the 'Enter' key moves the cursor to the 'P/N', however without a part number, the system opens a pop-up stating that the line code is not found.
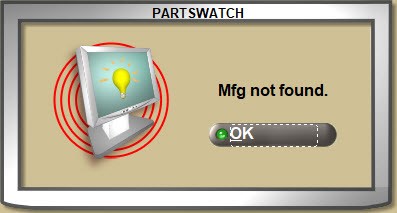
- Click the 'LINE' button to open the 'BROWSE LINE CODES' pop-up to search for a Line Code. Type-ahead can be used to find a Line Code by 'LINE CODE', 'LINE NAME', or line 'DESCRIPTION'.
With a 'LINE' displayed:
- Press the Enter key at the 'P/N' field and the first part number from the part table in the Line Code 'SORT CODE' order displays with the part field attributes.
- Enter a valid Part Number in the 'P/N' field and press the Enter key to display the part field attributes for that part.
- The system checks for "stripped" part numbers where letters (A through Z) and numbers (0 through 9) are valid and all other characters are ignored for a part number search
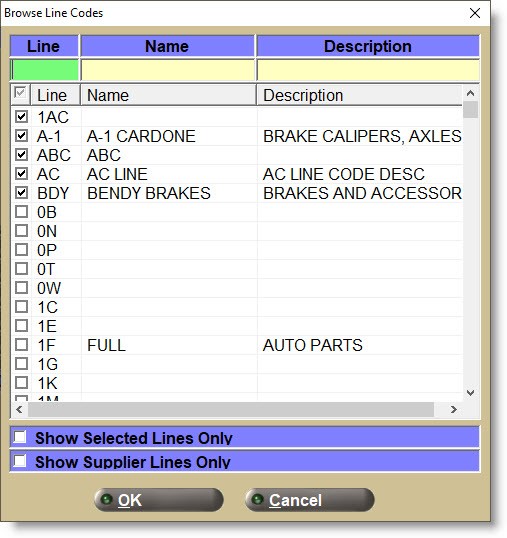
- If the part number is not found, the system prompts to add it.
Answer 'Yes' and the part is added.
Answer 'No' and the 'P/N' field clears.
Without a 'LINE' displayed:
- Enter a Part Number and if a single match is found, it will display.
- If more than a single match is found, the 'Available Matches' window opens with all Line Codes that contain the entered part number. Select the correct one to display that Line and Part Number.
- If a match is not found, the cursor remains in the 'P/N' field waiting for valid input.
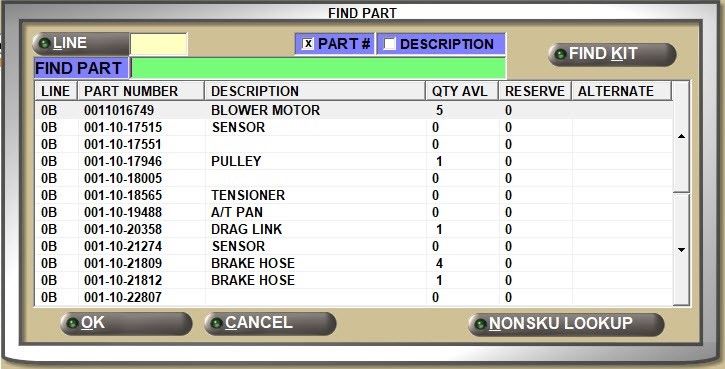
Click the 'P/N' button to open the 'FIND PART' window to search for a Part Number with or without a Line Code entered in the 'LINE' field.
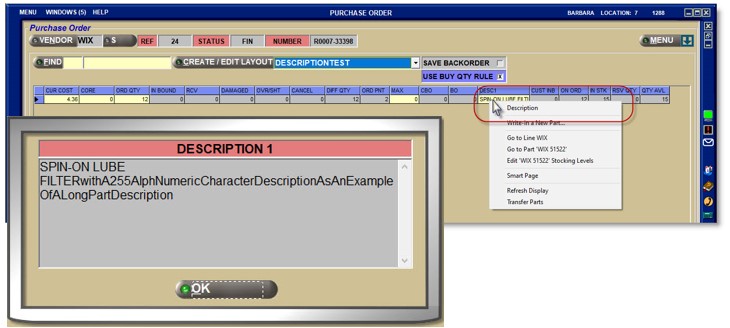
Enter up to 255 alpha numeric and special characters in a mixed case font that describe the part in focus.
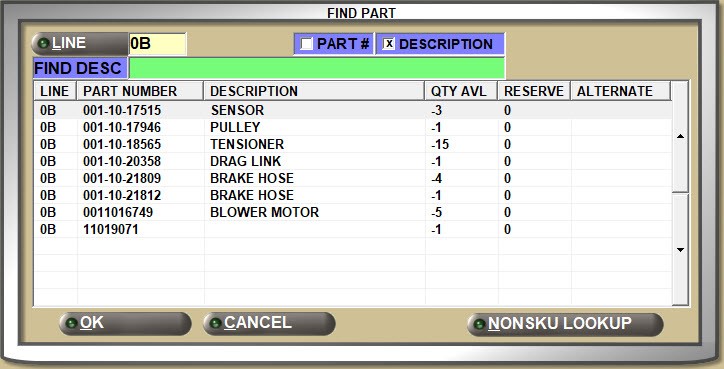
Click the 'DESCRIPTION 1' button open the 'FIND PART' window to search for parts by description. Focus is on the 'FIND DESC' field in the window.
- For descriptions longer than the field length, click the field to display the end of the description. Press the 'Home' key to return to the start of the description.
- Press the left and right arrow keys to move one character to the left or right to see additional characters in the description.
- Mouse hover-over tool tips display up to the full 255-character description or depending on the field or column, up to an 80-character description.

- Where applicable in grids, right-click and select 'DESCRIPTION' to display a pop-up. Expand the 'Description' column width by double-clicking between the grid column headers.
The following functionality supports a 200-character 'DESCRIPTION':
- Inventory Feed
- Data File Import Utility (DFIU)
- RF Gun - Part Inquiry
- Cloud - VPS
Enter up to 255 alphanumeric and special characters in a mixed case font that describe the part in focus with an additional description that, depending on the process, can be used with or instead of DESCRIPTION 1.
The 'DESCRIPTION 2' button is not enabled for a search and instead, click the 'DESCRIPTION 1' button to locate a part from the 'FIND PART' window by description.
Refer to 'DESCRIPTION 1' for additional information.
The 'LINE TYPE' field does not have a label. Instead, the field displays 'PARTS', 'FREIGHT', 'LABOR', or 'GIFT CARDS' depending on the Line Code 'TYPE' setting.
Stock Quantities
Displays the number of units that are on the shelf and available for sales for the part. The field is updated by Point-of-Sale and Purchasing, as well as being manually editable.
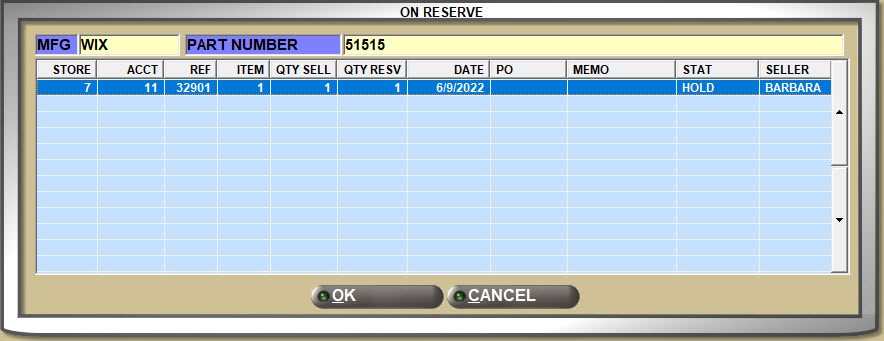
Displays the number of units that are "on reserve" on open sales orders for the part, for information only.
If a quantity is on reserve, click the 'QTY RESERVED' button to open the 'ON RESERVE' window with the accounts and sales order reference numbers that the part in focus is on.
Displays the total number of parts currently in stock whether on the shelf or on an open sales order.
('QTY AVAILABLE' + 'QTY RESERVED').
Determines whether or not sales and returns affect the 'QTY AVAILABLE'/'RESERVE QTY' fields.
Checked: Stock quantity is decreased by sales and increased by returns at Point-of-Sale. (Default)
Unchecked: Stock quantity is not affected by sales and returns at Point-of-Sale.
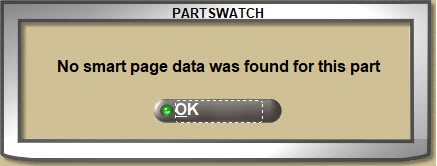
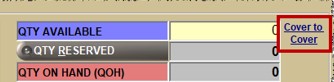
Click the 'Smart Page' link to open a browser with the manufacturer part information.
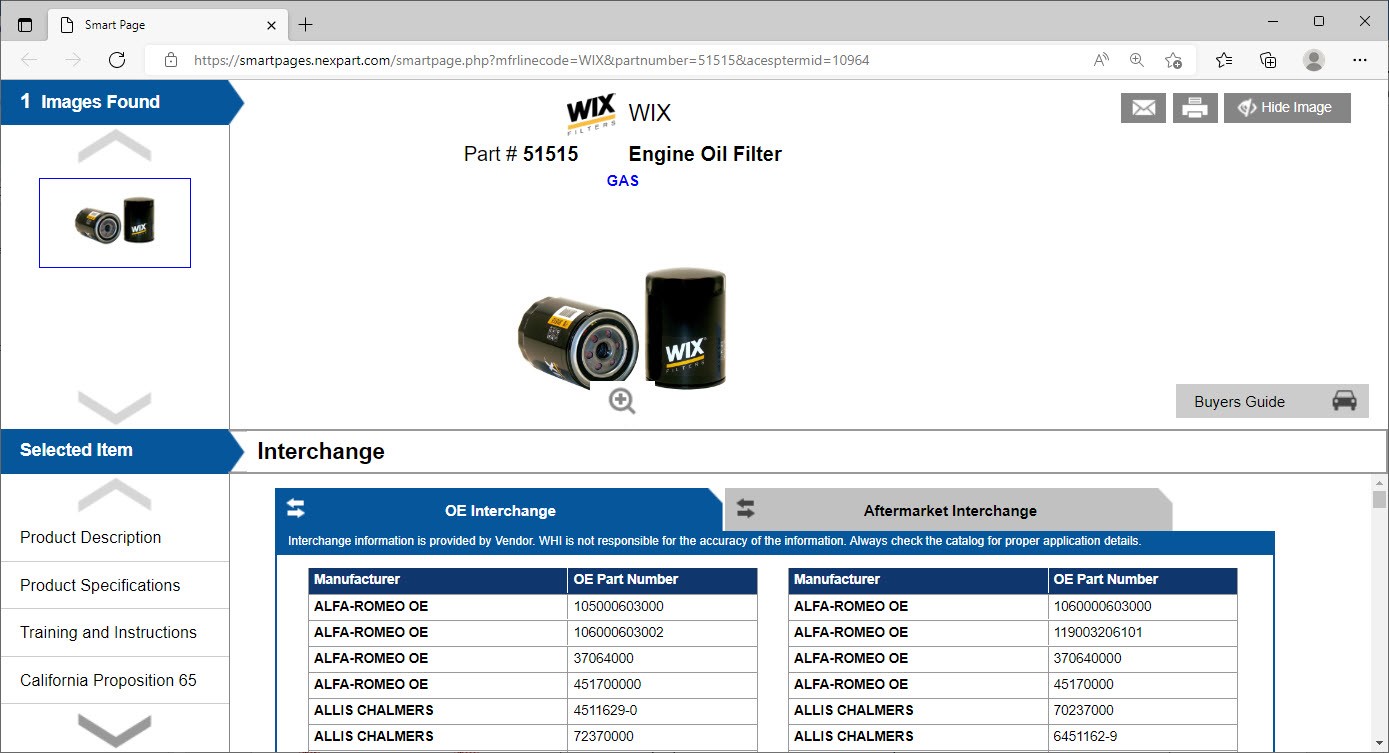
If a link is not found, a pop0up opens stating the page is not found.
Additionally, if using the Epicor catalog, and Cover to Cover information is available for the entered 'LINE' and 'P/N', the Cover to Cover link displays instead of Smart Page.
If a part link is set up on the PART ATTRIBUTES ENTRY screen in the 'Part Link URL' field, the clickable URL will display on the MAIN PART ENTRY screen.
Price Levels
Up to ‘7’ price levels display with the field names defined in the FIELD NAME SETUP screen.
If the 'AUDIT PART COST EDITS' control is enabled, edits to the price levels are tracked and can be reported from the 'PART LEDGER COST EDITS REPORT'.
Reporting Filters
Used primarily to include or exclude parts from inventory report output. Even though they are used as report filters and can mean different things to the store, suggested use includes:
"Stocked" parts are inventoried, ordered, and kept on the shelf.
"Real" parts are actual, physical parts as opposed to "parts" used for other things, such as coupons.
"Active" parts can be defined however needed. For example, "active" parts might have a min/max and stock quantity while "inactive" parts do not.
Stocking Levels
Determines whether or not 'MIN', 'MAX', and/or 'ORDER POINT' can be updated when running the 'SET MIN MAX ORDER POINT' utility.
- Checked: Running the 'SET MIN MAX ORDER POINT' utility will NOT evaluate and update parts that are stock protected, unless the 'OVERRIDE STOCK PROTECTION' checkbox is updated to checked when performing 'SET MIN MAX ORDER POINT'.
- Unchecked: Running the 'SET MIN MAX ORDER POINT' utility will evaluate and update parts based on the selections made at 'SET MIN MAX ORDER POINT'.
Enter the minimum number of units for a part to keep stocked on the shelf at any time and used for purchase order creation.
Enter the maximum number of units for a part to keep stocked on the shelf at any time and used for purchase order creation.
RETURN MAX
Used to safeguard that slow-moving parts are not kept in stock if over-ordered for any reason. Enter the uppermost "ceiling" amount that must be kept in the 'QTY AVAILABLE' field before any quantities can be returned in an 'OVERSTOCK RETURNS' Purchase Order.

ORDER POINT
Enter the number of units used as the "Order Point" for purchase order creation. Can be used with or instead of the 'MIN' and 'MAX' stocking levels.
Purchasing Setups
Determines whether or not the part in focus should be considered during purchase order creation.
- Checked: The part will not be considered for reorder during purchase order creation.
- Unchecked: The part is considered for reorder during purchase order creation.
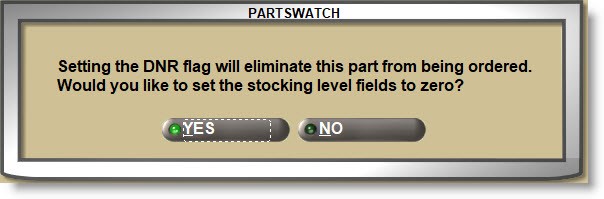
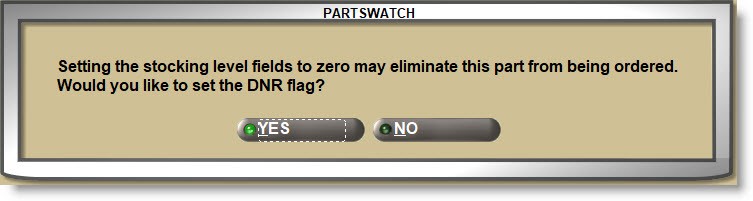
Note: If a stocking level ('MIN'/'MAX'/'ORDER POINT') fields are greater than ‘0’, checking the 'DNR' flag and clicking the 'UPD' button opens a prompt asking if the stocking level fields should be set to ‘0’.
Answer ‘YES’ and the 'MIN'/'MAX'/'ORDER POINT' fields are set to ‘0’.
Answer ‘NO’ and the stocking level field values do not change.
Regardless of the value of the stocking level ('MIN'/'MAX'/'ORDER POINT') fields, unchecking the 'DNR' flag opens a prompt with a reminder to make sure the stocking levels are correct so that the part will be considered for reorder.
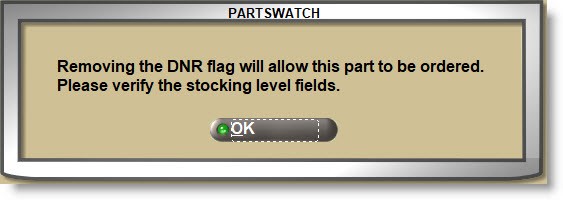
If the 'DNR' flag is unchecked and the value in the stocking level ('MIN'/'MAX'/'ORDER POINT') fields is cleared to ‘0’, the system prompts to asking if the 'DNR' flag should be checked so that the part will not be reordered.
Answer ‘YES’ and the 'DNR' flag is automatically checked.
Answer ‘NO’ and the 'DNR' flag remains unchecked.
If the 'DNR' flag is checked and the value of the stocking level ('MIN'/'MAX'/'ORDER POINT') fields is edited to a value greater than ‘0’, the system prompts to uncheck the 'DNR' flag so that the part will be considered for reorder.
Answer ‘YES’ and the 'DNR' flag is automatically unchecked.
Answer ‘NO’ and the 'DNR' flag remains checked.

Determines whether or not a part returned at Point-of-Sale is automatically added to a manifest to be returned to the vendor.
- Checked: The part will not be added to a return manifest.
- Unchecked: The part will be added to a return manifest.
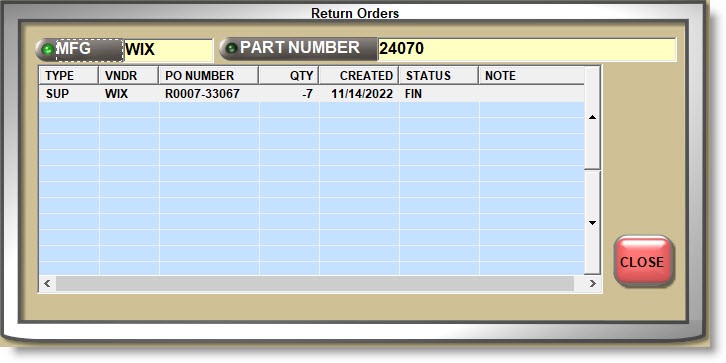
Used to “allocate” stock on Return Orders so that, if a subsequent Return Order is created before the first order is transferred out of stock, the parts will not come up again on regular overstock returns.
Return order quantities are calculated by evaluating the stocking level ('MIN', 'MAX', or 'ORDER POINT', depending on which of these methods was selected when creating the return order) and comparing to the 'QTY AVAILABLE'. Any 'QTY AVAILABLE' greater than the stocking level is considered “overstock”. If a pack quantity is established for the part, the result is then rounded down to the nearest pack to determine the final return quantity.
The 'RETURN ORDER' quantity field is incremented when a return order is finalized and if a finalized return order quantity for the part in focus is edited, the 'RETURN ORDER' field quantity is increased or decreased accordingly.
If a finalized return order is deleted, the 'RETURN ORDER' quantity is decreased by the return order quantity from the purchase order.
When creating a return order, the 'RETURN ORDER' quantity reduces the order quantity calculated for that return order before the return order quantity is rounded down to pack quantity.
Click the 'RETURN ORDER' button to display a window with all POs regardless of 'STATUS'. The list includes non-finalized POs, even though the 'RETURN ORDER' button is not active unless at least one Return Order has been finalized.
The 'AUTO FINALIZE TIMED ORDER QUEUE RETURN ORDERS' setting is used to determine whether or not return orders are finalized when created and allocated to the 'RETURN ORDER' field.
- Checked: Return Orders created through the TIMED ORDER QUEUE are finalized and allocated to the 'RETURN ORDER' quantity field.
- Unchecked: Return Orders are not finalized when created through the TIMED ORDER QUEUE, and are not allocated to the 'RETURN ORDER' quantity field until the return order is manually finalized.
The 'IGNORE RETURN ORDER VALUES' purchase order create setting determines whether or not the return order ignores the 'RETURN ORDER' quantity field or not.
- Checked: The current return order ignores the 'RETURN ORDER' quantity field. Note that this could result in the current return order showing the same parts that are on existing return orders.
- Unchecked: The current return order will take into consideration the 'RETURN ORDER' quantity field. The return order quantity for the current return order will be reduced by the already-existing return order quantity.
Displays the total quantity of the part in focus that is currently on open customer sourced Purchase Orders for information only.
Click the 'CUST ORDER' button to open the 'ON ORDER / BACK ORDER / INBOUND' pop-up displaying customer sourced order information per PO.
ON ORDER / MY QTY
Displays the total quantity of the part in focus that is currently on open stocked Purchase Orders for information only.
Click the 'ON ORDER' button to open the 'ON ORDER / BACK ORDER / INBOUND' pop-up displaying stocked order information per PO.
For Multi-Store Distributed purchase orders, the 'MY QTY' field displays the quantity of the part on order for the current store and is for information only. For example, the quantity in the 'ON ORDER' field for the part on a Multi-Store Distributed PO is 25 units. The current store’s order quantity is 20 units and is displayed in the 'MY QTY' field for information only. Therefore, it can be surmised that 5 units are ordered for all other stores participating in the order.
If the order is a single store PO, the value of 'MY QTY' is always equal to the value of the 'ON ORDER' quantity.
CUST INBOUND
Displays the total quantity of the part in focus on customer sourced orders that is currently inbound on ASNs for information only.
Click the 'CUST INBOUND' button to open the 'ON ORDER / BACK ORDER / INBOUND' pop-up displaying customer sourced order information that is inbound on ASNs.
IN BOUND
Displays the quantity of the part in focus that is currently inbound on an ASN for stocked parts and is for information only.
Click the 'ON ORDER' button to open the 'ON ORDER / BACK ORDER / INBOUND' pop-up displaying
'IN BOUND' information.
'VENDOR BO / MY QTY'
The VENDOR BO (backorder) field displays the quantity on back order vendor purchase orders for information only.
For Multi-Store Distributed purchase orders, the 'MY QTY' field displays the quantity of the part in focus on vendor back order for the current store. For example, if 25 units were ordered for the part on a Multi-Store Distributed PO, 20 for the current store and 5 for all other stores on the PO, and a partial order of 10 units is received. If 5 units satisfy the other stores and 5 units are for the current store, and the PO goes on back order, the VENDOR BO displays the backorder quantity of 15 and the 'MY QTY' value is also 15, so total units on back order are all for the current store.
If the order is a single store PO, the value of 'MY QTY' is always equal to the value of the 'VENDOR BO' quantity.
Click the 'VENDOR BO' button to open the 'ON ORDER / BACK ORDER / INBOUND' pop-up displaying stocked order information per PO.
'ON ORDER / BACKORDER / INBOUND' Pop-up
If 'CUST ORDER', 'ON ORDER', or 'VENDOR BO' is clicked, the 'ON ORDER / BACK ORDER / INBOUND' pop-up opens with the following information per order:
- 'PO NUMBER'
- 'VNDR' (vendor)
- 'QTY' (quantity ordered)
- 'PO CREATE' (date)
- 'DUE' (date)
- 'STATUS' of the order
Statuses are:
- 'NEW' – Purchase order is created but not finalized or processed in any manner.
- 'ORD' – (Ordered) – Order was transmitted.
- 'ASN' – Advanced Shipping Notification was received.
- 'OBK' – (Back Order) – Order was partially received. A 2-digit number indicates the number of times the order was received.
- 'FIN' – (Finalized) – Purchase order is finalized. When a PO is finalized, the on order value in the part file is updated and any items whose order quantity was zero are removed from the order.
- 'WIP' – (Work-In-Progress) – Purchase order is created and some editing was done.
- 'INVOICE' number
- 'ACCOUNT' number
- 'NOTE' (vendor note)
- 'MY QTY' (Multi-Store Distributed PO quantity ordered for the current store)
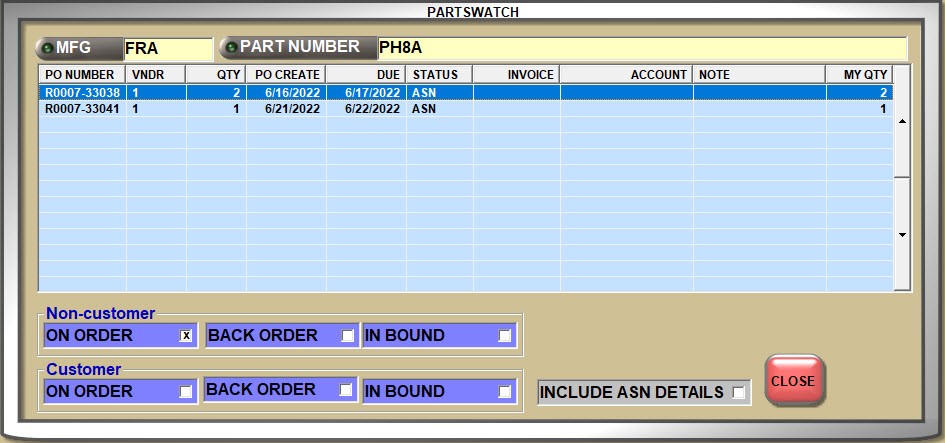
The 'INCLUDE ASN DETAILS' flag is not available.
With the window open, click 'Non-customer'/'Customer' flags to display applicable information.
If 'INBOUND' or 'CUST INBOUND' is clicked, the 'ON ORDER / BACK ORDER / INBOUND' pop-up displays with the following information per order:
- 'PO NUMBER'
- 'ASN NUMBER'
- 'ASN CREATE' (date)
- 'VNDR' (vendor)
- 'QTY' (quantity ordered)
- 'PO CREATE' (date)
- 'DUE' (date)
- 'STATUS' of the order
Statuses are:
- 'NEW' – Purchase order is created but not finalized or processed in any manner.
- 'ORD' – (Ordered) – Order was transmitted.
- 'ASN' – Advanced Shipping Notification was received.
- 'OBK' – (Back Order) – Order was partially received. A 2-digit number indicates the number of times the order was received.
- 'FIN' – (Finalized) – Purchase order is finalized. When a PO is finalized, the on order value in the part file is updated and any items whose order quantity was zero are removed from the order.
- 'WIP' – (Work In Progress) – Purchase order is created and some editing was done.
- 'INVOICE' number
- 'ACCOUNT' number
- 'NOTE' (vendor note)

'INCLUDE ASN DETAILS'
If 'INBOUND' is checked, the 'INCLUDE ASN DETAILS' field is enabled to display ASN information.
- Checked: The grid columns change to display ASN information.
- Unchecked: The grid does not display ASN information.
Displays the number of customer back orders for the part in focus from a sourced invoice, when 'BACK ORDER FILLING' functionality is enabled.
If the 'TRACK DAY FILL' control is enabled, each time the part is sold at Point-of-Sale, the system tracks the sell quantity to the 'FILL AMOUNT' field. When a Replenishment Order is created, the quantity is cleared and any new sales are then recorded for the next order.
The Replenishment Order method is unique in that the calculated order quantity is not reduced by other orders that are in an 'On Order' status, or by current stock quantities.
Click the 'BUY QUANTITY RULE' button to open a window used to set up the ‘rules’ needed for vendors that force purchases in pack quantities.
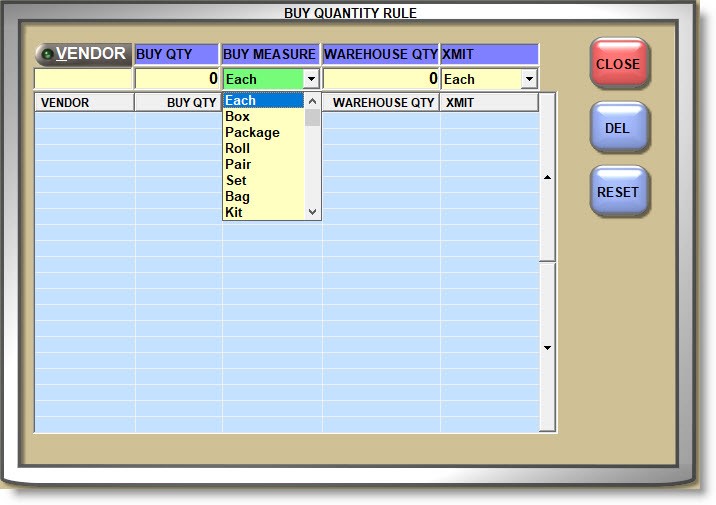
Set up vendor-specific Buy Quantity Rules by selecting a 'VENDOR' or a single "universal" Buy Quantity Rule that applies to all vendors by leaving the 'VENDOR' field blank.
A vendor-specific Buy Quantity Rule overrides a universal Buy Quantity Rule, if one exists. If a Buy Quantity Rule is not set up for the specific vendor that the order is being created for, it defaults to the Buy Quantity Rules that are set up for the blank vendor code, if any.
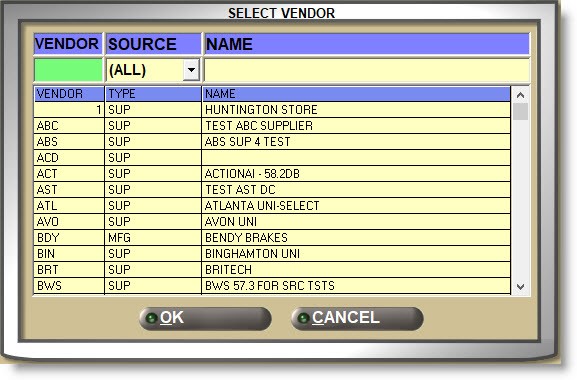
Enter a 'VENDOR', or click the 'VENDOR' button to open the 'SELECT VENDOR' window to search for a Supplier or a Line Code that has the 'USE AS VENDOR' flag checked
Enter the quantity in the 'BUY QTY' (quantity) field that the store sells the part in and select the container or measure in the 'BUY MEASURE' field that the part in focus is purchased as.
For example, the store may store a quantity of ‘1’ ‘EACH’.
Enter the quantity that must be purchased per pack in the stores 'BUY QTY' (quantity) field.
Select the pack measure that must be purchased in the 'BUY MEASURE' field.
Enter the quantity in the 'WAREHOUSE QTY' (quantity) field that the warehouse sells the part in and select the container or measure in the XMIT field that the part in focus is sold as.
For example, the warehouse may sell a quantity of ‘1’ ‘BOX’ (of 4 units).
A single Buy Quantity Rule can be created per vendor per part.
The ASN process uses the 'WAREHOUSE QTY' in Warehouse XMIT to extrapolate the actual quantity to apply to the 'In Bound' quantity. For example: the store sells an item in inches but must be purchased in feet. The store 'BUY QTY' is set to’ 3000’ inches in a 'Roll'. The 'WAREHOUSE QTY' is set to ‘12’ and the XMIT Qty is set to ‘Roll’. The transmitted quantity is ‘250’.
(3000/12 = 250)
If there are no rules set up for the specific vendor or a blank vendor code, '1' for 'BUY QTY' and 'WHSE QTY' and 'EA' for 'BUY MSR' and 'XMIT MSR' display.
Enter the weight of the part in focus that is used by the Order Create process. If a value is entered in the ‘Min Weight Threshold’ setup under the 'Options' tab in the ORDER CREATE screen, the system will use the value of this field to determine the total weight of the order.
The 'MINIMUM WEIGHT' field on the PURCHASE ORDER (PO DETAIL) screen displays the Min Weight Threshold as entered at the time of order creation and if the total order weight is under the threshold, will display the 'MINIMUM WEIGHT' field in a bright orange. This allows the order quantities to be edited up to the threshold if needed.
Allows entry of up to 6 digits with 3 decimal positions (999999.999).

Used in conjunction with the 'VENDOR DO NOT RTN' flag. Determines whether or not the part in focus is considered for an Overstock Return or a Stock Adjustment Return to the vendor.
- Checked: Even if the Vendor allows the part to be returned, the store does not want to return it to the vendor. The part is not considered for return.
- Unchecked: Depending on the 'VENDOR DO NOT RTN' setting, the part may be considered for return.
VENDOR DO NOT RTN
Used in conjunction with the 'STORE DO NOT RTN' flag. Determines whether or not the part in focus is considered for an Overstock Return or a Stock Adjustment Return to the vendor.
- Checked: Depending on the 'STORE DO NOT RTN' setting, the part may be considered for return.
- Unchecked: The part is considered for return.
Part Filters
There are eleven part filters that can be optionally used to "group" parts together in a Line or across Lines for purchasing and reporting.
Unless otherwise stated, all filters are optional and user-defined.
When setting up part filters, first determine how they will be used:
The parts considered for purchasing order creation can be filtered by:
- Order Type
- PN Group
- Department
- PN Code
- Category
- Sales Class
Depending on the report, part filters are also available to filter report output. For example, all eleven filters are available for the INVENTORY INFORMATION REPORTS, INVENTORY COUNT REPORT, and INVENTORY COST REPORT.
- Distribution Center (DC) Popularity (POP) Code.
- Up to 5 alphanumeric and special characters.
- Used for inventory reporting.
- Manufacturers Line Class Code.
- 1 alpha or numeric character.
- Only the LINE CLASS Codes set up per line code are available for selection.
- Sales Popularity Code.
- Used to rank and track the popularity of the parts.
- 1 alpha or numeric character in each of the 2 field positions.
- User-defined.
- 1 alphanumeric or special character.
- Part Number Group Code.
- Up to 10 alphanumeric, user-defined characters.
- Part Number Code.
- Up to 3 alphanumeric characters.
- Only the 'P/N CODES' set up per line code are available for selection.
- P/N Codes are used as "sublines" to categorize parts into groups. For example, oil filters can be grouped by conventional, light-duty, heavy-duty, racing, etc.
P/N CODE SETUP
P/N Codes must be set up on the P/N CODE SETUP screen in order to be available to the 'P/N CODE' part filter.
Click here to learn more about setting up P/N CODES.
- Areas or types that parts might be categorized as.
- Can be used in conjunction with 'CATEGORY' to identify specific part types or areas of use. For example, a Department might be ‘HWD’ for hardware.
- Up to 3 alphanumeric and special characters.
- Divisions that parts might be divided into.
- Can be used in conjunction with 'DEPARTMENT' to identify specific types of parts within the areas. For example, ‘NUT’ for nuts or ‘BLT’ for bolts might be categories within the ‘HWD’ hardware department.
- Up to 3 alphanumeric and special characters.
- Product Code.
- Up to 3 alphanumeric and special characters.
- Report Group code.
- Up to 9 alphanumeric and special characters.
- Generally used for purchasing.
- Up to 10 alphanumeric characters.
Invoicing Setups
Even though all of the part attributes are used for invoicing and purchasing, the following setups are used primarily by invoicing.
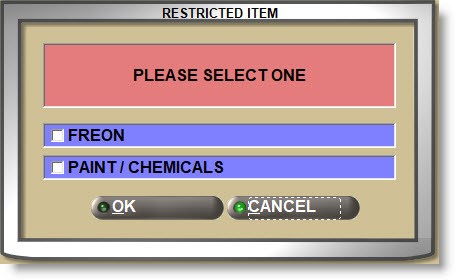
Determines whether or not restrictions apply to parts sold at Point-of-Sale as Paint/Chemicals or Freon.
- Checked: When a restricted part is sold at Point-of-Sale, a pop-up displays so you can select the type of restriction:
- 'FREON'
- 'PAINT/CHEMICALS'
If 'FREON' is selected, a pop-up displays at Point-of-Sale. Enter the certification number and the system allows you to click 'OK' to save the type and certification number for that customer.
Check the correct type of certification, enter the 'CERTIFICATION #' and click 'OK' to continue.
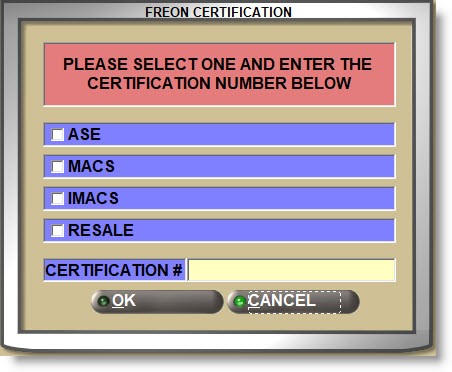
The certification number displays below the part number in the invoice body. The certification number is not validated and does not print on the invoice.
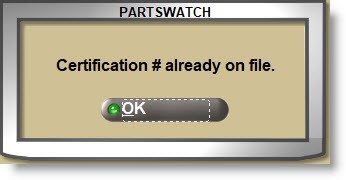
Once entered, the 'CERTIFICATION #' is saved for the customer. If the 'FREON' part is purchased again, the system will prompt that the certification number is on file.
If 'PAINT/CHEMICALS' is selected, a pop-up displays to 'PLEASE ENTER DRIVER'S LICENSE # OR STATE ID #' and to 'ENTER BIRTH DATE' for the customer.

Click 'OK' and the part displays in the invoice body with the driver’s license number and date-of-birth display below the part.
Restricted items cannot be sold without completing the information in the pop-up.
The item is moved to the invoice body with the certification type and number displayed as a note below the item.
ding text here
- Unchecked: The part is not restricted at Point-of-Sale.
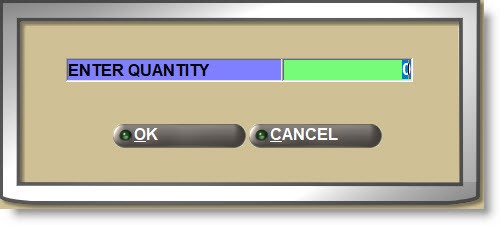
Determines whether or not the sell quantity must be entered in order to sell the part.
Checked: When the part is entered on the sell line and the 'Enter' key is pressed, a prompt opens to enter the quantity to be sold or returned, forcing the counterperson to validate the number of units.
For example, the box may have less than the intended amount or the item may have multiple bar codes, one for 'EACH' pricing and one for the 'BOX'.
Select the type of part to be warrantied:
- 'NONE' (all parts that are not tires or batteries)
- 'TIRE' (tires)
- 'BATT' (battery)
If the P/N entered is set up as a:
-
'KIT', then the 'SUB TYPE' field will default to ‘KIT’ and be grayed out.
-
'BOM', then the 'SUB TYPE' field will default to ‘BOM’ and be grayed out.
Used in conjunction with the 'WARRANTY' setup field. After selecting the 'SUB TYPE', click the 'WARRANTY' button to complete setup.
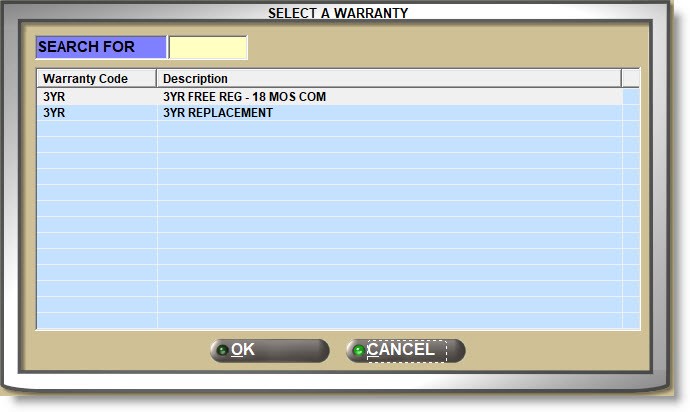
Displays the warranty terms of the part. Click the button to display the 'ACTIVE WARRANTY TERMS' window to search for a specific warranty term.
After selecting the 'SUB TYPE', click the 'WARRANTY' button and the 'ACTIVE WARRANTY TERMS' pop-up opens to select the warranty to apply to the part in focus.
CREATE DATE
Displays the date that the part was added to the part table.
LAST SOLD
Displays the date that the part was last sold t Point-of-Sale.
LAST RETURN
Displays the date that the part was last returned as a resalable return. Defective returns do not update this field.
LAST RCVD (received)
Displays the date that the part was last received from a purchase order.
LOST SALES
Displays the number of lost sales tracked from Point-of-Sale for the part.
The field is cleared during the End-of-Month process.
RETURN CORE
Displays the number of core returns tracked from Point-of-Sale for the part.
RETURN DEF
Displays the number of defective returns tracked from Point-of-Sale for the part.
RETURN NEW
Displays the number of new resalable returns tracked from Point-of-Sale for the part.
If a 'SUPERSEDED' part association is set up on the PART ASSOCIATION SETUP screen, the supersede Line and Part Number will display in the field before any other part associations.
If an alternate is set up instead, it will display in the field.
Click the 'ALT / SUP / VCO' button to open the PART ASSOCIATION SETUP screen for the part in focus to view the current store’s 'ALTERNATE', 'ASSOCIATION', 'SUBSTITUTION' and/or 'SUPERSEDED' setups.
If the part is displayed from the store’s nonSKU virtual inventory table part associations do not display.
Click the drop-down and select the pack measure the part is normally sold in. For example, ‘EACH’ part unit may be sold, or a ‘BOX’ may be sold. This field is no longer used by Point-of-Sale and can be used for information only.
STORE PACK QTY
Enter the number of units sold in a ‘pack’. For example, entering ‘1’ in the 'SELL' field may represent ‘1’ unit or ‘1’ box of ‘4’ units. This field is no longer used by Point-of-Sale and can be used for information only.
STORE PACK MSR
Click the drop-down and select the pack measure the part is normally stored in. This field is no longer used by Point-of-Sale and can be used for information only.
PER CAR
Enter the quantity that the part is sold in. For example, 4 spark plugs on a 4-cylinder car. If the 'POS DEFAULT SELL QTY' is set to ‘PER CAR’, then the value of this field will display in the SELL field at Point-of-Sale.
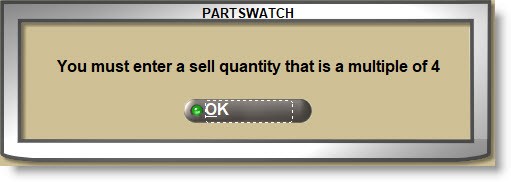
MIN SELL (minimum sell)
Enter the minimum quantity of the part in focus that must be sold at Point-of-Sale. The system forces the quantity to be sold to the 'MIN SELL' quantity in order to continue with the sale. If a value other than the 'MIN SELL' is entered in the 'SELL' field and the 'Enter' key pressed, the system prompts to enter the correct sell quantity.
Allows entry of 0 – 65535.
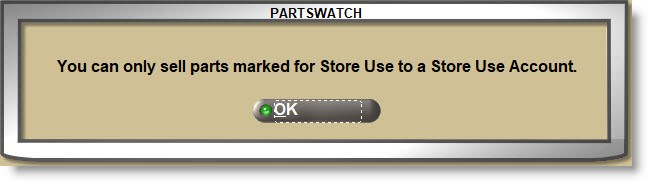
STORE USE
Determines whether or not the part in focus can be ‘sold’ to accounts with the ACCOUNT TYPE of ‘STORE USE’ in order to be used in the store.
- Checked: The part can be ‘sold’ to a 'STORE USE' account.
- Unchecked: The part cannot be sold to a 'STORE USE' account. When entered on sell line and the 'Enter' key pressed at the 'SELL' field, the system prompts that the part cannot be sold.
Click ‘OK’, the part clears and the cursor positions to enter the next item.
Select the default modifier that will be used when the part is entered on the sell line at Point-of-Sale. The modifier can be changed at the time of the sale.
- 'SELL' (Default)
- 'BUYOUT'
- CLEARANCE'
- 'DROP SHIP'
- 'FORWARD'
- 'PURCHASE'
- 'TRANSFER'
NET
Determines whether or not the part in focus is eligible for an overall discount at the time of invoicing.
- Checked: If an overall discount is applied to the invoice, the part will not be included in the invoice subtotal used when the overall discount is calculated. Generally, parts that have been given large discounts already should not be included in the overall discount calculation in order to prevent adversely impacting the GP%.
- Unchecked: The part will be included when an overall discount is applied to the invoice subtotal.
ALLOW PROMOTIONS
Determines whether or not the part is available for promotional pricing.
- Checked: The part is sold at promotional pricing.
- Unchecked: The part is not sold at promotional pricing.
When unchecked, the part is not available for promotional pricing.
CONSIGNED QTY
Displays the quantity of the part in focus that is on a customer consignment.
Click the 'CONSIGNED QTY' button to open a window that displays the customers that the part is on a consignment for. Enter a 'LINE' and 'PART NUMBER' in the window to display consigned quantities for that part.
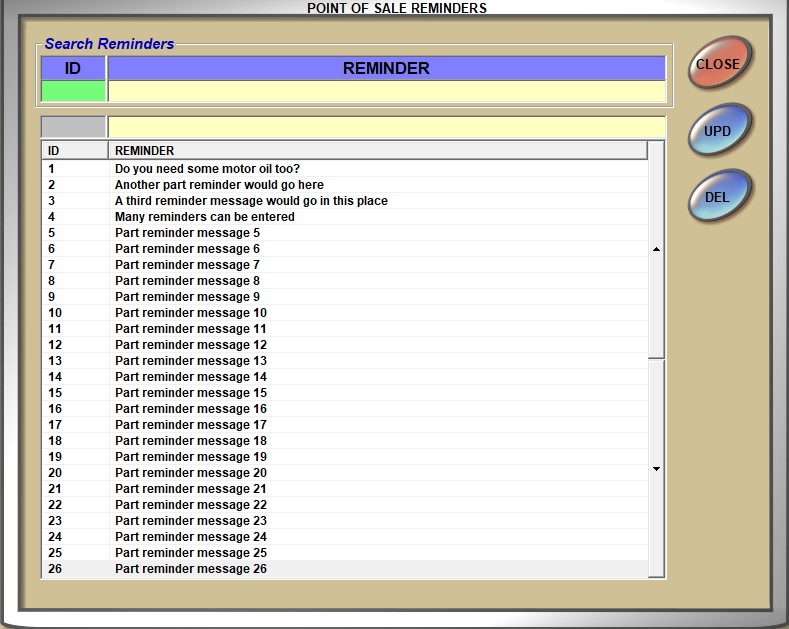
POS REMINDERS
Reminders are messages that display at Point-of-Sale that are used to prompt the counterperson to ask certain questions or offer related items to go with the part on the sell line. For example, if the customer is buying an oil filter, it might be a good idea to remind them to get oil while they’re there.
Once 'POS REMINDERS' are set up, click the 'POS REMINDERS' button and check each reminder per part. Use type-ahead in the fields above the grid to filter the reminders displayed. Click ‘OK’ to close the window.
Zone / Bin
- Enter a location used to divide the parts into different areas for quick picking and is used primarily in a warehouse environment.
- If the 'ZONE/BIN ON INVOICE SCREEN' setting is enabled, the 'ZONE/BIN' will display in the 'ZONE/BIN' column in the invoice grid.
- Allows entry of up to three alphanumeric and special characters.
- Additional Zone/Bin locations can optionally be set up on the ZONE / BIN SETUP screen.
- Enter a further breakdown of the location of parts within the zone to identify the shelf, tote, etc. where the physical part is stored.
- If the 'ZONE/BIN ON INVOICE SCREEN' setting is enabled, the 'ZONE/BIN' will display in the 'ZONE/BIN' column in the invoice grid.
- Allows entry of up to five (5) numbers.
- Additional Zone/Bin locations can optionally be set up on the ZONE / BIN SETUP screen.
For Vendor Changeovers, the following chart determines the behavior of the 'Zone' and 'Bin' fields of the new part resulting from the VCO are overwritten:

In the event that the old part has a 'Zone' or 'Bin' value prior to the VCO, that part retains those values after the VCO.
Note: This is only applicable to replace the primary 'Zone' and 'Bin' that appear on the Main Part Entry screen.
Part Taxability
'Tax Codes' fields are used to set up the state tax as well as any fees applied to the parts.
CORES
Click the small drop-down and select the tax code that identifies the State Taxability On Cores.
The system defaults to 'CR' (Tax In – Tax Out) when new parts are added to the part table.
TAX CATEGORIES
Click the small drop-down and select the tax code that identifies the State Taxability On Tax Categories (Parts).
The system defaults to 'PT' (General Parts) for new parts added to the part table.
STATE FEES
Optionally click the small drop-down and select the code that identifies State Fees imposed by the state.
DISPOSAL FEES
Optionally click the small drop-down and select the code that identifies Company Imposed Disposal Fees imposed by the store.
OTHER FEES
Optionally click the small drop-down and select the code that identifies any Other Fees imposed by the store.
SALES TAXABILITY
Click the drop-down and select when the system calculates tax on a part sale.
- 'ALWAYS' (Parts are always taxed)
- 'SOMETIMES' (Depends on the customer sales taxability)
- 'EXEMPT' (Never taxed)
Sales Taxability Flow Chart
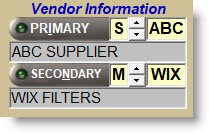
Vendor Information
Optionally select a 'PRIMARY' vendor if the part is normally purchased from the same vendor. Select a 'SECONDARY' vendor to order from in the event the part is not available from the primary vendor. Both fields are used as filters during purchase order creation.
The 'DESIGNATION' setting on the ORDER CREATE / PURCHASE ORDER PROFILE field defaults to ‘All Parts’, however, setting the 'DESIGNATION' to 'PRIMARY' filters the parts to only consider those with the setting of 'PRIMARY' for the designated vendor in the order. 'SECONDARY' is used the same way.
The setup consists of four sections:
- Middle: Defaults to ‘M’ (manufacturer). Click the small up/down buttons to change the field to ‘S’ (supplier).
- Left: Click the 'PRIMARY' button and, if an ‘M’ displays in the middle section, the 'BROWSE LINE CODES' pop-up opens to search for/select a Line Code. All Line Codes are available for selection regardless of the 'USE AS VENDOR' flag. If an ‘S’ displays in the middle section, the 'BROWSE SUPPLIERS' pop-up opens to search for/select a Supplier Code.
- Right: Enter a Line Code or Supplier Code. If one is selected from the browser window, the code will display in the field.
- Lower: Displays the selected Line or Supplier name for information only.
GET PRICES
The 'GET PRICES' button displays on the MAIN PART ENTRY screen when Price Updating is enabled.
When adding or editing parts and the 'DENY GET PRICES ADD PART' proc is enabled, the 'INSERT PRICES' button is available for update and if the 'DENY GET PRICES MODIFY RULES' proc is set enabled, the 'SHOW RULES' button is available to display and edit the rules.
UTIL
Whether the 'EDIT' button is enabled or not, click the 'UTIL' button to open a window with a number of features.
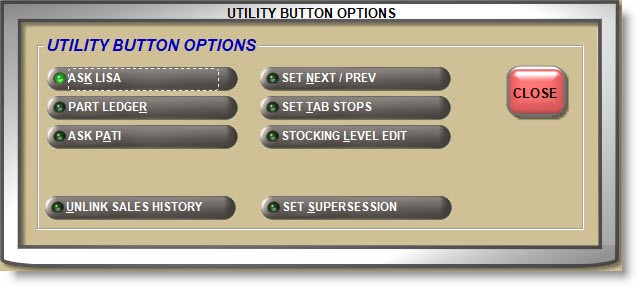
Used as a shortcut to open the LISA TRANSACTIONS REPORT screen with the part in focus. Closing the report returns to the MAIN PART ENTRY screen with the part still in focus.
PART LEDGER
Used as a shortcut to open the PART LEDGER REPORT screen with the part in focus. Closing the report returns to the MAIN PART ENTRY screen with the part still in focus.
ASK PATI
Used as a shortcut to open the PATI REPORTS screen with the part in focus. Closing the report returns to the Main Part Entry screen with the part still in focus.
Opens a window with several part attribute fields.
- Enter a value in one of the fields to update parts with that attribute under the Line Code displayed.
- Click the 'START' button, the window closes and clicking the 'NEXT' button or pressing the 'Page Up' key displays the next part with the value entered in the 'SET NEXT / PREV' window.
- Edit that part as needed and click the 'NEXT' button.
- If changes were made, a pop-up opens to save the changes. Focus is on the 'YES' button, so click the button or press the 'Enter' key and the next applicable part displays.
- Continue until all applicable parts have been displayed and optionally edited.
- Click the 'PREV' button to move back through the line if needed.
With the 'EDIT' button disabled, click the 'SET TAB STOPS' button and when the window closes, the MAIN PART ENTRY screen displays a checkbox in each editable field.
Check each field that the cursor should stop at or click 'SET ALL' and all fields will be checked.
Click the 'START' button and the 'EDIT' ('F5' key) button and the cursor will be in the first field to edit. All checked fields display with a green background and the cursor field displays with a bright green background.
Press the 'Tab' or 'Enter' key to move from checked field to checked field and edit the fields as needed. When all fields have been tabbed through, the next part displays and the cursor is back in the first tabbed field. When finished, click the 'UPD' button if lit or the 'EDIT' button and the system will prompt to save the changes. Click the 'EDIT' button to come out of 'SET TAB STOPS' mode.
Used as a shortcut to open the STOCKING LEVEL EDIT screen with the part in focus. Closing the report returns to the MAIN PART ENTRY screen with the part still in focus.
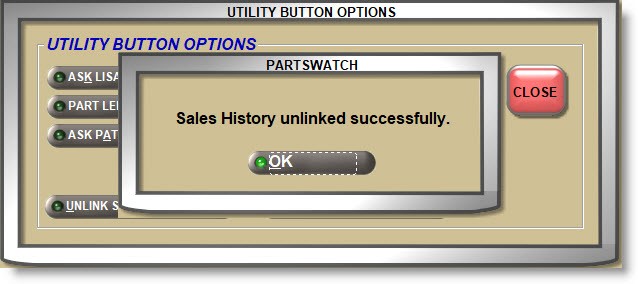
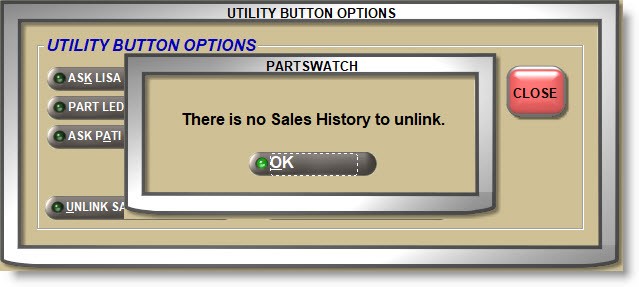
Opens a pop-up to make sure the part sales histories should be unlinked.

Answer 'YES' and if the part in focus has histories linked to the part superseding that part, the system will unlink the part histories.
If the part in focus does not have linked histories, a notification pop-up will open. Click 'OK' to close the prompt.
Opens a window to add a supersede replacement for a part as a quick way to add a instead of using the PART ASSOCIATION SETUP screen.
Enter the 'LINE' (line code) and 'P/N' (part number) for the part that will supersede (replace) the part in focus on the MAIN PART ENTRY screen. Answer each question:
- 'ADD THE QOH TO THE NEW ITEM?'
Checked: The 'QTY ON HAND' (QOH) will be set to ‘0’ on the original part and increased on the replacement part.
Unchecked: The 'QTY ON HAND' (QOH) remains on the original part, leaving it to sell out. - 'ADD THE ORDER POINT VALUE TO THE NEW ITEM?'
Checked: The 'ORDER POINT' value of the original part is added to the replacement part.
Unchecked: The 'ORDER POINT' of the original part is not zeroed out. - 'SET THE DO NOT REORDER (DNR) FLAG ON THE OLD ITEM?'
Checked: The 'DNR' flag is checked on the original item which prevents it from being considered for reorder.
Unchecked: The 'DNR' flag is not checked and the item will continue to be considered for order. - 'LINK THE SALES HISTORY TO THE NEW ITEM?'
Checked: The sales histories of the original part are linked to the sales histories of the replacement part when the supersede is created. If linked, the 'UNLINK SALES HISTORY' button can be used to unlink the original and replacement sales histories.
Unchecked: The sales histories remain separate for both parts.
Click the 'NOTES' button to display the 'INVENTORY NOTES' window used to set up a part note for Invoicing and/or Purchasing.
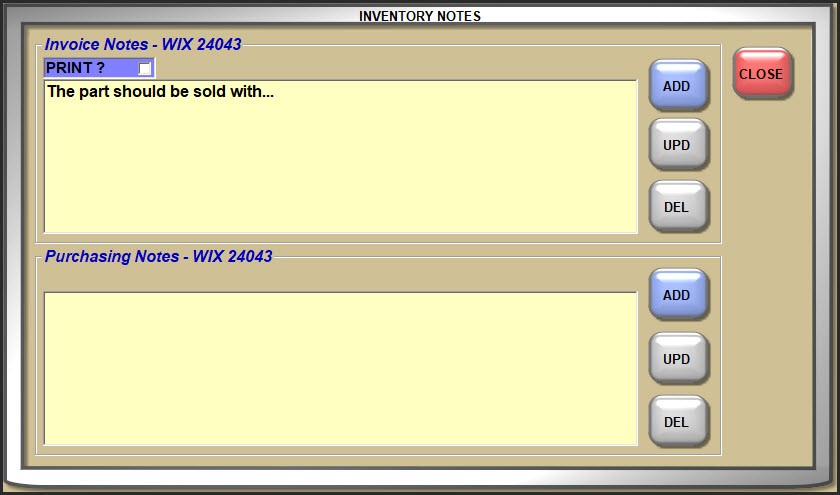
To add a new note, enter a note in the appropriate section and click the 'ADD' button.
To update an existing note, make the changes and click the 'UPD' button.
- If a note is entered under the 'Invoice Notes' section, the note will display in the INVOICE screen if the 'PART NOTE POPUP' setting is enabled.
Check the ‘PRINT ?’ checkbox to print the part note on a finalized invoice form below the applicable part. The form must be enabled to print the note. - If a note is entered under the 'Purchasing Notes' section, the note is for information only.