Epicor Catalog Access
The Epicor Catalog provides part ordering functionality and can be accessed from PartsWatch POS via the PartsWatch Invoice Point of Sale screen.
The CATALOG screen is accessed one of three ways.
- With a customer in focus, click the 'CATALOG' button in the upper-left section of the Invoice Point of Sale screen.
- Press the 'Alt' + 'G' keys from the Invoice Point of Sale screen.
- Press the 'F6' keyboard key or click the 'F6' hot key in lower screen border from any screen.
Note: When 'F6' is used, the default Cash Account and its pricing is used since no customer account number was entered.
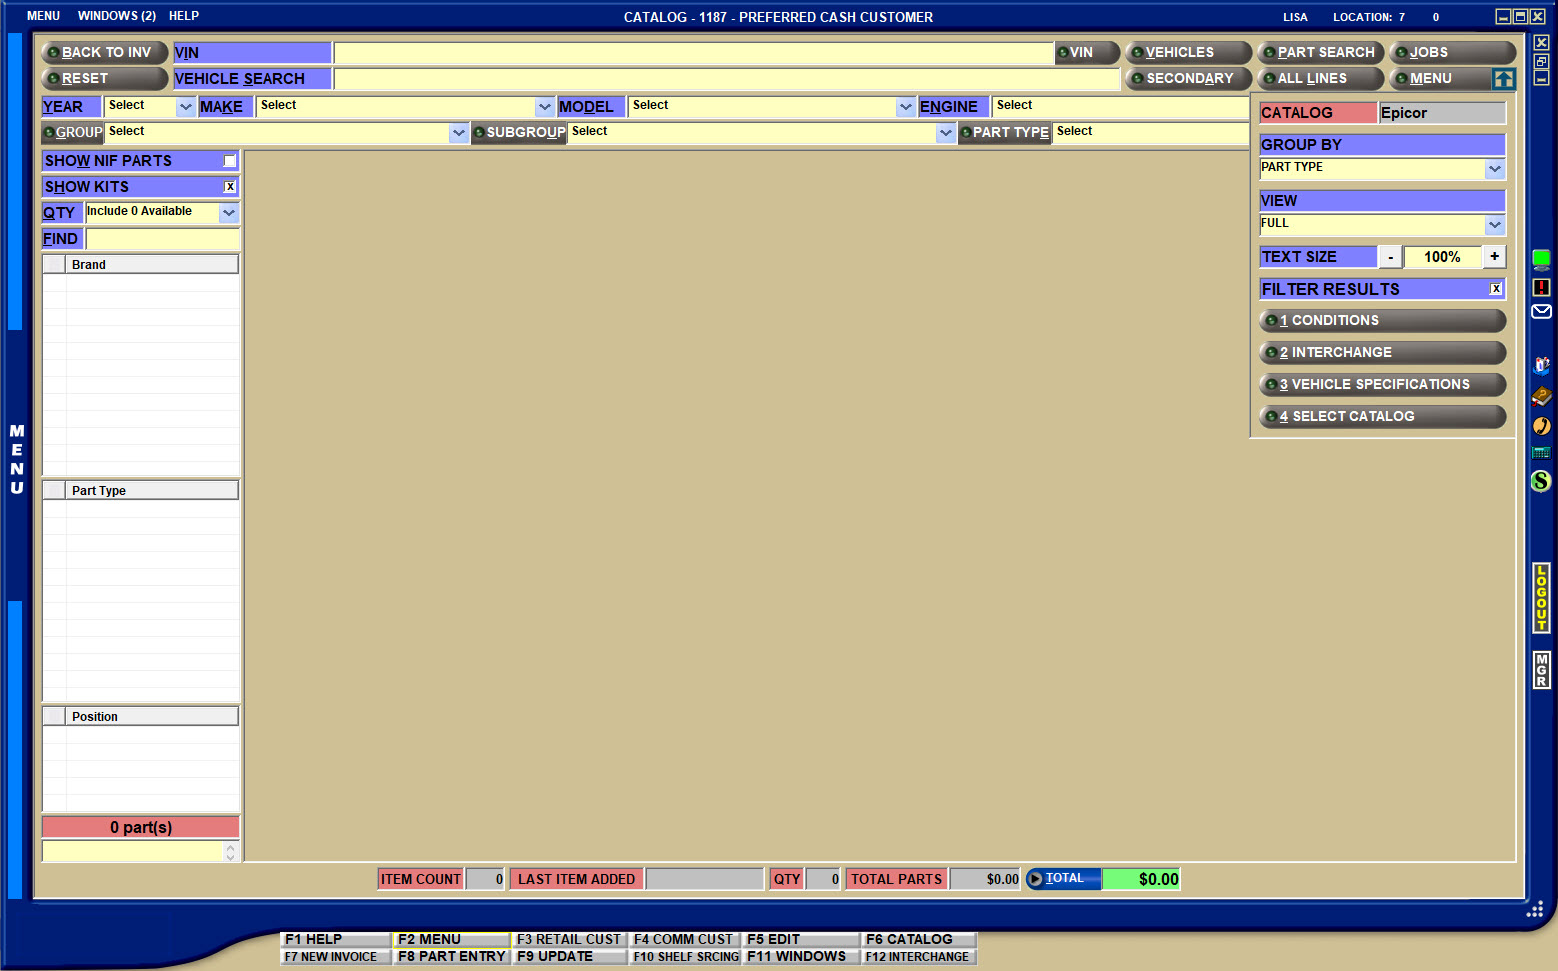
All of the fields used to select the application and vehicle for a part lookup in Cataloging are drop-down boxes.
To select an item in the 'YEAR', 'MAKE', 'MODEL', 'ENGINE', 'GROUP', 'SUBGROUP', and 'PART TYPE' lists, use one of the following methods:
Single-click an item in a list to select that item and move to the next field.
Enter the two-digit number next to the selection to move to the next field.
Enter the first letter of the item desired to skip through the list. The focus is on the first line that has the letter typed. From that position, use the down arrow key to move to the next selection of the same letter. Press 'Enter' or a right arrow to move to the next field.
Arrow down or up to a selection and press 'Enter' or the right arrow to move to the next field.
The following is an example of a populated CATALOG results screen.
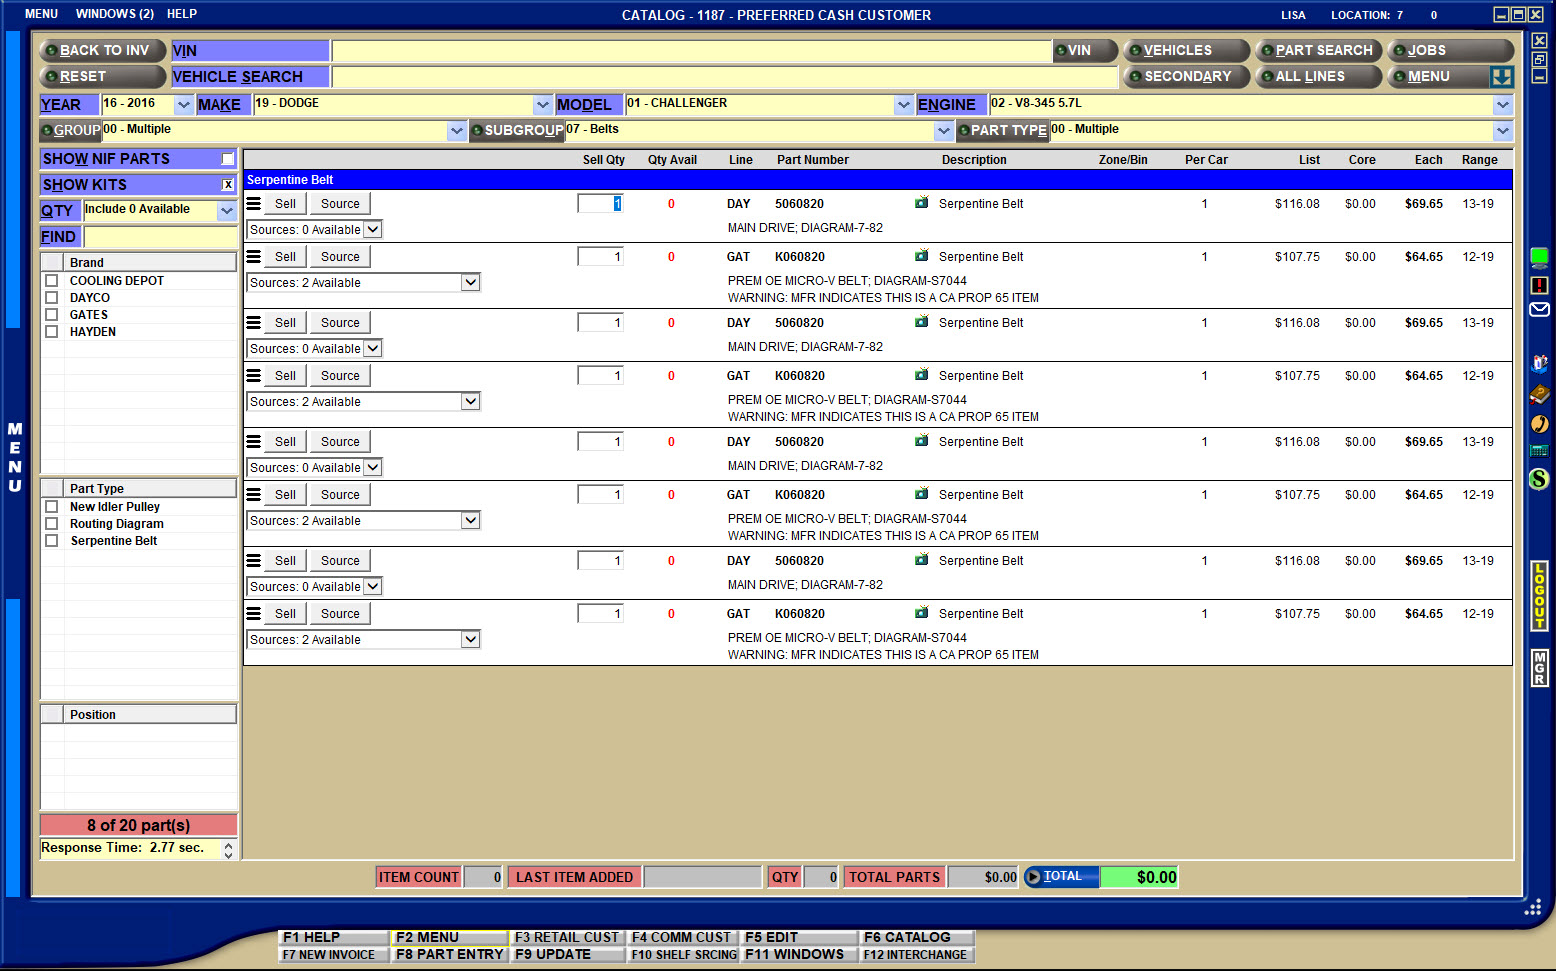
Catalog Search
Click to return to the Invoice Point of Sale screen. Accelerator key is 'Alt' + 'B'. When exiting to the Invoice Point of Sale screen by either of these two methods, returning to the Catalog from the current account/invoice redisplays the Catalog as the Catalog displayed when the 'BACK TO INV' button was clicked.
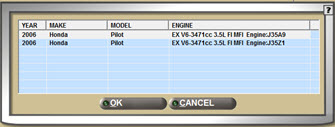
Allows entry of a Vehicle Identification Number (VIN) to look up a vehicle. Entry of a VIN with a single match populates the 'YEAR', 'MAKE', 'MODEL', and 'ENGINE' choices. Entry of a VIN with multiple matches displays a pop-up to select the desired vehicle.
Also allows entry of a license plate (2-character state, followed by an optional space and then the plate #). If a plate is found, the VIN replaces the plate number in the field and populates the 'YEAR', 'MAKE', 'MODEL', and 'ENGINE' choices.
If using PW Mobile, the 'VIN' button may also be clicked to display a list of vehicles that have had their VIN scanned.
Displays the 'VEHICLE' window with a list of previously viewed cars for this account, in order from most recent to older lookups. Although the button is not disabled, access to vehicle information is not available in Mode 2.
After selecting 'Year', 'Make', and 'Model' from the drop-downs, or after selecting a vehicle from the 'VEHICLES' list that does not have a saved engine, and the 'AUTO SELECT "DON'T KNOW" ENGINE' field in the STORE CATALOG OPTIONS screen is checked, the 'Engine' is automatically set to 'DON'T KNOW'. When the 'AUTO SELECT "DON'T KNOW" ENGINE' field is unchecked, the user must make a selection. Accelerator key is 'Alt' + 'V'.
Displays a 'Part Search' pop-up to do multiple searches in one session and select multiple part types regardless of the groups or subgroups they belong to, and have all resulting parts display in the CATALOG screen at one time, when clicked. Accelerator key is 'Alt' + 'P'.
Displays additional buttons to filter the part search.
Options are:
-
'GROUP BY' - Sorting and grouping of items in the CATALOG screen is determined by two settings:
-
The setting the store chose for the 'CATALOG GROUP BY QOH' in the STORE CATALOG OPTIONS screen.
-
The setting selected in the 'GROUP BY' field from the CATALOG screen.
-
GROUP BY options are:
-
'CATALOG BRAND' (Default)
-
'STORE LINE CODE'
-
'PART TYPE'
-
-
Three factors determine the grouping and sorting of results:
-
Primary Grouping: 'GROUP BY' selection
-
Secondary Grouping: 'CATALOG GROUP BY QOH' in the STORE CATALOG OPTIONS screen. When 'YES', items are grouped by QOH for all three 'GROUP BY' options. Positive in stock quantity lists first, and then parts with a zero or negative QOH and then NIF items (unless the 'HIDE NIFS' button is set to hide them). When 'NO', the QOH is not a factor.
-
Final Sort: The final sort will be 'PART TYPE' if the primary grouping was 'CATALOG BRAND' or 'STORE LINE CODE'.
-
Final sort will be 'STORE LINE CODE' if primary grouping was 'PART TYPE'.
-
Even though they do not have a part type, other parts such as alternates, supersedes and VCOs may also display as a result of the filtering when associated with a catalog part.
-
-
-
-
'VIEW' - Determines how the catalog results look on the screen. When set to 'FULL', descriptive text from the catalog displays underneath each part. Thumbnails also display when set to 'FULL', based on the setting of the 'THUMBNAILS IN CATALOG' results checkbox on the STORE CATALOG OPTIONS screen. When set to 'COMPACT', neither the descriptive text nor the thumbnails display.
-
'TEXT SIZE' - Increases (+) or decreases (-) the text size of the catalog results. 100% is the minimum size and default setting. Fewer items display at one time when set to a larger text size.
-
'FILTER RESULTS' - When checked, the filter panel on the left side of the screen displays. When unchecked, the filter panel will be hidden. Note: If filters are selected and then the 'FILTER RESULTS' checkbox is unchecked, results will still be filtered.
-
'CONDITIONS' - Displays a pop-up with a list of specific conditions about the selected vehicle. Conditions are the questions and answers that have been asked about the vehicle during the lookup process, such as w/PS, w/AC. Accelerator key is 'Alt' + 'C'.
-
'INTERCHANGE' - Displays the 'Interchange' window to locate a comparable part for the requested part. Button displays only when Interchange functionality is enabled.
-
'BUYERS GUIDE' - Acts like a "reverse lookup" for catalog parts. Specify a part number, brand, or part type to obtain a list of vehicles that the specified part fits.
-
'VEHICLE SPECIFICATIONS' - Opens the 'VEHICLE SPECIFICATION' window.
-
'LABOR' - Click to display the 'LABOR' pop-up for the part type returned in the catalog lookup. If multiple part types were selected, labor information is displays for all the part types. If the 'LABOR' selection is clicked before selecting the vehicle or part type, a prompt displays to request that those selections be made. If the labor catalog lookup feature is not enabled, licensed, and authorized on the catalog server, an error message displays.
-
'SELECT CATALOG' - Allows the selection of which catalog to access if there are multiple catalogs set up.
Access any saved Jobs that were set up on the CATALOG JOB SETUP screen.
Type in the 'Year', 'Make', and 'Model' of the vehicle you are searching for.
Note: The 'Year' must be entered first, either the full four digits or the final two digits.
Note: The search is a "begins with search", so the 'Make' and 'Model' of the car must be accurately typed in for desired results.
Clears selections, filters, and catalog results quickly to start a new search.
Filters parts containing the entered text in the following fields:
- Mfg Labels
-
Footnotes, which includes:
-
'Position' - Displays in blue standard text and contains info such as front, rear, left and right. Position can also be used to designate which part something is attached to or referring to. For example: for a pulley, the position could be 'SMOOTH PULLEY' or 'GROOVED PULLEY'.
-
'Attribute' - Displays in blue standard text.
-
'Qualifier' - Displays in blue italic text.
-
'Description' - Displays either the part type description from the Catalog or the PartsWatch inventory description. The description that displays depends on the 'CATALOG DESCRIPTION ON SCREEN' option set up in the STORE CATALOG OPTIONS screen.
-
Press 'Enter' to display items based on entered text. Click the 'X' to clear the entered text.
Displays the primary lines (lines added to the primary UDCF) in the results. (Displays by default when the CATALOG screen is first accessed.)
Access to the UDCF setup web pages to set lines as primary is via the CATALOG VENDOR SETUP screen.
Displays the secondary lines (lines added to the secondary UDCF) in the results, when clicked. When the vehicle is changed, the results default back to the 'PRIMARY LINES'.
Access to the UDCF setup web pages to set lines as secondary is via the CATALOG VENDOR SETUP screen.
Displays the 'ALL CATALOG LINES' pop-up with a list of all lines that carry parts in the group/subgroup selected. Accelerator key is 'Alt' + 'L'.
Hides or shows NIF items.
- Checked - NIF parts are shown in the catalog results.
- Unchecked - NIF parts are not shown in the catalog results.
The default is based on the 'SHOW NIF PARTS BY DEFAULT' flag on the SYSTEM GENERAL SETUP screen.
Checkbox that determines whether or not Kit parts are shown at the top of the Catalog results.
- Checked (default) - Kit parts are shown at the top of the Catalog results, in the 'Related Kits' section.
- Unchecked - Kit parts are not shown at the top of the Catalog results, in the 'Related Kits' section.
Displays the year of the vehicle. Required to conduct a successful part lookup.
If a vehicle is looked up and the selected 'YEAR' is changed, the system attempts to look up the same vehicle for the new year (that is, the system will auto select the make/model/engine based on the values that were selected before the year was changed). Note: Click 'RESET' to look up a different vehicle so the system does not attempt to look up the same vehicle in the different year.
Accelerator key is 'Alt' + 'Y'.
Displays the make of the vehicle. Required to conduct a successful part lookup. Accelerator key is 'Alt' + 'K'.
Displays the model of the vehicle. Required to conduct a successful part lookup. Accelerator key is 'Alt' + 'D'.
Displays the engine size of the vehicle. Displays "Don’t Know" when the 'AUTO SELECT "DON’T KNOW" ENGINE' field is checked in the STORE CATALOG OPTIONS screen. When the engine size is selected, only parts that match that engine display. Accelerator key is 'Alt' + 'N'.
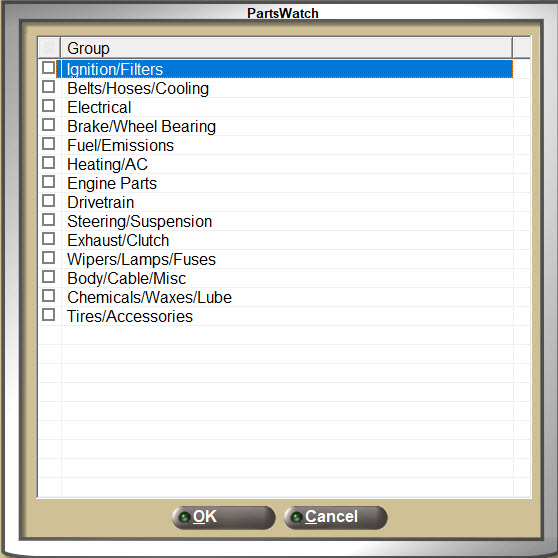
Displays the overall range of categories that are available for an application. Required to conduct a successful part lookup. Accelerator key is 'Alt' + 'G'.
If '00 - Multiple' is selected, a pop-up displays which lists groups that can be selected via a checkbox. Multiple groups can be selected at a time.
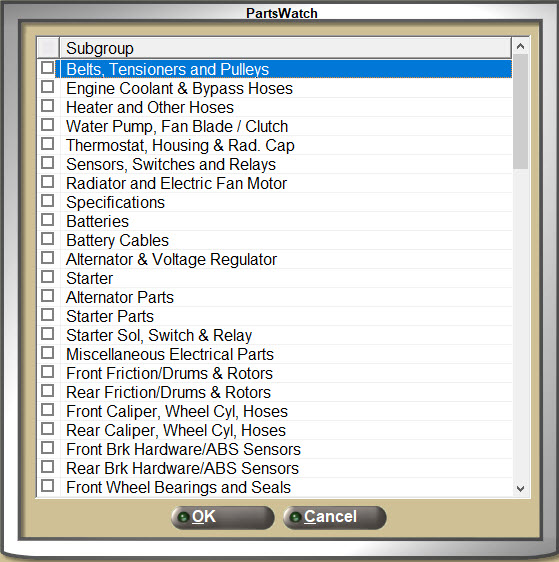
Displays a breakdown of the broader range of part type descriptions or subgroups. Required to conduct a successful part lookup. Accelerator key is 'Alt' + 'U'.
Automatically displays the 'PART TYPE' drop-down after selecting a subgroup.
If '00 - Multiple' is selected, a pop-up displays which lists subgroups that can be selected via a checkbox. Multiple subgroups can be selected at a time.
If '00 - Multiple' was selected for the 'GROUP' drop-down, and one or multiple Groups were chosen, then the Subgroup list will only list Subgroups that exist within those selected Groups.
Note: If enough Groups are selected to result in 100 or more Subgroups in the Subgroup list, and the user types in digits to select a Subgroup (rather than selecting with a mouse), the first Subgroup beginning with those digits will be selected. For example, if "10" is typed then Subgroup 10 will be automatically selected and the cursor will move to 'Part Type'. In order to select "100" the mouse is needed.
Displays the part type. The 'PART TYPE' drop-down automatically displays when a subgroup is selected or changed in the 'SUBGROUP' field. Defaults to 'SELECT'. A selection is required.
Options are:
- A single part type
- 'Part type 01 - All' to select all part types (Option does not display when a search was performed using the 'Part Search' window, accessed from the 'PART SEARCH' button.)
- 'Part type 02 - Multiple' to select multiple part types. The 'Part Type' window displays to select from the multiple part types.
To select a different set of multiple part types after multiple selections are made and Catalog results display:
- Click 'PART TYPE', or
- Click 'SELECT' from the drop-down, and then select '02 – Multiple' again to reopen the pop-up.
- Click the 'PART TYPE' button to display part types associated with the Group and Subgroup selections.
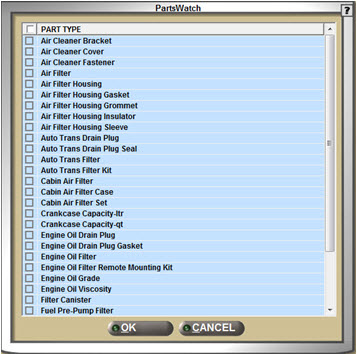
Click the header checkbox to select all part types or click individual part type checkbox(es).
Note: If enough Subgroups are selected to result in 100 or more Part Types in the 'Part Type' list, and digits are typed in to select a Part Type (rather than selecting with a mouse), the first Part Type beginning with those digits will be selected. For example, if "10" then Part Type 10 will be automatically selected. In order to select "100" the mouse is needed.
Catalog Results Grid
Click to access a menu pop-up used to quickly access additional screens and functions.
Options are:
- 'PRICE EDIT' - Click to open the 'PRICE EDIT' pop-up for the part.
- 'VIEW IN LISA' - Click to open the LISA PART RANKING REPORT screen with the part in focus.
- 'VIEW IN PART LEDGER' - Click to open the PART LEDGER REPORT screen with the part in focus.
- 'QTY AVAILABLE IN ALL STORES'
- 'QTY RESERVE'
- 'ON ORDER'
- 'GENERAL PART INFO' - Click to open the Part Entry screen with the part in focus.
- 'PART PRICES' - Click to open the PART PRICE ENTRY screen with the part in focus.
- 'ORDER / COST' - Click to open the ORDER - COST screen with the part in focus.
- 'PART HISTORY' - Click to open the PART HISTORY screen with the part in focus.
- 'UPC SETUP' - Click to open the UPC Setup screen with the part in focus.
- 'INTERCHANGE' - Click to open the 'Interchange' pop-up containing parts from the same line or other lines that could be used instead of the part selected on the invoice.
- 'BUYERS GUIDE' - Click to open the 'Buyers Guide' pop-up containing the 'Make', 'Application', and 'Years' corresponding with the part selected on the invoice.

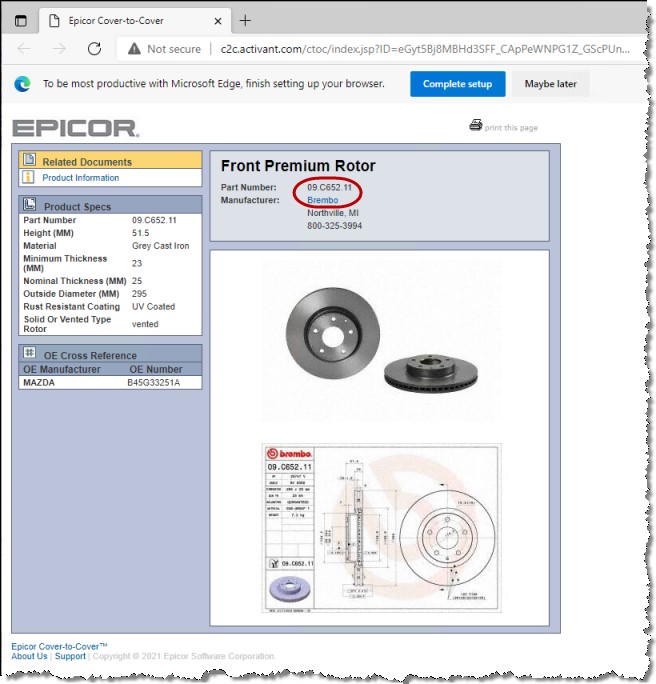
- 'COVER TO COVER' - Click to open the Epicor Cover-to-Cover webpage when available.
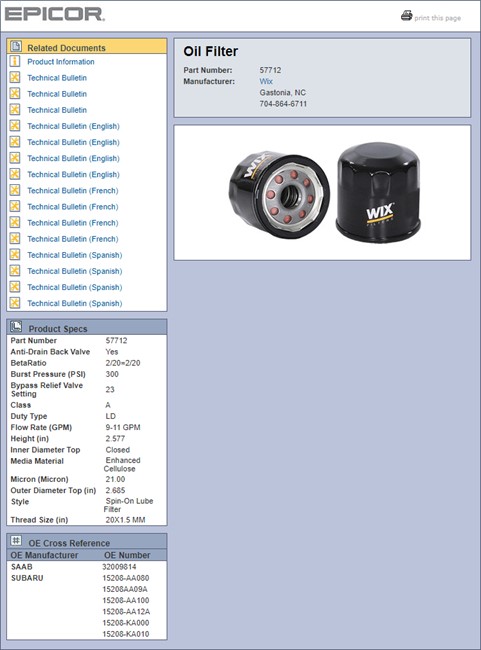
- 'SMART PAGE' - Click to open the smart page link for the part (if available).
- 'POS REMINDERS' - Click to open and read any Point-of-Sale reminders set up for the part.
- 'ADD LINE ITEM NOTE' - Click to add a note to the line item on the invoice which will print directly underneath the part on the invoice.
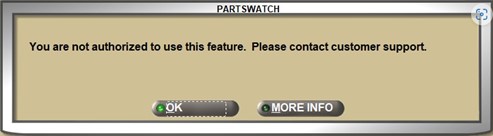
Note: If either the Interchange or Buyer's Guide features are not enabled, licensed, and authorized on the catalog server the following error message will display.
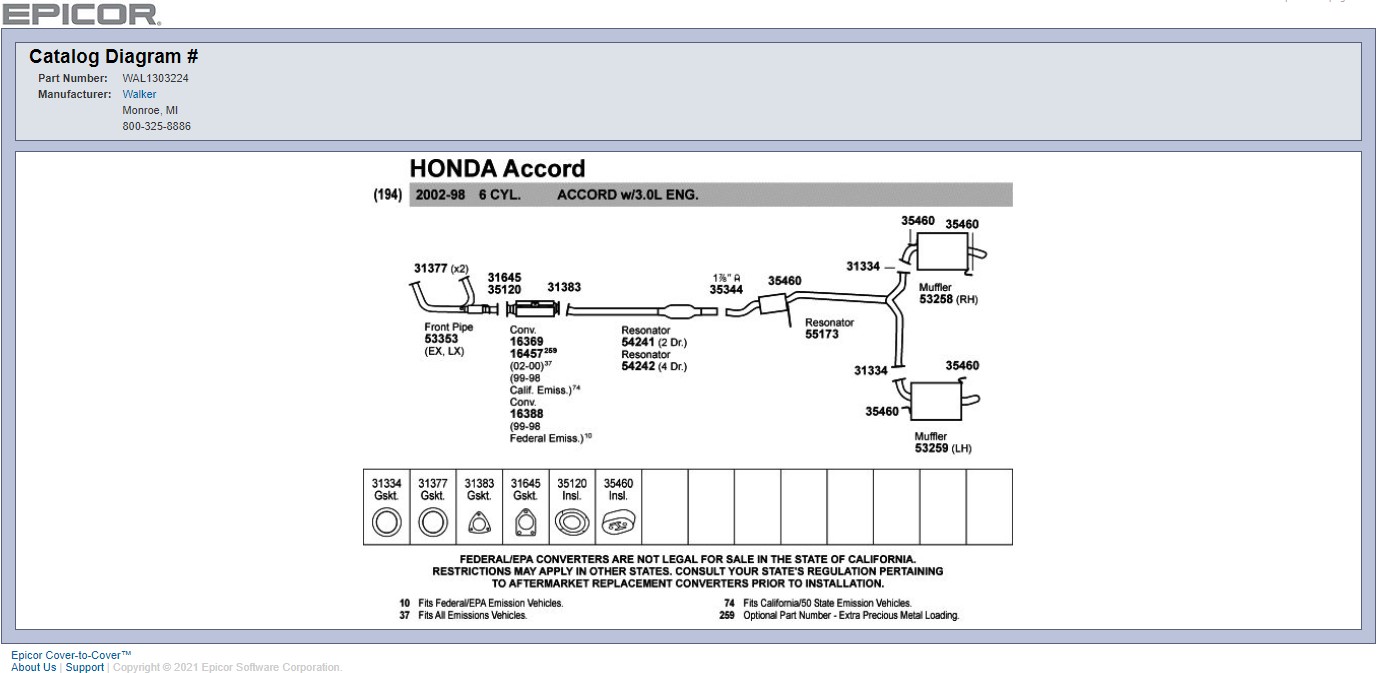
When an exhaust diagram is available for a part, it will display In the small section just above the part listings, indicated by the words 'Catalog Diagram' to the right of the camera icon. The part number and line code also display.
Click the camera icon, and the Epicor Cover-to-Cover diagram of the exhaust system components displays.
Click to sell a part.
Displays and populates the INSUFFICIENT QUANTITY - SOURCING (Quick Sourcing) screen enabling a selected Catalog part to be sourced from another location or vendor. When completed, the CATALOG screen redisplays with all previous selections ('YEAR', 'MAKE', 'MODEL', 'ENGINE', 'GROUP', 'SUBGROUP', and 'PART TYPE') retained.
Indicates the quantity to sell for the line selected.
To sell a part:
- Press 'Enter' to sell the default quantity of the part indicated in the field or,
- Press 'Shift' + 'Tab' to access the 'SELL' or 'SOURCE' buttons for that item to sell or source a part (without using the mouse).
- Enter a sell quantity other than the default quantity and then click 'SELL' or press 'Enter' to sell the item.
Enter 'L' and the number of lost sales, 'B' and the number of back orders, or 'E' for Core Exchange.
The maximum sell quantity is 32767. When a number greater than 32767 is entered, the message "Invalid Sell Quantity. Cannot sell a value greater than 32767." displays.
The sell quantity cannot exceed 5 digits. If it does, the message "Invalid Sell Quantity." displays.
Indicates the number of units of this part that are available for sale at any given time. Each time a part is reserved, sold or returned, the Quantity Available is adjusted.
Indicates NIF for part numbers that do not exist in the part file. QOH value and NIF display in red.
Note: The counterperson may attempt to source the NIF parts as they will possibly be available at one of the store's sources.
Indicates the line code as entered in the 'SELECT CATALOG VENDORS' field.
Indicates the unique part number that is available for sale.
Displays a clickable image thumbnail of the returned part results that brings up the Epicor Cover-to-Cover webpage. Note: Clicking the camera icon also yields the same results.
Displays the contents of the 'BIN' field from the part record, if available, when the column heading is BIN. (Default).
Displays the 'GP%' value for each item found from the Catalog and Interchange lookup when the column heading is 'GP%'. The 'INVOICE GP% ON POS SCREEN' User Security proc is used to optionally display the 'GP%'.
Displays the value found in the 'CATEGORY' field in the Part Entry screen, or the value from the non-SKU record, if applicable.
The value of the 'CATALOG EXTRA COLUMN' field in the STORE CATALOG OPTIONS screen determines the column name that displays.
Identifies the "per car" quantity supplied from the catalog lookup. (How many of these parts are in the selected vehicle).
Indicates the manufacturer's suggested retail price for this part number. Displays for price comparison purposes.
Indicates the base core price that is charged for this part numbers' core, if the part entered is a core part.
Indicates the sell price that the customer is charged for a single part of this part number during the sale.
Indicates the range of years that this part was used for the current vehicle model selected.
A drop-down that is at the top of the filter panel, allows the filtering of results based on the quantity available.
Options are:
- 'Include 0 Available' - Results will include parts regardless whether they have an available quantity or not. (Default)
- 'Available In Store' - Results will only include parts that have an available quantity greater than 0 in the store's part record.
- 'Avail In Store/Sources' - Results will only include parts that have an available quantity in the store and/or at preferred sources.
Note: The 'Avail In Store/Sources' selection will only appear when the 'INCLUDE PREFERRED SOURCE STORES IN CATALOG' is checked or 'DC / OTHER SOURCE FOR CATALOG' is specified in the STORE SOURCE SETUP screen.
Allows the user to quickly filter parts in the catalog results using checkboxes in three sections: 'Brand', 'Part Type', or 'Position'.
- Unchecked - When no checkboxes in a section are checked, no filtering is being done and all results are displayed.
- Checked - When any checkbox in a section is checked, the results are filtered to only items matching the selected checkboxes.
Displays the number of parts that were returned from the results.
When filtering is being used, displays the number of filtered parts out of the total number of parts returned from the search.
Drop-down that displays the total response time for displaying items.
Breakouts for Catalog response time, PartsWatch stock check response time, and DC stock check response times are available by clicking the scroll-down arrow to the right of the field.
Displays the number of items on the invoice.
Displays the line code and part number of the last item posted to the invoice.
Displays the quantity of the last item sold.
Displays the total dollar value of parts posted.
Displays the total dollar value of the invoice.
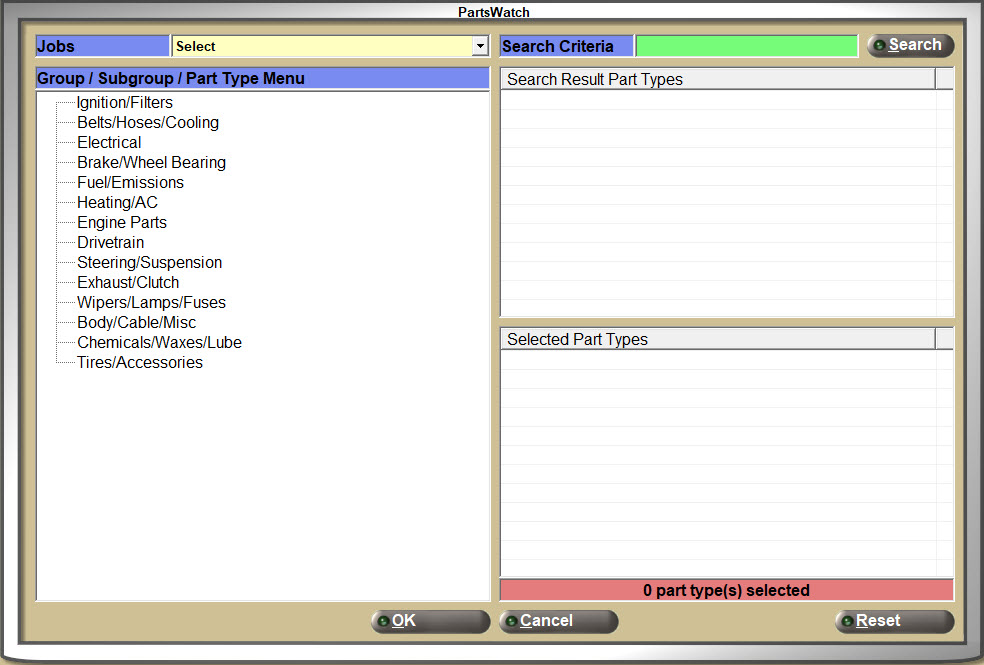
Part Search
Click the 'PART SEARCH' button to display the 'Part Search' window used to do multiple searches in one session and select multiple part types regardless of the groups or subgroups they belong to, and have all resulting parts display in the CATALOG screen at one time. The 'Part Search' window has a three-level menu that allows users to select multiple 'Groups', 'Subgroups', and 'Part Types' directly from the menu in the pop-up.

Vehicles
Click the 'VEHICLES' button to display the 'VEHICLES' window. The window automatically tracks the vehicles that have been looked up for a particular customer. Vehicles may also be manually added to that customer’s list.

Vehicle Setup
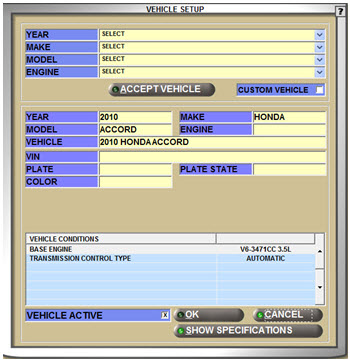
YEAR
Indicates the model year of the vehicle. Select a year from the drop-down list.
MAKE
Indicates the make of the vehicle. Select a make from the drop-down list.
MODEL
Indicates the model of the vehicle.
ENGINE
Indicates the engine size of the vehicle. Select a size from the drop-down list.
ACCEPT VEHICLE
Accepts the vehicle and populates the middle section of the setup window.
CUSTOM VEHICLE
- Checked - Indicates the vehicle is custom.
- Unchecked - Indicates the vehicle is not custom, and is a standard vehicle.
YEAR
Displays the model year of the vehicle that was selected using the drop-down above, or information can be manually entered.
MAKE
Displays the make of the vehicle that was selected using the drop-down above, or information can be manually entered.
MODEL
Displays the model of the vehicle that was selected using the drop-down above, or information can be manually entered.
ENGINE
Displays the engine size of the vehicle that was selected using the drop-down above, or information can be manually entered.
VEHICLE
Displays the complete vehicle description (Year/Make/Model/Engine Type).
VIN
Indicates the vehicle identification number.
PLATE
Indicates the vehicle's license plate number.
COLOR
Indicates the vehicle's color.
PLATE STATE
Indicates the state in which the license plate was issued and the vehicle is registered.
Grid
VEHICLE CONDITIONS
Indicates the state the vehicle was registered in.
VEHICLE ACTIVE
- Checked - Indicates that the vehicle is still owned and operated by the customer and is available for selection in the Catalog lookup.
- Unchecked - Indicates that the vehicle is no longer owned and/or operated by the customer and is no longer a selection in the Catalog lookup.
OK
Saves the information and closes the window.
CANCEL
Clears and closes the screen without saving the information.
SHOW SPECIFICATIONS
Displays the 'VEHICLE SPECIFICATION' window populated with the vehicle related specifications information. Available only after the 'ACCEPT VEHICLE' button is clicked.

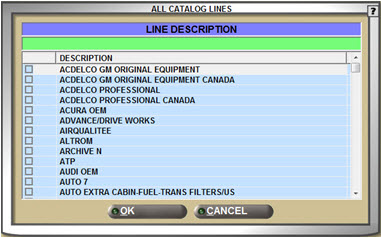
ALL LINES Button
The 'ALL LINES' button displays the 'ALL CATALOG LINES' window in which all the lines that are valid for the selected group/subgroup, year, make, and model are listed. Lines that are currently selected via the CATALOG SETUP screen and then logging in to the UDCF setup to display either as a Primary Line or a Secondary Line results in red text. Lines that have not been selected in the CATALOG SETUP screen display in black text. An additional line or lines can be selected for display by clicking the checkbox in the far left column and clicking 'OK'.
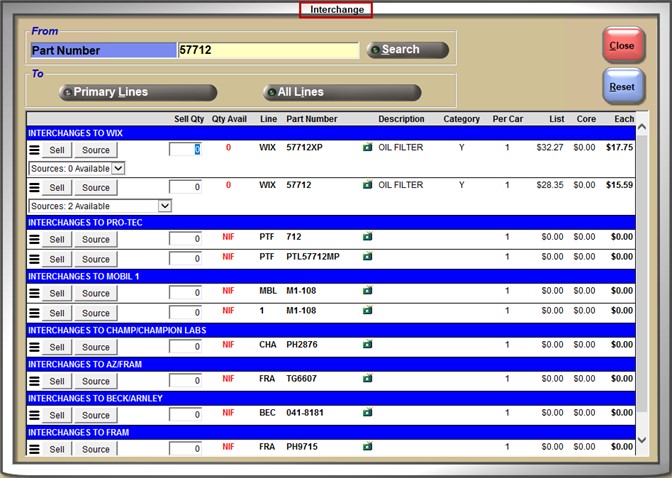
Interchange
The Interchange window is used to locate comparable parts for a requested part.
When a part is highlighted in the CATALOG lookup screen and the 'INTERCHANGE' button is clicked, when the 'Interchange' window opens, the highlighted part displays in the 'PART NUMBER' field and all resulting primary interchange parts display in the grid.
The following is a populated example.
Buyer's Guide
The Buyer's Guide allows a part number, brand, and part type to be entered to obtain a list of vehicles that the specified part fits.
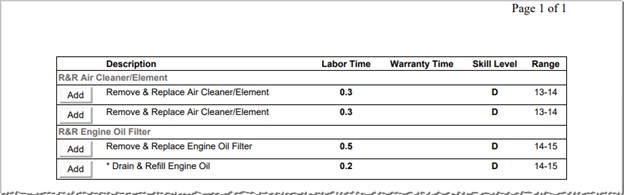
Labor Pop-up
The 'LABOR' pop-up displays for the part type returned in the catalog lookup when clicked in the Catalog 'Menu'. If multiple part types were selected, labor information is displays for all the part types.
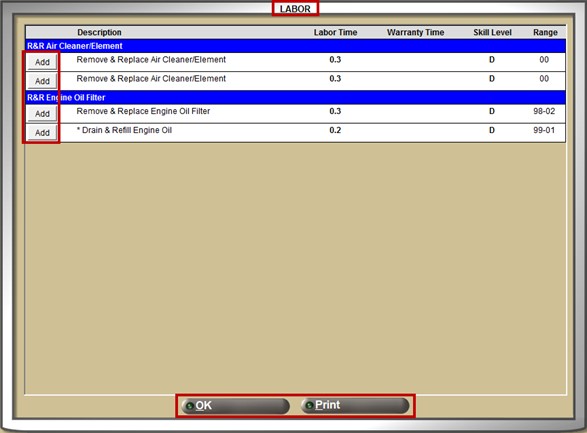
Add
Click the 'Add' button for each item in the 'LABOR' pop-up to add line item notes to the sales order in the Invoice Point of Sale screen with the information from the selected labor item(s). This information will print when the sales order is printed as an Invoice or Quote.
OK
Click 'OK' to close the pop-up.
Click to print the part type(s)' labor information displays in the pop-up in a report.
Esc Key
The 'Esc' key also exits the CATALOG screen; however, 'Esc' does not have the same characteristics as the 'BACK TO INV' button.
Press 'Esc' once to display the drop-down 'Group' selection list.
Press 'Esc' a second time display the 'YEAR' drop-down.
Press 'Esc' a third time to exit to the Invoice Point of Sale screen.
When posting items from the Catalog is completed, the user can return to Invoicing and add additional items to the Sales Order. If the user returns to Invoicing using the 'BACK TO INV' button, and then returns to Catalog, then the last lookup displays.
Lost Sale
A Lost Sale is an item requested by a customer at Point-of-Sale that was not available for sale. A lost sale can be recorded from the Invoice Point of Sale screen and the CATALOG screen.
To record a lost sale from the CATALOG screen, enter an 'L' in the 'SELL QTY' field and press the 'Enter' key. The program saves the parts and lost quantities to the sales order when the user returns to the Invoice Point of Sale screen from the CATALOG screen. The lost sale is tracked in the Lost Sales Report. The 'LOST SALES' field in the Part Entry screen is updated with the lost sales quantity if the part is stocked in the store's inventory.
When a quantity is sold and a quantity is lost in the same sale, the user:
- Sells a quantity.
- Enters an 'L' on the same item in the 'SELL QTY' field to record the 'PER CAR' or the default quantity of 1 if a 'PER CAR' does not exist, and enters the quantity lost before or after the 'L' to record a lost quantity other than the 'PER CAR' quantity or 1. For example, L5 or 5L.
When the user closes the CATALOG screen and returns to the Invoice Point of Sale screen, any parts that were selected as lost sales are updated to the sales order and the lost quantity is entered in the 'LOST' field. Lost sales entered in the Invoice Point of Sale screen from cataloging are processed the same as if they were entered from the Invoice Point of Sale screen directly. When the user does not wish to track a lost sale from cataloging as a lost sale, use the Manual Void (MV) modifier to void the part from the sales order.
Procedure to Record a Lost Sale Using the Default Quantity
To record a lost sale using the default quantity, follow the steps below:
-
Enter the CATALOG screen from the Invoice Point of Sale screen.
-
Enter the parameters for the part lookup in the CATALOG screen. The parts return.
-
Enter an 'L' in the 'SELL QTY' field and the quantity amount lost.
-
Press the 'Enter' key. The default sell quantity is tracked as the lost quantity. The part and lost sale quantity are stored.
-
Click 'BACK TO INV'. The part is updated to the sales order. The 'LOST' field is updated with the lost sales quantity from the CATALOG screen and tracked as a lost sale.
-
Click 'CANCEL ORDER' or press the 'Esc' key to not print the invoice. The sales order is voided. The lost sale is stored until the screen is closed at which time the lost sale is processed as if 'PROCESS' was clicked. The Lost Sales Report is updated.
Procedure to Record a Lost Sale and Sell a Part
To record a lost sale and sell another part, follow the steps below:
-
Enter the CATALOG screen from the Invoice Point of Sale screen.
-
Enter the parameters for the part lookup in the CATALOG screen. The parts return.
-
Enter an 'L' in the 'SELL QTY' field and the quantity amount lost.
-
Press the 'Enter' key. The part and lost sale quantity are stored.
-
Enter a quantity in the 'SELL QTY' field.
-
Press the 'Enter' key. The part is sold.
-
Click 'BACK TO INV'. The lost sale part is updated to the sales order along with any parts with a sell quantity. The 'LOST' field is updated with the lost sales quantity from the CATALOG screen and tracked as a lost sale.
-
Print the invoice. The lost sale is processed as if 'PROCESS' was clicked. The Lost Sales Report is updated.