Manual PO Receipt
When not received by ASN, a PO can be manually received into stock by using the 'Post ASN' button on the Purchasing Dashboard screen.
![]() PO Receipt Labels - 4 minutesPO Receipt Labels - 4 minutes
PO Receipt Labels - 4 minutesPO Receipt Labels - 4 minutes
Post ASN Button
The 'Post ASN' button is used to receive the PO.
When the PO has not been finalized first, a prompt displays asking if the PO should be finalized. Click 'Yes' to change the status to 'Fin' and allow the PO to be received. Click 'No' to cancel the process.
When the PO has been finalized, the 'Post PO' window displays to receive the order into stock and optionally print the 'Posting Report'.
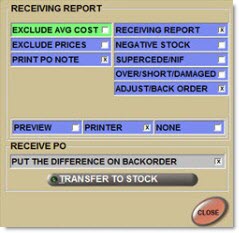
Posting Report
Reports posted purchase orders.
Exclude Avg Cost
Excludes reporting the average cost, when checked.
Exclude Prices
Excludes reporting the prices, when checked.
Print PO Note
Includes the PO Note, when checked.
Posting Report
Prints the 'PO Posting Report', when checked. Flag default is controlled by the value of the 'Posting Report' flag in the System Purchasing Setup screen but can be edited at the time of printing.
Negative Stock
Prints the 'Negative Stock' section of the 'Exceptions Report', when checked. Flag default is controlled by the value of the 'Negative Stock' flag in the System Purchasing Setup screen, but can be edited at the time of printing.
Supersede/NIF
Prints the 'Supersede/NIF Report' section of the 'Exceptions Report', when checked. Flag default is controlled by the value of the 'Supersede/NIF' flag in the System Purchasing Setup screen, but can be edited at the time of printing.
Over/Short/Damaged
Prints the 'Over/Short/Damaged Report' section of the 'Exceptions Report', when checked. Flag default is controlled by the value of the 'Over/Short/Damaged' flag in the System Purchasing Setup screen, but can be edited at the time of printing.
Adjust/Back Order
Prints the 'Adjust / Back Orders section of the 'Exceptions Report', when checked. Flag default is controlled by the value of the 'Adjust/Standing Orders' flag in the System Purchasing Setup screen, but can be edited at the time of printing. Displays and is available only for purchase order lines received from Corporate. Only the parts on the PO that have Vendor Order Adjustments or Back Orders (Standing Orders) are reported.
Note: A Vendor Order Adjustment is a communication sent by Corporate that adjusts order quantities either up or down without impacting inbound. There are several types of vendor order adjustments. A negative adjustment would be sent for a part that has been ordered by the store, but cannot be delivered for some reason. A positive adjustment could be sent for a corporate-created order on behalf of the store to increase order quantities due to minimum or pack quantities, or other reasons.
Preview
Generates a preview of the 'PO Posting Report', when checked.
Printer
Sends the report to a printer, when checked.
None
Receives the stock without printing or viewing the 'PO Posting Report'.
Put the Difference on Backorder
Saves back orders for this Vendor, when checked. If the Vendor does not save back orders, leave unchecked to cancel the unreceived parts.
- Decreases the 'On Ord' (On Order) quantities field.
- Increases the 'Qty Available' field on the part record.
- Puts any unreceived quantities on a back order PO if the 'Put the Difference on Backorder' field is 'Yes'.
- Cancels any unreceived quantities if the 'Put the Difference on Backorder' field is 'No'.
- Prints the 'Posting Report'.
- Removes the PO from the list of 'Current Open Purchase Orders'.
Closes the window.
Menu Button
When the status of the PO is 'Final', the Purchase Order screen displays. Click the 'Menu' button.
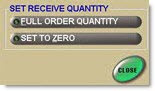
The 'Set Rcv Qty' button can be optionally used to default the received quantity of all items to either 0 or fully received. The received quantity can also be set manually on each item without using 'Set Rcv Qty'.
Click 'Full Order Quantity' to set the received quantity for the entire order to the full order quantity. The amount in the 'Rcv' field automatically changes to the full amount of the order. Manually edit the received amount.
Click 'Set To Zero' to set the 'Rcv' field to zero for all parts and manually enter the received quantity on the received items. The amount in the 'Rcv' field changes to zero. Manually enter the received amount.
Posting Report
The following is an example of the 'Posting Report'.

The following is an example of the 'Posting Report' with 'Negative Stock', 'Exceptions Total', 'Over/Short/Damaged Totals', and 'Adjust/Back Orders Totals'.
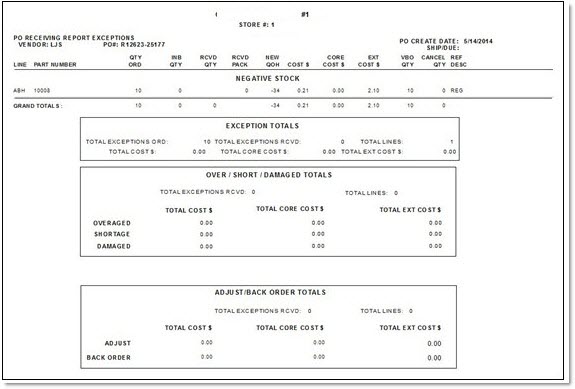
When more than one Vendor Order Adjustment is sent on the ASN for the same part on the same PO, the 'Adjust/Back Order Report' displays each 'Adj Qty' / 'Adj Code' on a separate row. Only the 'Line' and 'Part Number' print for all rows.
Note: The application determines if a part is from a Ghost Order based on the expected arrival date sent on the ASN. When a part is not received within a predetermined number of days after the expected date of arrival, the part is flagged as Ghost Order (Y for Yes). The default number of days is 30. When the part has been received, the field is blank (for No). If the 'Exp Arriv Date' field is blank, the 'Ghost Order' field is blank.
Procedures to Manually Post a PO
A PO can be posted into stock in one of two ways.
Manual Post Method One
To manually post a PO, follow the steps below:
-
From the Menu, select Purchasing, Purchasing Dashboard. The Purchasing Dashboard screen displays.
-
Click the PO in the grid.
-
Click 'Post ASN' or right-click the PO and select 'Post PO' from the command list. A prompt displays stating, "Transfer current PO to stock? Yes/No".
-
Click 'No' to cancel the process. Or,
-
Click 'Yes' to post the PO. If the PO has not been finalized first, a prompt displays asking if the PO should be finalized. 'Yes' changes the status to 'Fin' and allows the PO to be received. If the PO is finalized, the 'Posting Report' window displays.
-
Select the appropriate option, if the PO is finalized. The Purchase Order screen displays.
Manual Post Method Two
To Manually post a PO, follow the steps below:
-
From the Menu, select Purchasing, Purchasing Dashboard. The Purchasing Dashboard screen displays.
-
Double-click a PO in the grid. The Purchase Order screen displays with the PO detail.
-
Click the 'Menu' button. A list of buttons displays.
-
Click the 'Set Rcv Qty' button. The 'Edit Purchase Order' window displays.
-
Select the appropriate option.
-
Click 'Post' after editing the received quantities.The 'Post PO' window displays.
-
Click the appropriate option. Response is based on the selection chosen.