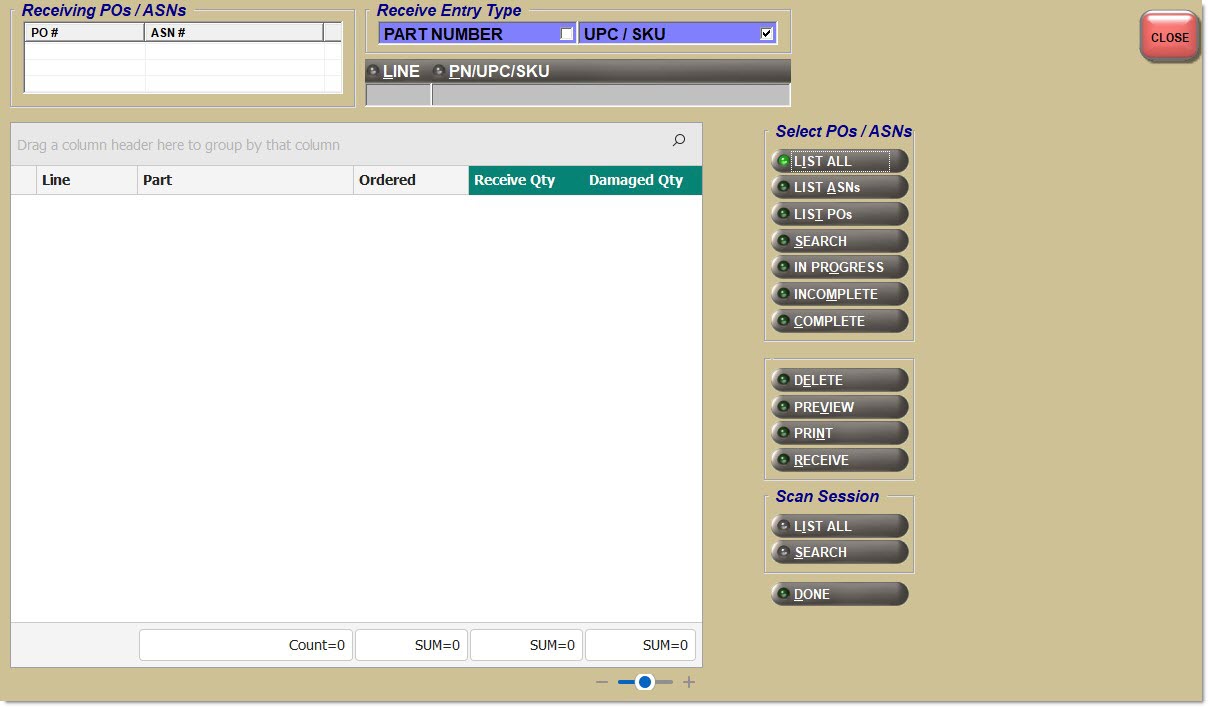
Scan Receive
The Scan Receive function enables the scanning of parts received against a PO using any wired or wireless Point-of-Sale scanner, either a "keyboard wedge" device or an "application" scanner.
An RF Device is a wireless scanning device used for PO receiving when not located near a PC terminal. A Point-of-Sale scanner, or keyboard wedge, is a hardware device or a software program that is wired to and interfaces with a PC terminal used to perform Point-of-Sale scanning and PO receiving when located near the PC terminal. The information in this section only pertains to using a Point-of-Sale scanner, not an RF scanner.
There are two basic types of Point-of-Sale scanners: an application scanner, which can be a scanner that plugs into the serial port or the USB port, and a "keyboard wedge scanner", which requires a keyboard wedge device to be installed between the scanner and the computer.
For either the serial or USB type of "application scanner", after the Point-of-Sale scanner device is plugged into a PC terminal's USB or serial port, the Point-of-Sale scanner device must be set up using the PartsWatch 'Device Manager'. Setting up a scanner device in the 'Device Manager' enables parts to be scanned while the cursor is positioned anywhere in the Scan Receive or Invoice Point of Sale screen. If the scanner device is not set up in the Device Manager, parts can only be scanned when the cursor is only positioned in the 'UPC' field in the screen because the scanner is treated like an alternate keyboard. A keyboard wedge scanner is not set up in 'Device Manager' and only allows parts to be scanned with the cursor positioned in the 'UPC' field.
While the Scan Receive screen is primarily used to "scan" parts, manual entry of received quantity can occasionally occur. Reasons for manual entry include:
-
The bar code is damaged on the part's packaging and the part cannot be scanned.
-
Rather than scan the quantity of an item multiple times (e.g., scan an item 15 times for a received quantity of 15), enter a received quantity of 15.
-
Enter a damaged quantity.
A database appswitch determines if the functionality is enabled. When functionality is enabled, User Security permission controls access to the 'Scan Receive' button. To enable this function:
-
Access the User Security Setup screen.
-
Select a plan from the 'Plan' drop-down.
-
Under 'Show Restrictions For:' check the 'Show All' box.
-
Look for 'Scan Receive' in the 'Title' column of either the 'Applied Restrictions' or 'Unapplied Restrictions' box. Highlight the row by clicking on it.
-
Check the 'Allow Edit' checkbox:
The Scan Receive screen is used to:
-
Select one or more PO / ASNs.
-
Scan parts to be applied to PO/ ASN.
-
Note: Bar codes can also be manually entered. Whether scanned or manually entered, the bar code must exist in the UPC bar code table to add the part to the PO / ASN.
-
Receive all of the scanned part quantities on one PO /ASN into stock.
-
Note: If multiple PO / ASNs are involved, each PO / ASN must be received separately.
-
Receive parts into stock without having received the entire ASN, while allowing the pick up and continuation of scan receiving against the same ASN later.
The ASN continues to be available until:
-
Eliminates the purchase order (receives in full or deletes/cancels it)
-
Uses the 'Auto Receive' function to receive the purchase order from the Purchasing Dashboard screen.
-
Uses the 'ASN Post' window to receive the purchase order by the ASN.
-
Answers 'Yes' to the "ASN Receipt Complete?" prompt after clicking 'Done' or 'Post'.
-
Preview and print the PO Receiving Report.
Menu Path: Purchasing, Scan Receive, Scan Receive screen
![]() Scan Receive - 12 minutesScan Receive - 12 minutes
Scan Receive - 12 minutesScan Receive - 12 minutes
Receiving POs / ASNs
PO #
Displays the POs selected from the 'PO / ASN List' pop-up, accessed from clicking the 'List' button.
ASN #
Displays the ASNs selected from the 'PO / ASN List' pop-up, accessed from clicking the 'List' button.
Receive Entry Type
Part Number
Identifies the PO /ASN was received by part number.
UPC / SKU
Identified the PO / ASN was received by UPC/SKU. (Default)
Line
When a PO is selected by clicking 'List' or 'Search', the field is enabled. Scan the part. A successful scan causes an audible "beep" and populates the grid. An unsuccessful scan causes an audible "buzz" and does not populate the grid.
PN/UPC/SKU
When a PO is selected by clicking 'List' or 'Search', the field is enabled. Scan the part. A successful scan causes an audible "beep" and populates the grid. An unsuccessful scan causes an audible "buzz" and does not populate the grid.
Bar codes can also be manually entered. Whether scanned or manually entered, the bar code must exist in the UPC bar code table to add the part to the PO / ASN.
Once a part is scanned or manually entered, the part cannot be deleted from the scan session. However, the part's received quantity can be updated to zero (0) so when the PO / ASN is received, the part's stock quantity will not be changed.
Grid
When a part is successfully scanned, the PC terminal makes an audible "beep" and the part is added into the grid. When a part is unsuccessfully scanned, the PC terminal makes an audible "buzz" and the part is not added to the grid. Reasons for failing to scan include:
-
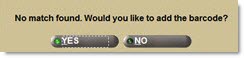
A bar code does not exist in the UPC bar code table. The following prompt displays when no match is found.
-
Click 'Yes' to display the UPC Setup screen, if User Security permission allows, to add the bar code. The scanned part is ignored if the bar code is not added. Click 'No' and the scanned part is ignored.
-
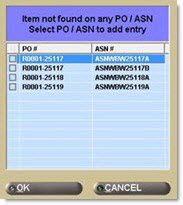
A scanned or manually entered part is not found on any PO / ASN within the scan session. The following pop-up displays with a list of the POs / ASNs within the active scan session for the current user.
-
Select one PO / ASN to apply the received quantity for the part. Click 'Ok' and the part is added to the PO / ASN and the PC makes an audible "beep". Click 'Cancel' and scanned or entered part is ignored and the PC makes an audible "buzz".
-
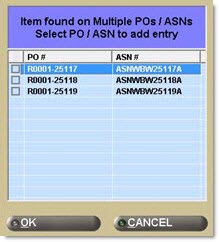
A scanned or manually entered part is found on multiple PO / ASNs within the scan session. The following pop-up displays with a list of POs / ASNs.
-
Select one PO / ASN to apply the received quantity for the part. Click 'Ok' and the part is added to the PO / ASN and the PC makes an audible "beep". Click 'Cancel' and scanned or entered part is ignored and the PC makes an audible "buzz".
If the same number is scanned again, then the received quantity is incremented on the same row in the grid. Note: Only one row displays in the grid for each different part scanned on the same PO / ASN.
As parts are scanned, they are added to the grid and updated to the application database (therefore, scanned parts do not need to be re-scanned in the event of a PC problem).
When a scan session is selected from the 'Search Scan Sessions' or 'Browse Scan Session' pop-ups, the parts in the Scan Session are added to the grid, one at a time, as if the parts had bene scanned while on the screen.
As each part from the scan session is processed, the application displays the 'Line' and 'PN' values for each part in the entry fields as if they had been entered on the screen.
The "beep" sounds does not sound when the parts are added from a Scan Session, unlike when parts are manually entered.
As each part is added to the grid, the application populates a value for each column in the grid:
-
'Line' - obtained value from scan session
-
'Part' - obtained value from scan session
-
'Ordered' - obtained from PO
-
'Received Qty' - obtained value from scan session
-
'Damaged Qty' - default value of 0
-
'PO/ASN#' - obtained from the PO/ASN# previously selected
If any part in the scan session does not exist on any of the POs/ASNs previously selected, the "buzz" sound will sound.
After the entire scan session is processed, the application prompts to delete the scan session.
Then, continue to select additional scan sessions to add additional parts to the grid.
Line
Displays the manufacturer line code.
Part
Displays the part number.
Ordered
Displays the number of ordered items. This quantity amount may differ from the received quantity amount.
Received Qty
Displays the number of received items scanned based on the part's bar code pack quantity.
Typically, defaults to 1 upon being scanned when the part has an 'Each' bar code pack quantity. When a non-'Each' bar code pack quantity value, such as 'Box' (i.e., 6 part items are packed in one box), is scanned, then the received value is the pack quantity number.
Manually edit the amount to the number received or scan one of the items multiple times to obtain the received quantity. A part's received quantity cannot be manually updated to an amount less than the damaged quantity.
Damaged Qty
Displays the number of damaged items, which can manually be entered. Defaults to 0.
PO/ASN #
Displays the PO / ASN number.
Select POs / ASNs
The scan session is active as soon as a PO / ASN is selected. An active scan session can be 'In Progress', 'Incomplete', or 'Complete'. The scan session is closed when either all part quantities are received into stock or the scan session is deleted.
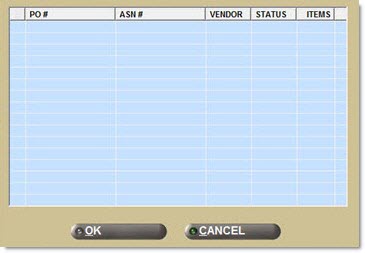
List
Displays the 'PO ASN List' window used to select one or more POs / ASNs to be scanned. Only PO with the PO status of 'Fin', 'Ord-R', 'ASN', or 'Obk' display.
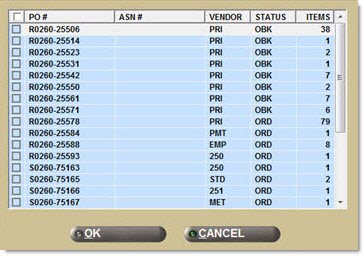

Displays the 'PO / ASN Search' pop-up used to find one or more PO / ASNs to scan. When found, the matches populate the grid. Select the desired POs / ASNs to be scanned.
In Progress
Displays the 'POs / ASNs In Progress' pop-up used to view a list of all scan sessions that are in the 'In Progress' scanning status.
Incomplete
Displays the POs / ASNs Incomplete pop-up with a list of PO / ASNs that are currently in the 'Incomplete' scanning status.

Complete
Displays the 'POs / ASNs Rcv Complete' pop-up that lists all PO / ASN scan sessions that are in 'Complete' status.
Use to select a scan session that had been paused after completely scanning all parts but had not yet received all scanned part quantities into stock. Note: Parts are not received into stock until 'Post' is clicked.

Delete
Displays the 'POs / ASNs Incomplete' pop-up when no scan session is currently in progress, when clicked.
Select the PO / ASN that is currently in 'Incomplete' status. Click 'Ok' and the selected PO /ASN scan session is deleted. Click 'Cancel' to not delete any PO / ASN.
Only scan sessions currently saved in the 'Incomplete' status can be deleted.
When a current scan session is 'In Progress' when clicking 'Delete', the following pop-up displays.

Click 'Yes' and the scan session is removed, the PO / ASN status is set to 'Complete' and the PO / ASN are no longer locked. Note: Since a PO / ASN cannot be deleted when the scanning sessions is in 'Complete' status, do not click 'Yes' if the current scan session is to be deleted. Click 'No' and the scan session is removed, the PO / ASN status is set to 'Incomplete' and the PO / ASN are no longer locked. Click 'Cancel' to return to the active scan session.
Displays the 'POs / ASNs Rcv Complete' pop-up used to select one PO / ASN to preview prior to actually receiving the scanned parts into stock by clicking the 'Post' button.
After selecting one PO or ASN, the 'Preliminary Receiving Report' pop-up displays.
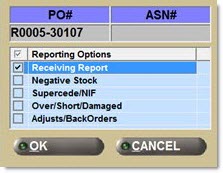
Select one, multiple or all preliminary receiving reports to be previewed. Click 'Ok' and the report displays on the screen.
Displays the 'POs / ASNs Rcv Complete' pop-up used to select one PO / ASN to print prior to actually receiving the scanned parts into stock by clicking the 'Post' button.

After selecting one PO or ASN, the 'Preliminary Receiving Report' pop-up displays.
Select one, multiple or all preliminary receiving reports to be printed. Click 'Ok' and the report displays prints.
Displays the following pop-up used to receive all scanned part quantities into stock.
-
'Yes' - Removes the scan session from the screen, sets the scanning status to 'Complete' and unlocks the PO / ASNs.
-
'No' - Removes the scan session from the screen, sets the scanning status to 'Incomplete' and unlocks the PO / ASNs.
-
'Cancel' - Returns to the active scan session.
If the current scan session is not in progress when the button is clicked, or the pop-up is closed, the 'POs / ASNs Rcv Complete' pop-up displays with a list of all PO / ASNs in 'Complete' status.

Since only one PO /ASN can be received into stock at a time, select on PO / ASN. Click 'Ok'.
The 'Receive PO / ASN Into Stock' pop-up displays.
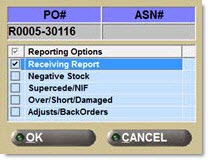
Confirm/select the reports to print upon receipt of the scanned part quantities into stock. Click 'Ok'. Selected reports print and all scanned part quantities are updated into stock. If no reports are selected, no reports print, however, all scanned part quantities update into stock. Click 'Cancel' without selecting a report and no reports print and scanned quantities are not updated into stock.
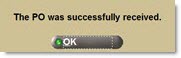
The following confirmation pop-up displays when the scanned part quantities are successfully updated into stock.
Scan Session
List All
Only enabled once one or more POs/ASNs have been selected.
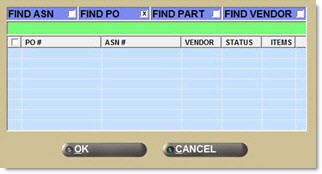
Displays the 'Browse Scan Sessions' pop-up to search for a Scan Session by either typing a full or partial name, or selecting one of the Scan Session values from the drop-down list.
Only one scan session can be selected.
Search
Only enabled once one or more POs/ASNs have been selected.
Displays the 'Search Scan Sessions' pop-up to search for a Scan Session by entering a 'Line' and 'P/N', or selecting one of the Scan Session values from the drop-down list.
Only one scan session can be selected.
Find
Displays a line code in the first box and a part number in the second box to search for a part number. Or, enter a part number without a line code. Or, click the 'Find' button to display the 'Find Part' window to search for a part. When a part is found, the cursor moves to that part in the grid.
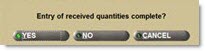
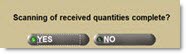
Displays a pop-up asking if "Scanning of received quantities complete?"
-
Click 'Yes' and the application displays the "ASN Receipt complete?" prompt to determine what happens to the ASN after the PO is received.
-
Click 'Yes', and the ASN is no longer accessible; no further receipts can be done against the ASN. However, the PO can still be received without using an ASN.
-
Click 'No', and the ASN is retained and further receipts can be done against the ASN.
-
-
Click 'No' and the application saves the PO / ASNs with an 'Incomplete' status, indicating that more scanning is still required for the PO / ASNs. The ASN/PO displays in the 'POs / ASNs Incomplete' window when clicking the 'Incomplete' button.
-
Click 'Cancel' and the application returns to the screen without saving changes and the status of the PO / ASNs remain 'In Progress'. The ASN/PO displays in the 'POs / ASNs In Progress' window when the 'In Progress' button is clicked.
Clicking 'Done' is optional. The same prompt displays when 'Delete', 'Preview', 'Print', or 'Receive' is clicked.
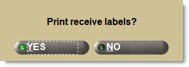
If the setting 'Print Receive Labels' in the 'Order Receive' section of the System Purchasing Setup screen is clicked, the following pop-up displays.
-
Click 'Yes' and the application prints part labels for each part received.
-
Click 'No' and the application ignores printing any labels.
To pause/interrupt a scan session before the scanning of all parts is complete on the PO / ASN ('In Progress'), click 'Done'. The following pop-up displays.
-
Click 'Yes' to remove the scan session from screen, set the PO / ASN status to 'Complete', and unlock the PO / ASNs.
-
Click 'No' to remove the scan session from screen, set the PO / ASN status to 'Incomplete' and unlock the PO / ASNs.
-
Click 'Cancel' to return to the active scan session.
Total Units
Displays the total number of units of the parts scanned.
Total Parts
Displays the total number of parts scanned.
Close
Exits the screen if no PO / ASN is selected. If one or more PO / ASN have been selected, the following pop-up displays.
If one or more PO / ASN have been selected, and one or more part has been scanned, the following pop-up displays.

Click 'Yes' and the scan session is removed from the screen, the PO / ASN scanning status is set to 'Complete' and the PO / ASN is unlocked. Click 'No' and the scan session is removed from the screen, the PO / ASN scanning status is set to 'Incomplete' and the PO / ASN is unlocked. Click 'Cancel' and the scan session remains open.
Scan Session Inactivity
When a scan session has been inactive for a specified time (for example, 5 minutes), the following pop-up displays.

Click 'Yes' to keep the screen open. Click 'No' to manually close the screen (or let the application automatically close the screen within 15 seconds). When the screen closes, the scan session is saved with a status of 'Incomplete' and any PO / ASN that was part of the scan session will be unlocked.
Procedure to Scan and Receive a PO / ASN
To scan and receive a PO / ASN, follow the steps below:
-
From the Menu, select Purchasing, Scan Receive. The Scan Receive screen displays.
-
Click 'List'. The 'PO /ASN List' window displays.
-
Check the checkbox next to each PO / ASN to select.
-
Click 'Ok'. The selected PO /ASNs display in the 'Receiving POs / ASNs' grid.
-
Scan all of the part units in the container. Note: Listen for the "beep" after each scanned part unit to ensure the scan was successful. A "buzz" indicates the part did not scan. The part unit information displays in the grid.
-
Click 'Receive'. A pop-up displays asking "Scanning of received quantities complete?"
-
Click 'Yes' on the pop-up to indicate that the scanning of all received quantities is complete. The 'POs / ASNs Rcv Complete' pop-up displays.
-
Confirm that the appropriate PO / ASN is checked and click 'Ok' on the 'POs / ASNs Rcv Complete' pop-up. The 'Receive PO / ASN Into Stock' pop-up displays.
-
Click 'Ok'. The received part quantities are received into stock. The Receiving Report (and any other selected report) prints. A pop-up displays stating the PO was successfully received.
-
Click 'Ok'.