Scan Validate
The scan validate function enables the user to validate the product sold and returned at Point of Sale by a retail store forcing the user to scan or enter a VAL (validation) quantity for each physical part.
Tap 'Scan Validate' on the 'Main Menu' screen to begin the scan validation process.
![]() RF Device Scan Validate - 8 minutesRF Device Scan Validate - 8 minutes
RF Device Scan Validate - 8 minutesRF Device Scan Validate - 8 minutes
Match Results
Opens when a validation from the Invoice Reference screen is performed and parts do not match.
Only displays a list of parts that had differences between the aggregated scan session quantity and the sales order quantity.
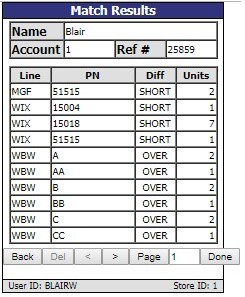
Displays the name of the selected session.
Displays the account associated with the selected session.
Displays reference number associated with the selected session.
Displays the scanned product's line code.
Displays the scanned product's part number.

Displays a value of 'SHORT' if more units need to be obtained and scanned to fulfill the sales order.
Displays a value of 'OVER' if items need to be returned to the shelf to match the quantity of the sales order.
Displays the amount of quantity difference between the aggregated scan session quantity and the sales order quantity.
Tap to return to the 'Main Menu' screen and discontinue the scan validation process.
Deletes one or more parts that are selected. Unavailable on this screen.
Tap to move forwards or backwards one page in the list of scanned parts.
Indicates the page number of the current page. Enter a new page number and tap the button to jump to that page.
Tap to return to the 'Main Menu' screen. Scan validation is discontinued.
Invoice Reference
The 'Select Invoice Reference' screen opens when the a session from the 'Scan Session' screen is opened and the 'Done' button is tapped.

Enters the 'Invoice Reference' from the search field into the grid.
Allows for the scanning of an item from this screen.
Allows for manual entry of an item to search for from this screen.
Allows for the selection of one or multiple sessions in the grid.
Displays the reference number of the sales order that was entered into the grid.
Displays the account associated with the sales order that was entered into the grid.
Displays the number of items scanned in the scan session.
Tap to return to the 'Scan Session' screen.
Deletes one or multiple selections based on the Radio Button.
Tap to move forwards or backwards one page in the list of scan sessions.
Indicates the page number of the current page. Enter a new page number and tap the button to jump to that page.
Performs a comparison between the user selected Scan Session and Sales Order.
Process to Compare Scan Session with Sales Order
-
Compare the scan quantity of each part in the scan session to the order quantity of each part in the sales order.
-
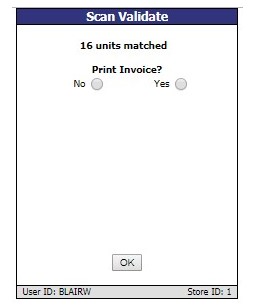
If the comparison results in an exact match of aggregated scanned quantity to order quantity for every part on the sales order, the system displays a prompt with the text "<N> units matched" and an 'OK' button. Note: The units are the number of total pieces on the scan session and sales order.
-
The prompt will also display the text "Print invoice?" with two radio buttons: 'No' and 'Yes'. The value of the switch 'RF SCAN VALIDATION PRINT INVOICE' will determine which radio button is pre-selected and whether the user has a choice to select a radio button value.
-
If the comparison results in "an exact match", and the 'OK' button is tapped on the prompt above, then the system performs the final processing of the scan session and sales order. See the section Finalize Sales Order for the details.
-
If the comparison results in "any differences" of aggregated scanned quantity to order quantity for any part, then display only the parts that contain differences on the 'Match Results' screen.