Kit Setup Overview
Kits Training Packet - 2 pages
Kits Glossary
A pre-defined list of component parts (within one or multiple lines), sold and priced together, "picked" from the shelf at the time of sale. KIT will be referred to as a standard or traditional kit.
A "KIT part" has no inventory and its primary purpose is to identify and select the list of components "all at once" at the time of sale.
An item within a KIT, and the number of units required for that item in the KIT.
One type of item is a single part number. That part can also be another KIT. For example, one KIT can be inside a second KIT which is inside a third KIT, etc.
Another type of item is a part list. A list of part numbers. An example for an engine KIT is a rod bearing. At setup, several rod bearing part numbers are added to the list for the different sizes required (e.g. STD, .50MM, .75MM). At Point-of-Sale, select the appropriate part number for the size required for the customer.
The third type of item is a part choice. A set of criteria that defines a "family" of part numbers (e.g. all "heater hoses" in the GAT line). Pre-define a default part number and still select any part number within the "family" at Point-of-Sale.
The fourth type of item is a catalog part type, used with ACES, Epicor, and TecAlliance catalog data. Using the ACES catalog, examples for a brake kit are "Disc Brake Rotor" and "Disc Brake Pad". At Point-of-Sale, either the application automatically chooses parts specific to the vehicle selected, or the user can manually select the parts from a list of available parts for that vehicle.
The fifth type of item is KIT Components, where you can copy all of the components from one KIT to another.
BOM "Bill of Materials"
A pre-defined list of component parts, sold and priced together.
However, component parts are not "picked" off the shelf at the time of sale. Instead, component parts are "assembled" into one package during a setup function, during which time the QOH of the BOM part is incremented, and the QOH of all component parts are decremented.
kit
For the remainder of this Help, the term "kit" will refer to both KITs and BOMs, while the term "Kit" or "KIT" will refer to only a standard or traditional KIT.
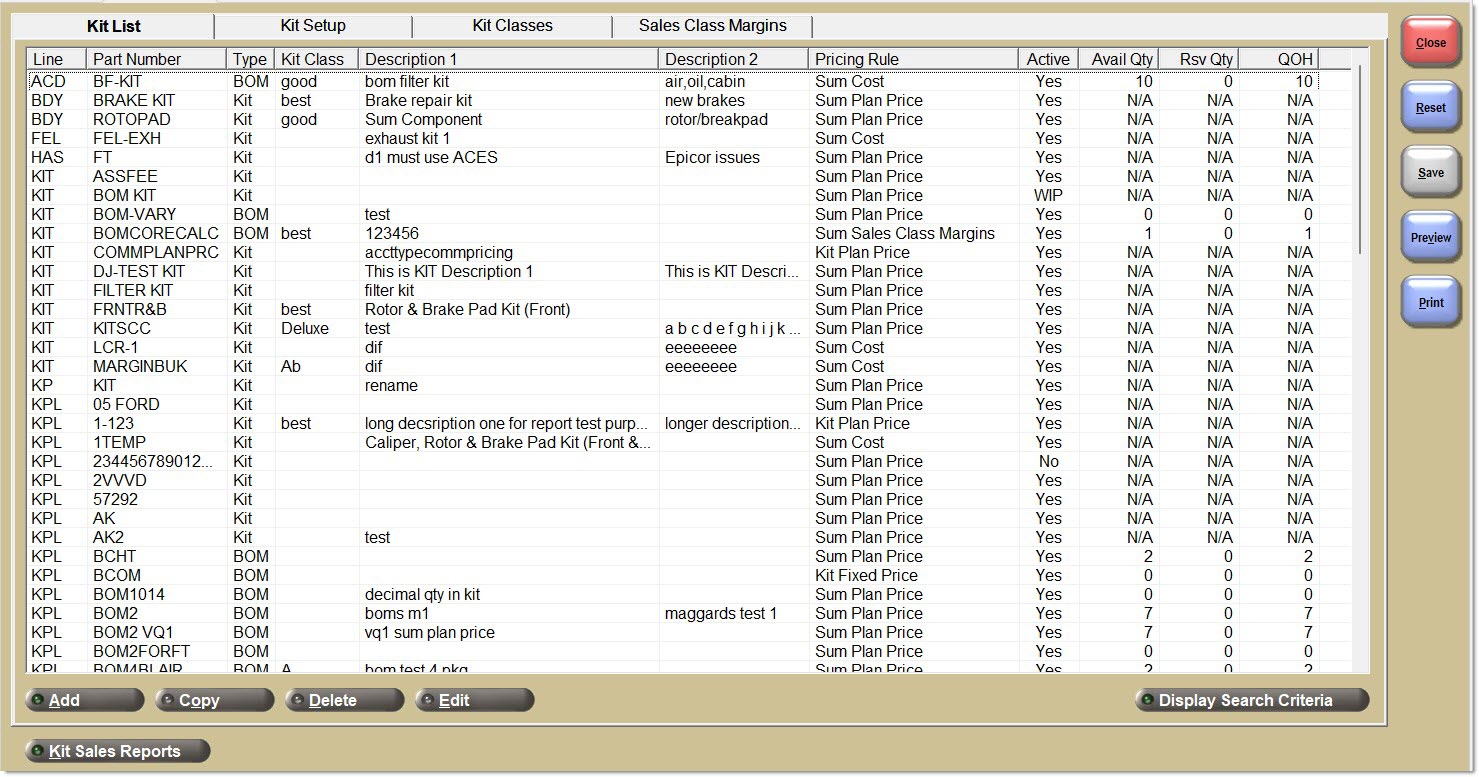
Kit Setup Screen
The KIT SETUP screen is used to create two different types of kits.
The first type of kit is a standard or traditional Kit, which contains a pre-defined list of component part numbers. The Kit can also contain pre-defined catalog Part Types where component part numbers are selected at Point-of-Sale.
- The KIT part has no QOH.
- At Point-of-Sale, Kit parts must be selected to sell all Kit component parts.
- At invoice finalization, all component parts are "picked off the shelf", their QOH is decremented and written to the Part Ledger.
- The component parts, if alternates are used, may be different for the same Kit sold. If Part Type components are used, the parts may also be different based upon a vehicle.
The second type of kit is a BOM ("Bill of Materials") Kit, which also contains a pre-defined list of component part numbers.
- However, the BOM part has a QOH.
- Before Point-of-Sale, BOM component parts are "picked off the shelf", packaged together, and their QOH is decremented and written to the Part Ledger. The QOH of the BOM part is increased and written to the Part Ledger.
- At Point-of-Sale, BOM parts must be selected to sell all BOM component parts.
- However, at invoice finalization, only the BOM part is "picked off the shelf", its QOH is decremented and written to the Part Ledger.
- The "pre-packaged" component parts are always the same for the same BOM part sold.
During kit setup (across all kits):
- Define Kit Classes (e.g. Economy and Premium) and assign any kit to a class.
- Define Kit Fees (e.g. add, upgrade and delete surcharge percentages and minimums), and apply to any KIT.
- Define Kit Fees (e.g. return restocking fee percentages and minimums) and apply them to any KIT or BOM (in addition to any store restocking fees used for sourced parts).
- Define Sales Class Margins (e.g. a margin percentage per sales class) and use it in any kit that defines a Pricing Rule of Sum Sales Class Margins.
During kit setup (for one kit):
-
Add components from one kit to another by copying one kit to another.
-
Choose one of five types of components:
-
Part - A single part number (e.g. WIX 51515)
-
Part List - A list of part numbers (which might be used for pistons or rods in engine kits where the only difference between the part numbers is the size of the part)
-
Part Choice - A list of Lines, PN Codes, PN Groups, or Prdt Codes (which might be used for a component of "oil filters" within the WIX or FRA line, when selling at Point-of-Sale without using a catalog)
-
Part Type - A list of ACES, Epicor, or TecAlliance "catalog part types" (which might be used for a component of "Engine Oil Filter" when selling at Point-of-Sale using the catalog)
-
Kit - All of the components from another kit, or even multiple kits when selected one at a time
-
-
Decide whether at Point-of-Sale, to sell any or all kit components (with a Component Type of Part, Part List or Part Choice) using fractional units (e.g. 1.5 or 1.25). Enter each component's 'Qty in Kit' value with one or two numbers to the right of the decimal.
-
Important Note: If a kit component part is set to use fractional units, then that part in the store's inventory must also be set to use fractional units because that part can be sold outside of the kit using the same fractional units.
-
Decide whether, at Point-of-Sale, the logged in employee can add, change, or delete Kit component parts.
-
Decide whether the application will apply surcharge fees to the kit price at Point-of-Sale when Kit components are added, upgraded, or deleted, with minimum surcharge fees for each action.
-
Decide whether at Point-of-Sale, to allow Kit component parts to be replaced with alternates, supersedes or vendor changeovers.
-
Decide whether, at Point-of-Sale, the application will apply restocking fees if customers attempt to return new re-sellable kit components.
-
Decide whether, at Point-of-Sale, if the logged in employee can enter or edit a component's Qty in Kit.
-
Decide whether at Point-of-Sale, to display kit notes or kit components on the printed invoice.
-
Decide whether to allow "breaking up the Kit" at Point-of-Sale; if yes, the parts in the Kit are not sold "as a Kit" but instead are "sold separately" using regular customer pricing, fees, and core pricing rules for each part.
-
Choose one of five pricing rules; the first three are based upon the components, and the last two are based upon the kit part:
-
'Sum Plan Price' (plus an optional discount or markup %) - Results in a different kit price for each customer based upon their regular pricing plan. The GPM% is different for each part component within the kit, and different from the kit's GPM%, even when the kit's sell price is edited to a fixed amount at point of sale, or surcharges are added to the kit price.
-
'Sum Cost' (plus a markup/margin %) - Can result in the same kit price for all customers. The GPM% is the same for each part component within the kit, and the same as the kit's GPM% (unless any part component has a Margin Override %). When the kit's sell price is edited to a fixed amount at Point-of-Sale, or surcharges are added to the kit price, then all kit components GPM% (regardless of any Margin Override %) will be the same as the kit's GPM%.
-
'Sum Sales Class Margins' - Can result in the same kit price for all customers. The GPM% can be the same or different for each part component within the kit, and the same or different as the kit's GPM%. When the kit's sell price is edited to a fixed amount at Point-of-Sale, or surcharges are added to the kit price, then all kit components GPM% will be the same as the kit’s GPM%.
-
'Kit Fixed Price' - Results in the same kit price for all customers. The GPM% is the same for each part component within the kit, and the same as the kit's GPM%, and continues to be the same when the kit's sell price is edited to a fixed amount at Point-of-Sale, or surcharges are added to the kit price.
-
'Kit Plan Price' - Can have different kit prices per account, model, group, account type, store, store group, or enterprise. The GPM% is the same for each part component within the kit, and the same as the kit's GPM%, and continues to be the same when the kit's sell price is edited to a fixed amount at Point-of-Sale, or surcharges are added to the kit price.
-
-
Control kit profit margins by defining "component price range rules" (e.g. if a Kit with two components has a Fixed Kit Price of $99.99, users can define that any part selected for Component 1 must have a sell price less than $29.99, and Component 2 less than $49.99).
-
To extend the example above, it is possible to assign each Kit to a different Kit Class (e.g. "good, better and best") and define two other Kits with Kit Fixed Prices of $149.99 and $199.99.
-
When using the pricing rule of Sum Sales Class Margins, decide whether each component will have its own Margin% override. Note: Component Margin% overrides can also be used with a Pricing Rule of Sum Cost (with Margin%).
-
The user can define Kit Fees: assembly fee percentage and a minimum specific to each KIT.
-
Decide whether, at Point-of-Sale, the application will apply restocking fees if customers attempt to return new re-sellable kit components.
-
Decide whether, at Point-of-Sale, the logged in employee can add, change, or delete Kit component parts.
-
Define Kit Fees: add, upgrade, and delete surcharge percentages and minimums specific to each KIT.
-
Decide whether the application will apply surcharge fees (percentages or a flat minimum surcharge) to the kit price at POS when Kit components are added, upgraded, or deleted.
-
Decide whether at Point-of-Sale, to allow Kit component parts to be replaced with alternates, supersedes, or vendor changeovers.
-
Decide whether, at Point-of-Sale, if the logged in employee can enter or edit a component's 'Qty in Kit'.
-
Decide whether at Point-of-Sale, to display kit notes and/or kit components on the printed invoice.
During kit setup (for those that want to sell kits based upon vehicles without using any catalog):
- Set up custom vehicles per kit and then search for those vehicles at Point-of-Sale without using the catalog.
During Kit setup (for those using ACES, Epicor, or TecAlliance catalog data within the PartsWatch CATALOG screen):
-
Define additional "part filtering rules" (using Lines, PN Codes, PN Groups, and Prdt Codes) to limit parts available for selection for each Part Type component. For example, for a "lower grade" Kit, define one list of Lines, and for a "higher grade" Kit another list of Lines.
-
Decide whether a Kit component's 'Qty in Kit' will use the Catalog 'Per Car' quantity.
-
Define a specified list of vehicles for a kit, and then if anyone in the store searches for catalog parts for that vehicle (using any Part Types), that kit will display at the top of the catalog result set. For example, a brake kit for a Ford Mustang would display when searching for filters. When vehicles are set up for a kit, it is possible to also find that kit by searching using a vehicle search at Point-of-Sale.
During kit setup (for those using ACES catalog data within the PartsWatch CATALOG screen):
- As a shortcut (within less than 5 minutes), create and start selling brake kits using one of six "seeded templates" (with pre-defined ACES Part Type components).
Menu Path: Inventory, Kit Setup, KIT SETUP screen
Procedure to Test, Activate, and Deactivate Kits
-
First create a new kit. The system sets the Active status to WIP.
-
Click the 'Test Kit' button. If there are any unsaved changes on the screen, a "Save Changes?" prompt displays. Note: Testing only uses kit information saved.
-
Click the 'Yes' button and the application saves all unsaved changes on the screen and continues to process the test including the latest changes.
-
Click the 'No' button and the application does not save any unsaved changes on the screen and continues to process the test excluding the latest changes.
-
Click the 'Cancel button' and the application does not process the test, and returns to the KIT SETUP screen.
-
-
The application performs the following validation:
-
For a BOM, the system validates whether the logged in employee has saved any component parts to the database. If not, the system displays a prompt with the text "You must have components to test or activate a BOM." and an 'OK' button. When the 'OK' button is clicked, the system returns to the KIT SETUP screen.
-
For a Kit, the system validates whether the logged in employee has saved any component parts, or has selected the 'Allow Add Components' option (with no components saved). If neither action were performed, the system displays a prompt with the text "You must have components or the Allow Add Components option selected to test or activate a KIT." and an 'OK' button. When the 'OK' button is clicked, the system returns to the KIT SETUP screen.
-
-
An "Are you sure?" prompt displays.
-
Click 'NO' and the application returns control to the 'Kit Setup' tab with the kit still in 'WIP' status.
-
Click 'YES' the application will:
-
Update the kit's status to "Test".
-
Change the label of the "toggle" button from "Test" to "Activate".
-
Create the Line Code in any store where that Line Code does not already exist
-
Create the kit part record in all stores. Note: If another employee has created a new part with the same line and part number as the kit (in any store), the system does not create the kit part, and displays a prompt with a message "Part number already exists. Cannot create kit part in stores.". Copy the kit to another kit and delete the original kit.
-
Set the 'SUB TYPE' field on the Part Entry screen for all kit parts in all stores to a value of either 'KIT' or 'BOM' based upon the Kit Type of the kit. Do not allow updating of the 'SUB TYPE' value of 'KIT' or 'BOM' on the Part Entry screen or using any other application function that can update the part's 'SUB TYPE'.
-
A record is written to the Audit Report.
-
-
-
Note: After clicking the 'Test Kit' button, the logged in employee can now go into invoicing, specify a customer, find a kit and view the kit on the 'Kit' pop-up at Point-of-Sale. Many of the setup values can be reviewed, for example, components and pricing rules. Does the kit have a fixed sell price of zero? Was a kit with a sell price based upon component costs marked up with the right percentage? Does every component have a part? Does every component have a non-zero sell price?
-
The 'Sell' button is enabled on the 'Kit' pop-up while a kit is in 'Test' status. However, kits can only be added to an invoice after the 'Activate Kit' button is clicked. Therefore, clicking the 'Sell' button displays the following prompt: "The kit is in test mode. It must be activated before it can be sold.".
-
After testing the kit, it is possible to make further edits to the kit, or click the 'Activate Kit' button.
-
Note: If a KIT contains another component that is also a KIT, and both KITs are in 'Test' status, only the "parent" KIT part can be seen at Point-of-Sale for testing. "Child" KITs cannot be seen at Point-of-Sale so the testing of the "parent" KIT will be incomplete. Therefore, the "child" KIT should be changed to an 'Active' status to fully test the "parent" KIT.
-
Click the 'Activate Kit' button, and if there are any unsaved changes on the screen, the application displays a "Save Changes?" prompt. Note: Activation only uses kit information saved.
-
Click the 'Yes' button and the application saves all unsaved changes on the screen and continues to process the activation including the latest changes.
-
Click the 'No' button and the application does not save any unsaved changes on the screen and continues to process the activation excluding the latest changes.
-
Click the 'Cancel' button and the application does not process the activation, and returns to the KIT SETUP screen.
-
-
The application perform the following validation:
-
For a BOM, the system validates whether the logged in employee has saved any component parts. If not, the system displays a prompt with the text "You must have components to test or activate a BOM." and an 'OK' button. When the 'OK' button is clicked, the system returns to the KIT SETUP screen.
-
For a Kit, validate whether the logged in employee has saved any component parts to the database, or has selected the 'Allow Add Components' option (with no components saved). If neither action has been performed, the system displays a prompt with the text "You must have components or the Allow Add Components option selected to test or activate a KIT." and an 'OK' button. When the 'OK' button is clicked, the system returns to the KIT SETUP screen.
-
-
An "Are you sure?" prompt displays.
-
Click 'NO' and the application returns control to the 'Kit Setup' tab with the kit still in 'Test' status.
-
Click 'YES' and the application will:
-
Update the kit's status to "Yes".
-
Update the kit's 'Activated' (date); only the first time a kit is activated.
-
Change the button caption to 'Deactivate Kit'.
-
Enable the 'Sell' button on the 'Kit' pop-up.
-
Write a record to the Audit Report.
-
-
-
Note: After clicking the 'Activate Kit' button, it is now possible to go into invoicing, and view a kit on the invoice, after clicking the 'Sell' button on the 'Kit' pop-up.
-
Click the 'Deactivate Kit' button and if there are any unsaved changes on the screen, the system displays a "Save Changes?" prompt. Note: Deactivation only uses kit information saved.
-
Click the 'Yes' button and the application will save all unsaved changes on the screen and continues to process the deactivation including the latest changes.
-
Click the 'No' button and the application does not save any unsaved changes on the screen and continues to process the deactivation excluding the latest changes.
-
Click the 'Cancel' button and the application does not process the deactivation, and returns to the KIT SETUP screen.
-
-
The system performs the following validation:
-
For a Kit, validate whether the logged in employee has saved any component parts to the database, or has selected the 'Allow Add Components' option (with no components saved). If neither action has been performed, the system displays a prompt with the text "You must have components or the Allow Add Components option selected to test or activate a KIT." and an 'OK' button. When the 'OK' button is clicked, the system returns to the KIT SETUP screen.
-
-
An "Are you sure?" prompt displays.
-
Click 'NO' and the application returns control to the 'Kit Setup' tab with the kit still in 'Yes' status.
-
Click 'YES' and the application will:
-
Update the kit's status to "No".
-
Update the kit's 'Deactivated' (date); only the first time a kit is deactivated.
-
Continue to display the same 'Activated' (Date).
-
Change the button caption back to 'Activate Kit'. Note: The button acts as a toggle between 'Activate Kit' and 'Deactivate Kit'. 'Test Kit' will not be available.
-
Hide the kit on the 'Find Kit' pop-up at Point-of-Sale and the CATALOG screen.
-
If that kit part is entered on the sell line after the 'Kit' pop-up opens, the system displays a prompt with the text "This kit is not available at POS." and an 'OK' button, so that is is not possible to sell the kit. After the 'OK' button is clicked, the system closes the 'Kit' pop-up and returns to the Invoice Point of Sale screen.
-
Write a record to the Audit Report.
-
-
-
Click the 'Activate Kit' button. If there are any unsaved changes on the screen, a "Save Change?" prompt displays. Note: Activation only uses kit information saved.
-
Click the 'Yes' button and the application saves all unsaved changes on the screen and continues to process the activation including the latest changes.
-
Click the 'No' button and the application does not save all unsaved changes on the screen and continues to process the activation excluding the latest changes.
-
Click the 'Cancel' button and the application does not process the activation, and returns to the KIT SETUP screen.
-
-
The application perform the following validation:
-
For a Kit, validate whether the logged in employee has saved any component parts to the database, or has selected the 'Allow Add Components' option (with no components saved). If neither action has been performed, the system displays a prompt with the text "You must have components or the Allow Add Components option selected to test or activate a KIT." and an 'OK' button. When the 'OK' button is clicked, the system returns to the KIT SETUP screen.
-
An "Are you sure?" prompt displays.
-
Click 'NO' to return control to the 'Kit Setup' tab with the kit still in 'No' status.
-
Click 'YES' and the application will:
-
Update the kit's status back to "Yes".
-
Clear out the kit's 'Deactivated' (date).
-
Continue to display the original 'Activated' (Date). Do not update this date.
-
Change the button caption back to 'Deactivate Kit'. Note: The button will act as a toggle between 'Activate Kit' and 'Deactivate Kit'. 'Test Kit' is not available.
-
Show the kit on the 'Find Kit' pop-up, and 'Kit' pop-up at Point-of-Sale, so that the kit can be sold.
-
Write a record to the Audit Report.
-
-
-
For a BOM part, it is mandatory to click the 'Activate' button before the 'Package kit' button can be clicked.
-
For a KIT part, once the status is 'Activated' or 'Deactivated', if any values are changed and the 'Save button is clicked, the system validates whether the logged in employee has saved any component parts to the database, or has selected the 'Allow Add Components' option. If neither action has been performed, the system displays a prompt with the text "You must have components or the Allow Add Components option selected to test or activate a KIT." and an 'OK' button. When the 'OK' button is clicked, the system returns to the KIT SETUP screen.
Procedure to Edit Kits (Kits Only)
-
It is possible to edit all information at any time while the kit has any 'Status' ('WIP', 'Test', 'Yes', or 'No').
-
The application displays the same tabs for editing kit information used for entering new kit information 'Kit Options' tab, 'Components' tab, 'Catalog Inclusions' tab, and 'Vehicles' tab. However, when editing an existing kit, the default tab opened is the 'Components' tab instead of the 'Kit Options' tab.
-
The application uses the same pop-ups for editing components used for adding new components: e.g. 'Setup Kit Part Component', 'Setup Kit Part List Component', 'Setup Kit Part Choice Component', and 'Setup Kit Part Type Component'.
-
Note: By allowing the editing of activated kits, this means it is possible to sell the same kit with different components or different pricing rules at any time.
Procedure to Edit Kits (BOMs Only)
-
It is possible to edit all information when the 'Status' is 'WIP' or 'Test'. This includes any kit settings on the 'Kit Options' tab, any components on the 'Components' tab, any Part Types on the 'Catalog Inclusions' tab, or any vehicles on the 'Vehicles' tab.
-
The application displays the same tabs for editing kit information used for entering new kit information: 'Kit Options' tab, 'Components' tab, 'Catalog Inclusions' tab, and 'Vehicles' tab.
-
The application uses the same pop-up for editing components used for adding new components: For example, 'Setup Kit Part Component'.
-
It is still possible to update kit settings on the 'Kit Options' tab, fees on the 'Kit Fees' tab, Part Types on the 'Catalog Inclusions' tab, or vehicles on the 'Vehicles' tab when the status is 'Yes' ("activated") or 'No' ("deactivated"). Once a kit is activated, it is not possible to change any components.
-
This rule is to ensure the integrity of the packaging and un-packaging functions; when component stock is decremented or incremented.
-
On the 'Components' tab, the 'Add', 'Delete', and 'Clear' buttons are all disabled.
-
On the 'Components' tab, the 'Edit' button is enabled to allow updating only the 'Margin % Override'.
-
If a component Part is right-clicked, the 'Setup Kit Part Component' pop-up opens, but with view-only values for 'Line', 'P/N', 'Qty In Kit', and 'Quantity Decimals'. Only the 'Margin % Override' field is enabled. The 'OK' button is disabled until a value is entered for the 'Margin % Override'. Otherwise, click the 'Cancel' button to close the pop-up and return to the 'Components' tab.
-