Part Move
The PART MOVE UTILITY screen is used to change the Line Code on any or all parts within a line to match the Line Code used within the primary supplier's warehouse to simplify interfaces between the store and the warehouse.
If a Line Code does not match the one used by the primary warehouse, or if the primary supplier changes, this utility can convert a line to match the Line Code used by the supplier.
Menu Path: Inventory, Part Utility, Part Move, PART MOVE UTILITY screen
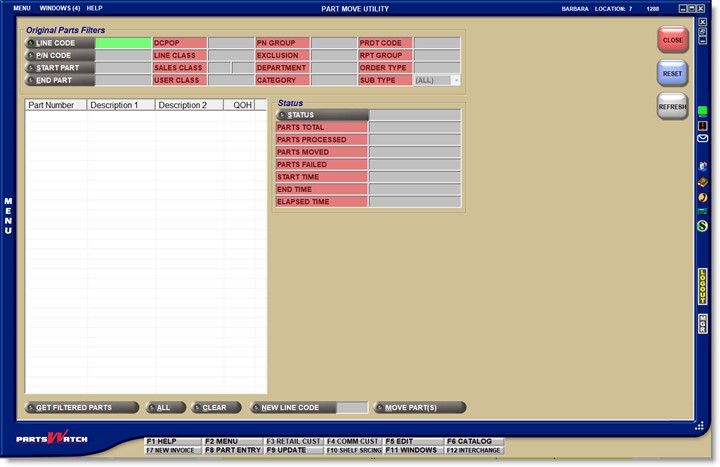

Original Part Filters
To run the utility, enter:
LINE CODE
Enter the Line Code that will be changed, i.e. the Line Code of the parts that will be moved. Click the 'LINE' button to select a Line Code.
PN CODE
Optionally select a 'PN CODE' to narrow the parts output for a single Line Code. Click the 'P/N CODE' button to select a P/N Code.
START / END PART NO
The field is only available when a single line is selected. Optionally narrow the output to parts within the selected range. Click the button to select a part number.
Search Options
Narrow the parts affected by part filters:
- 'DC POP'
- 'LINE CLASS'
- 'SALES CLASS'
- 'USER CLASS'
- 'PN GROUP'
- 'EXCLUSION' (obsolete)
- 'DEPARTMENT'
- 'CATEGORY'
- 'PRDT CODE'
- 'RPT GROUP'
- 'ORDER TYPE'
- 'SUB TYPE'
With the Line Code selected, click the button to display the parts that will be moved. To not impact system performance, up to 1000 parts can be moved at a time, so if there are more than 1000 parts, the utility will have to be run until all parts are moved.
The parts display in the left-side grid with a small check box next to each one. Include or exclude certain parts by checking or unchecking the small checkbox. The default is unchecked, therefore:
- Click the checkboxes.
- Click the 'ALL' button to include all parts and uncheck any to exclude.
- Click the 'CLEAR' button to uncheck all parts and check any to include.
NEW LINE CODE Button
Enter the new Line Code or click the button to select a new Line Code. If the Line Code entered does not already exist, the move will fail.
MOVE PART(S) Button
The 'MOVE PARTS' button is enabled when at least one part in the grid is checked. Click the button and a pop-up will open to make sure the move should continue.
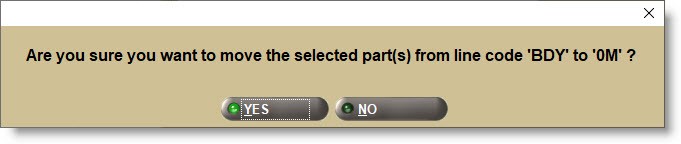
- Answer 'Yes' to continue.
- Answer 'No' to abort the move.
Status
If the move continues, the status will refresh every 10 seconds showing the progress. Click the 'REFRESH' button to refresh the 'Status' fields more often.
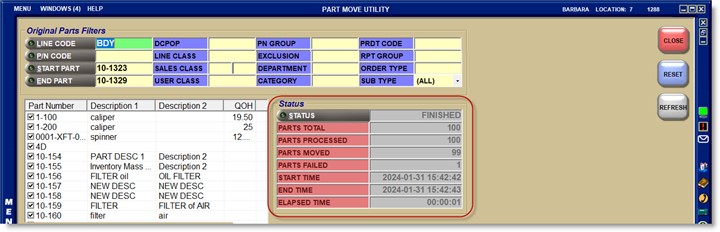
Once the move is completed, clicking the 'STATUS' button will open a System Message window with the information from the move.

While the conversion is running, the screen can be closed and the utility will continue to run in the background. Another move cannot be started until the process is finished.
The status will change to 'FINISHED' when done. And, unless all selected parts are moved to the new line, the status will show as 'FAILED'. The utility can be rerun using the same old and new Line Codes if any parts fail.
Once the selected parts have been moved, they are found only under the new Line Code throughout the application for part maintenance, invoicing, purchasing, and reporting, including historical reporting.