Hole Count
The Hole Count function enables the user to identify items on the inventory floor that have identifiable discrepancies via a RF device for reporting at a later time. The report assists in making adjustments to the shelf inventory to address those discrepancies.
Logging in to the RF device defines the user's permissions as determined by User Security in PartsWatch and determines if the user can see the 'Quantity on Hand' during the Hole Count operation.
A successful scan beeps and an unsuccessful scan buzzes.
Upon log in to the RF device, the 'Main Menu' screen displays.
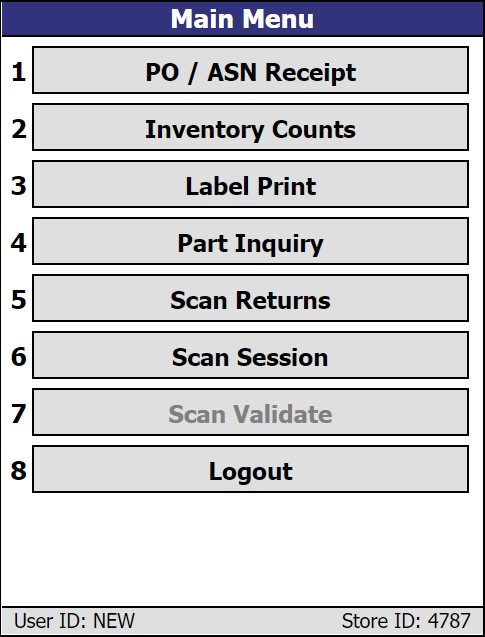
Select the 'Inventory Counts' option on the 'Main Menu' to display the 'Inventory Counts Menu' screen.

Select the 'Hole Count' option on the 'Inventory Counts Menu' screen to display the 'Hole Count Menu' screen.
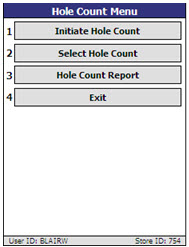
Displays the 'Hole Count Entry' screen used to initiate the Hole Count.
Displays the 'Select Hole Count' screen used to recall entries from saved hole counts.
Displays the 'RF Hole Count Report' screen used to print a hole count, regardless of its status.
Tap to return to the 'Main Menu' screen.
Initiate Hole Count
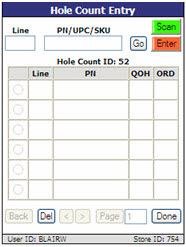
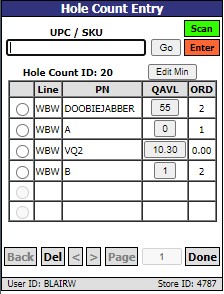
Select 'Initiate Hole Count' on the 'Hole Count Menu' screen to initiate the hole count. The 'Hole Count Entry' screen displays defaulted in the 'Scan' mode allowing the scanning of parts or shelf labels for inclusion in the report.
When 'Enter' is selected, the 'Enter' mode version of the 'Hole Count Entry' screen displays allowing manual entry of UPCs, SKUs, or Line Code and/or Part Numbers for inclusion in the report.
Hidden Switches

Manually enter the line code when in 'Enter' mode.
Manually enter the part number, universal product code, or stock keeping unit when in 'Enter' mode (for a number other than the sequenced numbers presented).
When 'RFShowExtraPartInfo' is set to 'TRUE', a second row displays underneath the 'PN/UPC/SKU' field detailing more part information.
When set to 'FASLE', no second row displays.
Tap 'Go' to add the part number to the grid (if valid).
Scan parts or shelf labels, when enabled. (Screen defaults to 'Scan' when opened.) Items are added to the bottom of the list in the grid as they are scanned.
Manually enter the parts, when in 'Enter' mode.
Indicates the system-generated hole count ID number. The number consists of a sequential number (001) that is generated by the PartsWatch application and is incremented for all cycle counts for that store from 001 to 999, at which point it recycles to 001. This, in combination with the three-character user ID (USR) and a six-character date (MMDDYY) in either the US or Canadian format (as indicated by the RF Device Regional Settings), identifies the hole counts.
Edit Min (the label of this button changes based upon User Security Settings)
The ability to modify stocking levels, 'Min', 'Max', and 'Order Point', is available for users with adequate permissions on the RF Device Scan App.
'EDIT'
- If the user account has edit privileges to stocking levels and the RF 'QAVL'/'QOH' quantity field, the button displays with a label of 'Edit Min'. Clicking the button will cycle through the modes, 'Edit Min', 'Edit Max', 'Edit OP', and 'Edit QAVL/Edit QOH' depending on system settings. Cycling through the modes also changes the corresponding column heading.
- If the user account does not have edit privileges to stocking levels but does have edit privileges to the RF 'QAVL'/'QOH' quantity field, the new button will not display.
- If the user account does have edit privileges to stocking levels but does not have edit privileges to the RF 'QAVL'/'QOH' quantity field, clicking the button will only cycle 'Edit Min', 'Edit Max', and 'Edit OP'.
- If the user account has edit privileges, clicking the button in the corresponding 'OP' cell for a part will display a message prompt with the following text: "Enter quantity." with an 'OK' and 'Cancel' button. Click 'OK' to modify the part's corresponding stocking level field with the quantity entered and close the message prompt. Click 'Cancel' to close the prompt without making any changes.
'VIEW-ONLY'
- If the user account has view-only privileges to stocking levels and the RF 'QAVL'/'QOH' quantity field, the button displays with a label of 'See Min'. Clicking the button will cycle through the modes, 'See Min', 'See Max', 'See OP', and 'See QAVL/Edit QOH' depending on system settings. Cycling through the modes also changes the corresponding column heading.
- If the user account does not have view privileges to stocking levels but does have view privileges to the RF 'QAVL'/'QOH' quantity field, the new button will not display.
- If the user account does have view privileges to stocking levels but does not have view privileges to the RF 'QAVL'/'QOH' quantity field, clicking the button will only cycle 'See Min', 'See Max', and 'See OP'.
'HIDDEN'
- If the user account has hidden security privileges for both stock quantity ('QAVL' or 'QOH') and stocking levels ('Min', 'Max', 'OP'), the new button is not displayed.
- The 'QAVL' or 'QOH' column is unavailable and no value is displayed in this column.
Select a part number, or multi-select several part numbers, to delete by clicking the radio button and then clicking the 'Del' button.
Indicates the added line code.
Indicates the added part number.
Indicates the quantity on hand for the part number. Available only if the 'QOH' field is permitted by User Security permissions. When the 'RF PART QOH' Security proc is enabled, a button displays to allow the 'QOH' to be edited from the RF device.
Indicates the quantity on order.
When tapped, and an item (or multiple) is selected, a prompt appears asking: "Print label. Are you sure?"
Tap 'OK' and the system will queue the part price label on the printer. Then, it will clear the selected checkbox and display another message prompt with the following text: "Label queued for print." with an 'OK' button. Clicking 'OK' closes the message prompt and returns to the corresponding Count Entry screen.
Tap 'Cancel' and the system will close the message prompt and return to the 'Hole Count Entry' screen.
When the 'RFShowBinInsteadOfLabel' is set to 'TRUE', the 'Label' button becomes a 'Bin' button, if the 'RFShowExtraPartInfoDefault' is set to 'Location', and becomes a 'SKU' button if the 'RFShowExtraPartInfoDefault' is set to 'Alias'.
This button will toggle between the text 'Bin' and 'SKU'. If the button label is 'Bin', when clicked the row beneath the 'Line' and 'PN' will toggle to display the Zone/Bin for that part. If 'SKU' is clicked, the information below the part will change to the CTC Product Number. Once toggled, the button label text will change based on the setting in the switch 'RFShowExtraPartInfoPnAliasType'.
Deletes a part number that was selected using the radio button from the hole count, when tapped.
Tap to move back or ahead in the listings when multiple pages exist.
Indicates the page number of the current page. Enter a new page number and tap the button to jump to that page.
Saves the entries. Displays a message stating, "Is this count complete?" Tap 'OK' to return to the 'Hole Count Entry' screen. A prompt then displays stating, "Exit and Save?" Tap 'OK' to save the count for later recall. Tap 'Cancel' to delete the count.
If parts are scanned or entered and the upper limit is exceeded, a message prompt displays with the text: "Quantity entered is greater than the warning threshold of '1000'. Are you sure?" with an 'OK' and 'Cancel' button.
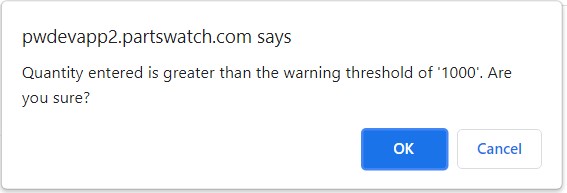
'OK' accepts the quantity and closes the pop-up.
'Cancel' abandons the changes and returns to the screen behind the message prompt.
Select Hole Count
Tap the 'Select Hole Count' menu option on the 'Hole Count Menu' screen to recall entries from saved hole counts.
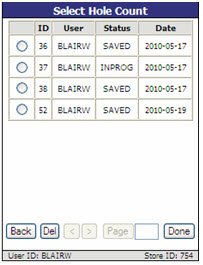
Tap to select a hole count.
Indicates the system-generated hole count ID.
Indicates the name of the user who initiated the hole count.
Indicates the status of the hole count.
Options are:
- 'INPROG' - Hole count is in progress and not yet saved.
- 'SAVED' - Hole count is saved.
- 'FINAL' - Hole count is marked as final and is ready to print.
- 'FINAL-P' - Hole count is final and has been previously printed.
Indicates the date the hole count was initiated.
Tap to return to the previous screen.
Deletes a selected hole count. Select 'OK' to delete the hole count. Select 'Cancel' to return to the 'Select Hole Count' screen.
Note: Hole counts that are not manually deleted are automatically cleared based in the parameters set in the JOB QUEUE UTILITY screen in the PartsWatch application.
Tap to move back or ahead in the listings when multiple pages exist.
Indicates the page number of the current page. Enter a new page number and tap the button to jump to that page.
Selects the selected hole cycle. The prompt, "Edit hole count?", displays. Tap 'OK' to recall the saved hole count. The status is set to 'INPROG'.
Tap 'Cancel' and the prompt, "Mark as final?" displays. Tap 'OK' to set the status to 'FINAL' to indicate the count is ready to print. Tap 'Cancel' to return to the 'Select Hole Count' screen.
Hole Count Report
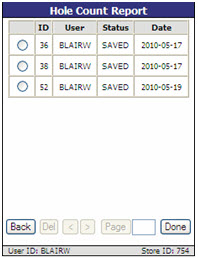
Tap 'Hole Count Report' from the 'Hole Count Menu' screen to print the RF Hole Count Report.
The 'Hole Count Report' screen displays with a list of all hole counts. Only one hole count can be selected at a time for printing. Hole counts with a status of 'INPROG' cannot be printed.
To print a report, follow the steps below:
-
Tap the desired cycle count.
-
Tap 'Done'. The "Print report?" prompt displays.
-
Tap 'OK'. The full 'RF Hole Count Report' prints. The "Print Exception report?" prompt displays.
-
Tap 'OK'. The "Delete after printing?" prompt displays.
-
Tap 'OK', if applicable. The Hole Count is deleted after printing. Note: Once deleted, the Hole Count is no longer available and cannot be retrieved.
-
Tap 'OK'. The Exception report prints. The 'Hole Count Report' screen re-displays.
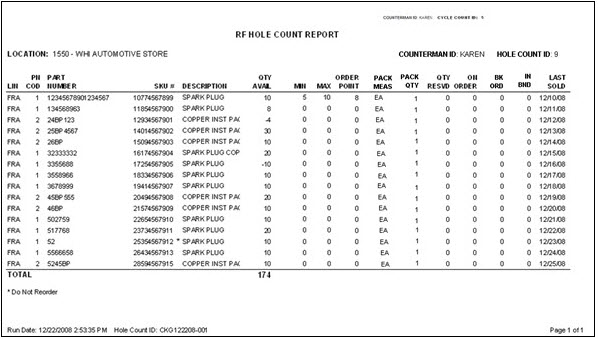
The following is an example of the 'RF HOLE COUNT REPORT'. The report prints via a background job to the Windows default printer for the terminal that has a background job set in that store.
Note: All reported quantities reflect the quantities at the time the report is run.
RF Hole Count Report Field Descriptions
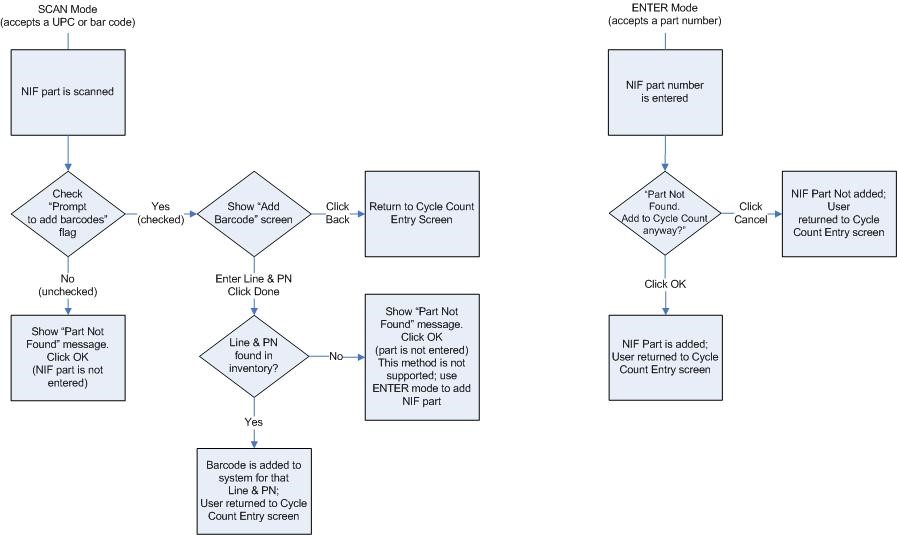
The following chart identifies existing system behavior when a NIF part is entered on the RF device: