Enterprise General Setup
The ENTERPRISE GENERAL SETUP screen enables the setting of the enterprise security controls for passwords, price labels, store group entry, and invoice options. All fields are at the enterprise level; therefore, all stores in all locations are affected by these settings.
Menu Path: Controls, Enterprise, General Setup, ENTERPRISE GENERAL SETUP screen

Password Security
Define the minimum password length (0-128 characters). When a password is made that does not fit this criteria, the system prompts to create another.
Define the maximum password length (0-128 characters). When a password is made that does not fit this criteria, the system prompts to create another.
Define the number of times the same character can be repeated within the password. When a password is made that does not fit this criteria, the system prompts to create another.
Checkbox that determines whether or not a number is required in the password.
-
Checked - A number is required to be part of the password. When a password is made that does not fit this criteria, the system prompts to create another.
-
Unchecked - A number is not required to be part of the password.
Checkbox that determines whether or not an upper-case letter is required in the password.
-
Checked - An upper-case letter is required in the password. When a password is made that does not fit this criteria, the system prompts to create another.
-
Unchecked - An upper-case letter is not required in the password (but is permitted).
This setting is only enabled if the application switch that establishes the password case setting is set to either:
-
'NONE' - Use the 'Shift' or 'Caps Lock' key to enforce required upper-case entry.
-
'UPPER' - Required upper-case entry defaults all entries to upper-case. It is not required to use the 'Shift' or 'Caps Lock' keys.
If the application switch is set to 'LOWER', this setting is disabled.
Checkbox that determines whether or not a lower-case letter is required in the password.
-
Checked - A lower-case letter is required in the password. When a password is made that does not fit this criteria, the system prompts to create another.
-
Unchecked - A lower-case letter is not required in the password (but is permitted).
This setting is only enabled if the application switch that establishes the password case setting is set to either:
-
'NONE' - Use the keyboard appropriately to enforce required lower-case entry.
-
'LOWER' - Required lower-case entry defaults all entries to lower-case.
If the application switch is set to 'UPPER', this setting is disabled.
Checkbox that determines whether or not a "special character" is required in the password.
-
Checked - Requires a special character to be part of the password. When a password is made that does not fit this criteria, the system prompts to create another.
-
Unchecked - Does not require a special character to be part of the password (but is permitted).
Accepted special characters are:
! # $ % & ( ) ' * + , - / : ; < = > ?
Checkbox that determines whether or not the password created can contain the first name of the employee creating the password.
-
Checked - The employee's first name cannot be part of the password.
-
Unchecked - The employee's first name can be part of the password (if desired).
Checkbox that determines whether or not the password created can contain the last name of the employee creating the password.
-
Checked - The employee's last name cannot be part of the password.
-
Unchecked - The employee's last name can be part of the password (if desired).
Checkbox that determines whether or not the password created can contain the employee ID of the employee creating the password.
-
Checked - The employee's ID cannot be part of the password.
-
Unchecked - The employee's ID can be part of the password (if desired).
PASSWORD LIFE (DAYS)
Define the maximum number of days a password can be used before expiring. Forces the creation of new passwords regularly. Numeric values are 0 - 999. When set to zero (0), the password does not expire.
PASSWORD EXPIRATION WARNING (DAYS)
Define when a warning message displays advising the employee of an upcoming password expiration. The warning message displays at every login until the password is changed. The value is less than the value in the 'PASSWORD LIFE (DAYS)' field. When set to zero (0), a warning message does not display.
PASSWORD REUSE
Define the maximum number of password changes that must occur before a password can be reused. Forces employees to use different passwords. Numeric values are 0 - 99. When set to zero (0), password reuse is not restricted.
MAXIMUM FAILED LOGIN ATTEMPTS
Set the maximum number of failed login attempts allowed before an account is locked. Numeric values are 0 - 9. When set to zero (0), the employee attempting to log in is not locked out of the application after failing to log in correctly.
To enable an employee who was locked out due to failed login attempts, uncheck the 'LOCKOUT USER' checkbox in the EMPLOYEE SETUP screen and click 'UPD'.
Click to display the 'PASSWORD SECURITY' window used to maintain words restricted from use in passwords.
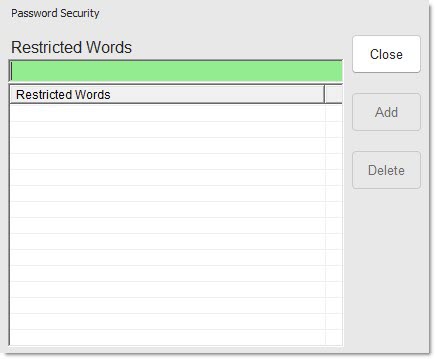
To add a word to the list, enter the restricted word in the text box. The 'ADD' button becomes enabled. Click 'ADD' to add the word to the grid.
To delete a word from the list, highlight a word in the grid. The 'DEL' button becomes enabled. Click 'DEL' to delete the word.
Existing passwords are checked at login. If a password previously met password requirements, and then changes were made to password requirements, then the next time the password is used to log in, the system will require the employee logging in to create a new password that meets the new advanced password requirements.
Margin Split Setup
The MARGIN SPLIT REPORTING hidden enterprise control determines the availability of the 'Margin Split Setup' section.
EGM / CGM %
Enter an Enterprise Gross Margin (EGM) and Corporate Gross Margin (CGM) that is used in the EGM/CGM calculation across all stores in the enterprise. Allows a numeric entry up to 9999.99 and defaults to 95.000%.
TABLE SPLIT % THRESHOLD
Enter a value used as the threshold for 'table split %' exception reporting across all stores in the enterprise. Only parts with a calculated Table Split % that is less than the value of this field is reported in the Table Split detail report. Allows a numeric entry up to 9999.99 and defaults to 30.0% (30.000).
In Store Financing Options
Click to open the 'IN STORE FINANCING SETUP' pop-up.

-
'PLAN ID' - 4 numeric digits indicating the customer plan associated with In Store Financing.
-
'ENGLISH PROMPT' - 100 alphanumeric characters that indicate what the In Store Financing plan is. Note: Does not display on returns.
-
'FRENCH PROMPT' - 100 alphanumeric characters that indicate what the In Store Financing plan is, in French. Note: Does not display on returns.
-
'ENGLISH RECEIPT' - 40 numeric characters that indicate what the In Store Financing Plan is on receipts. Note: Does not print on return slips or commercial invoices.
-
'FRENCH RECEIPT' - 40 numeric characters that indicate what the In Store Financing Plan is on receipts, in French. Note: Does not print on return slips or commercial invoices.
-
'THRESHOLD' - Indicates the minimum amount that an account needs to spend in order to have In Store Financing as an option in the 'Tender' window.
Store Group Entry
Define the store group name. There is no limit on the number that can be added. Each name must be unique and up to 50 alphanumeric and special characters to represent a store group. When added, the entry displays in the 'STORE GROUP NAME' grid.
If an entry is edited, a message displays stating, "The Store Group Name <original store group name> will be replaced with <new store group name> for assigned employees / stores. Do you wish to continue?" Click 'YES' to save the edited 'STORE GROUP NAME' and replace the original name with the edited name for any employees and stores assigned to it. Click 'NO' to cancel the edit.
To delete an entry, right-click on the row in the grid and click 'DELETE' from the command menu. A message displays stating, "The Store Group Name <original store group name> will be deleted from the assigned employees / stores. Do you wish to continue?" Click 'YES' to delete the entry from any employees and stores it is assigned to. The 'STORE GROUP' field is blank for any employees assigned to the deleted Store Group. Previously assigned stores to the deleted Store Group are no longer assigned to any Store Group. Click 'NO' to cancel the deletion.
ID
Displays the Store Group ID.
STORE GROUP NAME
Displays the Store Group Name.
ASSIGN LOCATIONS
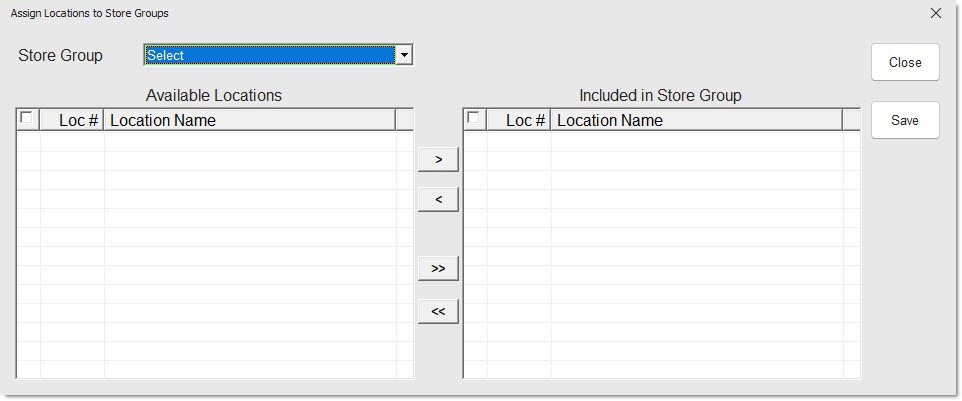
Click to display the 'ASSIGN LOCATIONS TO STORE GROUPS' window used to assign/unassign a store to a Store Group(s). A store can be assigned to any number of Store Groups.

Procedure to Assign Locations to Store Groups
To assign locations to Store Groups, follow the steps below:
-
From the Menu, select Controls, Enterprise, General Setup. The ENTERPRISE GENERAL SETUP screen displays.
-
Click 'ASSIGN LOCATIONS'. The 'ASSIGN LOCATIONS TO STORE GROUPS' window displays.
-
Select a Store Group in the 'STORE GROUP' field. The available stores for the selected Store Group display in the 'AVAILABLE LOCATIONS' grid. Assigned store locations for the selected Store Group display in the 'INCLUDED IN STORE GROUP' grid.
-
Check the checkbox to move all available locations or individually select available locations in the 'AVAILABLE LOCATIONS' grid to move to the 'INCLUDED IN STORE GROUP' grid. Stores are moved to the 'INCLUDED IN STORE GROUP' grid.
-
Click 'UPD'. The changes are saved.
Checkbox that determines whether or not store groups are available for promotional pricing.
-
Checked - Enable the 'Select Store Groups' button on the 'Add/Edit Campaign' pop-up in the PROMOTIONS SETUP screen. Note: This allows using existing store groups for a promotional campaign, in addition to any promo store groups defined.
-
Unchecked - Disable the 'Select Store Groups' button on the 'Add/Edit Campaign' pop-up in the PROMOTIONS SETUP screen. Note: This prevents using existing store groups for a promotional campaign. In this instance, it is only possible to use promo store groups instead.
Account Group and Report Group
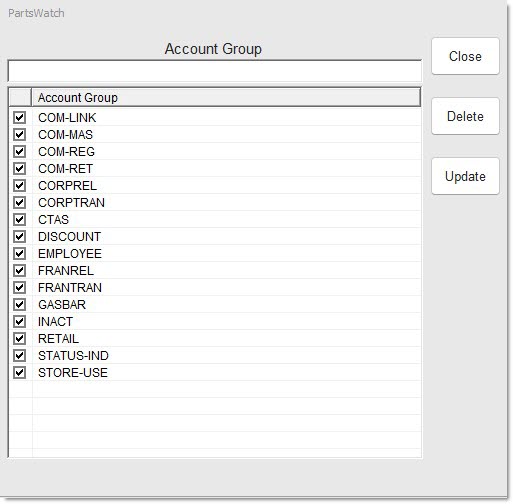
Click the 'ACCOUNT GROUP SETUP' button to display the 'ACCOUNT GROUP' window used to manually enter a new account group.
Account group names cannot be edited. If the account group name needs to be changed, delete the account group and add a new account group with the new name.
Procedure to Enter a New Account Group
To enter an account group, follow the steps below:
Procedure to Delete an Account Group
To delete an account group, follow the steps below:
Procedure to Make an Account Group Inactive
To make an account group inactive, follow the steps below:
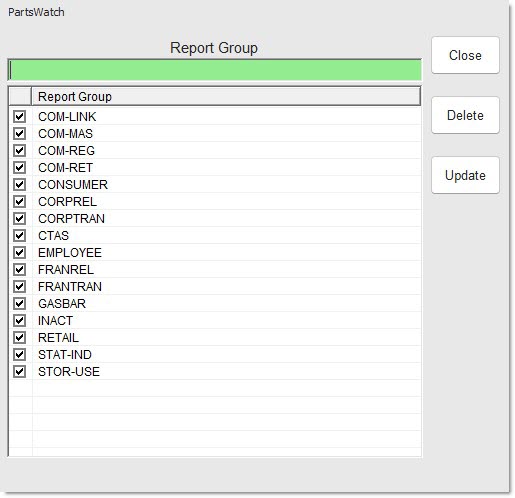
Click the 'REPORT GROUP SETUP' button to display the 'REPORT GROUP' window used to manually enter a new report group.
Report group names cannot be edited. If the report group name needs to be changed, delete the report group and add a new report group with the new name.
Procedure to Enter a New Report Group
To enter a report group, follow the steps below:
Procedure to Delete a Report Group
To delete a report group, follow the steps below:
Procedure to Make a Report Group Inactive
To make a report group inactive, follow the steps below:
Price Labels
Determines the pricing that will be used by the PRICE LABELS screen for the printing of shelf labels for all stores within the enterprise.
Select a different account than the account in the 'DEFAULT RETAIL ACCOUNT' field in the AR CONTROLS SETUP screen, if preferred.
Note: If the 'DEFAULT RETAIL ACCOUNT' field and 'LABELS RETAIL ACCOUNT' field are set to different accounts and have different pricing, the retail customer may be charged a different price at the register than what is displayed on the shelf label.
Click the button to display the 'FIND ACCOUNT' window to search for an account. Supports only accounts that have the 'STORE GROUP' field set to 'ALL'.
PRINT BAR CODE
Controls the default setting of the 'PRINT BAR CODE' field in the PRICE LABELS screen. Displays the 'PRINT BAR CODE' field as checked, when checked. Displays the 'PRINT BAR CODE' field as not checked, when unchecked.
Note: At an enterprise, a standard is set for the organization to either print bar codes on all labels or not; however, at the store level, it is possible to change the default setting by checking/unchecking the 'PRINT BAR CODE' field in the PRICE LABELS screen.
Allows selection from nine price label choices to set as the default.
The value selected in this drop-down menu is reflected in the 'OUTPUT TYPE' field in the PRICE LABELS screen.