Employee Setup
The EMPLOYEE SETUP screen is used to create and maintain employee specific information and access to passwords and pay information windows. An employee cannot edit their own information regardless of their User Security setup plan.
The setup of specific fields sends email and/or text message alerts to an employee's mobile phone when there is a PO transmission failure. Due to a network issue or issue with the vendor's system, the vendor's system may not receive and process a successfully transmitted application PO file. Or, a vendor system may successfully receive the PO file but reject the order due to unavailable quantity on hand. When these PO transmission failures occur, the application PO status is marked with a status of ORD-F. This status provides the store with the information required to react to the situation. Sending an alert allows the store to see these failures sooner rather than later.
Menu Path: Controls, System, Employee Setup, EMPLOYEE SETUP screen
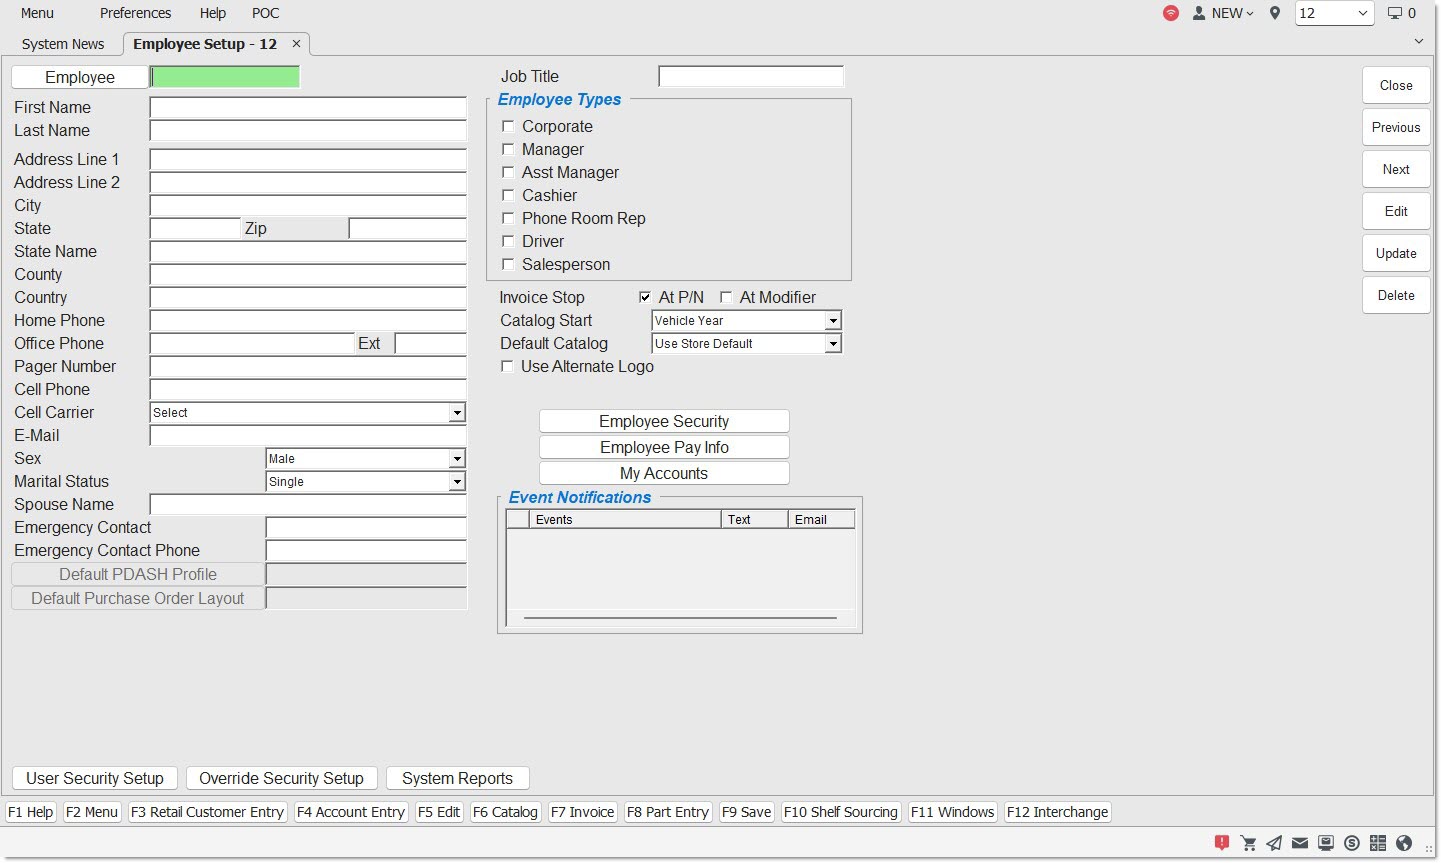
Employee Information Setups
EMPLOYEE
Indicates the User ID, which is any unique 10-character alphanumeric code. Does not have to be the employee's name. This is the only mandatory field. The remaining fields are optional.
Enter the employee's first name.
Enter the employee's last name.
Enter the first address line of the employee.
Enter the second address line of the employee.
Enter the city where the employee receives their mail.
Enter the state where the employee receives their mail.
Enter the zip code where the employee receives their mail.
Enter the county where the employee receives their mail.
Enter the country where the employee receives their mail.
HOME PHONE
Enter the employee's home phone number.
OFFICE PHONE
Enter the employee's office phone number.
EXT
Enter the employee's office phone extension, if applicable.
PAGER NUMBER
Enter the employee's pager number.
CELL PHONE
Enter the employee's cell phone number. This field is required if the employee wants to receive PO transmission failure notifications via email or text messages.
Choose the name of the cell carrier from the drop-down that provides wireless communication services. Also known as a mobile network operator, wireless service provider, wireless carrier, cellular company, or mobile network carrier.
Drop-down list includes worldwide cell carriers sorted by country and then by cell carrier name. Based on the country of the application database, specific cell carriers providing service in that country display at the top of the list.
Some cell carriers are identified by SMS and MMS. SMS (Short Message Service) is a short text message of 160 characters or less. MMS (Multimedia Messaging Service) can have videos, photos, sound recordings, and text messages with no size limit.
This field is required if the employee wants to receive PO transmission failure notifications via email or text messages. The list includes worldwide cell carriers sorted by country and then by cell carrier name and based on the country of the application database, specific cell carriers providing service in that country display at the top of the list.
E-MAIL
Enter the employee's email address. Must be populated (and the 'CORPORATE' field must be checked) in order to receive an emailed copy of the D-M-Y STORE SALES REPORT as part of the End-of-Day close.
This field is required in order for the employee to receive a PO transmission failure alert email when a specific event has occurred.
SEX
Choose the employee's gender. Options are 'MALE' and 'FEMALE'.
MARITAL STATUS
Enter the employee's marital status. Options are 'SINGLE', 'MARRIED', and 'DIVORCED'.
SPOUSE NAME
Enter the employee's spouse's name.
EMERGENCY CONTACT
Enter the name of the employee's emergency contact.
EMERGENCY CONTACT PHONE
Enter the phone number of the employee's emergency contact.
If a 'Default PDASH Profile' is configured, display the profile number followed by a space and the profile name here. If the name of the profile is longer than the text box, it will be truncated.
If a previously configured default profile is deleted from the 'Save and Load Profiles' pop-up, the default profile is removed from this screen.
Note: If the properties of an employee's default profile are changed, the employee may no longer have access to it on the PURCHASING DASHBOARD but it will remain assigned to them on the EMPLOYEE SETUP screen.
Click the 'Default PDASH Profile' button to open the 'Select Default Profile' pop-up. Note: The employee cannot click the 'Default PDASH Profile' button to modify their own record. An administrator must set the employee's default profile.
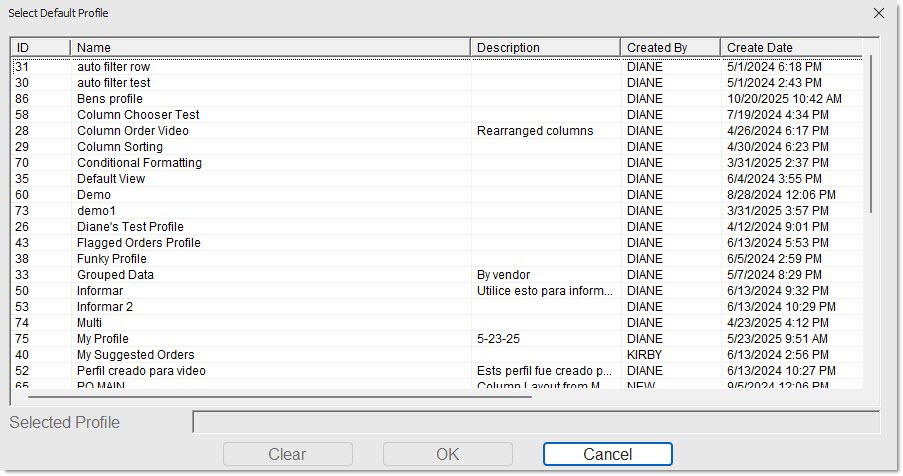
The columns in this pop-up are the same as in the 'Save and Load Profiles' pop-up.
The pop-up displays the name of the 'Selected Profile' under the grid, if there is one selected.
Click 'OK' to save the Selected Profile and close the pop-up. This profile will now be used every time the employee loads the PURCHASING DASHBOARD screen.
Click 'Cancel' to close the pop-up with no changes or selections made.
The 'Clear' button is only active if there is an existing default profile. In this case, clicking the 'Clear' button will prompt with an "Are you sure?" message.
- Click 'Yes' and the default profile is removed and the 'Select Default Profile' pop-up is closed. The employee no longer has a default profile.
- Click 'No' and the message prompt disappears and the system remains on the 'Select Default Profile' pop-up.
Note: Profiles are not connected to an Employee's Store Group at this time. It is recommended that any default profile selected for users with access to more than one location should have 'View Access' of 'All'.
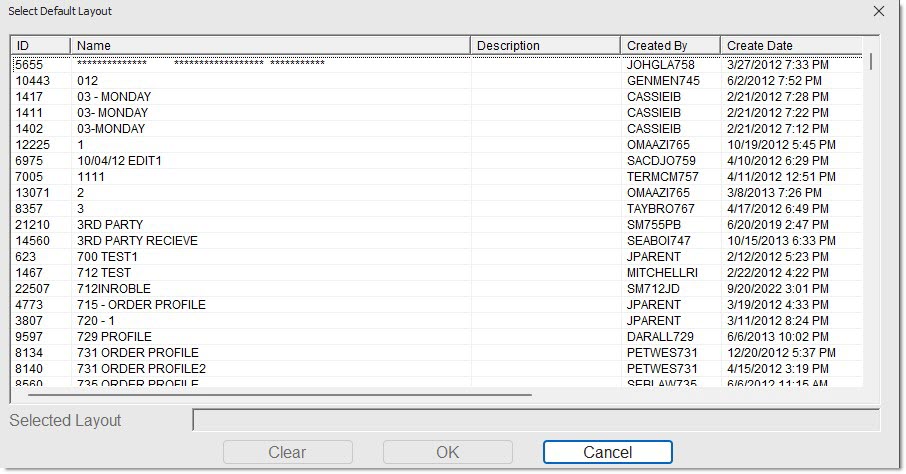
Click to open the 'Select Default Layout' pop-up. (You may not edit this field on your own employee record.) The pop-up lists all layouts on the PO Edit Layout Setup screen available to the user performing the action.
Note: It is possible that a layout displayed in this pop-up is not available to the selected employee. Care should be taken to assign a layout that the selected employee is authorized to view. If the employee is assigned an unauthorized layout, the purchase order screen displays the default layout when opened.

Enter the employee's job title.
Employee Types
Check each box that applies to the Employee in focus. Note: One employee can have multiple roles, if necessary.
Sets an employee to receive an email copy of reports sent to the Task Scheduler, when checked.
MANAGER
Identifies the employee as a Manager throughout the application, including an image in the border. Follows the Manager task route setup within the Override Security settings, when checked. Also, sets an employee to receive an email copy of reports sent to the Task Scheduler, when checked. A 'MANAGER' also has access to the COUNT SAFE and DRAWER MANAGEMENT screens. Only 'MANAGERS' are notified when there is a "price change" system message. A 'MANAGER' cannot also be an 'ASST MANAGER' or 'CASHIER'; however, a 'MANAGER' can also be a 'SALESPERSON' and/or 'DRIVER'.
ASST MANAGER
Identifies the employee as an Assistant Manager throughout the application, including an image in the border. Allows the employee to follow the Assistant Manager task route setup within the Override Security settings, when checked. An 'ASST MANAGER' also has access to the COUNT SAFE and DRAWER MANAGEMENT screens. An 'ASST MANAGER' cannot also be a 'MANAGER' or 'CASHIER'. However, an 'ASST MANAGER' can also be a 'SALESPERSON' and/or 'DRIVER'.
CASHIER
Identifies the employee as a Cashier throughout the application. Allows the employee to follow the Cashier task route setup within the Override Security settings, when checked. The system automatically populates the 'CASHIER' filter drop-down on the INVOICE JOURNAL REPORT screen for the selected employee. A 'CASHIER' cannot also be a 'MANAGER' or 'ASST MANAGER'. However, a 'CASHIER' can also be a 'SALESPERSON' and/or 'DRIVER'.
PHONE ROOM REP
Identifies employee(s) that can access the 'PHONE ROOM' button at Point-of-Sale.
The 'PHONE ROOM' button and all POS phone room functionality as well as regular invoicing functionality, depending on security permissions, are available to the employee at Point-of-Sale, when checked.
The 'PHONE ROOM' button does not display at POS, when unchecked. (Default)
Note: When the Phone Room enterprise control is set to not use phone room functionality or set to use existing Terminal Phone Room functionality, the 'PHONE ROOM REP' field is disabled.
DRIVER
Identifies the employee as a driver, for information purposes only.
SALESPERSON
Identifies the employee as a salesperson, allowing selection as a Salesperson in the Account Entry screen, with an account selected. The 'SALESPERSON' flag is also used as a filter on various reports. A 'SALESPERSON' can also be a 'DRIVER', 'MANAGER', 'ASST MANAGER', or a 'CASHIER'.
Additional Setups
Determines where the cursor stops when the employee creates an invoice. When checked, the cursor skips the 'MODIFIER' and 'LINE CODE' fields and displays in the 'PART NUMBER' field. When unchecked, the cursor stops at the 'LINE' field, skipping the 'MODIFIER' field, within the Invoice Point of Sale screen.
Determines where the cursor stops when the employee creates an invoice. When checked, the cursor starts in the 'MODIFIER' field. When unchecked, the cursor stops at the 'LINE' field, skipping the 'MODIFIER' field, within the Invoice Point of Sale screen.
Determines the starting position of the cursor when the employee first opens the Invoice Point of Sale screen, after choosing a customer.
DEFAULT CATALOG
Determines the starting catalog opened from the 'CATALOG' button at Point-of-Sale.
USE ALTERNATE LOGO
Determines whether an alternate company logo prints on an invoice, based on employee. This is useful for companies operating two businesses, even if in the same location, where employees are assigned to perform transactions for one of the business. Note: Requires an alternate logo file be created at the proper size and loaded into the proper directory.
Currently only available for form PW A4Full Pg LogoHeader Inv2, which prints on A4 paper that is sized 210 x 297 millimeters or 8.27 x 11.69 inches.
When checked, the alternate logo prints on the invoice when the employee prints any invoice if the A4 form has been selected and the alternate logo file has been saved to the proper directory.
When unchecked, the primary logo prints on the invoice. (Default)
Employee Buttons
Employee Security
Click the 'EMPLOYEE SECURITY' button to display the 'EMPLOYEE SECURITY SETUP' window used to create and maintain employee passwords. The window can be opened by the current employee to edit the 'PASSWORD', 'APPROVAL PASSWORD' and to view the existing or select a new 'SELLER ID FOR POS' value. No other fields are available to the current employee.
Click 'UPD' to save any changes made in the window, or 'CLOSE' to close the window without saving any of the changes.
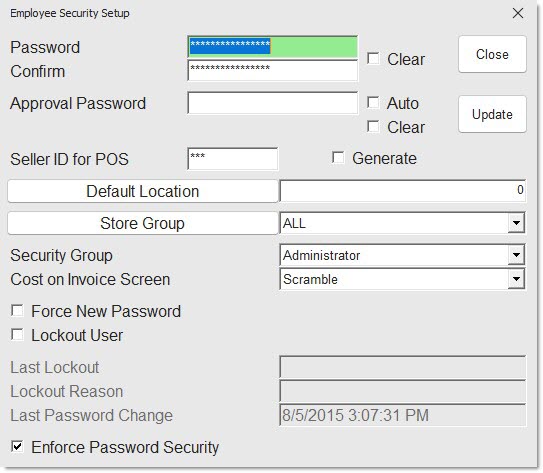
Enter a manually created password that links to the security setup and controls the employee's access throughout the system. The format is controlled by an application switch.
Password security requirement settings are controlled in the ENTERPRISE GENERAL SETUP screen. If the entered password does not meet the password security requirements, the following view-only pop-up displays indicating the password security requirements.
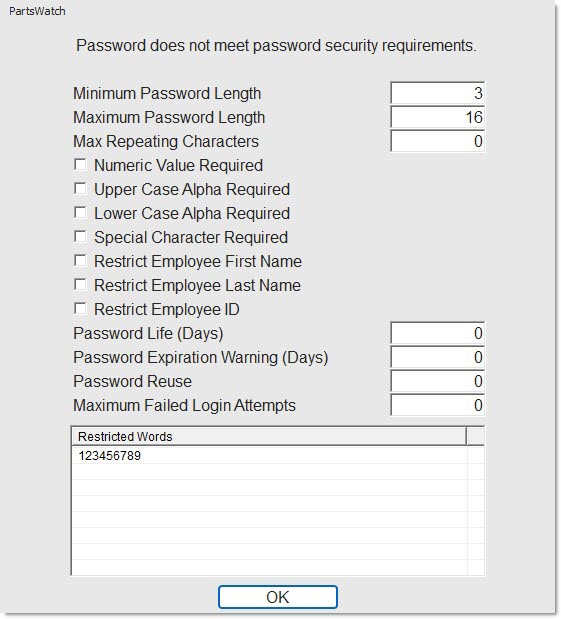
Review the requirements and click 'OK' to close the pop-up. Re-enter a password that meets that password security requirements.
The value stored in this field is hidden, displaying only asterisks for security.
Enter the same password as above, identically, to confirm that it is correct. The application will notify that they do not match, if they do not match.
Clears the password, when checked. The field only displays and is enabled when the 'MINIMUM PASSWORD LENGTH' field, located in the ENTERPRISE GENERAL SETUP screen, is set to zero. Only displays if the employee is marked as a 'MANAGER' or 'ASST MANAGER' in the EMPLOYEE SETUP screen.
Indicates system-generated or manually created password that works in conjunction with Override Security to allow approval of specific tasks of other employees. Only displays if the employee is marked as a 'MANAGER' or 'ASST MANAGER' in the EMPLOYEE SETUP screen.
The value stored in this field is hidden, displaying only asterisks for security.
AUTO
Automatically generates a four (4) character password that works in conjunction with Override Security, when checked. (Works identical to clicking 'CREATE APPROVAL CODE' in the 'MANAGER APPROVAL CODE' window opened from the 'MGR' icon located on the screen border.)
Displays an ID that is used to track sales by Counterman ID within the Invoice Point of Sale screen. Only used if the 'SELLER CHANGE' field is checked in the STORE INVOICE OPTIONS screen, 'STANDARD' tab. This ID can be changed to a new system-generated ID by checking the 'GENERATE' checkbox.
The value stored in this field is hidden, displaying only 3 asterisks for security.
Check to create a new ID in the 'SELLER ID FOR POS' field.
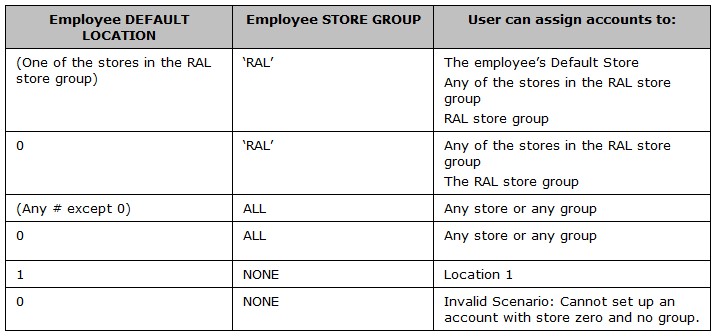
DEFAULT LOCATION
Indicates the default location the employee is assigned to and has login access. Displays the 'BROWSE LOCATIONS' pop-up to search for a location, when clicked. When set to zero (0), the application uses the Store Number that is assigned to the terminal. Defaults to zero (0) for new employees.
Indicates the Store Group that the employee is assigned to and has access to log into and/or run reports for. Employees can be assigned to only one Store Group.
-
'ALL' - The selected employee can log in to and run reports for any Store Group or any store.
-
'Specific Store Group' - The selected employee can login to and run reports on all the stores that are part of that Store Group.
-
'NONE' - The selected employee is not assigned to a Store Group. The selected employee can log in to and run reports on the 'DEFAULT LOCATION' store only but not to a Store Group.
Click to display the 'Find Store Group' window to search for a store group.
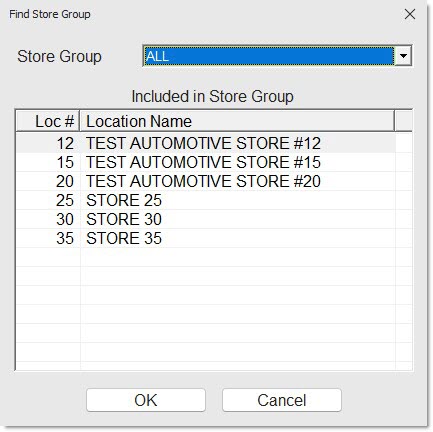
Store Group
Choose a store group option to display:
- 'ALL' - Displays all store groups.
- '[Specific Store Group]' - Displays the specified store group.
Included in Store Group
A grid that displays the stores within the selected 'Store Groups'.
LOC #
Displays the store location number.
Location Name
Displays the store location name. Highlight the desired store and click 'OK' or double-click the store to select the specific store.
OK
Saves the changes made in the window.
Cancel
Closes the window without saving any changes.
If the selected employee belongs to the "ALL" store group:
-
They can see all accounts.
If the selected employee does not belong to the "ALL" store group:
-
They can see accounts assigned to a store that the employee can access. For example:
-
Account store is equal to the employee's default store (if the employee has a default store).
-
Account store is in the employee's store group (if the employee has a store group).
-
Account store is equal to the current store.
-
-
They can see accounts assigned to the "ALL" store group.
-
They can see accounts assigned to the employee's store group (if the employee has a store group).
-
They can see accounts assigned to a store group that contains the employee's 'DEFAULT STORE' (if the employee has a default store).
-
They can see accounts assigned to a store group that contains the current store.
The employee's 'DEFAULT LOCATION' and the 'STORE GROUP' control the stores or Store Groups an employee can add accounts to.
The following illustrates the selected employee's ability to assign stores based on their set up.
Displays the Security Group name that links the Security Plan set up in the USER SECURITY SETUP screen to the specific employee to allow specific Security Plan access throughout the application.
Determines how cost displays in the INVOICE and SOURCING screens.
Options are:
- 'SHOW AS IS' - Cost / GP% fields and values display in the INVOICE and SOURCING screens.
- 'SCRAMBLE'- Cost and Core Cost display in the INVOICE, SHELF SOURCING, and SOURCING screens scrambled: cents first, then dollars, with a zero in between. For example, $130.17 scrambles as 170130. GP% displays without the decimal place. For example, 35.5% scrambles as 355.
This option is only available if User Security specifies that cost/GP% should be shown to the employee.
Forces the employee to change their password at the next login, when checked. Allows employee to log in with their existing password, when unchecked. If the user's password life has expired (refer to ENTERPRISE GENERAL SETUP screen), the system sets the field to checked when the selected employee makes an attempt to log in. This can be manually be checked, forcing the employee to change their password at the next login.
LOCKOUT USER
Locks the selected employee out of the application, when checked. Allows the selected employee to log into the application, when unchecked. The system sets the field to checked when the employee exceeds the quantity defined in the 'MAXIMUM FAILED LOGIN ATTEMPTS' field in the ENTERPRISE GENERAL SETUP screen. This field can be manually be set, forcing the employee to be locked out. Employees can only lock out another employee, not themselves.
LAST LOCKOUT
Indicates the date and time that the selected employee was last locked out of the system, either by the system or a different employee (with User Security permission).
LOCKOUT REASON
Indicates if the system or an administrator locked out the employee.
Lockout reasons are:
- 'LOGIN ATTEMPTS EXCEEDED' - Displays when system locks out the employee attempting to log in.
- 'MANUAL LOCKOUT' - Displays when an employee, with User Security permission, manually checks the 'LOCKOUT USER' field and clicks 'UPD'.
LAST PASSWORD CHANGE
Indicates the date and time of the user's last password change.
Determines whether password security settings in the ENTERPRISE GENERAL SETUP screen are enforced.
Password security requirements, as set up in the ENTERPRISE GENERAL SETUP screen are enforced for the employee, when checked. The selected employee must create and use a password that follows these requirements. (Default).
Password security requirements, as set up in the ENTERPRISE GENERAL SETUP screen are not enforced for the employee, when unchecked. The selected employee is able to create and use a password that does not follow these requirements.
If an employee does not need a password, then any current password established for that employee in the 'EMPLOYEE SECURITY SETUP' window must be cleared.
The ability to optionally allow access to the 'ENFORCE SECURITY PASSWORD' flag is controlled by the 'ENFORCE PASSWORD SECURITY' security proc in the USER SECURITY SETUP screen.
NEXPART COUNTER CATALOG USERNAME
Enter the user's Nexpart Counter Catalog username.
While this field is set up per employee, the store's credentials in the 'NEXPART COUNTER CATALOG USERNAME' field in the STORE CATALOG OPTIONS screen can be used as a "fallback" to enter the username. Nexpart Catalog uses the employee credentials, if specified, otherwise the store credentials are used. If neither are set up, a message displays when accessing the catalog stating "Nexpart credentials need to be set up to access the catalog."
Note: Each client is licensed for an allotted number of PartsWatch users (employees in the store). Each of these employees is limited to a set number of catalog sessions, allowing the selected employee to have multiple POS/catalog screens open in PartsWatch.
The field is only available when the database is configured to use the Nexpart Catalog.
NEXPART COUNTER CATALOG PASSWORD
Identifies the user's Nexpart Counter Catalog password.
While this field is set up per employee, the store's credentials in the 'NEXPART COUNTER CATALOG PASSWORD' field in the STORE CATALOG OPTIONS screen can be used as a "fallback" to enter the password. Nexpart Catalog uses the employee credentials, if specified, otherwise the store credentials are used. If neither are set up, a message displays when accessing the catalog stating "Nexpart credentials need to be set up to access the catalog."
Note: Each client is licensed for an allotted number of PartsWatch users (employees in the store). Each of these employees is limited to a set number of catalog sessions, allowing the selected employee to have multiple POS/catalog screens open in PartsWatch.
The field is only available when the database is configured to use the Nexpart Catalog.
Employee Pay Info
Click the 'EMPLOYEE PAY INFO' button to display the 'EMPLOYEE PAY INFO SETUP' window to create and maintain employee employment specific data. Most of these fields are for informational purposes only.
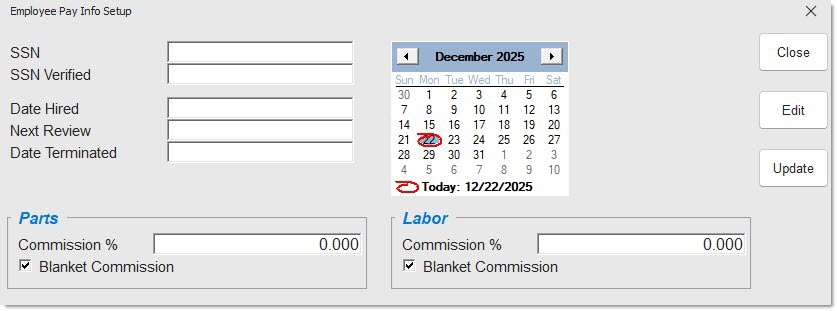
SSN #
Indicates the Social Security Number of the employee.
SSN VERIFIED BY
Indicates the name of the person who verified the Social Security Number.
DATE HIRED
Indicates the date the employee was hired.
NEXT REVIEW
Indicates the date of the next review.
DATE TERMINATION
Indicates the date the employee's termination. Entering a termination date deactivates the Employee. The unique User ID can be reused.
COMMISSION %
Indicates the employee's commission percentage on part sales.
BLANKET COMMISSION
Indicates the employee commission will override the line level commission percent, when checked.
COMMISSION %
Indicates the commission percentage on labor sales.
BLANKET COMMISSION
Indicates that the employee commission will override the line level commission percent, when checked.
My Accounts
Click the 'MY ACCOUNTS' button to open a window used to set up main, commercial accounts the employee normally sells to. This allows quick access at Point-of-Sale instead of going through 'CUSTOMER LOOKUP' to find the customers.
If any accounts are added to the list, the 'MY ACCOUNTS' field also displays as a drop-down to the right of the 'CUSTOMER LOOKUP' field on the Invoice Point of Sale screen.
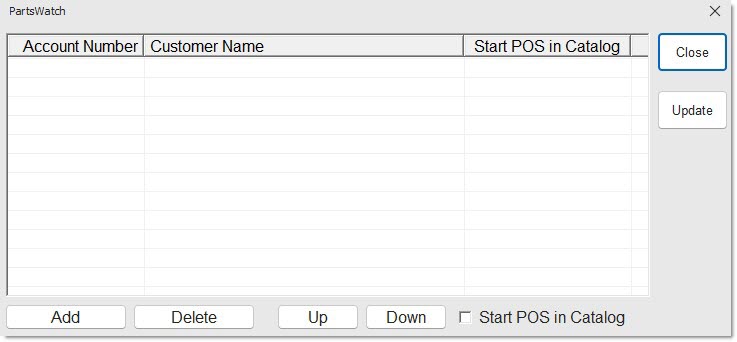
Add
Click the 'Add' button and the 'FIND CUSTOMER' pop-up is opened. Select a customer from the pop-up to add them to the grid.
Delete
Click to delete the selected customer from the grid.
Up
Click to move the account up one customer in the grid.
Down
Click to move the account down one customer in the grid.
Start POS In Catalog
When a customer is selected in the grid, and this checkbox is checked, the 'Start POS In Catalog' value changes from 'N' to 'Y', and starts the selected employee in the Catalog when the Invoice Point of Sale screen is opened for that customer.
When a customer is selected in the grid, and this checkbox is unchecked, the 'Start POS In Catalog' value changes from 'Y' to 'N', and does not start the selected employee in the Catalog when the Invoice Point of Sale screen is opened for that customer.
Close
Click to close the pop-up.
Update
Click to save the changes made in the pop-up.
Account Number
Displays the account number of the customer.
Customer Name
Displays the customer name.
Start POS in Catalog
Displays whether or not the Invoice Point of Sale screen opens the catalog immediately when the customer is loaded, with values of Y or N.
Event Notifications
The grid displays PO transmission failure events.
For an employee to receive a PO transmission failure alert email, the 'E-MAIL' field must be populated with the employee's email address. For an employee to receive a PO transmission failure alert text message, the 'CELL PHONE' and 'CELL CARRIER' fields must be populated with the employee's cell phone number and cell carrier, respectively. The employee receives both an email and text message when the 'E-MAIL', 'CELL PHONE', and 'CELL CARRIER' fields are all populated.
Click the checkbox for each row to select a specific event and notify the selected employee of that event via text message or email, based on the employee setup, when checked. Deselects the event, when unchecked.
Indicates the event notification.
Options are:
- 'Order Fulfillment Shelf' - Sends a text or email message when the 'VDR_REPLY' column of a shelf order is 'PARTIAL' or 'REJECTED'.
- 'Order Fulfillment Shelf Source' - Sends a text or email message when the 'VDR_REPLY' column of a shelf sourced order is 'PARTIAL' or 'REJECTED'.
- 'Order Fulfillment Source' - Sends a text or email message when the 'VDR_REPLY' column of a sourced order is 'PARTIAL' or 'REJECTED'.
- 'Order Transmission' - Sends a text or email message when the transmission of an order failed.
- 'Order Receive' - Sends a text or email message when the receipt of an order failed.
Displaying the text 'ERROR' in the 'TEXT' and 'EMAIL' fields indicates that an event was unsuccessful, and the selected employee will be getting a text or email notification.
In a multi-store database, a pop-up displays when an event is checked to allow the employee to select one or more stores within the database to receive text message and/or email alerts for any store selected that transmits a PO with errors. Note: All stores in the database display regardless of the user's security access to stores.
Displays 'ERROR' to indicate that a text message alert was sent to the employee for a failed order transmission with "errors".
The following is a sample text message.
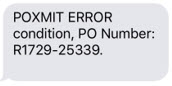
- 'POXMIT ERROR condition' - Indicates that there was a PO transmission failure that requires immediate attention.
- 'PO Number' - Indicates the application PO #. The number before the dash is the store number and number after the dash is the actual PO # within the store.
Displays 'ERROR' to indicate that an email alert was sent to the employee for a failed order transmission with "errors".
The email contains the POXMITERROR condition and PO Number.
- 'POXMIT ERROR condition' - Indicates that there was a PO transmission failure that requires immediate attention.
- 'PO Number' - Indicates the application PO #. The number before the dash is the store number and number after the dash is the actual PO # within the store.