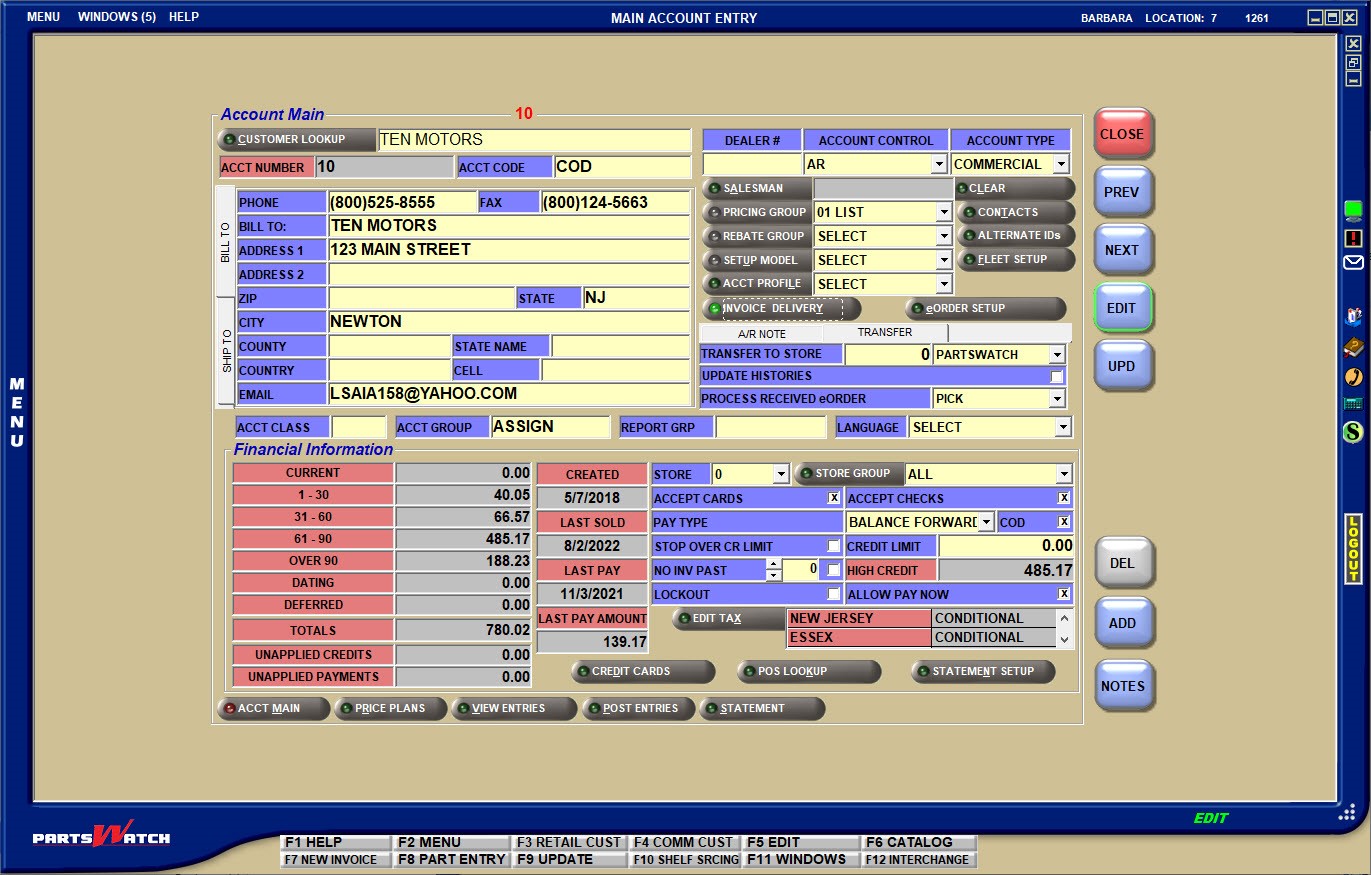
Main Account Entry
The MAIN ACCOUNT ENTRY screen is used to set up and maintain wholesale customers, also called main, primary, or commercial customers in PartsWatch. These accounts have their own pricing and may or may not have payment terms. Although retail cash customers are entered and maintained on the RETAIL CUSTOMER screen, all retail customers are linked to a primary account that sets the pricing, so the MAIN ACCOUNT ENTRY screen is also used to add and maintain the Retail Main accounts as well as Employee and Store accounts, and Transfer accounts for multi-stores.
Menu Path: Customers, Accounts, Account Main, MAIN ACCOUNT ENTRY screen
Note: The 'EDIT' button must be disabled when selecting customers and enabled to edit customers. The 'UPD' (update) button must be clicked to save changes. If the screen is closed without updating, the system prompts to save the changes.

Accelerator keys are 'F5' to 'EDIT' and 'F9' to 'UPD' (update).
Field Use - Upper Left
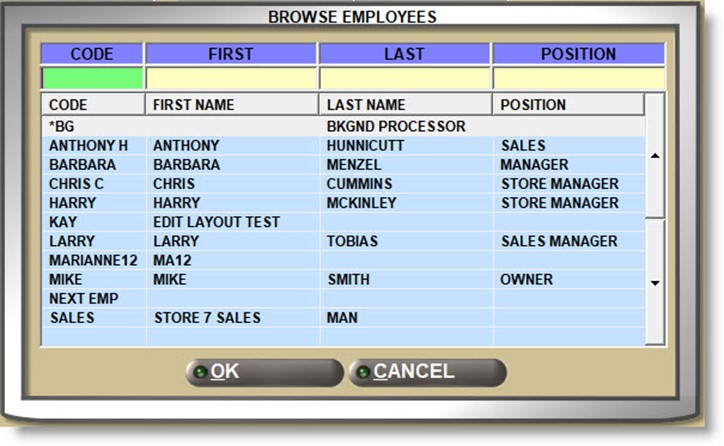
When the screen opens, the cursor is positioned in the 'CUSTOMER LOOKUP' field in the upper-left corner of the screen.
The 'CUSTOMER LOOKUP' field is used to enter or select a main account.
Enter the customer's name, phone number, account number, or account code, and press the 'Enter' key.

If an exact match is found, the customer displays on the screen.
If the wrong customer is found, press the 'Esc' key to return to the 'CUSTOMER LOOKUP' field to find a different customer.
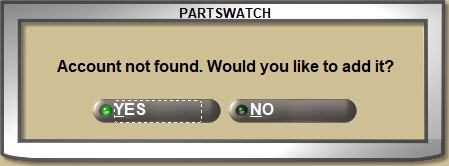
If more than one match is found, or no match is found, the 'FIND CUSTOMER' window opens to select the correct account or to start a new search.
If the customer is not found, a prompt will open to add it.
Adding an Account
Click the 'CUSTOMER LOOKUP' button and the 'FIND ACCOUNT' window is displayed to search main customer account information to locate a customer.
The following fields use type-ahead functionality to narrow the customers displayed:
- 'PHONE'
- 'ACCT CODE'
- 'ACCOUNT #'
- 'BILL TO NAME'
- 'CITY'
- 'ST'
- 'ZIP'
The 'SHIP ADDRESS' and 'CITY' display to assist in locating the correct customer.

If a search value is entered but not found in the table, the program prompts, "No account selected" when the 'Enter' key is pressed or the 'OK' ('Alt' + 'O') button is clicked.
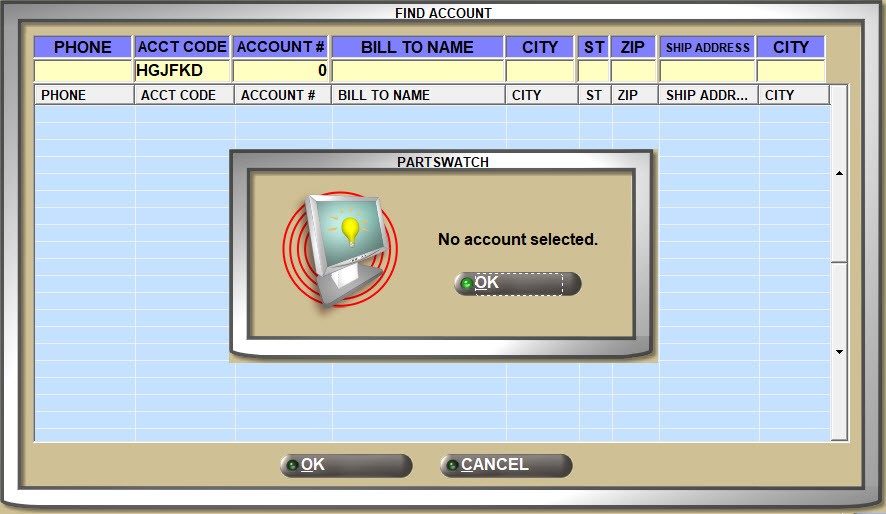
Double-click the row, highlight the row, and press the 'Enter' key or click the 'OK' button to close the window and bring that customer into focus on the MAIN ACCOUNT ENTRY screen.
To add a new account, either:
- Click the 'ADD' button and the 'ADD A NEW ACCOUNT' window opens.
- Enter the customer name in the 'CUSTOMER LOOKUP' field and if it doesn't exist, the system will prompt to add it. Answer 'YES' and the 'ADD A NEW ACCOUNT' window opens.

The 'ADD A NEW ACCOUNT' window is set up from the NEW ACCOUNT DEFAULTS screen and is used to narrow the fields to just those that are necessary when setting up new accounts.
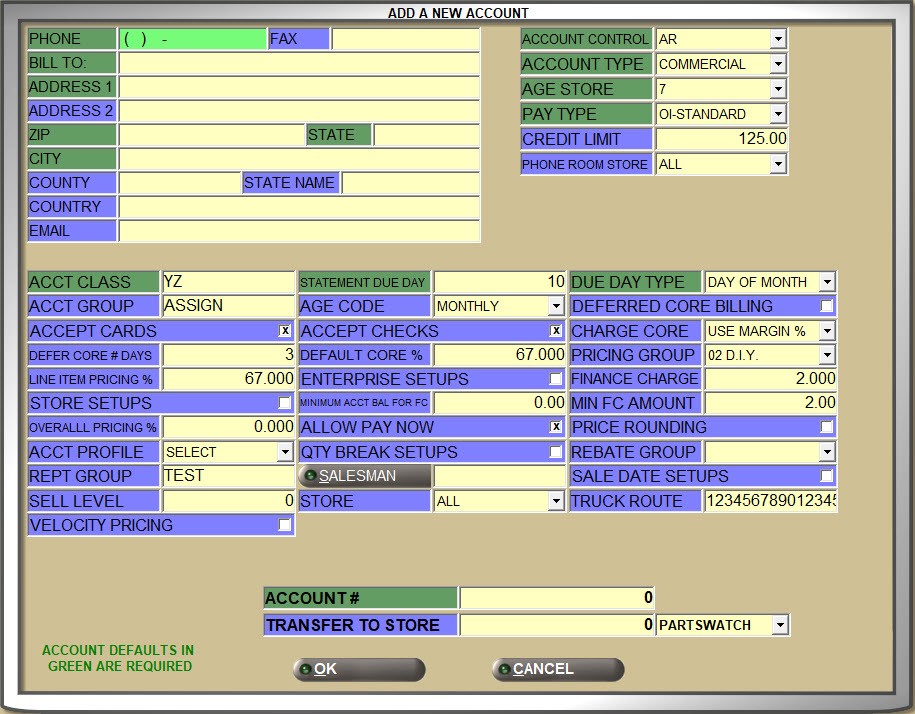
Unless previously set up, the 'ADD A NEW ACCOUNT' window displays the default for adding a customer with the 'ACCOUNT TYPE' of 'COMMERCIAL' and the associated required (green) and optional (blue) fields that store the customer information.
Select a different 'ACCOUNT TYPE' from the drop-down list prior to entering details in the other fields (account types include: 'RETAIL MAIN', 'PARTNER', 'TRANSFER', 'EMPLOYEE', and 'STORE USE') to set up an account with that 'ACCOUNT TYPE'.
Enter or edit the information in the setup fields and answer 'OK' ('Alt'+'O'), to save the account or 'CANCEL' ('Alt'+'C'), to return to the MAIN ACCOUNT ENTRY screen without adding the new customer.
Every customer is tracked with an account number which is assigned at the time the account is created.
Account numbers are between 1 and 10 numbers only and can be designated or assigned by the program.
If the store identifies groups of customers by their account numbers within a designated range, for example, jobbers (accounts 1-10,000), dealers (10,001-20,000), etc. when the 'ADD A NEW ACCOUNT' window opens to add an account, enter the next valid 'ACCOUNT #' for that group range.
Or leave the 'ACCOUNT #' field blank and the program will assign the next available valid number to the account.
If a store had used alphanumeric account numbers, enter a value between 1 and 8 alpha and/or numeric characters in the 'ACCT CODE' (account code) field. Account Codes are not unique and any number of customers can have the same account code.
If the 'USE ACCOUNT CODES' setting is enabled, then everywhere the Account Number would normally display, the Account Code will display instead.
The Account Code is used for customer lookup the same way the Account Number is regardless of the value of the 'USE ACCOUNT CODES' setting.
When a new commercial account is created, the Account Code is set to the Exploris Account Number.
Bill To/Ship To Tab
BILL TO Tab
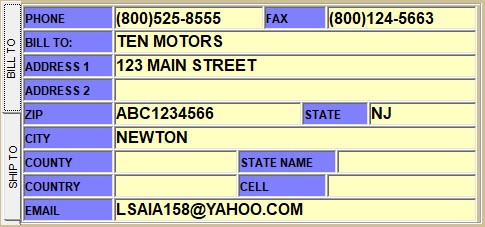
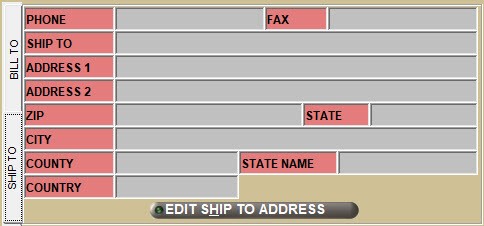
The 'BILL TO' section is used to define the customer's business information.
Primary phone number used for customer searches within the application as well as for customer calls. Allows entry of 10 numbers, or 11 if the first character is '1'.
The customer's fax number, used for faxing invoices/statements.
Customer name or business name.
Enter the customer's mailing address in the 'ADDRESS 1', 'ADDRESS 2', 'CITY', 'STATE', and 'ZIP' fields.
Enter the customer's mailing address 'COUNTY', 'STATE NAME', and 'COUNTRY' as needed.
Customer's mobile phone number used for customer contact and the Point-of-Sale Loyalty Program.
The customer's email address used to email quotes, invoices, and statements.
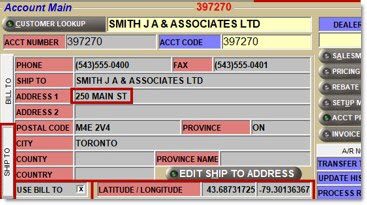
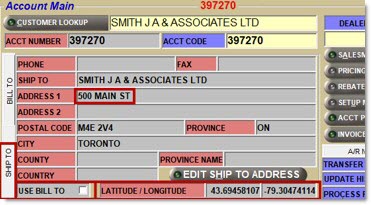
Latitude
Enter the latitude of the Bill To customer's address.
Longitude
Enter the longitude of the Bill To customer's address.
When either the 'Latitude' or 'Longitude' fields are edited, the following validations occur:
- Display a prompt pop-up with the text “Please enter a valid latitude.” when the 'LATITUDE' value entered is a number greater than 90 or less than -90.
- Display a prompt pop-up with the text “Please enter a valid longitude.” when the 'LONGITUDE' value entered is a number greater than 180 or less than -180.
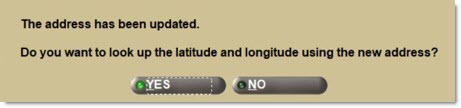
The following rules will be applied when any of the pertinent address fields are edited, which include: 'ADDRESS 1', 'CITY, 'PROVINCE/STATE', and 'POSTAL CODE/ZIP' and/or the 'LATITUDE' field, and/or the 'LONGITUDE' field on the two screens and one pop-up above:
- The Google API will be called and update the 'LATITUDE'/'LONGITUDE' fields when:
- The value of the 'LATITUDE' field or the 'LONGITUDE' field is set to zero, as long as all pertinent address fields have a value, regardless of whether any values of the address fields were changed.
- Any of the pertinent address fields are entered and saved, as long as all pertinent address fields have a value, and the current value of the 'LATITUDE' or 'LONGITUDE' field is zero.
- Any of the pertinent address fields are entered and saved, as long as all pertinent address fields have a value, the current value of both the 'LATITUDE' and 'LONGITUDE' fields are non-zero, and the 'YES' button is clicked after the prompt pop-up is displayed below:
SHIP TO Tab
The 'SHIP TO' section is used to define shipping addresses associated with the customer.
Click the 'SHIP TO' tab to display the 'SHIP TO' section to add, edit, and view shipping addresses. Click the 'BILL TO' tab to toggle back to the 'BILL TO' section.
All shipping address setups are optional.
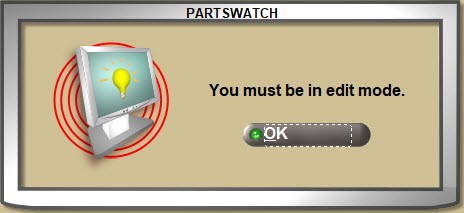
Note: The screen must be in 'EDIT' mode to add, edit, or delete a shipping address. If not, the system opens a reminder.
Checkbox that determines what address the system will use for the selected account.
-
Checked - If the account does not have a default ship to address, the 'Use Bill To' checkbox is checked and displays the 'Bill To' information in the 'Ship To' tab.
-
Unchecked - If the account does have a default ship to address, 'Use Bill To' is unchecked.
Latitude/Longitude
If the 'Use Bill To' checkbox is checked, and therefore the account uses the 'Bill To' address information in the 'Ship To' tab, the 'Latitude / Longitude' fields will show the values established for that 'Bill To' address.
If the account has a default 'Ship To' address, the 'Latitude / Longitude' fields will show the values established for that 'Ship To'.
If the account does not have a default 'Ship To' address, the 'Latitude / Longitude' fields will show the values established for any 'Ship To' address recorded including accounts with multiple 'Ship To' addresses.
The following are examples of one account with 2 addresses, therefore two sets of latitude and longitude coordinates (One using the 'Bill To' address and 'Latitude / Longitude' coordinates in 'Ship To', and another having a different 'Ship To' address, therefore its’ own 'Latitude / Longitude' coordinates).
The 'Latitude/Longitude' values will be cleared if any of the following values are changed in either the 'Bill To' or 'Ship To' tabs:
-
'Address Line 1'
-
'Address Line 2'
-
'City'
-
'State/Province'
-
'Zip/Postal Code'
Click the 'EDIT SHIP TO ADDRESS' button to open the 'SHIP TO ADDRESS' window.
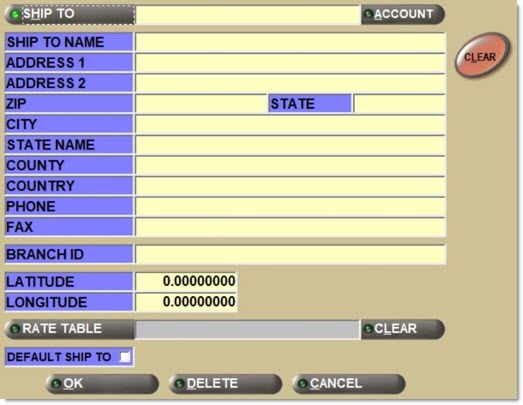
The window is blank until an address is entered and then when opened, the last entered or the "default" address displays. Click the 'CLEAR' button to clear the fields in order to enter a new address. The address is cleared from the screen but not removed from the list.
- 'SHIP TO NAME'
- 'ADDRESS 1'
- 'ADDRESS 2'
- 'ZIP'
- 'STATE'
- 'CITY'
- 'STATE NAME'
- 'COUNTY'
- 'COUNTRY'
- 'PHONE'
- 'FAX'
- 'Latitude'
- 'Longitude'
- 'Use Bill To' - If the account has no default Ship To address, the Bill To address is used and the 'Use Bill To' checkbox is automatically checked by the system. Once a default Ship To address is entered, the 'Use Bill To' checkbox is automatically unchecked.
Note: When the 'Upd' button is clicked, if the store's 'Address Line 1', 'Address Line 2', 'City', 'State/Province', or 'Zip/Postal Code' fields are updated, and if the 'Address Line 1', 'Address Line 2', 'City', 'State/Province', or 'Zip/Postal Code' all have non-blank values, the system performs the following:
- Update the store's 'Latitude' and 'Longitude' fields to blank values.
- Call the Google interface passing the values of the store's 'Address Line 1', 'Address Line 2', 'City', 'State/Province', or 'Zip/Postal Code' , without performing any validation of the five values passed.
- If any error occurs after the call to the Google interface is made:
- Display a prompt with the text “Failed address geocode lookup” and an 'Ok' button.
- When the 'Ok' button is clicked, the store's 'Latitude' and 'Longitude' field values will remain blank values.
- If no errors occur with the call to the Google interface:
- Receive from the Google interface the Latitude and Longitude values associated with the address values passed to Google.
- Update and display the store's 'Latitude' and 'Longitude' field values provided by Google.
Note: Only available if the hidden switch 'EnableGoogleGeocodeLookup' is enabled.
SHIP TO Button
Click the 'SHIP TO' button to open a window with additional existing addresses. Select one to display it in the 'SHIP TO ADDRESSES' window for editing as needed.
ACCOUNT
To use an existing customer as a shipping address for this customer, click the 'ACCOUNT' button and select an existing account from the 'FIND ACCOUNT' window. It displays in the 'SHIP TO ADDRESS' window and can be edited if needed without changing the selected existing customer.
BRANCH ID
The 'BRANCH ID' is a unique alpha-numeric code used to quickly enter a ship to address at Point of-Sale and can be used for multiple 'SHIP TO's within an account, as well as other accounts.
Note: This code is only unique within an account. Different accounts can use the same codes. It is up to the store to set the standards for how they are to be used. For example, the IDs could simply be 1, 2, 3, etc., or the account number followed by a dash and a number, or any other standard that will be easy for counterpersons to remember.
Branch IDs are reported from the LISA TRANSACTIONS REPORT, by clicking the 'COLUMNS DISPLAYED' and checking the 'SHIP TO BRANCH ID' field.
RATE TABLE Button
The store's 'RATE TABLE' displays and will be used for Point-of-Sale taxing if the shipping address is used for the sale.
Click the 'RATE TABLE' button to display the 'BROWSE TAX RATE TABLES' pop-up to search for and/or select a rate table from the grid to apply to the 'SHIP TO' address. Click the 'CLEAR' button to clear the existing rate table for the displayed address. If cleared, the store's rate table will be used for sales to this address.
Regardless of how many shipping addresses are set up, if a default is not identified, the system uses the 'BILL TO' address as the 'SHIP TO' address.
DEFAULT SHIP TO
To select a default, check the 'DEFAULT SHIP TO' at the bottom of the window to set the displayed ship to address as the default. Only one address can be enabled as the default. Each time the 'SHIP TO ADDRESS' window is opened, the default will display.
Physical Tab
Click to display the read-only fields assigned to the account's physical address. Only available based on the setting of the User Security Setup proc 'Edit Physical Address'.
Click to open the 'Physical Address' pop-up to edit the fields for the physical address.
Field Use - Upper Right
The 'ACCOUNT TYPE' defines how a customer is handled/tracked for invoicing and reporting.
All Account Types are optional except 'COMMERCIAL' for wholesale customers and 'RETAIL MAIN' for cash customers.
- 'COMMERCIAL'
- 'RETAIL MAIN'
- 'PARTNER'
- 'TRANSFER'
- 'EMPLOYEE'
- 'STORE USE'
ACCOUNT CONTROL
The 'ACCOUNT CONTROL' field, with the 'ACCOUNT TYPE' field, further defines how the customer is handled/tracked for invoicing and reporting:
- 'AR' (account receivable)
- 'MASTER'
- 'LINKED'
- 'NO AR'
DEALER #
Optionally, enter up to 6 alphanumeric and special characters to provide an additional option to identify customers. The field can be populated manually or by feeds. The field is used for information only and is not used in application searches or reporting.
SALESMAN ('Alt'+'A')
Click the 'SALESMAN' button to select the salesperson that is responsible for the account in focus whether or not 'COMMISSION' is paid for sales made.
Only employees with the 'SALESPERSON' flag checked on the EMPLOYEE SETUP screen are available for selection.
Since the field is not editable, click the 'CLEAR' button ('Alt'+'L') to remove a previously selected salesperson from the account.
Select a Pricing Group from the drop-down list to be used for customer pricing at Point-of-Sale. If the 'PRICING GROUP' is already set up on the PRICE PLAN SETUP screen, that value will display in this field. Changing one changes both. The 'PRICING GROUP' button is disabled and new groups cannot be set up here.
The 'DISCOUNT GROUP' User Security proc controls access to the field.
REBATE GROUP
Select a Rebate Group from the drop-down list to be used for customer rebate functionality at Point-of-Sale. If the 'REBATE GROUP' is already set on the PRICE PLAN SETUP screen, that value will display in this field. Changing one changes both. The 'REBATE GROUP' button is disabled and new groups cannot be set up here.
The 'REBATE GROUP ACCESS' User Security proc controls access to the field.
Select a Pricing Model from the drop-down list to be used for customer pricing at Point-of-Sale. If the 'MODEL' is already set up on the PRICE PLAN SETUP screen, that value will be displayed in this field. Changing one changes both. The 'MODEL' button is disabled and new groups cannot be set up here.
The 'SETUP MODEL ACCESS' User Security proc controls access to the field.
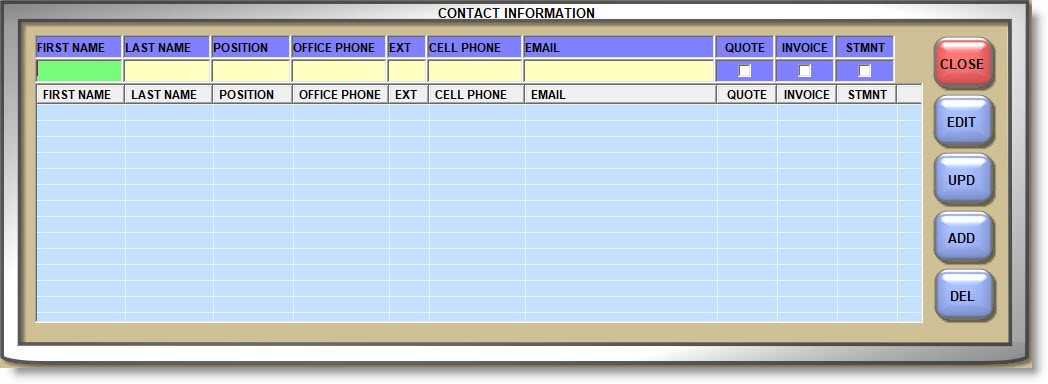
CONTACTS
Click the 'CONTACTS' button to open the 'CONTACT INFORMATION' window used to store contact information about the employees of the customer in focus.
Enter the 'FIRST NAME' and 'LAST NAME', 'POSITION' with the company, 'OFFICE PHONE' number and 'EXT' (extension), and their 'CELL PHONE' number and 'EMAIL' address.
Optionally check the 'QUOTE', 'INVOICE', and/or 'STMNT' (statement) fields if the contact should automatically receive quotes, invoices, and/or statements when printed. In order to email invoices and/or quotes, the 'SEND INVOICE COPY'/'SEND QUOTE COPY' settings must be enabled.
In order to email the documents, the contact's 'EMAIL' address under the 'BILL TO' tab must be valid.
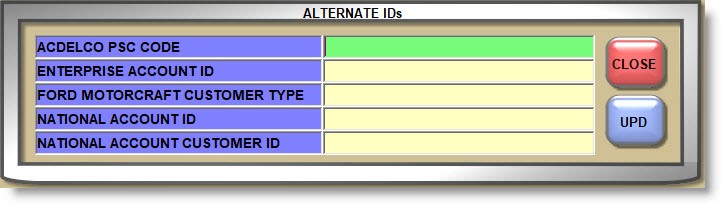
The Alternate ID functionality is specific to stores running sales or inventory extracts from Ford Motorcraft, ACDelco, or National.
Click the 'ALTERNATE IDs' button to open a window to enter the setup information.
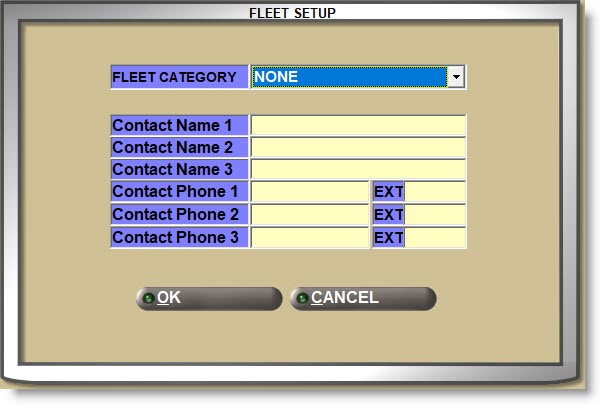
Fleet setup is optionally used to set up contact information and can be used to filter the data reported from the ACCOUNT INFORMATION REPORTS screen and for MAILING LABELS.
Select a 'FLEET CATEGORY' from the drop-down list and enter the contact information for that category.
Predefined fleet categories can be used as needed:
- 'STANDARD'
- 'COMMERCIAL FLEET'
- 'LEASING MANAGEMENT'
- 'EXTENDED WARRANTY'
- 'RENTAL'
- 'RECONDITIONING'
- 'AFFINITY'
INVOICE DELIVERY
Click the 'INVOICE DELIVERY' button to open the 'INVOICE & DELIVERY SETUP' window with setups used at Point-of-Sale for invoicing and delivery.
Delivery Setups
TRUCK ROUTE/TRUCK STOP
Enter up to 20 alphanumeric and special characters that identify the 'TRUCK ROUTE' and up to 2 numbers that identify the 'TRUCK STOP' used for deliveries.
If a value is entered in either or both fields, it will print on pick tickets if enabled on the form.
eDELIVERY
If subscribing to 'eDELIVERY', and this a delivery customer, check the 'eDELIVERY' field to the right of the 'TRUCK STOP' field and the 'eDELIVERY' field on the INVOICE screen will be checked by default and the 'TRUCK ROUTE' and 'TRUCK STOP' will be updated to the eDelivery zones.
Delivery Priority
Priority drop-downs containing the values of 'High', 'Medium', and 'Low'.
Acct Delivery Method
Allows for selection of 'None', 'Courier', 'Delivery', 'Pickup', 'Routed', and 'Shotgun'. Any selection made in this pop-up will override the default setting found for 'Selling From Hub', 'Selling From Sister', or 'Selling From DC' in the Delivery Surcharge screen.
DELIVERY NOTES
Optionally enter up to 64 alphanumeric and special characters for a note that will print in the body of the invoice with any information needed for delivery to the customer is focus. If the note spills over as the only item on an additional page, it will print at the top of the body section instead of at the bottom.
Point-of-Sale Setups
Determines whether or not backorders are saved for the customer.
- Checked - At Point-of-Sale, before the background processor prints a Quote, Pack, or Pick for an invoice including Internet and transfers, if a part has insufficient sell quantity, it is processed as a backorder.
If the 'BKORD / LOST SALE BUTTON AT POS' flag is checked, a 'BACKORDER' button displays on the 'INSUFFICIENT QTY - SOURCING' pop-up at Point-of-Sale to record the quantity as a customer backorder instead of sourcing it. - Unchecked - At Point-of-Sale, before the background processor prints a Quote, Pack, or Pick for an invoice including Internet and transfers, if a part has insufficient sell quantity, it is processed as a lost sale.
If the 'BKORD / LOST SALE BUTTON AT POS' flag is checked, a 'LOST SALE' button displays on the 'INSUFFICIENT QTY - SOURCING' pop-up at Point-of-Sale to record the quantity as a lost sale instead of sourcing it.
ALLOW SALES AND RETURNS ON THE SAME INVOICE
Determines whether or not both sales and returns can be processed on the same invoice at Point-of-Sale.
- Checked - By default, sales and returns can be made during the same sale.
- Unchecked - Sales and returns must be made on two separate invoices when the customer buys something and returns something at the same time.
ALLOW RETURNS FROM MULTIPLE INVOICES
Determines whether or not items returned at Point-of-Sale can be processed on the same invoice, even if they were purchased on different invoices.
- Checked - All returns, regardless when sold, can be processed on the same invoice.
- Unchecked - Only sales from a single invoice can be returned on the invoice.
ADDITIONAL PRINTED INVOICE COPIES
Even though forms are set up on the store level to print additional invoice copies, as a customer override, enter a number between 1 and 9, and each time an invoice is printed, that number of additional invoice copies will print for the customer in focus.
SEND INVOICE COPY
Select 'EMAIL' or 'FAX' to either email or fax a copy of each invoice when finalized to the 'BILL TO' customer. If the 'INVOICE' flag is checked for any 'CONTACTS' a copy will be sent to those contacts also. If set to 'NONE' (default), invoice copies are not sent regardless of whether the 'INVOICE' flag is checked or not.
SEND UNDO INVOICE COPY
Select 'EMAIL' or 'FAX' to either email or fax a copy of each 'UNDO' invoice to the 'BILL TO' customer. If set to 'NONE' (default), 'UNDO' invoice copies are not automatically sent.
SEND QUOTE COPY
Select 'EMAIL' or 'FAX' to either email or fax a copy of each Quote to the 'BILL TO' customer. If the 'QUOTE' flag is checked for any 'CONTACTS' a copy will be sent to those contacts also. If set to 'NONE' (default), Quotes are not sent regardless of whether the 'QUOTE' flag is checked or not.
Determines how customer purchase order numbers are tracked at Point-of-Sale:
- 'No' - A PO# is not required.
- 'Force Begin' - A pop-up opens at the start of a sales order and a purchase order number must be entered before the sale can continue.
- 'Force End' - A pop-up opens at the end of a sales order and a purchase order number must be entered before the sales order can be finalized.
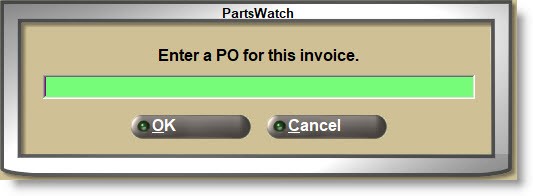
If 'REQUIRE PO' is forced, a PO number must be entered in order to complete the invoice. Once entered, it can be edited, but not deleted.
If a customer profile is set up on the PROFILE PARAMETER SETUP screen to capture the PO number, the 'PROFILE DATA' window opens to capture the PO number in the 'PO / AUTHORIZATION NUMBER' field instead.
Refer to the Customer Purchase Order Setup for additional setups.
Acct Profile
Drop-down that allows selection of the 'Account Profile' from the window.
REQUIRE PO / SEQUENCE NUMBERS ON INVOICE
Determines whether or not the 'PO SEQUENCE NUMBER' pop-up opens to enter a 'PO SEQ#' (sequence number) for each item on the sales order before finalizing invoices for the account. This control is normally used if the customer wants to track each item bought on an invoice and wants to be able to reference the "sequence numbers" by PO number.
- Checked - At the time of invoice finalization, the pop-up displays to enter a PO number and enter the sequence number for each part. If a Blanket PO exists or one has been manually entered in the 'PO' field, the PO will display in the pop-up but can be edited.
Note: Sequence numbers must be provided by the customer. - Unchecked - The pop-up does not display.
The pop-up only contains parts added with a sales modifier.
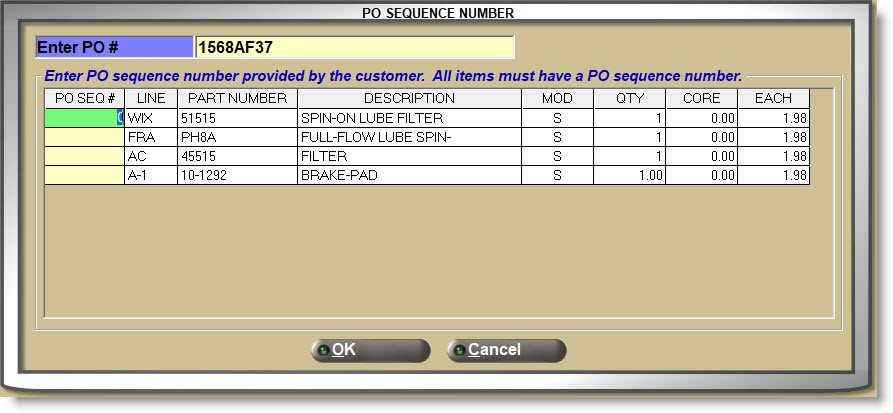
Refer to the Customer Purchase Order Setup for additional setups.
PRINT ONLY STORE COPY OF INVOICE
Determines whether to print only the store copy of the invoice at Point-of-Sale or both the store and the customer copies.
- Checked - The store setting to print both the store and the customer copies of the invoice is overridden and only the store copy is printed.
- Unchecked (default) - Both the store and the customer copies are printed.
If consignment functionality is used, this setting determines whether or not the customer in focus can be set up with a consignment.
- Checked - The customer can be given a consignment.
- Unchecked - Consignment functionality is not available to the customer.
eDELIVERY
Determines whether or not invoices for this account go to eDelivery.
- Checked - All invoices for this account go to eDelivery.
- Unchecked (default) - Invoices are not sent to eDelivery.
Note: The setup is only available when the database is configured for ePaperlessOffice.
Determines whether or not customer prices print on pack slips.
- Checked - Prices are printed on pack slips for the customer in focus.
- Unchecked - Prices do not print on pack slips for the customer in focus.
Determines how parts are ordered on pack slips.
- Checked - Parts print in warehouse sequence.
- Unchecked - Parts are printed in the order they are entered at the time of invoice creation.
Determines whether or not customer prices print on pick tickets.
- Checked - Prices print on pick tickets for the customer in focus.
- Unchecked - Prices do not print on pick tickets for the customer in focus.
Determines how parts are ordered on pick tickets.
- Checked - Parts print in warehouse sequence.
- Unchecked - Parts print in the order they are entered at the time of invoice creation.
Determines whether or not customer prices print on both the 'STORE COPY' and the 'CUSTOMER COPY'; which includes the 'LIST PRICE', 'NET', 'NET CORE', and 'EXT. AMOUNT' for all line items and the 'FREIGHT', 'TAXABLE AMT.', 'SALES TAX', 'TOTAL CORE', 'PREV. DEPOSIT', and 'PAY THIS AMOUNT' invoice totals.
- Checked - Prices are printed on invoices for the customer in focus.
- Unchecked - Prices do not print on invoices for the customer in focus.
Determines how parts are ordered on invoices as an override to the 'INVOICE RESEQUENCE' setting on the store level.
- Checked - Parts are sorted by: 'Catalog Vehicle', 'Zone', 'Bin', 'Line Code', 'Part Number', and 'Invoice Item #'.
- Unchecked - (default) Parts are sorted by 'Catalog Vehicle', 'Invoice Item #', 'Line Code', and 'Part Number'.
Determines whether or not the remaining account balance after the 'ROA AMOUNT APPLIED' has been deducted on the printed ROA for the customer.
- Checked - The balance prints on the ROA.
- Unchecked - The balance does not print on the ROA.
Note: The ROA form must support printing the account balance. Contact Support, if needed.
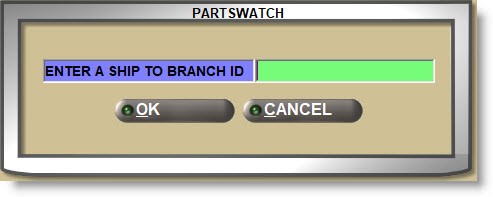
Determines whether or not a pop-up opens at Point-of-Sale to enter a 'BRANCH ID'.
- Checked - If using Branch IDs, set up under the 'SHIP TO' tab, a window opens to enter the 'BRANCH ID' each time the customer buys something instead of looking for the ship to address.
- Unchecked - The pop-up does not open at Point-of-Sale for the customers regardless of whether or not 'BRANCH IDs' are set up.
If enabled, eRewards is used to encourage the store's customers to "earn" "dollars" each time they shop that can be "spent" at the store.
Entering a value in the 'LOYALTY PROGRAM ID' field enables the functionality for the customer in focus and is used to identify commercial customers from retail customers. Any alphanumeric value can be entered, however, it is recommended that two IDs be created, one used for commercial customers, for example, "CR" and one for retail customers, for example, "RR". The same ID can be used for all customers and since customers can be enrolled at Point-of-Sale, the easier the ID, the more reliable the enrollment process.
The 'LOYALTY PROGRAM ID', along with the customer's 'CELL' number and invoice information (e.g. points earned and redeemed) are sent to the loyalty program (via eOffice) after invoice transactions are finalized.
The "eRewards" program, also called the "Loyalty Program" is a subscription fee-based feature using the Autologue eProduct, eRewards. Contact Sales if interested.
Optionally enter up to 20 alphanumeric and special characters that represent customer purchase order numbers in each of the three (3) 'BLANKET PO' fields as needed and enter the expiration date of each of the fields, if the PO expires.
For a single blanket PO, enter the number, and if it doesn't expire, enter an expiration date far in the future. Without a date, the setup will not be used. If more than one blanket PO is set up, different expiration dates are needed so the system knows the correct one to use.
For example, if 2 POs are given by the customer, one to be used between Jan 1 and Jun 30, and the other between July 1 and Dec 31, enter each with their expiration date.
If a value is entered, the PO field is automatically populated for each new invoice that is created on or before the expiration date but can be changed at invoice time.
A valid 'BLANKET PO' overrides both the 'REQUIRE PO' setting and a PROFILE PARAMETER SETUP profile forcing a purchase order to be captured at Point-of-Sale.
Refer to the Customer Purchase Order Setup for additional setups.
Show No Receipt Button
When checked, displays the 'No Receipt' button. When unchecked, does not display the button.
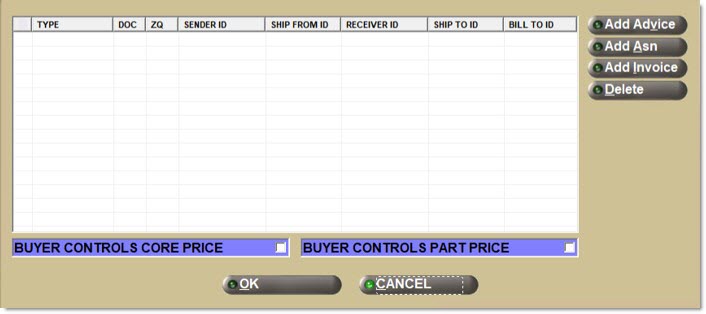
EDI Setups
Stores/warehouses can sell to any buyer, running any system, that buys their parts via the same gCommerce Gateway, using the same EDI file formats. All inbound purchase orders (850) received by PartsWatch are processed as sales orders, and PW sends all outbound documents in the same EDI industry-standard file formats (e.g. ASN (856) and eInvoice (810)).
PartsWatch, as a selling system, has a manual shipping integration with national carriers, e.g. FedEx, UPS, etc. The 'SHIP' pop-up at Point-of-Sale allows the entry of shipping information obtained from third-party systems such as FedEx Shipping Manager. The shipping information entered on the PartsWatch sales order is included in the EDI ASN (856) and eInvoice (810) documents sent from PW when the sales order is finalized.
An outbound EDI inventory file (846) is sent daily from the system to provide buyers and their buying systems, via the gCommerce Gateway, with all of the parts being offered for sale by the seller.
As EDI setups are added, they are displayed in the EDI Setup grid. Double-click an existing row in the grid to open the window for edit. Check a row and click the 'Delete' button to delete it.
BUYER CONTROLS CORE PRICE/BUYER CONTROLS PART PRICE
Typically, in almost all buyer-seller trading relationships, the seller dictates all parts' sell prices and core charges. In some buyer-selling trading relationships, with a large buyer with strong "buying power", the buyer may dictate part sell prices and core charges. These arrangements are often documented and agreed to in a contract between the buyer and seller before any purchasing transactions occur.
- Checked - The buyer dictates the core price/part price.
- Unchecked - The seller dictates the core price/part price.
EDI Setup Windows
- Click the 'Add Advice' button to display the 'EDI Inventory Advice Setup' window.
- Click the 'Add Asn' button to display the 'EDI ASN Setup' window.
- Click the 'Add Invoice' button to display the 'EDI Invoice Setup' window.
Note: All of the above windows have identical fields and each is used to set up customer-level overrides of any INVOICE OPTIONS screen, 'EDI SETUP' tab settings on the store level.
All information is required to transmit an EDI 810 Invoice from PartsWatch to any recipient.
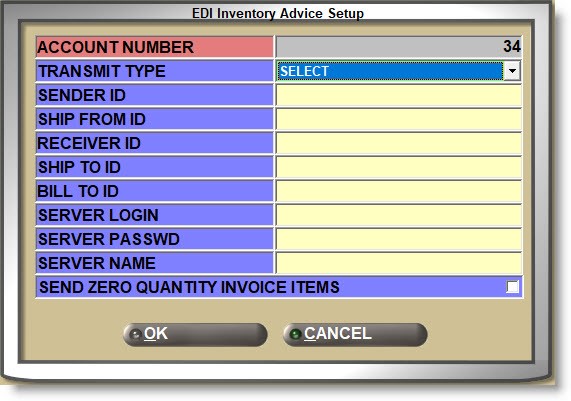
The Account Number of the customer in focus, for information only.
Select 'CORECENTRIC EDI' or 'GCOMMERCE EDI' as the handler.
Note: All of the following values are provided by the EDI VAN.
SENDER ID
Enter the PartsWatch organization sending the invoice (EDI Sender Identifier).
The first two characters represent the EDI Interchange ID qualifier and the remaining characters represent the EDI Interchange Sender ID.
SHIP FROM ID
Enter the location of the PartsWatch organization sending the invoice (EDI Ship From Identifier).
The first two characters represent the EDI Identification Code qualifier and the remaining characters represent the EDI Identification ID.
RECEIVER ID
Enter the recipient entity receiving the invoice (EDI Receiver Identifier).
The first two characters represent the EDI Interchange ID qualifier and the remaining characters represent the EDI Interchange Receiver ID.
SHIP TO ID
Enter the receiver location receiving the invoice (EDI Ship To Identifier).
The first two characters represent the EDI Identification Code qualifier and the remaining characters represent the EDI Identification.
BILL TO ID
Enter the receiver location responsible for handling the bill (Bill To Identifier).
The first two characters represent the EDI Identification Code qualifier and the remaining characters represent the EDI Identification.
Enter the username of the FTP server for FTP delivery of the EDI 810 Invoice file.
SERVER PASSWD
Enter the user password on the FTP server for FTP delivery of the EDI 810 Invoice file.
SERVER NAME
Enter the server name or IP address of the FTP server to which the EDI 8190 Invoice file is to be delivered.
SEND ZERO QUANTITY INVOICE ITEMS
Determines whether or not items on the invoice with zero '0' quantity are sent in the transmission.
- Checked - Zero quantity parts are sent with the transmission.
- Unchecked - Only parts with quantities greater than '0' are sent.
Click the 'eORDER SETUP' button to open the 'eORDER' window used to set up internet invoice processing controls.
eORDER STORE
Select the store number from the drop-down list that will receive the eOrders.
eORDER BILLING STORE
Select the store from the drop-down list that will be tracked as the "billing" store.
When an order is submitted for an account, the "PartsWatch eCommerce Gateway" (PEG) creates a sales order in the specified 'eORDER BILLING STORE', instead of the requested fulfillment store, and all of the parts on the sales order will be sourced from the requested fulfillment store (except for eOrder VI parts).
When an eOrder is submitted for a 'TRANSFER' account, the system ignores the 'eORDER BILLING STORE'.
Enter up to 16 alphanumeric and special characters that are used as the Internet store password.
Enter an overall discount percent applied to items ordered via the Internet.
Select how eOrder customers see the store's available quantity for the parts.
- 'SEND STORE QOH' (default)
- 'SEND '0' QUANTITY'
- 'SEND NEEDED QUANTITY'
Select how eOrders print when received:
- 'INVOICE'
- 'QUOTE'
- 'PICK'
- 'PACK'
If the store is using 'terminal' phone room functionality, select the store the customer in focus defaults to buy from. If 'ALL' is selected, then the 'SELECT PHONE ROOM LOCATION' window opens at Point-of-Sale to select the location.
Determines whether or not eOrder parts with insufficient quantity can be "oversold", allowing the 'QTY AVAILABLE' to go negative.
- Checked - Parts on eOrders with insufficient sell quantity can be sold as an Oversell.
- Unchecked - Parts on eOrders with insufficient sell quantity are added with the Buyout (BO) modifier set to 'SOURCE LATER' status. For store-to-store transfer orders, parts with insufficient sell quantity are recorded as either a backorder or lost sale (based on the account's 'SAVE BACKORDERS' setting).
Click the 'EDI Setup' button to open the 'EDI Setup' window.
Click the 'AR NOTE' tab to display an 'AR NOTE' field used to store a note about the customer. The 'AR NOTE' is for information only.
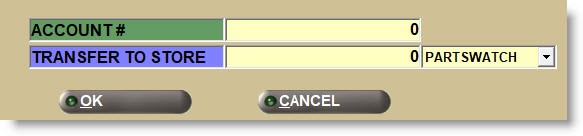
TRANSFER Tab
Click the 'TRANSFER' tab to display fields for multi-store transfer setup:
Enter the transfer 'TO' (buying store) store number.
Determines whether or not part histories are updated for the 'TO' (buying store) store at the time of PO receipt, since purchase orders are always created for store transfers.
- Checked - Purchase histories are updated.
- Unchecked - Purchase histories are not updated by PO receipt.
The flag is not used to determine whether or not to update part histories in the 'FROM' (selling) store.
Stock quantities are adjusted and sales are tracked separately from normal sales regardless of the flag setting.
Select how the order is processed in the 'FROM' store creating the invoice.
- 'INVOICE'
- 'QUOTE'
- 'PICK'
- 'PACK'
The program will force an order to be processed as a pick instead of an invoice depending on:
- Insufficient sell quantity for the parts.
- Any of the parts are NIF.
- Calculated sell price for any part is '0.00'.
- The account is Over the Credit Limit or Past Due.
- The account's 'PAY TYPE' is set to 'CASH'
- The store is set up to use "real" cash drawers.
- The order contains return items.
- Sourced items (From Nexpart VI or IAP/ACL item messages).
- If the order is flagged as "urgent" (IAP only).
- IWS (In-Warehouse Sales) to a non-transfer account.
Account Filters
Enter up to 2 alphanumeric or special characters that can be used to group accounts together to filter information returned in applicable reports.
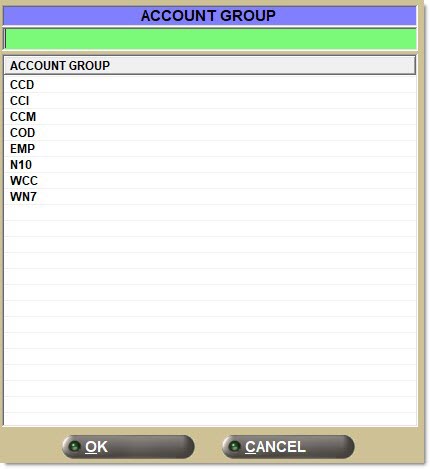
Enter up to 10 alphanumeric or special characters, preset from the ENTERPRISE GENERAL SETUP screen and used to group accounts together to filter information returned in applicable reports. If the value entered has not been set up, a window will open with all existing values for selection. The 'ACCOUNT GROUP' field in the window is used to filter the setups for easy selection. Account Groups cannot be added from the MAIN ACCOUNT ENTRY screen.
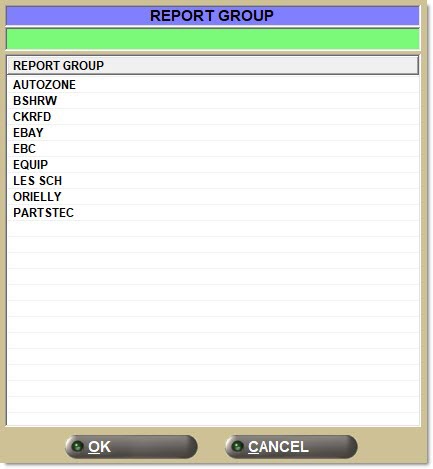
Enter up to 8 alphanumeric or special characters, preset from the ENTERPRISE GENERAL SETUP screen and used to group accounts together to filter information returned in applicable reports. If the value entered has not been set up, a window will open with all existing values for selection. The 'REPORT GROUP' field in the window is used to filter the setups for easy selection. Report Groups cannot be added from the MAIN ACCOUNT ENTRY screen.
Select the language from the drop-down list that will be used as an override to the PC SETUP, SYSTEM LANGUAGE. The language selected here will set Statement and Invoice language for the customer in focus.

Displays the customer's aging balances depending on:
The AGE CODE:
- 'MONTHLY'
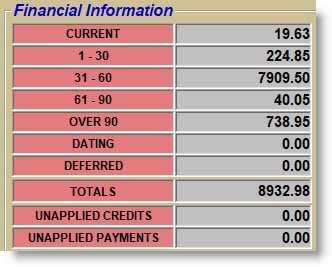
- 'WEEKLY'
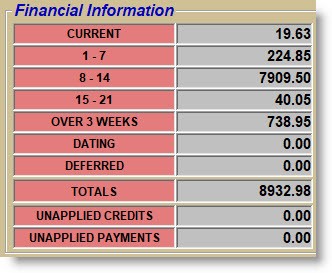
- The 'VIEW FINANCIAL DATA' User Security restriction. If disabled, the totals do not display.
![]()
Displays the date that the account was created, for information only.
Displays the date that the customer last made a purchase in invoicing.
Displays the date that a payment was last posted to the customer's account.
Displays the amount of the last payment made by the customer.
For multi-stores, select the store or the 'STORE GROUP' the customer normally buys from.
If 'STORE' is set to '0' and a 'STORE GROUP' is not selected, the system prompts that one or the other must be selected.
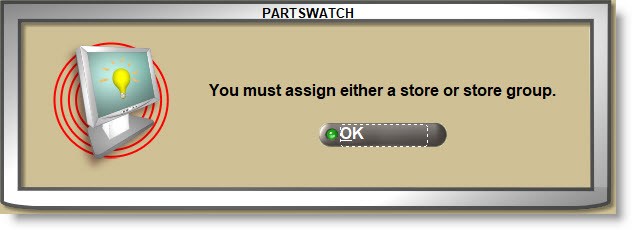
An account can only be set to a 'STORE' or a 'STORE GROUP', not both.
The 'STORE' can be set to any store in the business.
The customer can be assigned to any 'STORE GROUP' preset in the 'STORE GROUP ENTRY' setting or:
- 'ALL' - The account can be found and invoiced to all stores in the database.
- 'NONE' - Store Group not used. The account is assigned to a valid 'STORE' number.
- [specific Store Group] - Assigns the account to a single store group. The account can be invoiced from any of the stores in that group.
Click the 'STORE GROUP' button to open the 'FIND STORE GROUP' window to search for a store group. Employees are allowed/not allowed to assign accounts to 'STORE GROUPS' depending on the 'STORE GROUP' they are assigned to.
If the employee/user belongs to the 'ALL' store group, they can access all accounts.
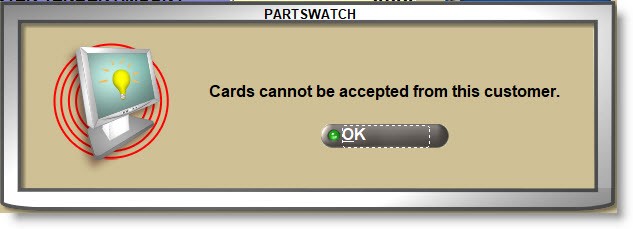
Determines whether or not credit cards are accepted from the customer at Tender and as an ROA payment.
- Checked - Any combination of credit, debit, or gift cards can be accepted as tender and as an ROA for a sale.
- Unchecked - Credit, debit, and gift cards are not accepted as tender or as an ROA. If presented, the system prompts that cards are not accepted.
Select the accounting method that best tracks customer transactions for invoice payment and statement printing.
- 'OI-STANDARD'
- 'OI-STATEMENT PAY'
- 'BALANCE FORWARD'
- 'CASH'
The ACCOUNT CONVERSION screen is used to change a 'PAY TYPE' from 'BALANCE FORWARD' to 'OPEN ITEM' or vice versa if needed.
The setup only works with the Override Security restrictions to determine how Point-of-Sale handles customers with on account payment terms when they are over the 'CREDIT LIMIT'.
If a customer is entered at Point-of-Sale that is over the credit limit, the 'ACCOUNT OVER CREDIT LIMIT' OVERRIDE SECURITY proc is enabled and the 'STOP OVER CR LIMIT' flag is:
- Checked - An alert displays in the border and the 'Manager Approval Required' pop-up opens to allow/disallow the sale.
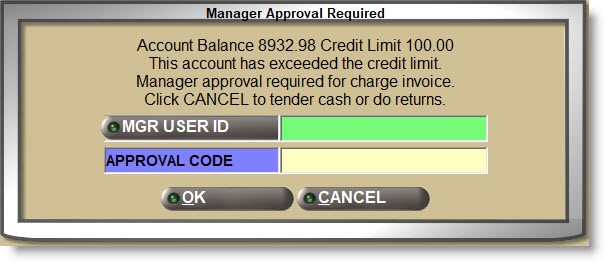
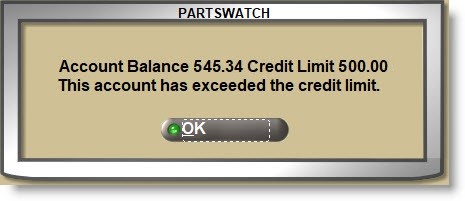
- Unchecked - A notification pop-up opens, an alert displays in the border, and the sale is allowed without a manager override.


If a customer is entered at Point-of-Sale that is over the credit limit, the 'ACCOUNT OVER CREDIT LIMIT' OVERRIDE SECURITY proc is disabled and the 'STOP OVER CR LIMIT' flag is:
- Checked - A notification pop-up does not open, an alert displays in the border, and the sale is allowed.

- Unchecked - A notification pop-up opens, an alert displays in the border, and the sale is allowed.
Quick view of the above functionality:

Customers over the credit limit can pay ROAs against their balance and when below the limit, are then able to charge on account again.
Determines whether or not sales are allowed if the account is not paid on time and is past due.
Click the small up/down arrows to set the number of days, from 0 to 255, that the customer has to pay their account before becoming "past due".
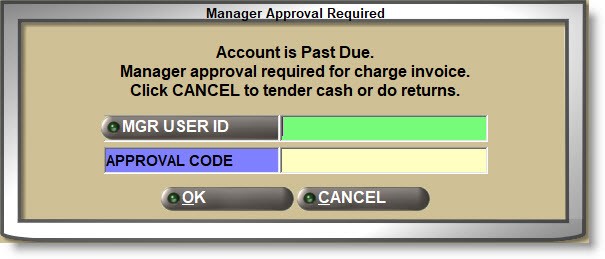
If a customer is entered at Point-of-Sale that is past due, the 'PAST DUE ACCOUNT' OVERRIDE SECURITY proc is enabled, and the 'NO INV PAST' flag is:
- Checked - An alert displays in the border and the 'Manager Approval Required' pop-up opens to allow/disallow a sale.

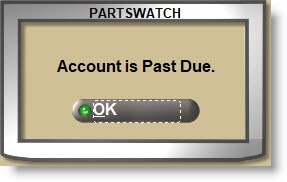
- Unchecked - A notification pop-up opens, an alert displays in the border, and the sale is allowed without a manager override.

If a customer is entered at Point-of-Sale that is over the credit limit, the 'ACCOUNT OVER CREDIT LIMIT' OVERRIDE SECURITY proc is disabled, and the 'STOP OVER CR LIMIT' flag is:
- Checked - A notification pop-up does not open, an alert displays in the border, and the sale is allowed.

- Unchecked - A notification pop-up opens, an alert displays in the border, and the sale is allowed.
Quick view of the above functionality:

Customers over the credit limit are able to pay ROAs against their balance and when below the limit, are then able to charge on account again.
Determines whether or not the customer is allowed to buy in the store.
- Checked - The customer is no longer found from the 'CUSTOMER LOOKUP' field or button at Point-of-Sale. If entered in the customer lookup field, the 'FIND CUSTOMER' window opens to search for another customer. To see if the customer is locked out, check the 'DISPLAY LOCKED ACCOUNTS' flag on the 'FIND CUSTOMER' window and click the 'SEARCH' button and all accounts that are locked out will display for information only. These accounts cannot be selected to buy in the store.
- Unchecked - (default) The customer is active and can be selected for sales and returns at Point-of-Sale.
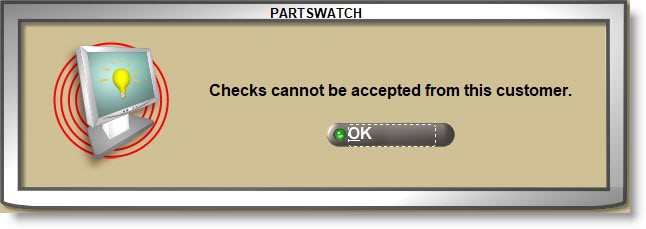
Determines whether or not the customer is allowed to pay by check.
- Checked - The customer can pay by check.
- Unchecked - The customer cannot pay by check. If the 'CHECK' icon is selected on the invoice 'Tender' window or ROA Tender screen, the system prompts that checks cannot be accepted.
Determines whether or not invoices can be processed as a COD (Cash on Delivery).
- Checked - If COD functionality is enabled, it is available at Point-of-Sale for the customer.
- Unchecked - COD functionality is not available for the customer.
Note: If a 'CASH' account has both the 'ALLOW PAY NOW' and 'COD' buttons unchecked, there is no way to finalize a sales order for that customer since all "finalize" buttons are disabled.
Note: If an account with payment terms has both the 'ALLOW PAY NOW' and 'COD' buttons unchecked and the account is over their credit limit/past due without a manager override, there is no way to finalize a sales order for that customer since all "finalize" buttons are disabled.
Enter the highest amount that the account can "charge" on account at Point-of-Sale.
Note: When determining the 'Credit Limit', consider that "dated" transactions are included in the customer's balance due.
If the 'CREDIT LIMIT' field is set to '0.00', the customer has unlimited credit.
The field is updated at statement print time and represents the highest "current" balance from customer purchases in a single period, and is for information only.
This field is updated during either the end-of-week or end-of-month close, depending on the account's 'AGE CODE'.
Determines whether the customer can pay cash for sales at Point-of-Sale or if all invoices for the customer are automatically put on account.
-
Checked - (default) Allows invoices to be put "on account" or payment be tendered at the time of the sale. If the store uses the:
-
'PAY NOW'/'ON ACCT' buttons, the 'PAY NOW' button is enabled to tender sales.
-
'INVOICE'/'SLIP' buttons, the 'INVOICE PAY OPTIONS' window opens to allow the selection of 'PAY NOW' or 'ON ACCOUNT' per sale.
-
-
Unchecked - All invoices are automatically put "on account" with no option to tender payment at the time of he sale. If the store uses the:
-
'PAY NOW'/'ON ACCT' buttons, the 'PAY NOW' button is disabled and all sales are "on account".
-
'INVOICE'/'SLIP' buttons, the 'INVOICE PAY OPTIONS' window does not open and all sales are "on account".
Note: If the account has already tendered payment for an invoice on a B2C website the 'PAY NOW' button will be enabled so the invoice can be finalized.
Note: If a 'CASH' account has both the 'ALLOW PAY NOW' and 'COD' buttons unchecked, there is no way to finalize a sales order for that customer since all "finalize" buttons are disabled.
Note: If an account with payment terms has both the 'ALLOW PAY NOW' and 'COD' buttons unchecked and the account is over their credit limit/past due without a manager override, there is no way to finalize a sales order for that customer since all “finalize” buttons are disabled.
-
The 'EDIT TAX' field displays the taxability for each tax authority from the current store's 'STORE RATE TAX TABLE' and the tax status of each. Therefore, a different value could display in the 'EDIT TAX' grid depending on which store the account is being displayed from.
![]()
![]()
Click the 'EDIT TAX' button to display the 'ACCOUNT TAX INFORMATION' window to edit/view the account's sales taxability setups.
Select the account's sales taxability from the drop-down list.
- 'ALWAYS' - The customer is normally taxed.
- 'CONDITIONAL' - Conditionally taxed if the customer does not have a State Tax ID.
- 'EXEMPT' - The customer is normally not taxed.
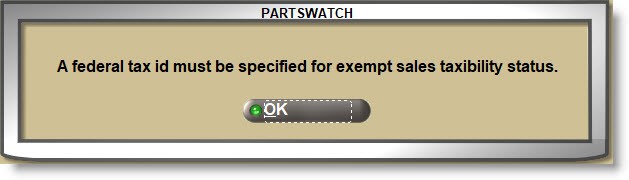
If set to 'EXEMPT' a 'FEDERAL TAX ID' number must be entered. If the 'UPD' button is clicked before entering a 'TAX ID' number, the system will prompt with a reminder.
Determines whether or not the customer is charged Company Imposed Disposal Fees.
- Checked - Any applicable disposal fees are charged.
- Unchecked - Disposal Fees are not charged.
Enter the customer's federal tax ID number if the customer is 'EXEMPT' on the federal level. The field is forced if the 'SALES TAXABILITY' is set to 'EXEMPT' and unavailable if set to 'ALWAYS' or 'CONDITIONAL'.
Exempt State / State Fee Taxability / Tax ID
- All State Tables in the system will display in the 'STATE TABLE' column.
- If a 'TAX ID' number is entered in the 'TAX ID' field, the account is exempt from that state.
- A Tax ID can be up to 20 alphanumeric characters.
- The Tax ID follows the sales transactions and is available for historical reporting.
All State tables display in the 'STATE' column. If the customer is exempt in one or more states, with the 'SALES TAXABILITY' field set to 'CONDITIONAL', either *SET ALL or set up per state:
- 'STATE TAX ID' - Enter the state tax ID number.
- 'TAXABILITY' - Select the customer's taxability in the state ('ALWAYS', 'CONDITIONAL', or 'EXEMPT'). If a 'STATE TAX ID' is entered, the 'TAXABILITY' field allows for the selection of 'CONDITIONAL' or 'EXEMPT'. Without a 'STATE TAX ID', the field can be set to 'ALWAYS' only.
- 'TIRE STATUS' - Select the customer's taxability on tire fees in the state. The 'TAXABILITY' only allows for the selection of blank (not exempt) or 'EXEMPT'. If 'EXEMPT', fees are not added to the invoice for parts with the 'SUB TYPE' of 'TIRE'.
- 'BATTERY STATUS' - Select the customer's taxability on battery fees in the state. The 'TAXABILITY' only allows for the selection of blank (not exempt) or 'EXEMPT'. If 'EXEMPT', fees are not added to the invoice for parts with the 'SUB TYPE' of 'BATT' (battery).
- 'TIRE/BATTERY FEE ID' - Enter the customer tax-exempt number on tire/battery fees.
*Note: Enter values in the 'SET ALL' fields and click the 'SET ALL' button to update all 'STATE' setups with that value. Then, edit any 'STATE' setups as needed.
Taxability at Point-of-Sale depends on whether a tax ID exists for the State the customer is buying in. If an 'EXEMPT' tax ID is not set up, then the customer is conditionally taxed. If an 'EXEMPT' tax ID is set up, then the customer is conditionally not taxed.
Tax IDs are tracked with the sales transactions and are available for historical reporting.
Enter up to 65 alphanumeric and special characters about the account/taxability for information only.
Certain states, such as Louisiana, allow some customers to have a special tax rate that will follow the customer wherever they shop throughout the state. If the customer leaves the state and goes to a store in another state, then they will be taxed at the other state's tax rate.
Click the 'RATE TABLE' button to open the 'BROWSE TAX RATE TABLES' pop-up to select a Rate Table used for tax calculation for the account.
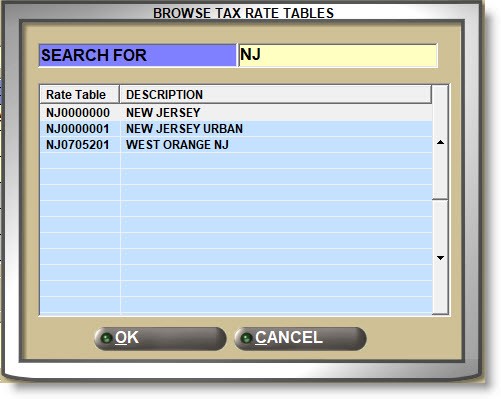
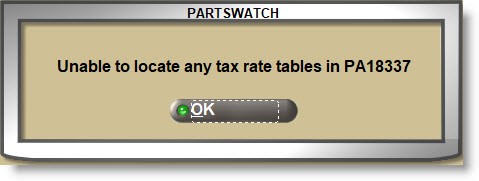
The system will look for Tax Rate Tables in the 'STATE' set up for the customer and if none are found, will display an informational pop-up. Clicking 'OK' will open the 'BROWSE TAX RATE TABLES' pop-up with all available rate tables.
'FOR STATE' is unavailable and when a forced 'RATE TABLE' is selected, displays the 'STATE' table the Rate table is assigned to. If a Forced Rate Table is set up, then that state's 'RATE TABLE' is used for all sales to the customer in that 'STATE'.
CREDIT CARDS
The Electronic Funds Transfer (EFT) functionality must be configured, enabled, and available for true credit card financial processing.
The 'CREDIT CARD' functionality is not available if EFT functionality is not configured, enabled, and available.
If enabled, click the 'CREDIT CARDS' button to display the 'CREDIT CARD INFORMATION' window used to view credit card information already stored as tokens and to add additional credit cards via swiping a card or manually entering additional information into a PIN pad. The 'CREDIT CARD BUTTON' User Security restriction allows/disallows access to the 'CREDIT CARD INFORMATION' window.
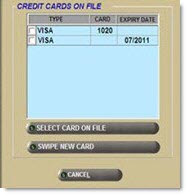
- 'CARD TYPE' - Identifies the card type, e.g. MasterCard, Visa, etc.
- 'LAST 4 DIGITS' - Displays the last four digits of the credit card number.
- 'EXPIRY DATE' - Displays the credit card expiry (expiration) date.
- 'REFERENCE #' - (token) Displays the token number, up to 19 digits. The token is automatically populated by a third-party integration module used to generate Electronic Funds Transfer (EFT) transactions, using the "Add a Token" procedure.
- 'DATE ADDED' - Displays the date the credit card was added to the file and is automatically populated when a token is successfully added to the file.
To delete one or more cards, check the small checkbox at the start of the row and click the 'DEL' (delete) button. Existing credit card information can be deleted; however, it continues to display for information only and cannot be edited.
With EFT functionality enabled, click the 'ADD' button:
- Communication initiates a request validation. The application is in "wait" mode. 'Please Wait' displays while waiting for the card information to be swiped or entered into the PIN pad and for information to be returned.
Note: If the waiting process takes longer than the timeout time, 'Timed Out - Try Again' displays. ('TIMEOUT' is configured in the Device Manager screen, on the PC that has the PIN pad and third-party integrator running.) Click 'OK' to return to the 'CREDIT CARD INFORMATION' window. Click 'ADD' to try again or 'CLOSE' to exit.
The PIN pad prompts the customer to swipe the card or enter the card number manually if the card is not present. - Swipe the card (customer) or enter the card number manually (user or employee) into the PIN pad.
If the card is swiped, the card number, expiry date, last four (4) digits, and BIN are obtained from the swipe and sent for validation.
If the card is keyed manually, the PIN pad prompts the user for the card number, expiry date, and BIN, which are entered manually into the PIN pad and populates the 'ENTER ADDITIONAL CARD INFO' pop-up. - After swiping or keying data into the PIN pad, click 'OK' in the pop-up.
The information is sent with a message requesting a token for the credit card.
A valid token is returned to the application, which is automatically captured into the customer record. (Other data, such as expiry date, was already obtained from the swipe/manual entry at the PIN pad.)
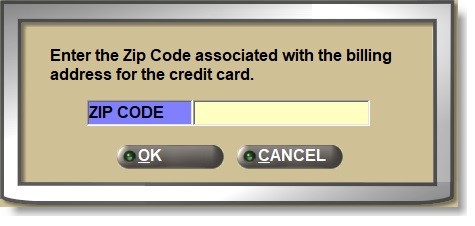
Or, if a card fails the screening process, a failure message is returned to the application. - When the token is successfully returned to the application, a pop-up displays requesting the zip code. Enter the zip code and click 'OK'.
The prompt closes and the token and zip code are stored.
The 'CREDIT CARD INFORMATION' pop-up re-displays with the new card appended to the bottom of the list. The 'DATE ADDED' field populates with the current date and the card is saved.
To add additional information, with a row checked, click the 'ADD' button to open the 'ENTER ADDITIONAL CARD INFO' window to enter required credit card information:
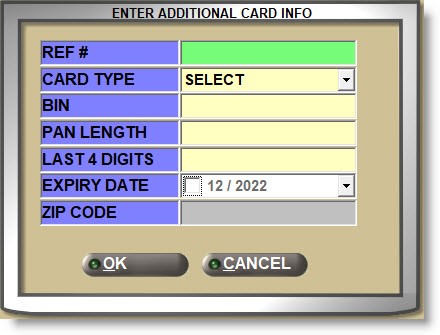
- 'REF' - Enter up to 20 numbers used as a "token".
Note: A token (or reference #) replaces a credit card number in an electronic transaction. A stored token can be used at tender instead of the actual credit card. - 'CARD TYPE' - Select the credit card type from the drop-down list. All credit cards with the 'ACCEPTED CREDIT CARDS' flag checked are available in the list.
- 'BIN' - Enter up to 6 digits used as the credit card bin number.
- 'PAN LENGTH' - Enter up to 2 digits used as the card pan length.
- 'LAST 4 DIGITS' - Enter the last four digits of the credit card number.
- 'EXPIRY' - Enter the credit card expiry (expiration) date. Enter month and year in MM and YYYY format, or select from the calendar drop-down.
- 'ZIP CODE' - Indicates the customer's zip code associated with the billing address of the credit card being tokenized. The credit card is declined at the time of tender if a different zip code other than the one associated with the billing address is entered.
When a token is successfully returned after entering the additional card information, a pop-up displays to enter the zip code associated with the billing address for the credit card. Enter the zip code and click 'OK' to store the token and zip code.
The list of existing cards is sorted by the date added, in descending order by default. Click the column headings to re-sort the columns.
Note: A token (or reference #) replaces a credit card number in an electronic transaction. A stored token is used at tender instead of the actual credit card number.
Tokens cannot be stored for fleet cards since a fleet card requires a PIN pad to answer multiple questions at the time of payment. When a fleet card is swiped or manually keyed in the PIN pad, the request is declined and the prompt "Transaction declined. Fleet cards cannot be stored." displays.
Credit card tokens are stored for any main account regardless of the customer's 'ACCOUNT TYPE' but cannot be stored for retail customers.
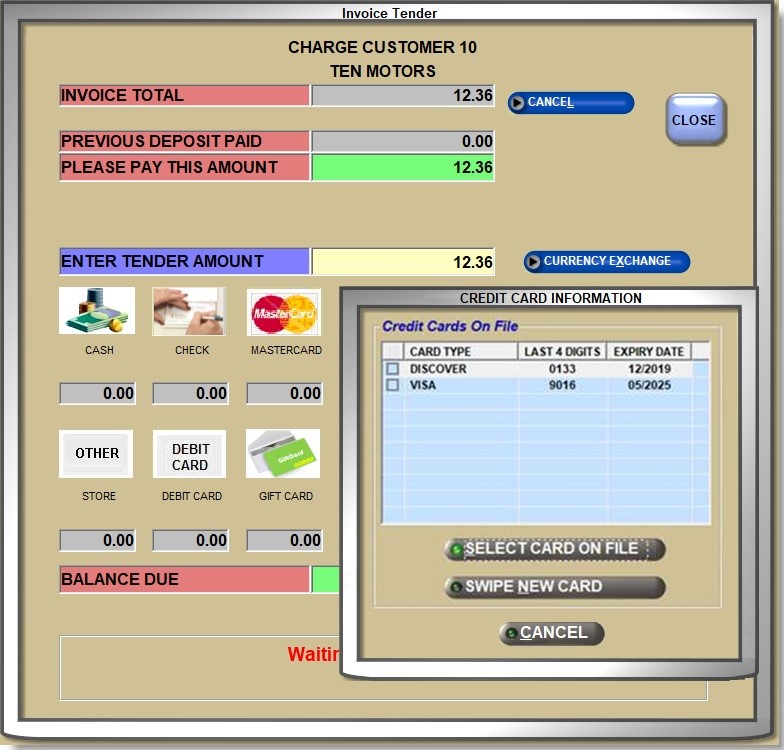
Stored credit cards are available for selection at Invoice Tender.
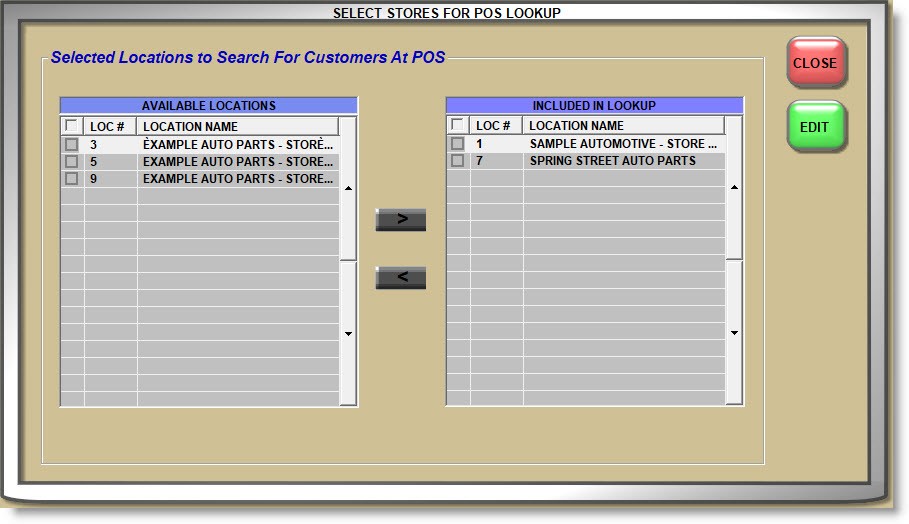
Click the 'POS LOOKUP' button to display the 'SELECT STORES FOR POS LOOKUP' window used to select the locations that will be accessed first for customer lookup at Point-of-Sale.
By selecting the locations the customer frequently shops in from the 'AVAILABLE LOCATIONS' list and clicking the right arrow button to move those locations into the 'INCLUDED IN LOOKUP' list, the system will check those locations first to quickly find the customer without checking the entire account file.
STATEMENT SETUP
Click the 'STATEMENT' setup button to open the 'ACCOUNT STATEMENT CONTROLS' window used to set up statement controls for the account.
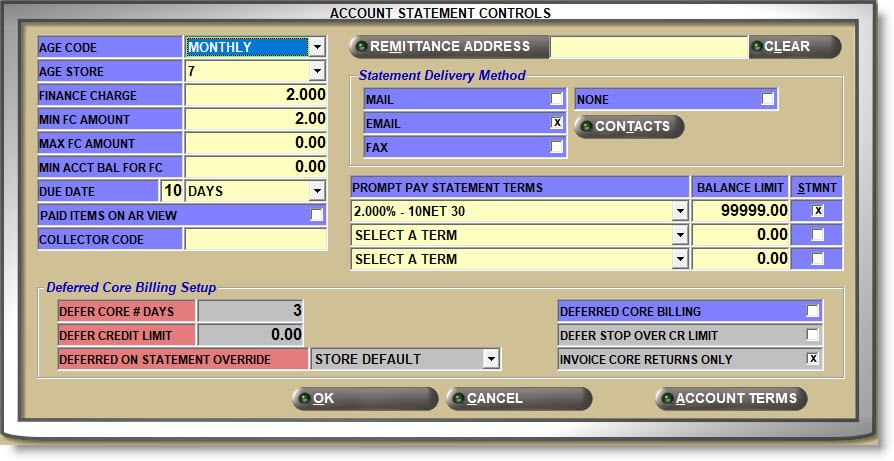
Click the drop-down arrow and select how the account should be tracked for period aging and reporting.
- 'WEEKLY' - The account is aged on the close day and time set up under the Weekly System Close Schedule.
- 'MONTHLY' - The account is aged on the close date and time set up under the Monthly System Close Defaults.
Multi-store - To ensure the customer receives a single statement, regardless of how many stores they shop in, select the store that will be responsible for sending out the statement and tracking the account receivables for the customer.
For example, if each store tracks receivables for their select customers, select the store per customer. If a single store tracks the receivables for all customers, select that store for all customers.
Enter a value up to 999.999 that represents the percent (%) used to calculate the finance charge applied to the account at the time of statement printing if payment is delinquent.
MIN FC AMOUNT
Enter a value up to 9999999.99 that is used as the least amount of finance charge that can be applied to an account balance at any one time.
For example, if the finance charge on an overdue amount comes to $0.25 and $1.00 is entered as the 'MIN FC AMOUNT', then a $1.00 finance charge will be applied.
MAX FC AMOUNT
Enter a value up to 9999999.99 that is used as the greatest amount of finance charge that can be applied to an account balance at any one time.
For example, if the finance charge on an overdue amount comes to $5.25 and $5.00 is entered as the 'MAX FC AMOUNT', then a $5.00 finance charge will be applied.
MIN ACCT BAL FOR FC
Enter a value up to 9999999.99 that is used as the minimum dollar amount that the customer must past due to be assessed a finance charge.
Enter a number up to 99 in the first 'DUE DATE' field and select the value from the drop-down list that best defines when statements must be paid by:
- 'DAYS' - The statement is due in "X" days. The program adds the number of days from the first field to the statement date and displays the result as the due date. For example, if statements are run on June 25 and "10" is set up in the first field, then the due date for that month's transactions is calculated as July 5 (June 25 plus 10 days).
- 'DAY OF MONTH' - The statement is due on the "X" day of the month. The program looks at the next close date and sets the due date to the day in the first field as the day in the month payment is due. For example, if month-end is in June and "10" is set up in the first field, then the due date for that month's transactions is July 10th.
Enter up to four alphanumeric and special characters used to group accounts for reporting purposes only.
REMITTANCE ADDRESS
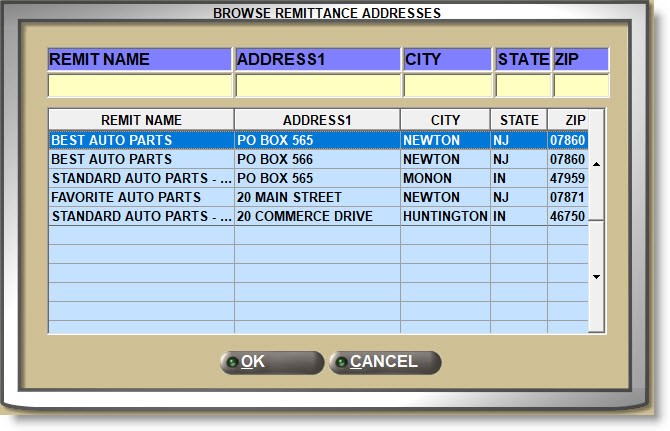
Click the 'REMITTANCE ADDRESS' button to display the 'FIND REMITTANCE ADDRESS' window used to search for/select the address which statement payments are remitted. Remittance addresses are preset on the store level.
Click the 'CLEAR' button to clear the address.
If an address is not selected, the store level 'REMITTANCE ADDRESS' is used.
Determines how statements are presented to the customer. Check each method of delivery.
- 'MAIL' - Send the statement to a printer for mailing.
- 'EMAIL' - Emails the statement without printing it. The customer's email address must be correctly entered in the 'BILL TO' section to email statements.
- 'FAX' - Faxes the statement without printing it. The customer's fax number must be correctly entered in the 'BILL TO' section to fax statements.
- 'NONE' - A statement is not output for the customer.
Click the 'CONTACTS' button to open the 'CONTACT INFORMATION' window used to view and modify customer contacts.
Select up to 3 prompt payment statement terms that will be applied for the customer when the terms are met with prompt payment.
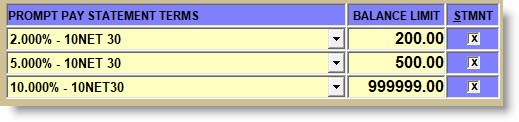
Setup displays the description, the maximum balance amount allowed for the term, and whether or not the calculated percent off prints on the statement for each prompt pay statement term selected.
Click the 'ACCOUNT TERMS' button to open the store-level statement terms setup screen.
Deferred Core Billing (DCB) functionality allows the customer to purchase core parts without being charged for the core at the time of the sale. Instead, cores are printed on a separate invoice from the part and payment is not expected until the core is not returned to the store within a predefined length of time. Defaults to 3 days.
The 'DEFERRED CORE BILLING' flag must be checked to enable the DCB setup fields.
- Checked - Tracks the account as a DCB customer and uses all the functionality defined for deferred core billing.
- Unchecked - Cores are not deferred for the customer.
The flag cannot be unchecked when deferred core invoices currently exist for the account.
Enter up to 99 numbers that represent the number of days that a core invoice is deferred before being deemed delinquent and the account billed for it.
When set to zero, the core is deferred when invoiced and becomes due after the End-of-Day process is run for that day if not returned.
DEFER CREDIT LIMIT
Enter the greatest amount of core sales that the customer can defer.
DEFERRED ON STATEMENT OVERRIDE
Overrides the store level 'DEFERRED ON STATEMENT' flag used to determine whether or not deferred core transactions print on the statement:
- 'STORE DEFAULT' - Uses the store 'DEFERRED ON STATEMENT' setting to determine whether or not to print DCB transactions on the statement.
- 'YES' - Deferred core transactions print on the statement in date order after all other open transactions and payments. Deferred core is not included in the aging buckets or in the total amount to be paid, however, the deferred core total is reflected on the statement.
- 'NO' - Deferred core transaction detail does not print, however, the deferred core total is reflected on the statement.
Determines whether or not cores will be deferred or included on the part invoice when the value of the deferred core is greater than the 'DEFER CREDIT LIMIT' amount.
- Checked - Core is not deferred when the customer is over the 'DEFER CREDIT LIMIT'.
The 'ACCOUNT OVER THE DEFERRED CREDIT LIMIT' manager OVERRIDE SECURITY restriction determines whether or not the core can still be deferred when the customer is over the 'DEFER CREDIT LIMIT'. - Unchecked - Core is deferred regardless of the 'DEFER CREDIT LIMIT'.
INVOICE CORE RETURNS ONLY
The field is checked and unavailable for edit.
The first item on an invoice for a DCB account sets the type of invoice to be created. For example, if the first item added uses the 'C' – Core Return modifier, then no part sales or new or warranty returns can be added to the invoice.
Click the 'Stats' button to open the 'Stats' pop-up.
STATEMENT Button
Click the 'STATEMENT' button to open the 'SEND STATEMENT OPTIONS' window to select the method of output for the current statement.
The window populates based on the selected customer 'Statement Delivery Method' setting. For example, if set to 'MAIL', that field will be checked by default in the window.
- 'MAIL'
- 'EMAIL'
- 'FAX'
- 'PREVIEW'
Edit the checkboxes as needed and click 'OK' to output the statement in the requested methods.
Note: Only the current statement is output from the 'SEND STATEMENT OPTIONS' window. Archived statements can be output from the STATEMENTS screen.
NOTES Button
Click the 'NOTES' button to open the 'ACCOUNT NOTES' window used to enter a customer or an invoice note.
- 'Customer Notes':
Enter up to 4 rows of any alphanumeric and special characters, in both upper and lower case to provide information about the customer in focus as a note that can be accessed from the 'NOTES' button as needed. The customer note displays on the 'ACCOUNT NOTES' window only. - 'Invoice Notes:'
Enter up to 4 rows of any alphanumeric and special characters, in both upper and lower case to provide information about the customer in focus as a note that will be displayed on the INVOICE screen.
Check the 'PRINT?' flag to print on the invoice if the 'INVOICE FORM' supports it.
ACCOUNT PROFILE
Select a profile from the drop-down list to be used at Point-of-Sale. Profiles are used to capture certain information about the customer, such as the PO number, and can be forced or optional at Point-of-Sale.
Click the 'ACCT PROFILE' button to open the PROFILE PARAMETER SETUP screen to add and maintain profiles.
The 'PROFILE' User Security proc is used to control access to the field.