Account Defaults
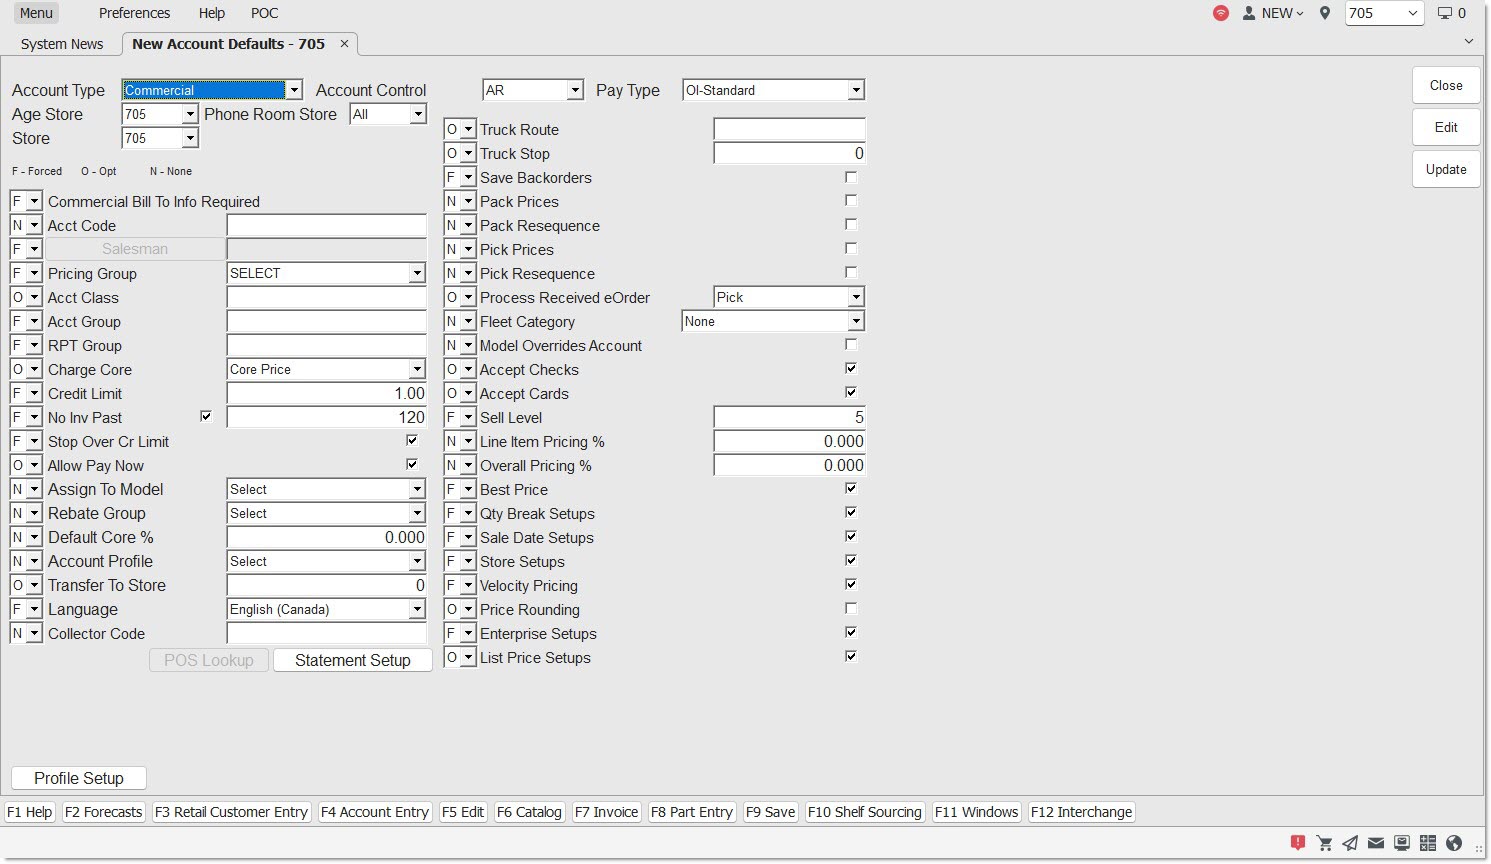
The New Account Defaults screen is used to set up the defaults that are used when a new account is entered from the Account Entry screen.
Menu Path: Controls, Store, Account Defaults, New Account Defaults screen
Default Setups
Six separate Account Default setups can be created, one for each 'ACCOUNT TYPE'.
-
'COMMERCIAL'
-
'RETAIL MAIN'
-
'PARTNERSHIP'
-
'TRANSFER'
-
'STORE USE'
-
'EMPLOYEE'
When a value is entered in any of the fields in the New Account Defaults screen for each Account Default setup when a new account is created for that 'ACCOUNT TYPE', that value is inserted for the account.
Select 'F' (Forced), 'O' (Optional), or 'N' (None) for each field in the New Account Defaults screen. When Forced is selected, it is required to enter a value in the field at the time of creation or the account will not be created. When Optional is selected, it is optional to enter data by choice and the account is added regardless of the whether the data is entered or not. When None is selected, the field does not display on the New Account Defaults window and can be entered at any time.
When the field value is the default then that value displays on the creation of a new account. The field does not have to be Forced or Optional as the value is already entered. When a Forced or Optional field also has a default in the New Account Defaults screen, the data can be changed but is not required at the time of account creation.
Three fields must always be entered at the time a new account is created.
-
'ACCOUNT CONTROL'
-
'ACCOUNT TYPE'
-
'PAY TYPE'
These three fields cannot be changed to Optional or Forced. Any defaults entered for these fields in the New Account Defaults screen display in the pop-up when entering a new account; however, they can be changed at that time.
When the 'COMMERCIAL BILL TO INFO REQUIRED' field is checked as Forced, the following information must be entered.
-
'PHONE'
-
'BILL TO'
-
'ADDRESS 1'
-
'CITY'
-
'STATE'
-
'ZIP'
When the field is Optional or None, data is not required for the customer name, address and phone number.
Required entry that determines how an account is handled at Point-of-Sale.
Options are:
- 'COMMERCIAL'
- 'RETAIL MAIN'
- 'PARTNER'
- 'TRANSFER'
- 'EMPLOYEE'
- 'STORE USE'
Required selection that determines how the program track each account number for sales and reporting.
Options are:
-
'AR'
-
'MASTER'
-
'LINKED'
-
'NO AR'
Required selection that determines the Statement and Payment Type for each account.
Charge customers use 'OI Standard', 'Balance Forward', and 'Open Item' Statement Pay. When a customer is not permitted to charge, the 'Pay Type' is 'Cash'.
Once a 'Pay Type' is set up as 'Balance Forward' or 'Open Item', the flag cannot be easily changed.
Determines the store that takes responsibility for all Accounts Receivables, statements, aging, and posting for the displayed customer, regardless of which location the customer purchases from since all customers are permitted to purchase from all locations.
This method ensures a customer receives one statement rather than one from each store printing statements.
Indicates the store that is designated as a Phone Room. A drop-down list indicates the valid and active stores. Defaults to 'ALL'. The field can be edited in the 'ADD A NEW ACCOUNT' window that displays when a new account is added.
Determines the store that the customer will buy from. This can be changed to any valid store. Default is 'ALL'.
The following three codes are used to determine how new account fields are handled:
Forces information to be entered in the specific field when a new account is created.
Allows information to be entered (optionally) in the specific field when a new account is created.
Prevents the specific field from displaying when adding a new account.
The following fields are used when creating a new account, and whether or not they must be entered or whether or not they display is based on the value of the drop down field next to it. ('F', 'O', or 'N').
COMMERCIAL BILL TO INFO REQUIRED
Indicates Bill To information for commercial accounts. When checked as 'O' or 'N', data is not required for the customer name, address, and phone number; however, when the field is checked as 'F', 'Phone', 'Bill To', 'Address 1', 'City', 'State', and 'Zip' must be entered.
ACCT CODE
Displays the entered, eight alphanumeric character code used similar to the way the account number is used.
Can be used to conduct a search in the 'CUSTOMER LOOKUP' field to locate an account.
SALESMAN
Used to locate the salesman responsible for this account. Displays the 'BROWSE EMPLOYEES' window, when clicked. Only employees with the 'SALESPERSON' flag checked in the EMPLOYEE SETUP screen display in the lookup window. The field is not editable.
PRICING GROUP
Used to select a pricing group that this account will use for pricing.
To select a new group as the default, select an available group from the drop-down list.
The pricing plans are set up in the PRICE PLAN SETUP screen.
ACCT CLASS
Displays a value of up to two alphanumeric characters that identifies an account class. Used to group accounts together for reporting purposes or to filter information returned in a report.
ACCT GROUP
Displays a value of up to 10 alphanumeric characters that identifies an account group. Used to group accounts together for reporting purposes or to filter information returned in a report.
RPT GROUP
Displays a value of up to eight alphanumeric characters that identifies a report group. Used to group accounts together for reporting purposes or to filter information returned in a report.
Determines how core is charged for each deferred core billing account.
Options are:
-
'CORE PRICE'
-
'CORE COST'
-
'NO CHARGE'
-
'USE MARGIN %'
When the account is set as a core billing account, 'NO CHARGE' is not available.
Determines the credit limit amount. No invoice is permitted if the account is over the credit limit entered in the 'CREDIT LIMIT' field.
Indicates the number of days from 0 to 255 that this account may be overdue for payment before no longer being permitted to charge.
Stops the account from purchasing further, when checked, based on the number of days indicated.
When blank, the customer is allowed to purchase.
When override security is enabled for pop-ups, a pop-up displays to allow a manager password to override this setting.
-
Checked - Indicates that no invoice is permitted when the account is over the credit limit amount entered in the 'CREDIT LIMIT' field.
-
Unchecked - The program does not check the Credit Limit before allowing a customer to charge.
When override security is enabled for pop-ups, a pop-up displays to allow a manager password to override this setting.
Future Due is always considered as part of what a customer owes. If a dated invoice puts a customer over the credit limit and further sales are stopped, then the 'CREDIT LIMIT' should be increased.
Checkbox used to determine the default for the 'ALLOW PAY NOW' field when adding new accounts in the Account Entry screen.
-
Checked (default) - The 'PAY NOW' button is enabled for that customer when the 'ON ACCT' or 'PAY NOW' buttons are clicked. Also enables the 'INVOICE' and 'SLIP' buttons for that 'CASH' or 'CHARGE' account.
-
Unchecked - The 'PAY NOW' button is disabled for that customer when the 'ON ACCT' or 'PAY NOW' buttons are clicked. Also disables the 'INVOICE' and 'SLIP' buttons for 'CASH' accounts, and finalizes the invoice on account when the 'INVOICE' or 'SLIP' buttons are clicked for 'CHARGE' accounts.
Note: If the account created and already tendered payment for an invoice on a B2C website, the 'PAY NOW' button will be enabled, even if the 'ALLOW PAY NOW' checkbox is unchecked, so the invoice can be finalized.
Note: If a 'CASH' account has both the 'ALLOW PAY NOW' and 'COD' checkboxes unchecked, there is no way to finalize a sales order for that customer since all finalize buttons are disabled.
Note: If a 'CHARGE' account has both the 'ALLOW PAY NOW' and 'COD' checkboxes unchecked, and that account is over their credit limit/past due without a manager override, there is no way to finalize a sales order for that customer since all finalize buttons are disabled.
Determines the defaults model to assign to the account.
Determines the default Rebate Group to assign to the account.
Indicates the value to update to the field when a new account is added. Uses the 'PRICE SETUP AS MARGIN / MARKUP' field in the SYSTEM GENERAL SETUP screen to determine whether the value entered is a margin or a markup.
Valid percentages are 0.000 to 999.999%.
Used to add the default value or to select another value for the 'ACCT PROFILE' field in the Account Entry screen when adding new accounts.
When the field is set as 'F' and 'SELECT', it is required to select a value from the drop-down list when adding a new account from the 'ADD A NEW ACCOUNT' window. When already set to a value other than 'SELECT', optionally change the value to another value, but not to 'SELECT'.
When the field is set as 'O' and 'SELECT', it is possible to select another value, but it is not forced, when adding a new account from the 'ADD A NEW ACCOUNT' window. The value defaults to the selected value. Optionally change the value to another value, including 'SELECT', when adding a new account.
TRANSFER TO STORE
Determines the transfer "to" store number.
Specifies a default language setting for new accounts.
The drop-down contains the same choices available in the 'CHANGE SYSTEM LANGUAGE' window. Defaults to 'SELECT'.
COLLECTOR CODE
Displays a value of up to four alphanumeric characters used to group accounts for reporting purposes.
TRUCK ROUTE
Identifies the truck number or route that is used for deliveries to the customer.
When used with 'TRUCK STOP', loading and deliveries are made easier. The field value can be up to 20 alphanumeric characters.
TRUCK STOP
Identifies the order the truck stops for customer deliveries.
Enter the number that works best for the customer. Remember, first orders on the truck are the last orders off the truck. When used with 'TRUCK ROUTE', loading and deliveries are made easier. The field value can be up to two numeric digits.
SAVE BACK ORDERS
Indicates that any parts not available for sale at the requested time are placed on back order, when checked. When a part is available, the customer should be notified. When unchecked, parts that are not available are not placed on back order for this customer.
PACK PRICES
Indicates that packing slips print prices for this customer, when checked. When unchecked, prices do not print on the packing slips.
PACK RESEQUENCE
Indicates that packing slips print in warehouse sequence, when checked. When unchecked, the packing slips print in the order the parts were entered at the time the invoice was created.
PICK PRICES
Indicates that pick tickets print prices for this customer, when checked. When unchecked, prices do not print on the pick tickets.
PICK RESEQUENCE
Indicates that pick tickets print in warehouse sequence, when checked. When unchecked, the pick tickets print in the order the parts were entered at the time the invoice was created.
Indicates the method used to process a received order.
Options are:
-
'INVOICE'
-
'QUOTE'
-
'PICK'
-
'PACK'
Indicates the type of fleet.
Options are:
-
'NONE'
-
'STANDARD'
-
'COMMERCIAL FLEET'
-
'LEASING MANAGEMENT'
-
'EXTENDED WARRANTY'
-
'RENTAL'
-
'RECONDITIONING'
-
'AFFINITY'
Uses the values of the assigned 'MODEL', in the 'ASSIGN TO MODEL' field, for the account pricing, when checked. Uses the 'ACCOUNT' settings for account pricing, when unchecked.
Determines the default for the 'ACCEPT CHECKS' field when adding new accounts in the Account Entry screen.
- If set to 'F', the field must be edited when adding a new account. (Recommended for important fields where a value must be entered.)
- If set to 'O', the default can be set and can be optionally changed when adding new accounts in the Account Entry screen. (Recommended for important checkbox fields and fields where the default can be optionally changed.)
- If set to 'N', the field does not display when adding new accounts. (Recommended for fields not used.)
Checkbox that determines whether or not payment cards are accepted as tender during point-of-sale.
-
Checked - If any of the credit (combined or individual), debit, or gift card icons are selected on the 'Tender' pop-up, cards can be used as tender for the sale.
-
Unchecked - If any of the credit (combined or individual), debit, or gift card icons are selected on the 'Tender' pop-up, cards cannot be used as tender for the sale, and a pop-up displays stating as such.
Indicates the base price the customer is charged.
LINE ITEM PRICING %
Indicates the percent that is applied to each line item during invoicing.
OVERALL PRICING %
Indicates the percent that is applied to the subtotal of an invoice.
BEST PRICE
Applies best price logic to the account, when checked.
QTY BREAK SETUPS
Applies quantity break discounts to the account, when checked.
SALE DATE SETUPS
Applies promotional discounts, when checked.
MASTER SETUPS
Applies Master discounts, when checked.
VELOCITY PRICING
Applies velocity pricing to the account, when checked.
PRICE ROUNDING
Applies price rounding to the account, when checked.
ENTERPRISE SETUPS
Applies Enterprise discounts, when checked.
LIST PRICE SETUPS
Applies the list price percent, when checked.
Click to open the PROFILE PARAMETER SETUP screen.
POS LOOKUP
Click the 'POS LOOKUP' button to display the 'SELECT STORES FOR POS LOOKUP' window. The window is used to select the locations that will be accessed first for customer lookup at Point-of-Sale or from the account maintenance and reporting screens. Setup of a selected location is optional, however, if a specific customer is not selected, then the program searches all accounts in the system for the create location and any selling locations for the customer.
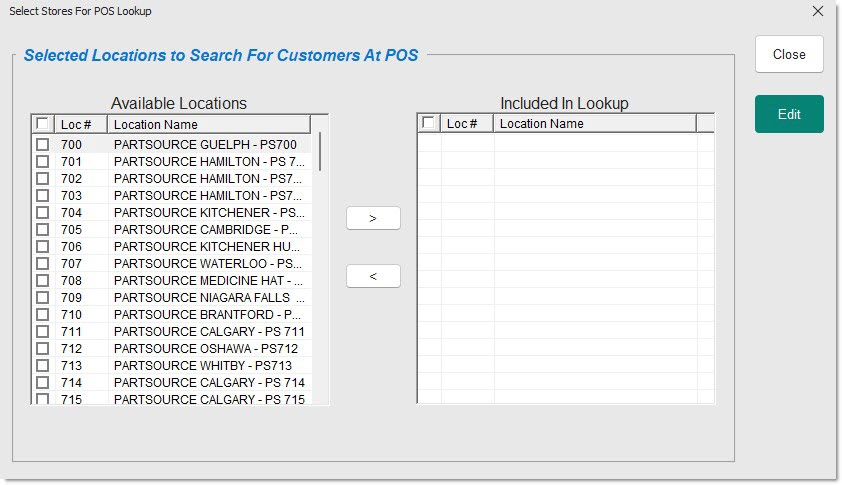
The location that the customer is most likely to shop in can also be added to the "preferred account" list via this window.
When a new account is created or the customer purchases or returns something at Point-of-Sale that location is recorded in the system as a "preferred account" to be used for future quick customer lookup. This process also brings the most likely "preferred account" to the top of the entire account list which allows for a faster lookup at Point-of-Sale.
Procedure to Set Locations
To select locations, follow the steps below:

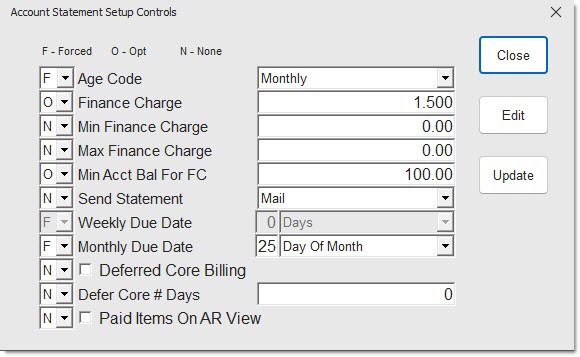
STATEMENT SETUP
Click the 'STATEMENT SETUP' button to display the 'ACCOUNT STATEMENT SETUP CONTROLS' window. The window is used to set the controls as to whether or not information must be entered or is optional when a new account is created.
Procedure to Set Up Defaults
To set up defaults when creating a new account, follow the steps below:
-
From the Menu, select Controls, Store, Account Defaults. The New Account Defaults screen displays.
-
Click 'EDIT'.
-
Enter the Account Type in the 'ACCOUNT TYPE' field, Account Control in the 'ACCOUNT CONTROL' field and the Pay Type in the 'PAY TYPE' field.
-
Select the fields to display when a new customer account is created.
-
Click 'STATEMENT SETUP'. The 'ACCOUNT STATEMENT SETUP CONTROLS' window displays.
-
Complete, as appropriate.
-
Click 'OK'. The window closes.
-
Click 'UPD'. The information is saved.