Edit Layout Setup
The PO Edit Layout Setup screen is used to create a new purchase order layout using selected fields or edit an existing purchase order layout to be saved and used for future purchase order creations. Selected fields display in the Purchase Order screen.
Menu Path: Purchasing, Edit Layout, PO Edit Layout Setup screen
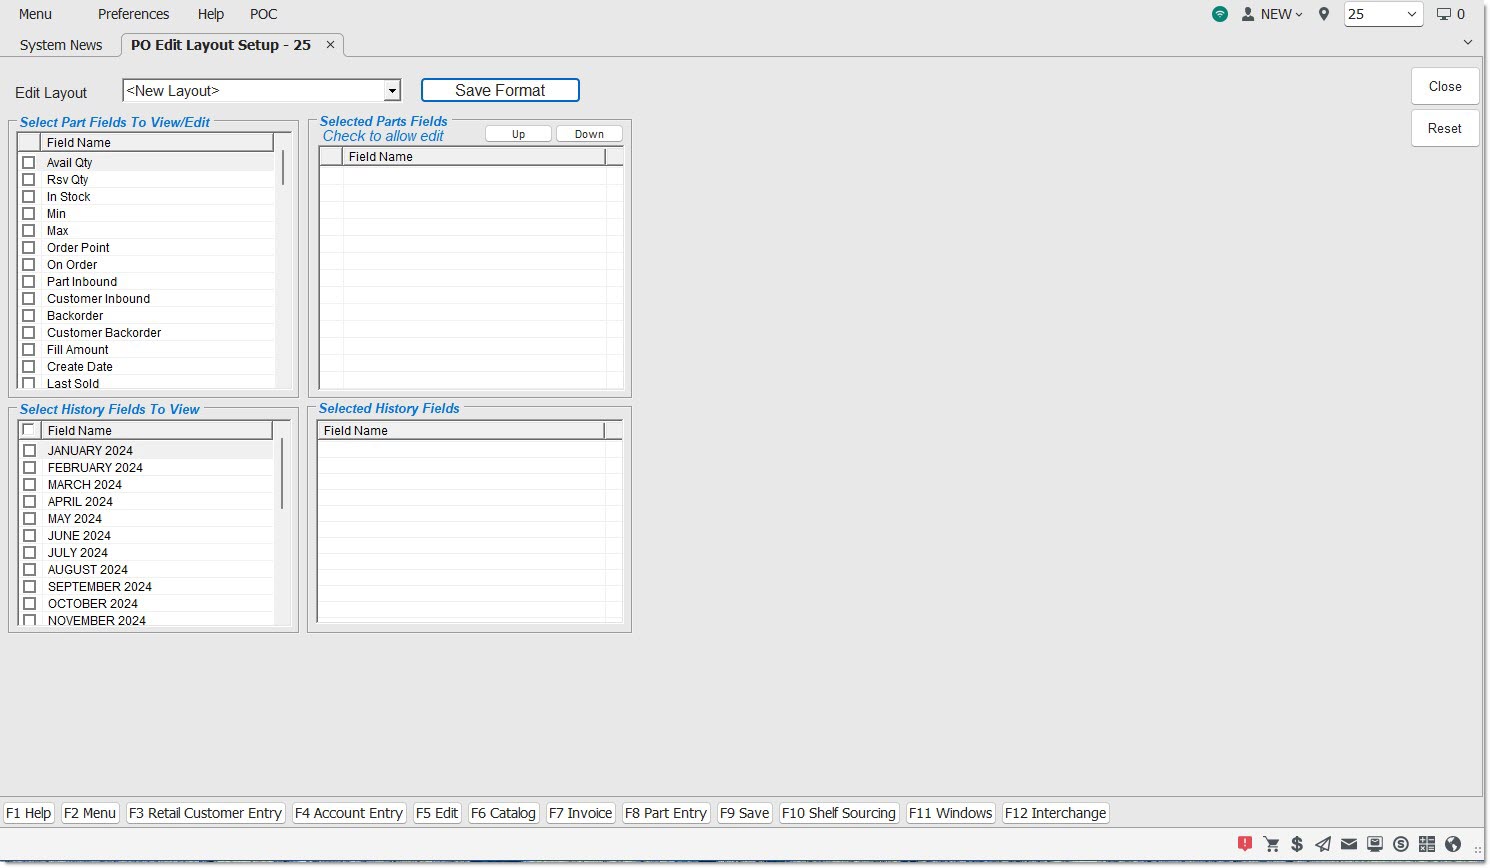
Edit Layout
Displays the name of the layout.
Save Format
Displays the 'Save As' window to name and save the layout changes for future use.
Once all the fields to display and edit on are selected for a purchase order, the format must be saved.
Click 'Save Format' to display the 'Save As' window.
Select Part Fields to View/Edit
Field Name
Displays the fields available to use to create or edit a layout.
[Checkbox]
Selects and moves a field name from the 'Select Parts Fields to View/Edit' grid to the 'Selected Part Fields' grid to make available to view and edit on the purchase order. Uncheck the field to remove the field name from the 'Selected Part Fields' grid.
Selected Part Fields
Up
Moves the position of the field name up the grid list to change the order in which the field displays on the purchase order.
Down
Moves the position of the field name down the grid list to change the order in which the field displays on the purchase order.
Select History Fields to View
Field Name
Displays the available history fields that can be selected to be viewed on a purchase order. History fields cannot be made editable.
[Checkbox]
Selects and moves the history field(s) to the 'Selected History Fields' grid to make available to view on the purchase order. Uncheck the field to remove the field name from the 'Selected History Fields' grid.
Selected History Fields
Field Name
Displays the selected field name(s) from the 'Select History Fields to View' grid that will display on the purchase order.
Edit/View Part Field Descriptions
Most of the fields available for editing and viewing display from the part file and affect the part file, if edited. When selected, the fields display in the grid in the Purchase Order screen.

Qty Avl
Total in stock quantity less reserved quantity
Rsv Qty
Number of items on open sales orders
In Stk (Required)
Total of 'Qty Avl' + 'Rsv Qty'
Min (Required)
Minimum stocking quantity
Max (Required)
Maximum stocking quantity
Ord Pnt
Order point (can order to this quantity as well as min/max)
On Ord
Total on order of this part on all purchase orders
Part In Bound
Total in bound of this part from all purchase orders from ASN-capable vendors. When an ASN-capable vendor acknowledges receipt of a purchase order, the quantity is updated.
Cust Inb
Total in bound of items sourced for customer.
BO
Total vendor back order quantity of this part on all purchase orders
CBO
Total quantity on order of items sourced for customers
Stk Code (Required)
Stock Code
Fill Amt
Fill Amount (with 'Track Day Fill' enabled from the Store Invoice Options screen, 'Standard' tab) reports the number of units sold since the last Replenishment Order was created.
Create Date
Date the part was created
Last Sold
Date the part was last sold
Last Ret
Date the part was last returned on an invoice
Last Rcvd
Date the part was last received on a purchase order
Lost Sls
Quantity of lost sales recorded through invoicing
Ret Core
Current returned core quantity. (Core return recorded through invoicing but not yet on a manifest.)
Ret Def
Current returned defective quantity. (Defective return recorded through invoicing but not yet on a manifest.)
Ret New
Current "new return" quantity recorded through invoicing (and not yet on a manifest).
Ord Typ (Required)
Ten-character, free form field in the part file that can be used for filtering reports and orders.
Pk Qty (Required)
Pack Quantity. Orders are rounded to the pack quantity. If a pack measure is also established, orders are transmitted in numbers of packs. For example, 1 PACK will be ordered rather than 4 individual spark plugs.
Pk Msr (Required)
Pack measure (such as Pack, Box, Roll). Prints on the order showing how items with pack quantities are bundled.
Weight (Required)
Weight of the part
Zone (Required)
Shelf zone location
Bin (Required)
Shelf bin location
Min Sell (Required)
Minimum Sell Quantity. If established, invoicing forces the user to sell this quantity or higher.
Sell Msr (Required)
Store Sell Measure. For informational purposes only. When a part has a minimum sell quantity, the sell measure indicates how the item is packaged: 'Each', 'Barrel', 'Case', 'Drum', 'Skid', 'Pack', 'Box', 'Roll'.
Pri (Required)
Primary Vendor Code from the part record. When creating an order, specify a 'Designation' of 'Primary'. This means a part is only ordered if the PO vendor matches the 'Primary' vendor entered in the part record.
Sec (Required)
Secondary Vendor Code from the part record. When creating an order, specify a 'Designation' of 'Secondary'. This means a part is only ordered if the PO vendor matches the 'Secondary' vendor entered in the part record.
Turns
Number of times the inventory for this line "turned" (replaced) per year
Lead Time
Number of days between the time the order was finalized and the time the order was received. Every time a purchase order is received, the system calculates the lead time for the PO. This is averaged into the existing lead time in the part record. On the Line Order Setup screen, specify to apply (pad) lead time on all parts or parts matching specified class codes.
Desc1 (Required)
Part description associated with the part that can be printed on the History and Purchase Order Reports. Also prints on invoices and most reports.
Desc2 (Required)
Additional part description associated with the part that can be printed on the History and Purchase Order Reports. Does not print on invoices or most reports.
Stock (Required)
Any or all of these flags may be set for a part and used for filtering on reports and orders. 'Stock' indicates an inventoried part that is ordered and stocked. 'Real' indicates an actual part as opposed to parts used for other things, such as coupons. Only REAL parts are included in the Inventory Cost report. 'Active' is a user-defined field since there are several conditions that could classify a part as inactive, such as no min/max, no sales history and no stock quantity.
Real (Required)
Any or all of these flags may be set for a part and used for filtering on reports and orders. 'Stock' indicates an inventoried part that is ordered and stocked. 'Real' indicates an actual part as opposed to parts used for other things, such as coupons. Only REAL parts are included in the Inventory Cost report. 'Active' is a user-defined field since there are several conditions that could classify a part as inactive, such as no min/max, no sales history and no stock quantity.
Active (Required)
Any or all of these flags may be set for a part and used for filtering on reports and orders. 'Stock' indicates an inventoried part that is ordered and stocked. 'Real' indicates an actual part as opposed to parts used for other things, such as coupons. Only REAL parts are included in the Inventory Cost report. 'Active' is a user-defined field since there are several conditions that could classify a part as inactive, such as no min/max, no sales history and no stock quantity.
Stk Prot (Required)
Stock Protect. When the flag is checked in the part record, the 'Min' and 'Max' cannot be changed when running the set min/max utility. This utility sets 'Min' and 'Max' based on sales histories. Generally, this flag is set on new parts that have not had a chance to build up sales history, which could result in the Set Min/Max Utility zeroing out the 'Min' and 'Max'.
Per Car (Required)
Number of units needed per car
Line Cls (Required)
Line Class. This field is user-defined and must be set up on the Line Code Rank Specifics screen before setting up in the part file. Used as a filter in most reports and in purchasing.
Sls Cls1 (Required)
Sales Class 1 and 2 are one-character fields, which are updated by running the Popularity Ranking Report. The first field is the current Popularity Code. This character is moved into the second field when the next ranking is run. This is used to compare the popularity of a part across two separate rankings.
Sls Cls2 (Required)
Sales Class 1 and 2 are one-character fields, which are updated by running the Popularity Ranking Report. The first field is the current Popularity Code. This character is moved into the second field when the next ranking is run. This is used to compare the popularity of a part across two separate rankings.
Usr Cls (Required)
User Class. One-character, user-defined field used for filtering on inventory reports and in purchasing.
PN Grp (Required)
Part Number Group. Eight-character, user-defined field used for filtering on inventory reports and in purchasing.
PN Code (Required)
Part Number Code. Three-character, user-defined field used for filtering on inventory reports and in purchasing. Also commonly used for pricing and discounts.
Dept (Required)
Department. Three-character field used in conjunction with Category to classify specific Departments within a store for purchasing and reporting.
Cat (Required)
Category. Three-character field used mainly to classify specific Categories within a department for purchasing and reporting.
Prdt Code (Required)
Product Code. Three-character, user-defined field.
Product Type
Product Type, found on the Part Attributes Entry screen for the part.
Rpt Grp (Required)
Report Group. Up to eight user-defined, alphanumeric characters.
(Price Levels) (Required)
Part selling and cost levels. Price Level names are user-defined in the Field Name Setup screen.
Core Sell (Required)
Core Sell Level. Price Level names are user-defined in the Field Name Setup screen.
Core Cost (Required)
Core Cost. Price Level names are user-defined in the Field Name Setup screen.
Ext Cost
Extended Cost. Purchase order cost multiplied by order quantity. Does not exist in part record.
Current
Current sales history, which is updated automatically when a part is sold or returned on an invoice.
YTD
Year to date sales history
Last Year
Last year's sales history
Qty Avl in All Stores (Required)
Quantity Available in All Stores. Quantity available in other stores in the schema displays when editing a PO in the Purchase Order screen.
Damaged (Required)
Damaged Quantity. Editable once 'Set Received Qty' is selected to allow the quantity of each part that has arrived damaged to be entered. Not updated by the ASN or the system.
Always enter the physical quantity that is being received including the quantity damaged in the 'Rcv' field. A part that is recorded as 'Damaged' is added to a manifest if the 'Auto Return Damaged Parts' flag in the System Purchasing Setup screen is checked. At the time of PO receipt, the system adds the quantity that is not damaged to stock and the quantity that is damaged to the Warranty or DNRV Warranty manifest. When the flag is unchecked, at the time of PO receipt the quantity is updated to stock.
'Damaged' part quantity is added to manifest if the 'Auto Return Damaged Parts' flag in the System Purchasing Setup screen is checked.
'Damaged' part quantity is updated to the Available Qty if the 'Auto Return Damaged Parts' flag is unchecked.
Ovr/Sht (Required)
Over/Short Quantity. Updated as the 'Rcv' quantity is entered. Not updated by the ASN or the system.
Tracking the 'Ovr/Sht' quantity is a manual process within the application. The system does not automatically adjust the 'Rcv' field by the quantity entered in the 'Ovr/Sht' field or adjust the 'Ovr/Sht' field by the quantity entered in the 'Rcv' field. Always enter the physical quantity received in the 'Rcv' field and the quantity short with a minus or the quantity over as a positive value in the 'Ovr/Sht' field. If a part is recorded with a minus, the quantity is canceled when the PO is received into stock. The Over/Short/damaged Report and PATI Report show the value as a short and not as a cancel. If the part is recorded as a positive quantity, the quantity is updated to the Available Qty in the part table. The Over/Short/damaged Report and PATI Report show the value as an over.
Value is tracked and reported in the Receiving Report and PATI Report.
Exp Arriv
Expected Arrival Date. Only used for Back Orders sent on the ASN, which displays in the 'Backord' field. The ASN notification of a 'Back Order' optionally brings the expected arrival date. When receiving a PO for more than one ASN, the most current ASN date is used should different expected arrival dates exist in the ASNs for the same part. Field displays blank if a 'Back Order' quantity exists in the ASN but the expected arrival date is blank. Value is tracked and reported in the Receiving Report and PATI Report.
Adj Qty
Vendor Order Adjustment Quantity. Positive and negative values are tracked and reported in the Receiving Report and PATI Report.
Adj Code
Vendor Order Adjustment Code. Displays the reason code for each part identified with a Vendor Order Adjustment quantity from the ASN. Field displays the word 'Multiple' when a part has more than one Vendor Order Adjustment attached to it; click the field to display a pop-up with all of the 'Adj Qty' or 'Adj Code' values associated with that part. Not editable, are not stored in the application and for information purposes only. Value is tracked and reported in the Receiving Report and PATI Report.
Buy Qty
Buy Quantity. If no Buy Quantity Rules are set up for the specific vendor (supplier or line) under which this PO is being created, it defaults to the Buy Quantity Rules that are set up for the blank vendor code, if any. If no rules are set up for the specific vendor or blank vendor code, '1' displays. If the PO is created under a line code (rather than a supplier code) and the line code does not have the 'Use as Vendor' flag checked, '1' displays.
Buy Msr
Buy Measure. If no rules are set up for the specific vendor or blank vendor code, 'EA' displays. If the PO is created under a line code (rather than a supplier code) and the line code does not have the 'Use as Vendor' flag checked, 'EA' displays.
Whse Qty
Warehouse Quantity. If no rules are set up for the specific vendor or blank vendor code, '1' displays. If the PO is created under a line code (rather than a supplier code) and the line code does not have the 'Use as Vendor' flag checked, '1' displays.
XMIT Msr
XMIT Measure. If no rules are set up for the specific vendor or blank vendor code, 'EA' displays. If the PO is created under a line code (rather than a supplier code) and the line code does not have the 'Use as Vendor' flag checked, 'EA' displays.
(History Periods)
Monthly sales histories. Names are user-defined in the Field Name Setup.
Purchasing Notes
The Purchasing Notes, found on the Part Entry screen for the part after clicking the 'Notes' button. If the note text is longer than the width of the column, or contains multiple lines, the application displays the entire note in the mouse hover-over tool tip.
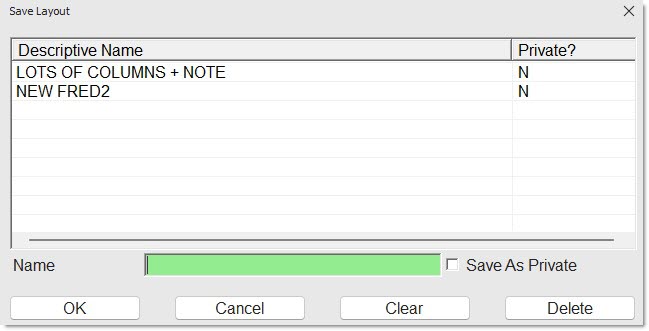
Procedure to Save Purchase Order Edit Layout
To save a purchase ordLine Rank Setup, follow the steps below:
-
Click the 'Save Format' button on the PO Edit Layout Setup screen. The 'Save As' window displays with the 'Save as Private' checkbox checked.
-
Enter a layout name in the 'Name' box.
-
Uncheck the 'Save as Private' checkbox if other users are to have the ability to change the layout. Keep the check box checked if the private layout is to be edited only by who created the layout.
-
To save the layout, click 'Ok'. The PO Edit Layout Setup screen displays allowing more changes, if desired.
-
To delete a layout, click the layout name and click 'Delete'. The PO Edit Layout Setup screen displays allowing more changes, if desired.
-
To exit without saving or making changes, click 'Cancel'. The PO Edit Layout Setup screen displays allowing more changes, if desired.
-
Click 'Close' to return to editing the purchase order. The Purchase Order screen displays indicating the fields selected to view and edit.
Procedure to Create New Purchase Order Edit Layout
To create a purchase order edit layout, follow the steps below:
-
From the Menu, select Purchasing, Edit Layout. The PO Edit Layout Setup screen displays.
-
Select 'New Layout' in the 'Edit Layout' field.
-
Click the checkbox next to the desired field names(s) in the 'Select Part Fields to View/Edit' grid. The field names move to the 'Selected Part Fields' grid.
-
Click the checkbox to allow the field to be edited on the purchase order.
-
Click 'Up' and/or 'Down' to position the field names to reflect the order they are to appear on the purchase order.
-
Click the checkbox next to the desired field name(s) in the 'Select History Fields to View' grid. The field names move to the 'Selected History Fields' grid.
-
Click 'Save Format'. The 'Save As' window displays to name, describe and save the new layout setup format.
-
Name, describe, and save the format. The PO Edit Layout Setup format is saved. The new name displays in the 'Edit Layout' drop-down to use currently or in the future.
Procedure to Modify an Existing Layout
To modify an existing purchase order edit layout, follow the steps below:
-
From the Menu, select Purchasing, Edit Layout. The PO Edit Layout Setup screen displays.
-
Select the desired 'Edit Layout' from the drop-down list in the 'Edit Layout' field.
-
Click the checkbox next to the desired field names(s) in the 'Select Part Fields to View/Edit' grid. The field names move to the 'Selected Part Fields' grid.
-
Click the checkbox to allow the field to be edited on the purchase order.
-
Click 'Up' and/or 'Down' to position the field names to reflect the order they are to appear on the purchase order.
-
Click the checkbox next to the desired field name(s) in the 'Select History Fields to View' grid. The field names move to the 'Selected History Fields' grid.
-
To change the order in which selected part fields will display on the purchase order, click on a field name in the 'Selected Part Fields' grid and then click 'Up' and/or 'Down'.
-
Click 'Save Format'. The 'Save As' window displays to name, describe and save the new layout setup format.
-
Double-click the name in the grid of the layout being modified. The Layout name populates the 'Name' field.
-
Click 'Ok'. The modified PO Edit Layout Setup format is saved.
Remove a Field Name
To remove a field name from the 'Selected Part Fields' and/or 'Selected History Fields' grid, with the format selected in the 'Edit Layout' field, uncheck the checkbox in the 'Select Part Fields to View/Edit' and/or 'Select History Fields to View' grids. The field is removed from the 'Selected Part Fields' and/or 'Selected History Fields' grids. Click 'Save Format', double-click the format name in the upper grid and click 'Ok' to close the prompt and save the changes.
Delete a Format
To delete an existing format, with the format selected in the 'Edit Layout' field, click 'Save Format', double-click the format name in the upper grid of the 'Save As' window and click 'Delete'. The system prompts "Format <format name> will be deleted – Are you sure?" 'Yes' closes the prompt and deletes the format. 'No' closes the prompt without deleting the format.