Return Manifest Detail
The Return Manifest Detail screen is used to display the detail on an 'Open' or FINAL manifest that has not been transmitted to the vendor and to 'Close', or 'Close and Transmit', a manifest.
Invoice finalization looks for all items on the invoice with the "core sell only" modifier. For each "core sell only" item, invoice finalization looks for the core in the manifest tables. The manifest status must be 'Open'. The manifest type must be 'Core' (or 'Battery' if the store has the 'Battery Manifest Acts As' field set to 'Core'). If these conditions are met, the core is removed from the manifest. Even if the core is not found on a manifest, invoice finalization continues because the "core sell only" transaction has already been tendered; it is too late to back out once the finalization code is running. The "core sell only" modifier existed in PartsWatch long before manifests.
Menu Path: Purchasing, Manifest Main, Return Manifests screen, highlight a selection from the list of 'Open' and 'Final manifests, click the 'Select Manifests' button.
Manifest #
Displays the manifest number.
Return To
Indicates the location of the Return Point.
L/S
Indicates line (M) or supplier (S).
Type
Indicates the type of manifest: 'Core', 'Warranty', 'Labor Claim', 'Shrink', and 'Battery'. 'Rtn Buyout' is available only in stores where all new re-sellable returns are sent to a new ('Rtn Buyout') manifest to return to the vendor instead of adding them back to the shelf. If new re-sellable returns are added back to the shelf, the 'Rtn Buyout' manifest is not available.
Vendor
Displays the vendor name.
Date Created
Displays the date the manifest was created.
Status
Displays the status of the manifest ('Open', 'Final', or 'Close').
Date
Displays all parts on the manifest for all manifest types including 'Shrink' regardless when they were added to the manifest, when unchecked. Displays only the parts added to the manifest for the selected date for all manifest types, including 'Shrink'. The system uses the invoice date for parts returned at Point-of-Sale and the date the part was manually entered on the manifest for found parts. Regardless of the date displayed, when the manifest is 'Closed', all items are included.
PN/UPC/SKU
Displays the part number, UPC, or SKU number of the part.
Description
Displays the part description.
The 'Description' fields support up to 255 characters.
Rtn Qty
Indicates the return quantity for the part.
When Point-of-Sale adds a part to a manifest, the return quantity on the manifest will equal the return quantity on the invoice.
When a part is manually added to a manifest, the return quantity on the manifest will equal the return quantity entered in the 'Add Part To Manifest' pop-up.
Part Cost
Indicates the part cost.
Core Cost
Displays the core cost, if the current part is from a core line.
Ext Cost
Displays the extended cost (part cost + core cost).
Inv/Ref
Indicates the invoice or reference number.
PO #
Indicates the PO # that the part being returned was sourced via.
Source
Indicates how the PO was created.
Sources include:
-
'Found' - Parts manually added as an off-the-shelf defect.
-
'Inv' - Parts added at Point-of-Sale (Invoicing).
-
ShipDmg - Parts added as 'Damaged' from PO receipt.
Total Manifest $
Displays the total cost of all the parts on the manifest.
Finalize Manifest
Finalizes the manifest. Includes all parts, regardless if a date was specified in the 'Date' field.
Close/Transmit
Closes the manifest when the vendor does not have an XMIT record.
Closes and transmits the manifest when the vendor has an XMIT record.
Note: The button is dynamic. The existence of an associated XMIT record determines whether the 'Close' or 'Close/Transmit' button displays.
When this button is clicked, if there are any NIF (not-in-file) parts on the manifest, the system does not add any of the NIF parts to the store’s inventory.
When this button is clicked, the system will check the value of the 'Copies of Manifest and RO Reports' drop-down found on the System Purchasing Setup screen.
Manifest Process
A manifest is a process used to return all non-resellable core and defective (warranty) items returned at Point-of-Sale, any sourced items purchased from a non-company-owned vendor, or any items manually input by the user back to the supplying vendor.
Parts are added to a Return to Vendor manifest:
-
Automatically from returns at Point-of-Sale
-
Manually
The total part cost displays on the Return Manifests screen for a manifest and the individual part cost and/or core cost displays as part of the manifest detail.
When a manifest is 'Closed', a new manifest of the same type is automatically created with the next return or manual addition of that type.
Separate, automatic Return To Vendor manifests are created:
-
Core: All core go on one separate manifest.
-
Warranty Return: All defective returns go on one separate manifest.
Each item on a manifest is a single line item on the manifest depending on the quantity of the 'Buy Qty' field in the Buy Qty Rule. If four of the same items are returned, there are four line items on the manifest if the 'Buy Qty' is 1 and 1 line item on the manifest if the 'Buy Qty' is 4.
Both the Core and the Warranty manifests are generated using the default Return Point in the Store Invoice Options, 'Returns' tab. Customer sourced returns are generated using the Return Point for the vendor the part was sourced through.
Manifests can be transmitted store to store (with the proper XMIT record setup) and can be transmitted from one PartsWatch DB to another PartsWatch DB (with proper XMIT record setup). If the XMIT record is set up as a "store-to-store", it is possible to transmit the manifest to a DC, Hub, or Sister Store. The Point-of-Sale modifier associated with the manifest parts determines whether an item is a core, defective or resellable part. The system uses the Point-of-Sale modifier brought on the transmission to add the parts from the manifest to the ticket as either a core, defective or resellable return. 'C' - COR (Core Return) is for parts on a core manifest. 'D' - DEF (Defective Return) is for parts on a defective manifest. 'R' - RTN (Resellable Return) is for parts on a return buyout manifest. Upon printing an invoice at the DC/Hub/Sister Store, the return credit is applied to the store that sent the manifest to the DC/Hub/Sister Store. Return buyout manifests ('Rtn') contain parts that are good (not defective). If a 'Rtn Buyout' Manifest is transmitted to a store, the invoice created in the receiving store uses a Resellable Return modifier; therefore, when finalizing the invoice, the parts go to stock. For return manifests to a DC/Hub/Sister Store, the application does not send ASNs back to the store that sent the part.
Automatic Process Flow
Parts returned at Point-of-Sale or manually added as defective or core are entered on an 'Open' manifest or a new manifest is opened, if none exists. Parts can be added to a manifest from Point-of-Sale as long as it is in the 'Open' status. Once the manifest is in the 'Final' status, parts can no longer be added from the Point-of-Sale and can only be added manually. Parts can be 'Moved to New', 'Moved to Next', and 'Moved to Shrink' in 'Open' and 'Final' status.
Part Histories are updated for defects when returned at Point-of-Sale or when manually added to a manifest.
A completed manifest is manually changed to a status of 'Final' and parts can be manually added or removed; however, parts can no longer be added from Point-of-Sale.
When ready to be returned, the manifest is manually changed to a status of 'Closed'. A 'Closed' manifest can be printed and transmitted if the vendor accepts transmissions and is removed from the list of manifests on the Return Manifest screen. A 'Closed' manifest can be viewed or printed by clicking the 'Show Historical' flag.
Manifest Number

Right-Click Command Menu
Right-Click an item on a manifest to bring up the following right-click menu:
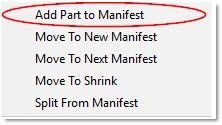
Add Part to Manifest
Always adds the part to the selected manifest. If the User Security Proc 'Deny Manifest Add Found Part' is active, parts will not be allowed to be added to the manifest.
Move To New Manifest
The item is removed from the existing manifest and updated to a different manifest. A window displays allowing selection of the manifest to move the item to. The part assumes the credit code of the manifest it moves to regardless of the manifest it moved from.
If a part is moved from a 'Core', 'Warranty', or 'Labor Claim' manifest to a 'Defective' manifest, the system checks the value of the 'Do Not Manifest' flag in the Main Part Entry screen to determine if the part is to be moved to a 'Defective' or a 'DNRV Defective' manifest.
Parts cannot be moved from a 'DNRV Defective' manifest to a 'Defective', 'Core', 'Warranty', or 'Labor Claim'.
Right-click a part in the Return Manifest Detail screen and choose 'Move To New Manifest' to move a part from one manifest to another. Select a manifest from the pop-up. The determined manifest cost of the selected manifest is compared to the cost level of the current manifest.
If the cost levels match, the moving of the part to the selected manifest is completed.
Note: Manifest cost level is determined based on the 'PO Cost Level' setting of the vendor associated with the return point. If the manifest return point vendor does not have a 'PO Cost Level' set on the Supplier Order Specifics screen, then part 'Current Cost' is assumed.
If the manifest compared cost levels do not match, the item is not moved. A pop-up displays that states "Moving the Item to the Existing Manifest did not succeed. Cost level of selected manifest does not match the cost Level of the current part manifest. The part cannot be moved to the selected manifest."
The 'Deny Manifest Move New/Next' User Security proc determines access to the 'Move to New Manifest' and 'Move to Next Manifest' functionality. When set to 'Not Visible', the 'Move to New Manifest' and 'Move to Next Manifest' right-click menu items are grayed out and the functionality is not available. When set to 'View Only', the 'Move to New Manifest' and 'Move to Next Manifest' right-click menu items are grayed out and the functionality is not available. When set to 'Allow Edit', the 'Move to New Manifest' and 'Move to Next Manifest' right-click menu items display and the functionality is available.
Move To Next Manifest
The item is removed from the current manifest and is added to a new or the most current open manifest for the same 'Type' and 'Return Point'. The part assumes the credit code of the manifest it moves to regardless of the manifest it moved from.
When the part on the manifest is in the 'Open' or 'Final' status, and another 'Open' manifest of the same 'Type' and 'Return Point' is available, the part moves to that manifest. When one is not available, the system creates a new manifest in the 'Open' status and moves the part to it. When more than one manifest of the same 'Type' and 'Return Point' is in the 'Open' status, the part is moved to the most recent manifest.
Right-click on part on the Return Manifest Detail screen and choose 'Move To New Manifest' to move a part from an existing manifest to a new manifest. Select a 'Return Point' and 'Manifest Type' from the 'Select Manifests' pop-up. The determined manifest cost of the user-selected Return Point vendor is compared to the cost level of the current manifest. If the cost levels match, the new manifest is created and the part move is completed. If the manifest Return Point vendor's compared cost levels do not match, a new manifest is not created and the part is not moved. A pop-up displays that states "Moving the item to the New Manifest did not succeed. Selected return point vendor has a different PO COST LEVEL setting from the cost level of the manifest. Changing the return point is not allowed."
The 'Deny Manifest Move New/Next' User Security proc determines access to the 'Move to New Manifest' and 'Move to Next Manifest' functionality. When set to 'Not Visible', the 'Move to New Manifest' and 'Move to Next Manifest' right-click menu items are grayed out and the functionality is not available. When set to 'View Only', the 'Move to New Manifest' and 'Move to Next Manifest' right-click menu items are grayed out and the functionality is not available. When set to 'Allow Edit', the 'Move to New Manifest' and 'Move to Next Manifest' right-click menu items display and the functionality is available.
Move To Shrink
The item is removed from the manifest detail table and updated to a shrink table. The part retains the credit code from the manifest it was moved from. If moved out of 'Shrink', then the part assumes the credit code of the manifest it moves to.
Moving Manifest Parts
Split From Manifest
The items are split from their current manifest. A new manifest is created for the selected items that will be split off, and two records are written to the "manifest audit" table. The items that were not selected for the split remain on the original manifest. If all the parts from the manifest are split in full, the original manifest will close.
The 'Deny Manifest Split' User Security proc determines access to the 'Split From Manifest' functionality. When set to 'Not Visible', the 'Split From Manifest' right-click menu item is grayed out and the functionality is not available. When set to 'View Only', the 'Split From Manifest' right-click menu item is grayed out and the functionality is not available. When set to 'Allow Edit', the 'Split From Manifest' right-click menu item displays and the functionality is available.
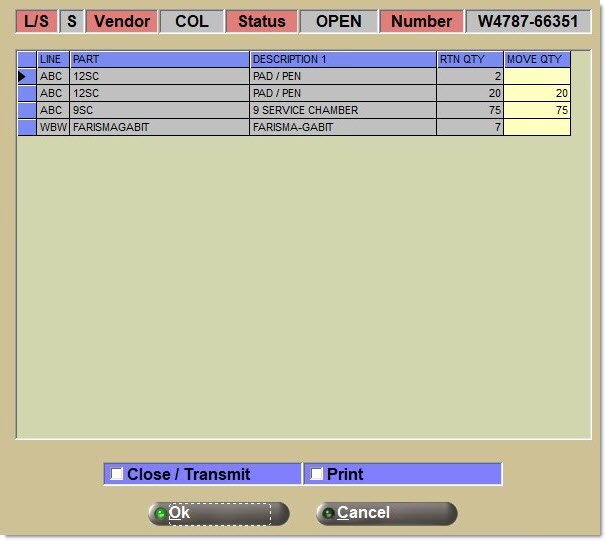
Split Parts From Manifest
The Split Parts From Manifest pop-up opens when the clicks the Split From Manifest right-click menu option. The 'L/S', 'Vendor', 'Status', and 'Number' of the manifest display at the top of the pop-up.
Manifest Setup Fields
Close and Transmit Manifest Process
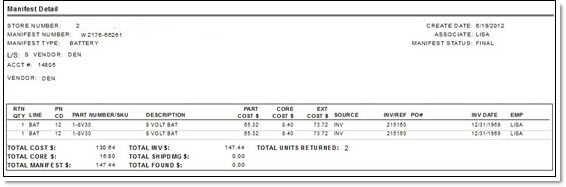
Print Manifest
All manifests can be printed and reprinted from the Manifest Detail screen by clicking 'Print'.
The store number will always print at the top of a manifest.
The following is an example of a printed manifest.
New Items
Warranties and Labor Claim
Battery Manifest