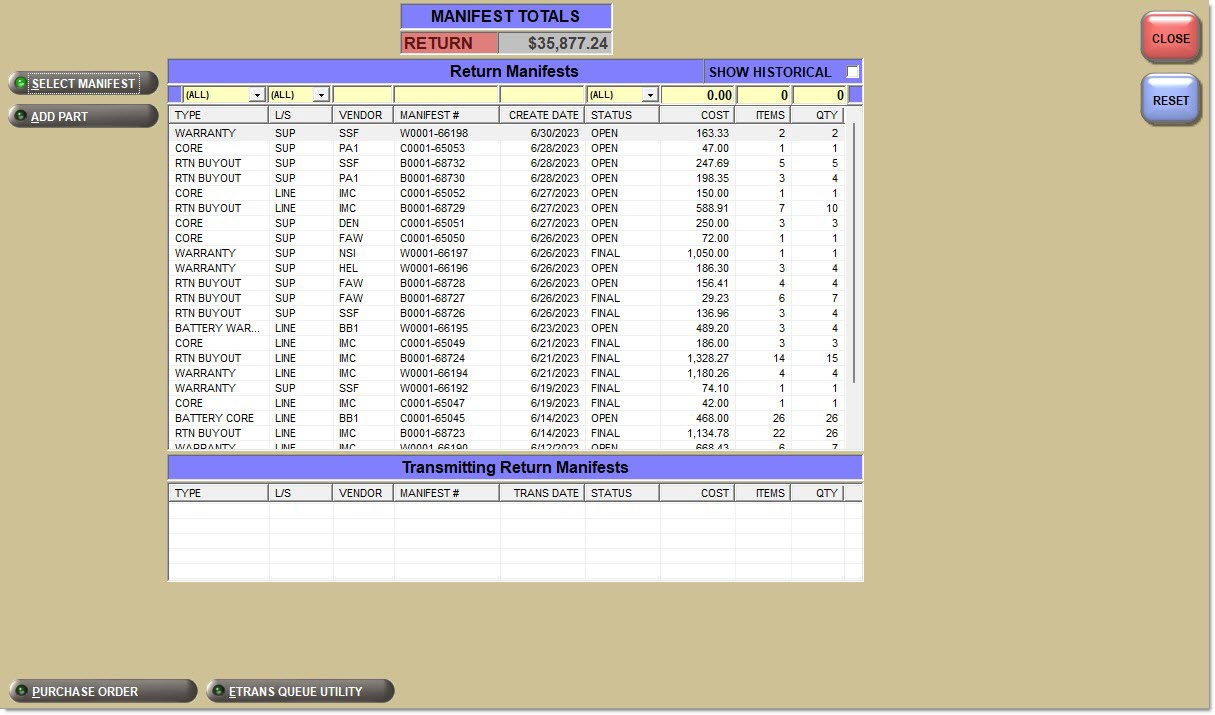
Return Manifests
A manifest is a list of returned core and warranty items automatically added from Point-of-Sale and manually added from the shelf. When creating a new manifest, the vendor record is read ('Mfg' or 'Sup') as well as the vendor Return Point. If the Return Point vendor has a 'PO Cost Level' set, the manifest is created with that cost level. If 'PO Cost Level' is set to 'Not Selected', the manifest is created using 'Current Cost'.
The Return Manifests screen is used to list all 'Open' and 'Final' manifests that have not been transmitted to the vendor and displays a list of 'Closed' or transmitted manifests historically.
Invoice finalization looks for all items on the invoice with the "core sell only" modifier. For each "core sell only" item, invoice finalization looks for the core in the manifest tables. The manifest status must be 'Open'. The manifest type must be 'Core' (or 'Battery' if the store has the 'Battery Manifest Acts As' field set to 'Core'). If these conditions are met, the core is removed from the manifest. Even if the core is not found on a manifest, invoice finalization continues because the "core sell only" transaction has already been tendered; it is too late to back out once the finalization code is running. The "core sell only" modifier existed in PartsWatch long before manifests.
Menu Path: Purchasing, Manifest Main, Return Manifests screen
Menu Path: Purchasing, Purchasing Dashboard screen, click the 'Manifest' button.
Indicates the total dollar amount of the items on the manifest.
Select Manifest
Displays the Return Manifest Detail screen for the selected manifest in the grid.
If a part is moved across manifests with different 'PO Part Cost Levels', and the 'Allow Manifest Move With Different Cost Level' is set to 'Prompt' on the Store Purchasing Setup screen, 'Manifest' tab a pop-up displays: "The selected manifest has a different PO COST LEVEL setting from the cost level of the current part manifest. If the part is moved, it will be recorded at the cost level of the selected manifest. Do you want to continue?"
If the 'Yes' button is clicked, the system performs the move and "re-costs" the part. If the 'No' button is clicked, the system does not perform the move.
Add Part
Displays the 'Add Part to Manifests' window, after entering a manager override if one is set up, if required, to manually add a part to any type of manifest with the status of 'Open' or 'Final'.
If the User Security Proc 'Deny Manifest Add Found Part' is active, adding parts to the manifest is not allowed.
The system checks the 'Do Not Manifest' setting in the Main Part Entry screen. When checked, the system automatically adds parts to the 'DNRV Warranty' manifest instead of the 'Warranty' manifest without manual intervention.
The default return point is read and the part is added to the appropriate manifest type at the appropriate cost level; 'PO Cost Level', if set, otherwise 'Current Cost'. If there is no matching type, a new manifest is created and the part placed on it.
Click the 'Add Part' button to open the 'Add Part To Manifest' window that allows manual entry of a part to a manifest. Enter the 'Line Code' and 'Part Number', 'SKU' or 'UPC' and select a 'Reason' for adding the part:
-
'Core'
-
'Warranty'
-
'Labor Claim'
-
'Battery'
When 'Core' or 'Labor Claim' is selected as the 'Reason', the 'Qty Available' for the part is not decreased.
When 'Warranty' is selected as the 'Reason', the part is assumed to be off the shelf and the 'Qty Available' is decreased.
By right-clicking the list, besides adding a part to the manifest, the Return Point can be changed and the Return Manifest Detail can be opened.
"Found" parts are core parts that are found in the store or parts that are defective when pulled from the shelf and never sold or returned at Point-of-Sale. Found parts manually added to a Core manifest do not decrease inventory. Found parts manually added to a Warranty and a Labor Claim manifest decrease inventory and are tracked to the Part Ledger to reflect a change in the stock for Warranty and Labor Claim manifests. These parts do not reflect a change in the stock quantity for Core manifests.
When more than one manifest is in the 'Open' status when a part is added using the 'Add Part' button, the part is added to the most recently created 'Open' manifest with the correct 'Type'.
Return Manifests Grid
Click the 'Manifest #', 'Vendor', 'Type', 'Create Date', or 'Status' column headings to sort the list by that topic.
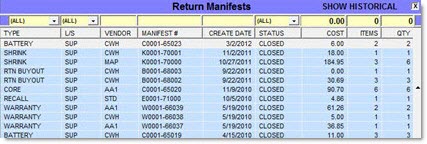
Show Historical
Displays the closed POs, when checked. Defaults to No (unchecked) so 'Open' and 'Final' manifests normally display.
The 'Show Historical' flag is used to display the Closed POs. The flag defaults to No (unchecked) so 'Open' and 'Final' manifests display.
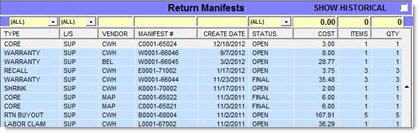
Click the check box for Yes and the 'Closed' manifests display.
Type
Indicates the type of manifest.
Options are:
-
'All'
-
'Battery'
-
'Core'
-
'Defective'
-
'DNRV Warranty'
-
'Labor Claim'
-
'Shrink'
-
'Return Buyout' - A resellable return sold with S or CL modifiers, or not found in history, to a Return Buyout manifest when the 'NIF Part Return Destination' is set to 'Manifest', or set to 'Prompt' and 'Manifest' is chosen.
L/S
Indicates 'Line' or 'Supplier'.
Vendor
Indicates the vendor code.
Manifest #
Indicates manifest number.
Create Date
Indicates the date the manifest was created.
Status
Indicates the status of the manifest.
Options are:
-
'All'
-
'Open'
-
'Closed'
-
'Reconciled'
-
'Transmit'
-
'Final'
Cost
Indicates the cost of the distinct part.
Items
Indicates the number of distinct parts on the manifest.
Qty
Indicates the total quantity on the manifest.
Transmitting Return Manifests Grid
Reflects the same fields as the Return Manifest grid with the exception of the following:
Trans Date
Indicates the date that the Return Manifest was transmitted.
Right-Click Command Menu
Right-click on a manifest in the grid to display the following command list:
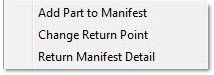
Add Part to Manifest
Displays the 'Add Part To Manifest' window used to manually add a part to any type of manifest with the status of 'Open' or 'Final'. Note: The 'Manager Approval Required' window displays to enter a manager override if enabled. Not available for Historical manifests.
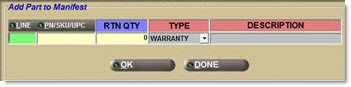
Enter the values in the 'Line', 'PN/SKU/UPC', 'Rtn Qty' and 'Type' fields. The 'Description' field displays the description of the part that is being added to and is grayed out. Click 'Ok' to add the item to the manifest as a found part. Found parts manually added to a Core manifest do not decrease inventory. Found parts manually added to a Warranty and a Labor Claim manifest decrease inventory and are tracked to the Part Ledger to reflect a change in the stock for Warranty and Labor Claim manifests. These found parts do not reflect a change in the stock quantity for Core manifests. The system tracks the correct credit code for the manifest that the found part is added to for transmission to the warehouse. Found parts added to a manifest have the same credit code as the manifest it is added to. This ensures all parts on a manifest are sent in one transmission.
If the part exists in the part record, the manifest return vendor 'PO Cost Level' determines the cost level to use from the part. That cost level is used if non-zero. Otherwise, the cost defaults to the part's 'Current Cost'. If the part does not exist in the part record, LISA is queried for the original sale record. If a record is found, the part cost and core cost from LISA is used (even if zero). If a LISA record is not found, the part cost and core cost from the return invoice is used.
When a part is added to a manifest via an invoice, a 3-step process occurs to determine the part cost on manifest.
-
Reads invoice body record. Takes part cost, core cost and VD (Variable Decimal) from invoice body record.
-
Reads original sale record (sali). If sali found and manifest part cost is currently zero (from previous costing (Step 1)), takes part cost, core cost and VD from sali record, even if zero.
-
If part found in part record, and applicable cost level cost of part is non-zero, takes part cost, core cost and VD from part record using cost level of manifest. Manifest Cost Level is that of Manifest Return Point Vendor 'PO Cost Level', if set, otherwise, defaults to 'Current Cost'.
If the part is found in the part record, it figures the cost using method in Step 3. If not found, it looks in LISA and figures it using the method in Step 2. If it is not found there, it uses the invoice cost (Step 1).
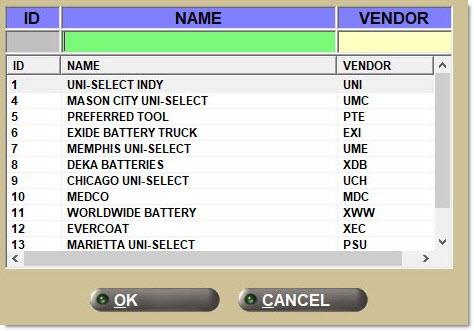
Change Return Point
Displays the 'Browse Return Points' window used to select a new return point for the manifest. Not available for Historical manifests.
Manifest cost level is determined based on the 'PO Cost Level' setting of the vendor associated with the Return Point. If the manifest return point vendor does not have a 'PO Cost Level' set on the Supplier Order Specifics screen, then part 'Current Cost' is assumed. When a new Return Point is selected, the determined cost of the selected Return Point is compared to the cost level of the manifest. If the cost levels match, the Return Point is completed. If the cost levels do not match, the Return Point does not occur. A pop-up stating "Selected return point vendor has a different PO COST LEVEL setting from the cost level of the manifest. Changing the return point is not allowed" displays.
The 'Allow Manifest Move With Different Cost Level' drop-down on the 'Manifest' Tab of the Store Purchasing Setup screen determines the behavior of the application when trying to change the return point of a part with a different cost level.
-
If the drop-down is set to 'Never', the changing of a Return Point with a different cost level is not allowed.
-
If the drop-down is set to 'Always', the changing of a Return Point with a different cost level is allowed, and all part items are re-costed.
-
If the drop-down is set to 'Prompt', a prompt displays allowing the user to decide whether or not to allow or disallow the changing of a Return Point for parts with different cost levels.
Return Manifest Detail
Displays the Return Manifests Detail screen used to view the detail on the selected manifests in the grid.
Add Damaged Purchase Order Part to Manifest
Note: Only applies when the 'AutoReturnDamagedParts' option is enabled (only accessible by a Support Rep) and a Purchase Order is received with a damaged quantity.
If the part exists in the part file, the 'Manifest Return Point' vendor is read. If the Return Point vendor has a 'PO Cost Level' selected, that cost level is used to cost the part on the manifest unless the applicable cost Level is 0.00. If the 'PO Cost Level' is not assigned, then the part's 'Current Cost' is used as the part cost on the manifest, but only if non-zero cost. If the result is a 0.00 part cost, the part cost and core cost from the Purchase Order is used (even if 0.00.).
Procedure to View Manifest
To view a manifest in the grid, follow the steps below:
-
From the Menu, select Purchasing, Manifest Main. The Return Manifests screen displays.
-
Highlight the manifest to view in the Return Manifest grid.
-
Click 'Select Manifest' or double-click the manifest. The Return Manifest Detail screen displays.