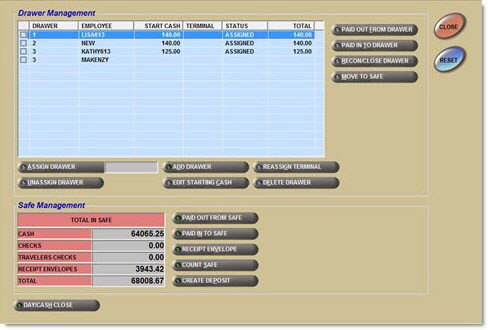
Drawer Management (Real)
The Drawer Management screen is used to manage both the drawers and safe for "Real" drawers. The manager can:
-
Designate the number of drawers in the store
-
Assign employee(s) to drawers
-
Unassign employee(s) from drawers
-
Track the amount collected in each drawer
-
Close drawers
-
Create Paid In and Paid Out transactions
-
Close and reconcile the drawer
-
Manage the safe
Those not designated as managers can:
-
Close drawers
-
Creates Paid In and Paid Out Transactions
-
Close and reconcile the drawer
User Security permissions determine the cash drawer functions available to the employee. When a function button is clicked, the system prompts for the employee log in and password. The system tracks who is logged into the Drawer Management screen rather than who logged into the application.
Menu Path: Invoicing, Cash Drawer, Management Functions, Drawer Management, Drawer Management screen
![]() Cash Drawer - 7 minutesCash Drawer - 7 minutes
Cash Drawer - 7 minutesCash Drawer - 7 minutes
Drawer Management
Drawer Functions Grid
Used to track users/drawers/terminals for cash management and is updated by the system not manually.
The Drawer Function Grid is used to track employees/drawers/terminals for cash management and is updated by the system, not manually. When multiple employees are assigned to the same drawer, all the assigned users display in the grid. When multiple users are assigned to the same drawer, only the row for the logged in employee displays the 'Drawer', 'Employee', 'Start Cash', 'Terminal', 'Status', and 'Total'. All other rows for the same drawer display the 'Drawer' and 'Employee' only. Each row can be checked individually to assign the drawer and unassign a drawer.
-
Checked - Identifies the drawer that is focus.
-
Unchecked - Does not identify the drawer that is in focus.
Only one drawer can be checked (in focus) at a time.
Drawer
Displays a unique drawer number, up to 10 alphanumeric and special characters, for each drawer used in the store. A user can only be assigned to one drawer at a time (per shift). Drawer number displays until manually deleted. Any number of drawers can be added. Assigning a user to a drawer links that user to the drawer.
Employee
Displays the user assigned to the drawer.
Start Cash
Identifies the amount that is used as the "float" and is assigned to the drawer and not to the user. Amount is included in the drawer 'Total' if the drawer total collected displays or represents the 'Total' if the drawer total collected is not displayed per drawer.
Terminal
Displays the terminal device number that the drawer is loaded into, which links the drawer to a terminal. Tracks the drawer to the terminal when loaded and until the drawer is moved or closed. Field is updated when the drawer number is entered to load the drawer. Not user-editable.
Status
Displays the state of the drawer at any given time. Updated by the system and is not editable.
Status values are:
-
'Assigned' - Drawer is assigned (linked) to an employee. The employee is able to load the drawer into the terminal.
-
'Active' - Drawer is loaded into a terminal. The employee(s) assigned to the drawer are able to tender cash and create ROAs and Paid In and Paid Out transactions.
-
'Reassigned' - Drawer is unlinked from the terminal when the employee is moved from one terminal to another. Status changes from 'Reassigned' to 'Active' when the employee logs into the new terminal.
-
'Safe' - Drawer has been moved to the safe via the 'Move to Safe' button. The employee is no longer able to tender cash or create ROAs or Paid In and Paid Out transactions from the drawer. The drawer can be accessed to reconcile from the same terminal or another terminal that does not already have a drawer loaded. The drawer can be reloaded to continue working or to reconcile/close the drawer from the same or a different terminal. The drawer does not have to be loaded to reconcile and close. As long as another drawer is not already loaded on the terminal, the system uses the employee's login and, if the employee is assigned to a drawer in 'Safe' status, the employee will be able to open the Drawer Reconciliation screen and reconcile their drawer. Moving the drawer to the safe is optional. When not moved, the drawer can still be reconciled and closed from the same terminal.
-
'Locked' - System automatically changes the status to 'Locked'when:
-
Assigned employee logs out of the terminal or closes the application and the 'Status' is 'Active'. If multiple employees are assigned to the drawer, the drawer remains 'Locked' for all employees until the assigned employee logs in.
-
Application restarts on the terminal after the application shut down for any reason. (The status returns to 'Active' once the employee logs back in and the employee can resume tendering cash and creating ROAs and Paid In and Paid Out transactions. The status remains 'Locked', however, if an employee not assigned to the terminal logs in.)
-
Exception: 'Status' does not change to 'Locked' when the application loses connection with the server and goes into Mode 2.
-
-
-
'New' - Drawer is first created and remains 'New' until it is used and the status changes. When a drawer is closed, the status becomes 'New'.
Total
Display the amount currently in the drawer for all tender types and includes the amount of the 'Start Cash' value.
The amount (drawer 'Total') only displays when the 'Cash Drawer Totals' User Security proc, under 'Drawer Management', is set to 'View Only' or 'Allow Edit'. When set to 'Not Visible', the field displays the value of the Starting Cash.
Action Buttons
The following action buttons can be accessed below the grid, or via right-clicking a drawer in the grid to display the following menu:
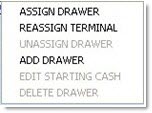
Use either the right-click menu selection or the action buttons underneath the grid to access the desired functionality for the selected drawer.
Assign Drawer
Assigns an employee to a drawer. Available to employees with the 'Manager' or 'Asst Manager' flag checked in the Employee Setup screen. Button does not display for employees with the 'Manager' and 'Asst Manager' flags unchecked. Accelerator key is 'Alt' + 'A'.
An employee can only be assigned to one drawer per shift. A message displays stating, "<Name> is already assigned to drawer <#>", when the manager attempts to assign an employee to another drawer. An employee can only be assigned to another drawer after the previously assigned cash drawer has been closed or unassigned. The value of the 'Drawer Type' field in the Store General Setup screen, 'Cash Drawer' tab determines if closed drawers must be reassigned before the next shift. When set to 'Always Assigned', the last employee(s) to the drawer will still be assigned. The manager does not have to reassign the user(s) before each shift. When set to 'Manager Reassigns', the manager assigns the employee(s) to a drawer before each shift.
Any number of employees can be assigned to a single drawer. For example, if two employees share Drawer 003, Drawer 003 displays on two consecutive rows.

To assign an employee to a drawer, follow the steps below:
1. From the Menu, select Invoicing, Cash Drawer, Management Functions, Drawer Management. The Drawer Management screen displays.
2. Select a drawer in the grid. The row is checked.
3. Click 'Assign Drawer' (or right-click a drawer and select 'Assign Drawer' from the command list), or enter an Employee Code in the field. If the button was clicked, the 'Browse Employees' window displays to select an employee. If the Employee Code was entered in the field, the system validates the entry and assigns the employee to the drawer. The employee is assigned to the drawer.
To assign multiple employees to a drawer, use the following illustration and follow the steps below:
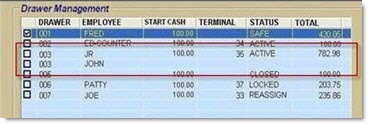
1. From the Menu, select Invoicing, Cash Drawer, Management Functions, Drawer Management. The Drawer Management screen displays.
2. Select a drawer (003) in the grid. The row is checked.
3. Click 'Assign Drawer' (or right-click a drawer and select 'Assign Drawer' from the command list), or enter an Employee Code in the field. If the button was clicked, the 'Browse Employees' window displays to select an employee. If the Employee Code was entered in the field, the system validates the entry and assigns the employee to the drawer. The employee is assigned to the drawer.
4. With the first row for Drawer 003 still checked, enter an employee in the 'Assign Drawer' field.
The system validates that the selected employee is not already assigned to a drawer. Another row of Drawer 003 displays below the original Drawer 003 row and the employee assigned to Drawer 003 displays.
5. With the first row for Drawer 003 still checked, enter an employee in the 'Assign Drawer' field.
The system validates that the selected employee is not already assigned to a drawer. Another row of Drawer 003 displays below the second Drawer 003 row and the employee assigned to Drawer 003 displays. All three employees are assigned to Drawer 003.
Unassign Drawer
Removes a employee from a drawer. Drawer status must be 'Assigned'. Available to employees with the 'Manager' or 'Asst Manager' flag checked in the Employee Setup screen. Button does not display for employees with the 'Manager' and 'Asst Manager' flags unchecked. Accelerator key is 'Alt' + 'U'.
A manager may want to unassign an employee for the following reasons:
-
The employee assigned to a drawer is being assigned to another drawer.
-
A different employee is to use the assigned drawer.
-
The manager or assistant manager does not want employees not currently working left as assigned.
When the sole employee of a drawer is unassigned, the 'Status' of the drawer changes to 'Unassigned'. However, when one employee is unassigned from a drawer that has multiple employees assigned to it, the 'status' remains as 'Assigned'.
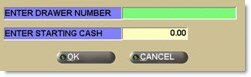
Add Drawer
Adds drawers to the Drawer Management screen. Available to employees with the 'Manager' or 'Asst Manager' flag checked in the Employee Setup screen. Button does not display for employees with the 'Manager' and 'Asst Manager' flags unchecked. Accelerator key is 'Alt' + 'D'.
The 'Add Drawer' button is used to add drawers to the Drawer Management screen. Button access is available to employees with the 'manager' or 'Asst Manager' flag checked in the Employee Setup screen. The manager enters the drawer number and starting cash, if desired. An employee does not need to be assigned when creating a new drawer. The drawer can be assigned/unassigned, as needed.
Edit Starting Cash
Edits the starting cash per drawer. Drawer status must be 'New'. Available to employees with the 'Manager' or 'Asst Manager' flag checked in the Employee Setup screen. Button does not display for employees with the 'Manager' and 'Asst Manager' flags unchecked. When clicked, a window displays indicating the existing starting cash amount. Accelerator key is 'Alt' + 'C'.
The 'Edit Starting Cash' employee Security proc determines access to the 'Edit Starting Cash' button. When set to 'Not Visible', the button does not display and the functionality is not available. When set to 'View Only', the button displays but is disabled and the functionality is not available. When set to 'Allow Edit', the button displays and the functionality is available. Note: The proc does not control the ability to add the starting cash at the time a drawer is first added and does not control whether the 'Ending Cash' field can be edited during the drawer reconciliation.
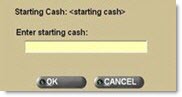
When a new starting cash value is entered in the text box, the system:
-
Creates a Paid In To Safe for the value of the existing starting cash with the 'Reason' of 'Drawer Ending Cash' if the value of the existing starting cash is greater than 0.00.
-
Creates a Paid Out From Drawer for the value of the starting cash with the 'Reason' of 'Ending Cash' if the value of the existing starting cash is greater than 0.00.
-
Creates a Paid Out From Safe for the value of the new starting cash with the 'Reason' of 'Drawer Starting Cash'.
-
Creates a Paid In To Drawer for the value of the starting cash with the 'Reason' of 'Starting Cash'.
Reassign Terminal
Moves a drawer from one terminal to another terminal. Available to employees with the 'Manager' or 'Asst Manager' flag checked in the Employee Setup screen. Button does not display for employees with the 'Manager' and 'Asst Manager' flags unchecked. Accelerator key is 'Alt' + 'G'.
If the employee has started a cash invoice, but is not in the 'Tender' window when the reassigned, the employee is able to put the ticket on hold and continue after moving to the new terminal. If the started invoice is on account, the ticket can be finished before moving to the new terminal. In either case, 'Tender' is not available. If the employee is in the Invoice Point of Sale screen or 'ROA Tender' window when the manager clicks 'Reassign Terminal', the employee is not reassigned until the Invoice Point of Sale screen or 'ROA Tender' window closes.
Delete Drawer
Removes a drawer(s) from the Drawer Management screen. Drawer status must be 'New'. Available to employees with the 'Manager' or 'Asst Manager' flag checked in the Employee Setup screen. Button does not display for employees with the 'Manager' and 'Asst Manager' flags unchecked. Accelerator key is Alt + E.
If starting cash was added to the drawer, the Ending Cash Paid Out From Drawer and Paid In To Safe transactions are created when the drawer is deleted.
Deleted numbers can re-added, if needed.
Paid Out From Drawer
Displays the Paid Out From Drawer screen. The employee's login used to open the Paid Out From Drawer screen is tracked for the employee creating the Paid Out From Drawer transaction. Accelerator key is 'Alt' + 'F'.
Paid In To Drawer
Displays the Paid In To Drawer screen. The employee's login used to open the Paid In To Drawer screen is tracked for the employee creating the Paid In From Drawer transaction. Accelerator key is 'Alt' + 'T'.
Recon/Close Drawer
Displays the Drawer Reconciliation screen used to count, reconcile and close the drawer. Accelerator key is 'Alt' + 'R'.
Move To Safe
Disassociates the drawer with the terminal. Interrupts the ability to tender cash at that terminal. Only available when the drawer 'Status' is 'Active' and clicked from the terminal the drawer is loaded on. The drawer 'Status' changes to 'Safe' and a prompt displays stating, "Drawer <drawer number> has been successfully moved to the safe." Drawer must be loaded on the same or another terminal to continue tendering cash. Accelerator key is 'Alt' + 'M'.
The 'Move To Safe' employee Security proc determines access to the 'Move To Safe' button. When set to 'Not Visible', the button does not display and the functionality is not available. When set to 'View Only', the button displays but is disabled and the functionality is not available. When set to 'Allow Edit', the button displays and the functionality is available.
Safe Management
Used to manage the safe and is only available to employees where the 'Manager' or 'Asst Manager' flag is checked in the Employee Setup screen. Section does not display for all other employees.
User Securities determine button(s) availability. The system tracks the employee who is logged into the Drawer Management screen as the user accessing the safe functionality.
The 'Safe Totals' User Security proc determines who can see the amount in the 'Total In Safe' and '<foreign> Total In Safe' fields. When set to 'Not Visible', the totals do not display in the Safe Management section for both home and foreign currency. When set to 'View Only' and 'Allow Edit', the totals do display in the 'Safe Management' section for both home and foreign currency.
Total In Safe
The value of the 'Safe Totals' User Security proc determines whether the totals display or are blank.
Cash
Indicates the total loose cash in the safe not in receipt envelopes.
Check
Indicates the total checks in the safe not in receipt envelopes.
Travelers Checks
Indicates the total Travelers Checks in the safe not in receipt envelopes and only displays if accepted as tender as set up in the Tender Setup screen.
Receipt Envelopes
Indicates the total amount in the safe in receipt envelopes.
Indicates the total cash, Travelers Checks, and receipt envelopes in the safe.
<foreign> Total In Safe
If Currency Exchange is set up, the value of the 'Safe Totals' User Security proc determines whether the totals display or are blank.
Cash
Indicates the total foreign cash in the safe not in receipt envelopes.
Travelers Checks
Indicates the total foreign Travelers Checks in the safe not in receipt envelopes.
Receipt Envelopes
Indicates the total amount of foreign currency in the safe in receipt envelopes.
Total
Indicates the total foreign cash, Travelers Checks, and receipt envelopes in the safe.
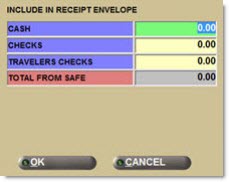
Receipt Envelope
The 'Receipt Envelope' button displays the 'Create Receipt Envelope' window that is used to create a receipt envelope for the safe with any currency that is loose in the safe (not already in a receipt envelope). Bank deposits can only be made for values in receipt envelopes.
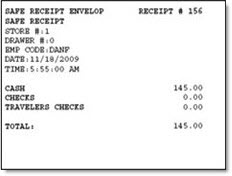
Safe Receipt Envelope Receipt
The following is an example of the safe receipt envelope receipt: