Lost Sales Report
The 'Lost Sales Report is used to track items that could have been sold had they been available. The report tracks lost sales that are recorded and processed from both the Invoice Point of Sale screen (Point-of-Sale) and Catalog screen, and sourced parts deleted from the invoice or where the sourced quantity was decreased.
If, for any reason, a part is not available when a sales order is being created, then the part is considered a lost sale. When this occurs, the counterperson enters the requested quantity of the unavailable part directly into the sales order or Catalog screen, uses the 'BkOrd Lost Sale' button in the 'Insufficient Quantity' pop-up, or deletes or reduces the order quantity of a sourced item. The 'Lost Sales' bucket "prtLostSales" is cleared at the End-of-Month process.
Menu Path: Reports, Inventory, Lost Sales, Lost Sales Report screen
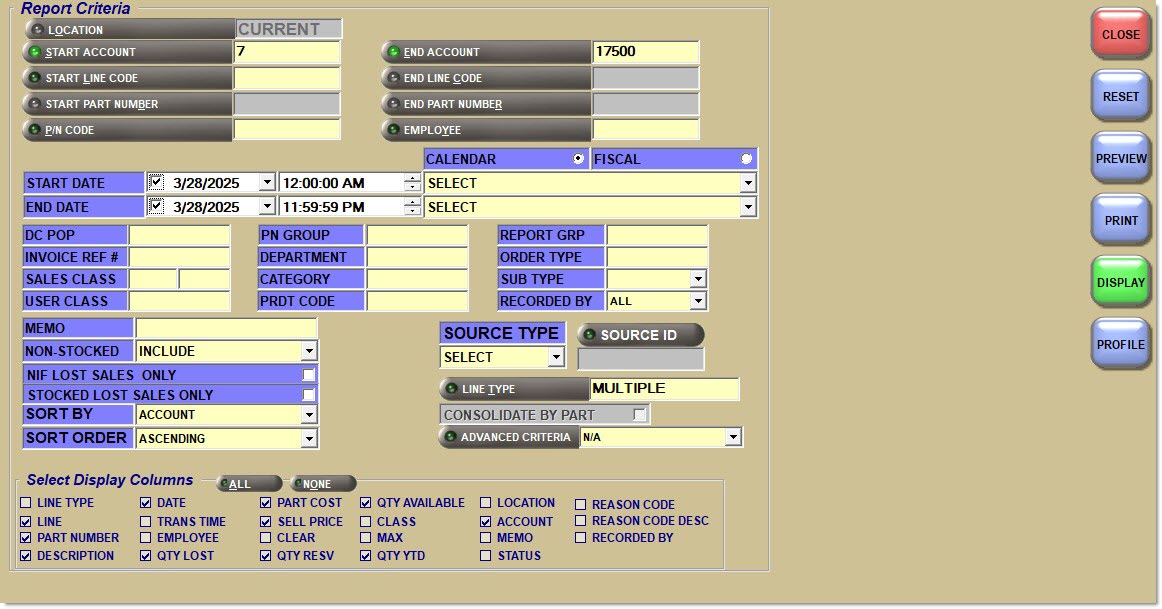
Report Criteria
Location
Filters by the selected store location. Defaults to current location. For multi-store users, either enter a store number or leave blank to filter data for all stores. Click the button to display the 'Browse Locations' window to search for a specific location.
Start Account
Specifies the beginning account number to report data by a range of accounts. Leave blank to report all accounts. Click the button to display the 'Find Account' window to search for a specific account.
End Account
Specifies the ending account number to report data by a range of accounts. Leave blank to report all accounts. Click the button to display the 'Find Account' window to search for a specific account.
Start Line Code
Specifies the beginning line code to report data by a range of line codes. Leave blank to report all line codes. Click the button to display the 'Browse Line Codes' window to search for a specific line code.
End Line Code
Specifies the ending line code to report data by a range of line codes. Leave blank to indicate all line codes. Click the button to display the 'Browse Line Codes' window to search for a specific line code.
Start Part Number
Specifies the beginning part number to report data by a range of line codes. Leave blank to indicate all parts within the selected line code.
When the 'Customer Lookup Stripped Match' flag is checked in the System General Setup screen, only letters and numbers are searched; spaces, special characters and punctuation are "stripped-out" of the search and ignored.
End Part Number
Specifies the ending part number to report data by a range of line codes. Leave blank to indicate all parts within the selected line code.
When the 'Customer Lookup Stripped Match' flag is checked in the System General Setup screen, only letters and numbers are searched; spaces, special characters and punctuation are "stripped-out" of the search and ignored.
PN Code
Filters data for a predefined P/N Code per Line Code. Click the button to select a specific P/N Code per Line Code.
Employee
Filters by an Employee ID to track lost sales, as recorded by employee. Click the button to display the 'Browse Employees' window to search for a specific employee.
Start Date
Indicates the start date and time for reporting purposes. Click the small down arrow to display a calendar. Click the desired date to select. Use the small left and right arrows to display previous/next months. Transactions created or submitted within the date range display. Enter a check mark in the field to report sales for a certain period. Displays all transactions, when unchecked. Defaults to current date.
Automatically populates with the appropriate date when a 'Calendar' or 'Fiscal' option is selected.
When saving as a profile, using the relative date option is recommended rather than selecting dates from the pop-up calendar. If the profile is saved with a fixed date range, then whenever the report is run using the saved profile, the report's output always contains the same information for that fixed date range only. If the profile is saved with a relative date range, the dates included are adjusted based on when the report is run.
End Date
Indicates the end date and time for reporting purposes. Click the small down arrow to display a calendar. Click the desired date to select. Use the small left and right arrows to display previous/next months. Transactions created or submitted within the date range display. Enter a check mark in the field to report sales for a certain period. Displays all transactions, when unchecked. Defaults to current date.
Automatically populates with the appropriate date when a 'Calendar' or 'Fiscal' option is selected.
When saving as a profile, using the relative date option is recommended rather than selecting dates from the pop-up calendar. If the profile is saved with a fixed date range, then whenever the report is run using the saved profile, the report's output always contains the same information for that fixed date range only. If the profile is saved with a relative date range, the dates included are adjusted based on when the report is run.
Calendar
Uses Relative Calendar dates, when selected. Works in conjunction with the 'Start Date' and 'End Date' fields.
Fiscal
Uses Relative Fiscal dates, when selected. Works in conjunction with the 'Start Date' and 'End Date' fields.
Note: Fiscal Periods refer to the most recently completed (closed) instance.
DC Pop
Filters by a Distribution Center (DC) popularity (POP) code.
Invoice Ref #
Filters by an invoice reference number.
Sales Class
Filters by a valid Sales Class code in the first and/or second Sales Class code position.
User Class
Filters by a User Class Code.
PN Group
Filters by a Part Number Group Code.
Memo
Used to enter a note, up to 16 characters, if desired. To print the memo on the report, check the 'Memo' checkbox in the 'Select Display Columns' section.
Non-Stocked
Determines whether non-stocked parts are reported.
Options are:
-
'Include' - Reports sales and inventory values for non-stocked parts and stocked parts.
-
'Exclude' - Does not report sales and inventory values for non-stocked parts.
-
'Only' - Only reports sales and inventory values for non-stocked parts.
NIF Lost Sales Only
Filters by write in/not-in-file parts, when checked.
Stocked Lost Sales Only
Filters by the part that is in inventory and is ordered and stocked, when checked.
Department
Filters by a specific Department Code.
Category
Filters by a specific Category code.
Prdt Code
Filters by a Product Code.
Report Grp
Filters by a Report Group Code.
Order Type
Filters by an Order Type.
Sub Type
Filters by parts for warranty and prorating purposes.
Options are:
-
'None'
-
'Tire'
-
'Batt' (Battery)
Recorded By
Drop-down used to select the method that recorded the lost sales:
-
'All' - Reports all lost sales regardless of how they were recorded.
-
'Canceled' - Reports lost sales that were automatically recorded by the system when the 'Track Canceled Items as Lost Sales' setting is set to 'Always' or 'Sourced'.
-
'Escape' - Reports lost sales that were automatically recorded by the system when the 'Track Esc At Sell Qty FIeld As Lost Sale' setting is enabled.
-
'Manual' - Reports lost sales that are manually added by the user.
Source Type
Drop-down menu that filters the report output by source type values.
Selections are:
-
'Supplier' - Source is set up as 'Other', 'Sister', 'DC', or 'Hub' in the 'Source Category' field in the Supplier Entry screen. The lost sale would be sourced from outside the store's database.
-
'Company' - Source is set up as 'Hub', 'Sister', or 'DC' in the 'Source Category' field in the Supplier Entry screen. The lost sale would be sourced from outside the store's database.
-
'All' - All sourced Lost Sales reported, sourced from both Supplier and Company sources.
-
'Select' - Default to report all lost sales whether sourced or not.
Source ID
Browser button that opens the multi-select 'Select Sources' window, and is used to filter the report output by source(s).
Line Type
Filters by a line type, as set in the 'Type' field in the Line Code Entry screen.
Click the button to display the 'Line Types' pop-up used to select specific line type(s).
Options are:
-
'Freight'
-
'Gift Cards'
-
'Labor'
-
'Parts'
Include any 'Line Type' by checking the checkbox(es). Check the checkbox in the header to report all line types. Uncheck the checkbox in the header to deselect all line types.
-
When all are checked, 'All' displays in the 'Line Type' field.
-
When more than one but less than all types are checked, 'Multiple' displays in the 'Line Type' field.
-
When only a single type is checked, that Line Type displays in the 'Line Type' field.
Note: Reports both gift cards and merchandise cards when 'Gift Cards' is selected.
Consolidate By Part
Prints one row per part number, showing total lost sales and total number of occurrences (invoice line items with lost sales), when checked. Available only when 'Sort By' field is set to 'Line/Part'. When checked, the 'Qty Avail' and 'Qty Resvd' columns represent the quantities at the time the report is being run.
When unchecked, the 'Qty Avail' and 'Qty Resvd' columns represent the quantities at the time the lost sale was recorded. When unchecked and when 'Sort By' is set to 'Line/Part' and 'Consolidate By Part' is checked, the resulting report is sorted by Line, Part, then Date. Parts are not consolidated into one row. Each occurrence is reported on its own row.
Note: Write-in (NIF) parts are not sorted. Within each line code, the NIF is listed first, in no particular order, followed by the in file parts, in part number order.
Sort By
Indicates the method that the report is sorted.
Options are:
-
'Account'
-
'Line / Account'
-
'Line / Part'
-
'Date Lost'
When 'Line /Part' is selected, and 'Consolidate By Part' is checked, the report sorts by Line, Part Number, then Date. Each Line code is subtotaled.
Sort Order
Sorts the report in 'Ascending' or 'Descending' order.
Advanced Criteria
Displays the 'Inventory Report Overrides' window used to set override defaults for the inventory report, when clicked.
Page Break for Each Location
Provides a page break in the report by location, when checked.
Displays only when more than one location is selected from the 'Browse Locations' window accessed by clicking the 'Location' button.
Select Display Columns
Check a specific checkbox(es) to display an X next to any columns you wish to output on the 'Display' version of the report.
Search Criteria
Reporting can be by a single account or a range of accounts.
Reporting options are:
-
To report on one account number, enter the same 'Start Account' and 'End Account'.
-
To report up to an account number, leave 'Start Account' blank and enter 'End Account' for which to report.
-
To report starting at one account number and continuing through all account numbers, enter 'Start Account' and leave 'End Account' blank.
-
To report a range of account numbers, enter 'Start Account' and'End Account'.
-
To report on all account numbers, leave 'Start Account' and 'End Account' blank.
Lost Sales Display Results Frame
The Lost Sales Display Results frame displays the results of the search initiated by selecting the appropriate items in the 'Select Display Columns' section and clicking the 'Display' button In the Lost Sales Report screen.
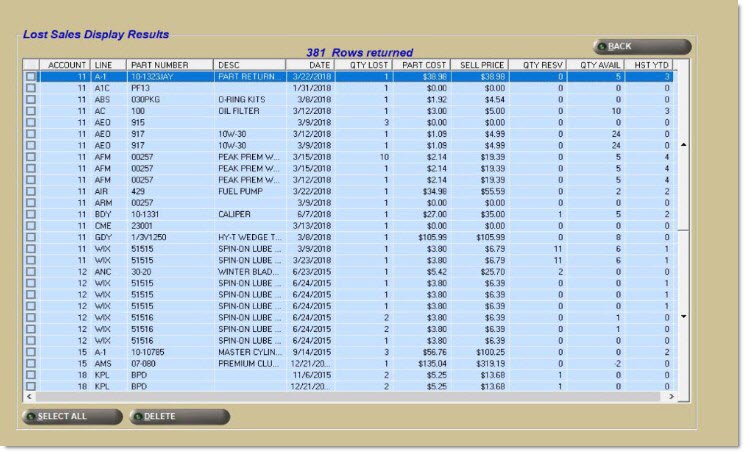
[ ] Rows returned
Indicates the number of rows returned. Each occurrence of a lost sale displays for each part. To narrow the results further, select only those rows required by checking the checkbox on each individual line.
Back
Returns to the Lost Sales Report screen.
Select All
Selects all of the rows on the screen.
Delete
Permanently deletes the lost sales data on any rows selected and commits the change to the parts file. The delete cannot be undone.
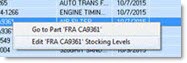
Right-Click Command Menu
Right-click on a row in the grid to display the following menu.
Options are:
-
'Go to Part < line><part>' - Displays the Part Entry screen with the part in focus.
-
'Edit <line><part> Stocking Levels' - Displays the Stocking Level Update screen with the part in focus to edit the stocking level.
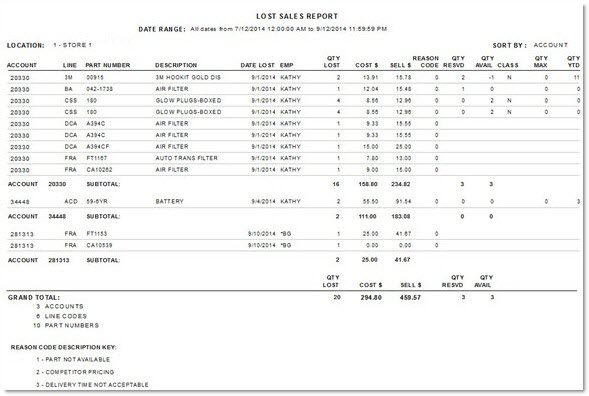
Lost Sales Report
The following is an example of the 'Lost Sales Report' Print/Display version: