G/L Export
PartsWatch General Ledger functionality provides the ability to accurately export sales totals in a format applicable to both QuickBooks and other third-party General Ledger software packages. Totals only are exported since all transaction details are available in the Invoice Journal, Cash Drawer, and A/R Transactions reports in PartsWatch.
The General Ledger Sales Total Export is accomplished on PartsWatch as follows:

G/L Export Setup
Store General Setup - 'G/L Export' Tab
The 'G/L EXPORT' tab on the STORE INFORMATION screen is used to enable G/L export settings, per store, to export sales totals to an accounting package such as QuickBooks.
G/L Account Code Setup Screen
The G/L ACCOUNT CODE SETUP screen is used to "link" the PartsWatch total fields included in the General Ledger (G/L) export to the unique General Ledger account numbers from the accounting package.
G/L Mapping Worksheet
General Ledger Export
The GENERAL LEDGER EXPORT screen is used to manually initiate the General Ledger (G/L) export file when not automatically initiated as part of the End-of-Day (EOD) process.
Note: When the 'AUTO EXPORT TO G/L WITH EOD' flag in the STORE GENERAL SETUP screen is checked, the export is automatically initiated by the system and this procedure is not needed.
Menu Path: Closeouts, G/L Export, GENERAL LEDGER EXPORT screen

Note: When the G/L is automatically exported, the date is updated with each automatic G/L export, and the 'EXPORT DATE' field and 'EXPORT' button are not available.
![]() G/L Export - 11 minutesG/L Export - 11 minutes
G/L Export - 11 minutesG/L Export - 11 minutes
GL Totals Export Overview - 1 page
How to Use the GL Export - 7 pages
Displays the Date and Time that the G/L file was last exported, whether automatically or manually, for information only.
All EOD Closes Since Last Export
If a single store is selected and the 'All EOD Closes Since Last Export' is unchecked, the 'EOD Close Date' drop-down and date widget both become enabled.
If an 'EOD Close Date' is selected from the drop-down, the date widget becomes disabled.
Once an 'EOD Close Date' is selected, if the user wants to choose a date range instead, the 'EOD Close Date' must be set to 'Select'. Then, the date widget becomes enabled.
If a date range is selected, the 'EOD Close Date' reverts to 'Select' but remains enabled.
If a date range is selected and the user wants to choose an 'EOD Close Date' instead, it can be selected from the drop-down. Once an 'EOD Close Date' is selected, the date widget becomes disabled. The date range will revert to its default values.
If either a date range or 'EOD Close Date' is selected and the 'All EOD Closes Since Last Export' is then checked, both the 'EOD Close Date' and date widget are disabled and revert to their default values.
If multiple locations are selected, the 'All EOD Closes Since Last Export' checkbox and 'EOD Close Date' drop-down are disabled. The date widget is enabled. Only the date widget will be available for selection for multiple locations.
Note: When multiple stores close on the same day, each close might close one second apart, allowing a user to select a date (without any times), this will enable all stores to be included in the export file generation for the day selected.
If multiple locations are selected and a date range is set, then the 'Location' changes to a single store, the 'All EOD Closes Since Last Export' checkbox will be enabled and unchecked and the date selection will remain.
Click the drop-down to display a list of each end-of-day close within the past six months; with the most recent close date displayed at the top of the list.
Since the export files are created when the end-of-day close is run, the number of export files will be in direct relation to the times of the close. If the store is closed daily, a new file will be available each day. If closed weekly, a single file will be available summing all transactions for the week allowing a single value to be exported for each total in one file. If separate files are needed to represent a single day, then the EOD close must be performed each day.
The list defaults to 'Select'.
Select a single date to export that date only. A single date selected can be any date within the drop-down list, before or after the 'LAST EXPORT DATE'. For example, if a date is selected after the 'LAST EXPORT DATE', then a new export file will be created for that close date.
However, if a date is selected before the 'LAST EXPORT DATE', then an export file will be created that will replace a previously created export file for the close date selected.
The program does not track the exported dates so it is important to be extremely careful and not re-export and subsequently re-import the same dates more than once to the accounting package.
If multiple locations are selected, the 'All EOD Closes Since Last Export' checkbox and 'EOD Close Date' drop-down are disabled. The date widget is enabled. Only the date widget will be available for selection for multiple locations.
Note: When multiple stores close on the same day, each close might close one second apart, allowing selection of a date (without any times), this will enable all stores to be included in the export file generation for the day selected.
If multiple locations are selected and a date range is set, then the 'Location' is changed to a single store, the 'All EOD Closes Since Last Export' checkbox will be enabled and unchecked and the date selection will remain.
Start Date
Specifies the start date and time to report data. Click the small down arrow to display a calendar. Click the desired date to select. Use the small left and right arrows to display previous/next months. Transactions created or submitted within the date range display. Enter a check mark in the field to report sales for a certain period. Displays all transactions, when unchecked. Defaults to current date.
Automatically populates with the appropriate date when a 'Calendar' or 'Fiscal' option is selected in the respective 'Select' field.
When saving as a profile, using the relative date option is recommended rather than selecting dates from the pop-up calendar. If the profile is saved with a fixed date range, then whenever the report is run using the saved profile, the report's output always contains the same information for that fixed date range only. If the profile is saved with a relative date range, the dates included are adjusted based on when the report is run.
End Date
Specifies the end date and time to report data. Click the small down arrow to display a calendar. Click the desired date to select. Use the small left and right arrows to display previous/next months. Transactions created or submitted within the date range display. Enter a check mark in the field to report sales for a certain period. Displays all transactions, when unchecked. Defaults to current date.
Automatically populates with the appropriate date when a 'Calendar' or 'Fiscal' option is selected in the respective 'Select' field.
When saving as a profile, using the relative date option is recommended rather than selecting dates from the pop-up calendar. If the profile is saved with a fixed date range, then whenever the report is run using the saved profile, the report's output always contains the same information for that fixed date range only. If the profile is saved with a relative date range, the dates included are adjusted based on when the report is run.
For multi-store environments, the export must be done per location. The 'LOCATION' field defaults to the current location. If multi-store EMPLOYEE SECURITY permissions are available, enter a location or select a single location from the 'BROWSE LOCATIONS' window to export the file for that location.
Should another location be selected, the screen fields are re-set to match the data specific to the selected store.
Determines whether or not to export zero-balance totals.
- Checked - Transactions that have a zero-balance display on the screen and are included in the export.
- Unchecked - Zero-balance totals do not display and are not included in the export.
USE COMBINED DEBIT/CREDIT CARDS
Determines how to display and export credit/debit card totals. The field defaults to the store 'USE COMBINED CREDIT/DEBITS CARDS' setting value and can be optionally changed.
- Checked - All credit/debit card transactions are summed in one total.
- Unchecked - Each credit/debit card type is totaled separately.
Select a close date from the 'EXPORT DATE' drop-down list and the 'DISPLAY' button is enabled.
Note: The 'DISPLAY' button is not available when 'ALL SINCE LAST EXPORT' is selected.
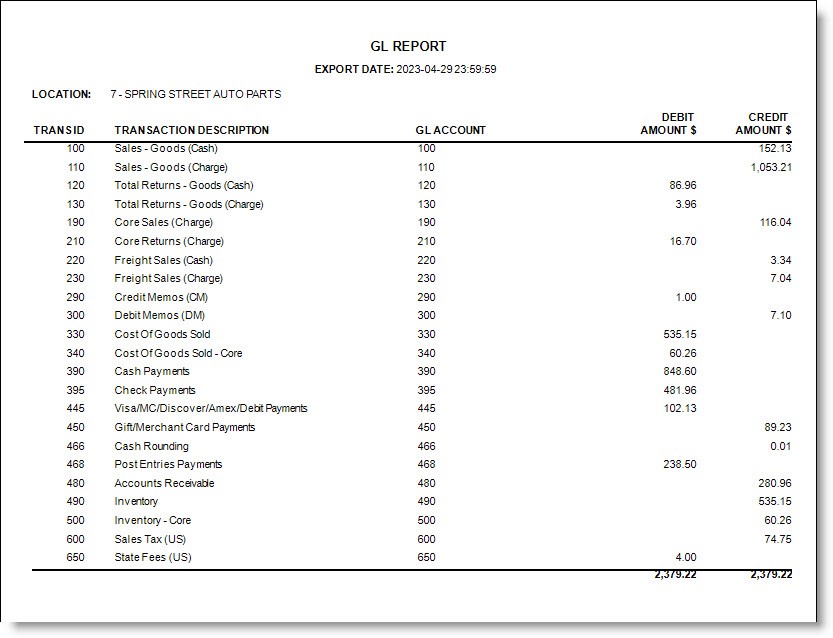
With a close date selected, click the 'DISPLAY' button and the grid fills with each sales total 'TRANSACTION DESCRIPTION', the G/L accounting package account number or code mapped to it, and since double-entry accounting is used, the 'DEBIT AMOUNT' and 'CREDIT AMOUNT' of the totals.
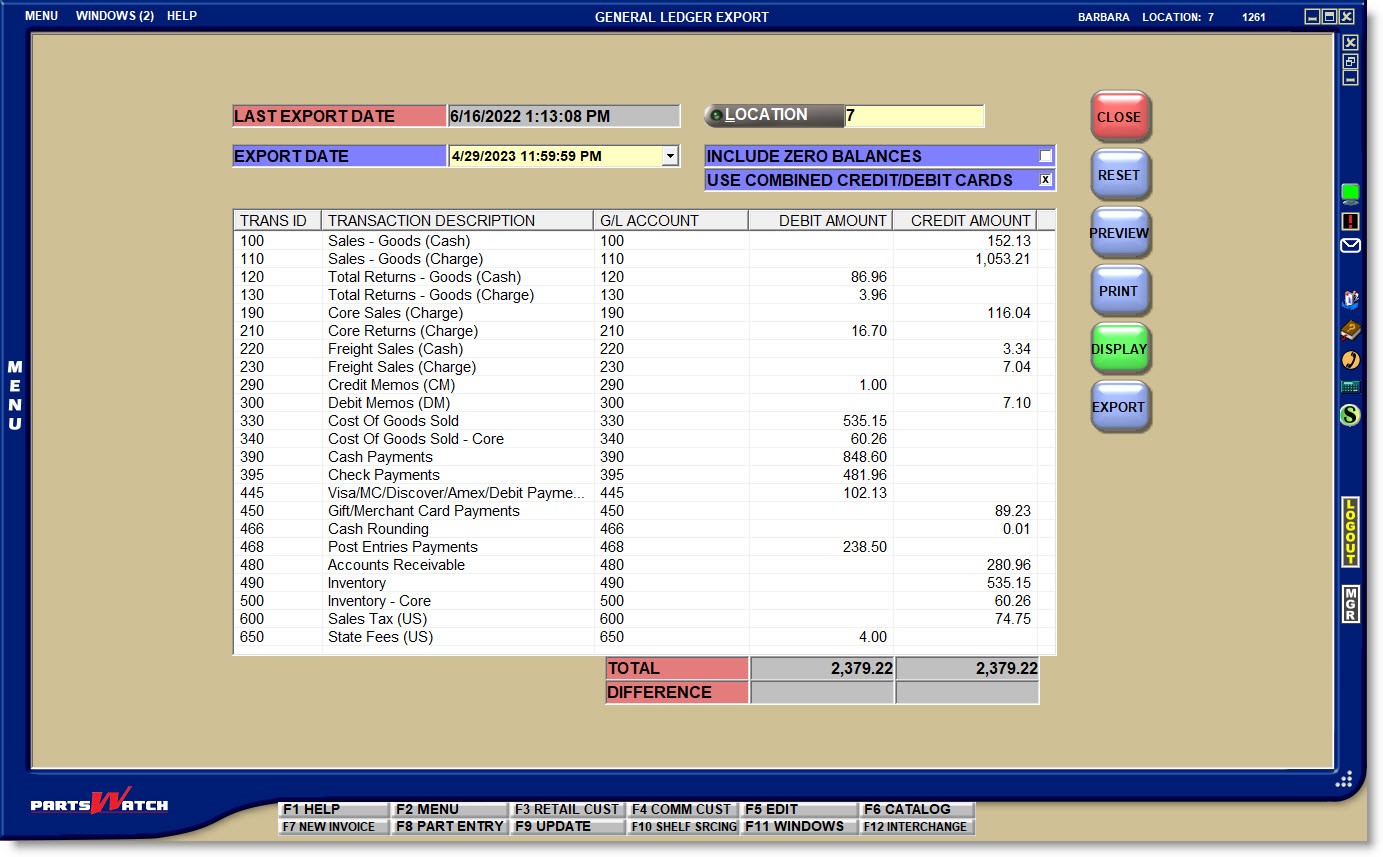
The 'DEBIT AMOUNT' and 'CREDIT AMOUNT' columns are each summed in the 'TOTAL' fields.
The system calculates the difference between the 'TOTAL' of the 'DEBIT AMOUNT' and 'CREDIT AMOUNT' columns and:
- If the export totals balance, the 'DIFFERENCE' fields will be blank.
- If the export totals do not balance, the amount over or short will display in the 'DIFFERENCE' field.
If the 'DEBIT AMOUNT' and 'CREDIT AMOUNT' fields do not balance:
- Make sure that the 'G/L ACCOUNT' numbers or codes are correctly mapped to the sales totals in the G/L ACCOUNT CODE SETUP screen. Incorrect mapping is the primary reason for an out-of-balance difference.
- Make sure that accounts with the 'ACCOUNT TYPE' of 'STORE USE' or multi-store 'TRANSFER' are set up with the 'ACCOUNT CONTROL' of 'NO AR' since only the 'Cost Of Goods' and 'Inventory' transaction types are included in the G/L export for 'NO AR' accounts.
- Make sure all other 'ACCOUNT TYPES' are not set up with the 'ACCOUNT CONTROL' of 'NO AR' since all totals for 'ACCOUNT TYPES' other than 'TRANSFER' and 'STORE USE' always include the cash tendered, but 'SALES' are not included for 'NO AR' accounts.
Note: The export will complete even if the transactions do not balance. Be sure to correct the accounts in PartsWatch or offset the totals in the accounting package.
With an 'EXPORT DATE' selected, the 'PREVIEW' and 'PRINT' buttons are enabled to preview or print the export totals.
With a close date or 'ALL SINCE LAST EXPORT' selected from the 'EXPORT DATE' drop-down list, click the 'EXPORT' button to initiate the G/L file export.
Once the 'EXPORT' button is clicked, the program will create the file in the designated directory and when completed, a prompt opens indicating that the export is complete.
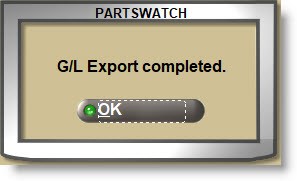
Click 'OK' to close the prompt and continue working. If the same 'EXPORT DATE' is again selected, the export file is rewritten over the previously saved file without any indication that the file already exists.
Once complete:
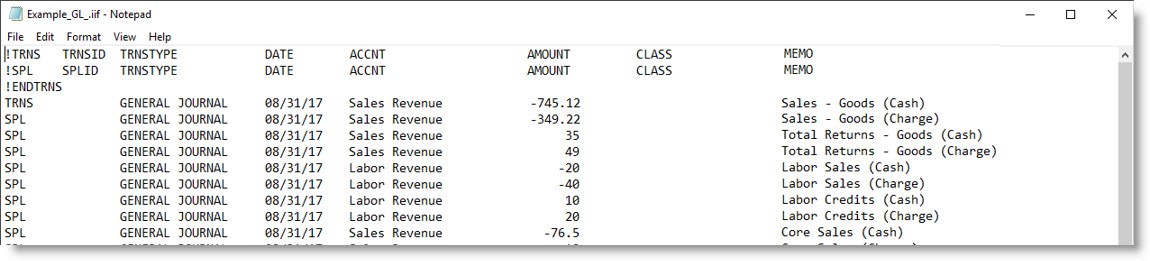
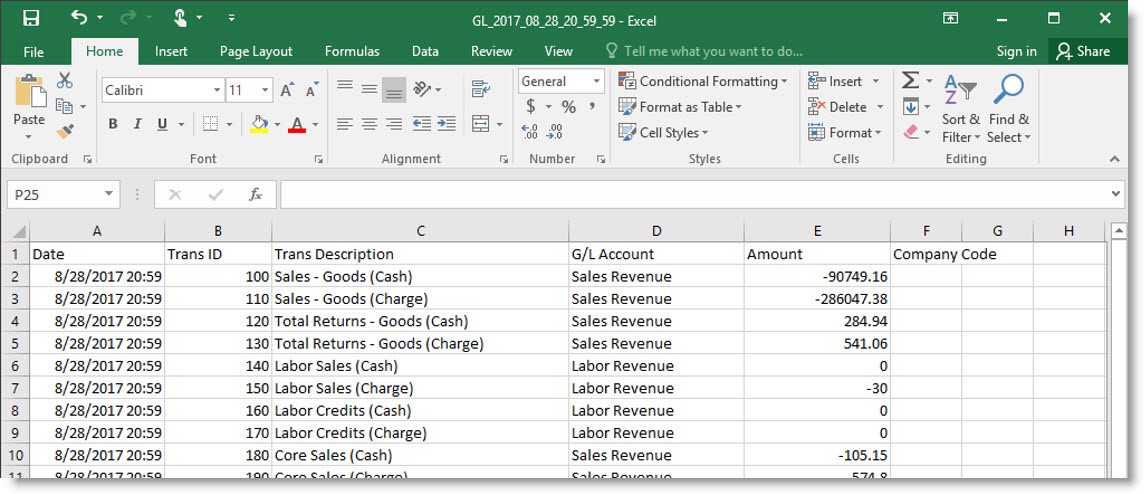
- Import the .iif file into QuickBooks using the existing QuickBooks import functionality. The following is an example of a .iif file:
- Open a .csv file in Microsoft Excel or applicable accounting package. The following is an example of a .csv file opened in Microsoft Excel:
- The export can be initiated as often as needed during the same day.
- The program does not attempt to balance the totals being exported.
- The program exports the file to the designated local PC drive only.
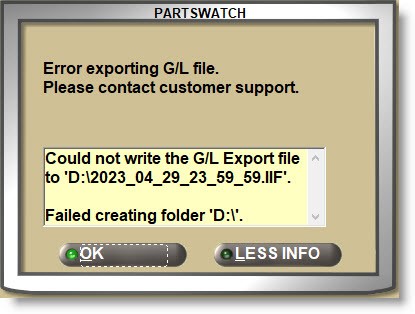
If the export fails for any reason, a prompt displays to contact Customer Support. The export fails primarily because the file path is not correct or is unavailable.
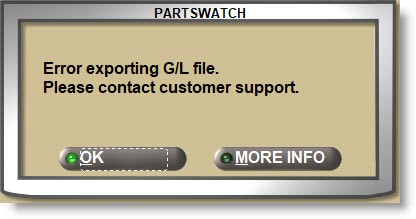
Click the 'MORE INFO' button to display additional information.
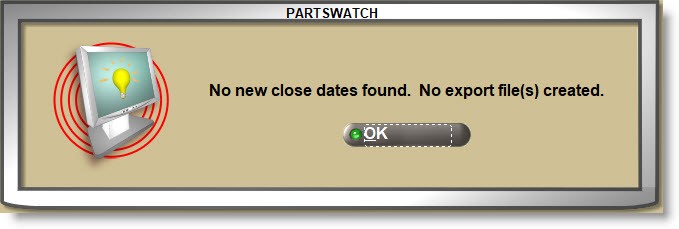
If 'ALL SINCE LAST EXPORT' is selected for the 'EXPORT DATE' but there are no new close files since the 'LAST EXPORT DATE', the system prompts that no export files were created.
Opens the 'Save and Load Profiles' window to load, save, or delete a profile for this screen.
The 'Report' drop-down is set to 'N/A' and is read-only.
When a profile is loaded, the name of the profile is displayed at the top of the screen.