Recurring Charges
Recurring Charges Overview

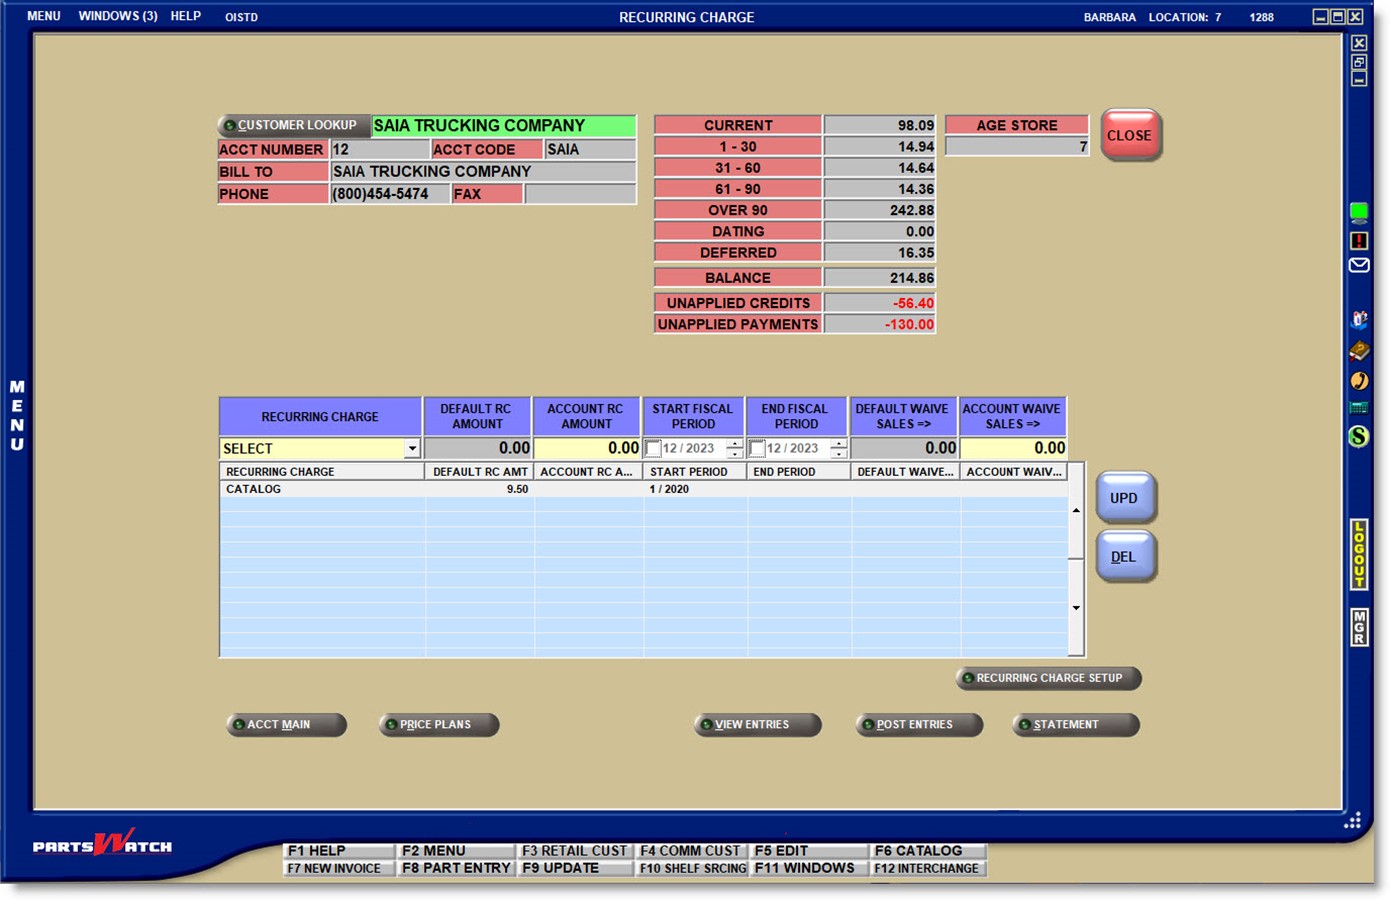
The account RECURRING CHARGE screen is used to enable Recurring Charges as well as to display, edit, and delete existing Recurring Charge setups for the accounts.
Menu Path: Customers, Entry Info, Post Entries, Post Entries screen, RECURRING CHARGE button
The 'RECURRING CHARGE ADD/EDIT/DELETE' User Security permission controls access to the RECURRING CHARGE SETUP screen from the AR CONTROLS SETUP and the account RECURRING CHARGE screens.
With a customer in focus on the POST ENTRIES screen, click the 'RECURRING CHARGE' button to open the RECURRING CHARGE screen.
The customer's account information and aging balances are displayed at the top of the POST ENTRIES screen for information only.
To enable a new Recurring Charge for the customer, select/enter the setups in the data entry rows and press the 'Enter' key at the last field or click the 'UPD' button. The setup moves into the grid and the cursor repositions in the 'RECURRING CHARGE' field to enable the next setup.
Once the screen is opened with a customer in focus, use the 'CUSTOMER LOOKUP' button to assign Recurring Charges to as many accounts as necessary before closing the screen or returning to the POST ENTRIES screen.
To edit an existing value, double-click the row with the mouse to move the setup into the data entry fields, edit any values as needed, and press the 'Enter' key at the last field or click the 'UPD' button.
To delete an existing value, highlight the row in the grid and press the 'DEL' button or right-click a highlighted row with the mouse and click the 'DEL' button or right-click a row and select the delete option from the right-click menu.

Data Entry Fields
Click the drop-down field and select a Recurring Charge previously set up on the RECURRING CHARGE SETUP screen. New Recurring Charges cannot be entered in this field.
DEFAULT RC AMOUNT
Non-editable and used for information only. Displays the 'AMOUNT' set up in the RECURRING CHARGE SETUP screen for the selected Recurring Charge.
If the default 'AMOUNT' is changed in the setup from the RECURRING CHARGE SETUP screen, the value will also automatically change for any accounts that have the default value in the 'ACCOUNT RC AMOUNT' field without user intervention.
ACCOUNT RC AMOUNT
Optionally enter a value from 0.00 to 999999.99 as the amount to apply to the account instead of the 'DEFAULT RC AMOUNT'. This amount will be used when the Recurring Charge is applied. If the account value is anything other than the default value, changes to the default value will not affect the 'ACCOUNT RC AMOUNT'.
START FISCAL PERIOD
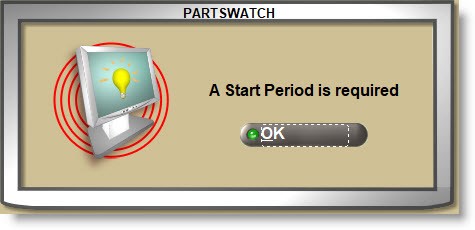
The end-of-month period date the Recurring Charge will be applied to the account for the first time. By default, the field is unchecked and set to the current month/year. Check the field to accept that date or click the month and/or year to edit the date. If the field is not checked, the system will prompt that a start period is required.
The end-of-month period date the Recurring Charge will be applied to the account for the final time. By default, the field is unchecked and set to the current month, which indicates no end date. Check the field and click the month and/or year to enter an end date and uncheck the field when done.
DEFAULT WAIVE SALES =>
Non-editable and used for information only. Displays the 'WAIVE SALES =>' value set up on the RECURRING CHARGE SETUP screen.
ACCOUNT WAIVE SALES =>
Optionally enter a value from 0.00 to 99999.99 as the amount to apply to the account instead of the 'DEFAULT WAIVE SALES =>' value.
If a value is entered in this field and the customer's net sales are more than that value, the Recurring Charge will not be applied for that month. If the customer's net sales for that month are less than the value entered here, the Recurring Charge will be applied. If the field is blank, then the Recurring Charge will be applied each month for the entered date range regardless of how much the customer bought.
If User Security permissions allow, click the button to open the RECURRING CHARGE SETUP screen normally opened from the AR CONTROL SETUP screen to add, edit, and/or delete setups.
Recurring Charges - Creating / Tracking
End-of-Month
If set up, Recurring Charges are applied to the accounts during the end-of-month close only regardless of whether the account's 'AGE CODE' is set to 'WEEKLY' or 'MONTHLY'.
- To the 'CURRENT' bucket before the statements are printed and the accounts are aged.
- Even if the 'STOP OVER CREDIT LIMIT' and/or 'LOCKOUT' flag is checked and whether or not the customer is past due ('NO INV PAST' # days/flag).
The program checks the value of the 'ACCOUNT WAIVE SALES =>' field before applying a recurring charge each month and if the net sales are equal to or greater than the value, the charges are not applied. If the net sales are less than the value, the charges are applied that month.
Recurring Charges will be applied at each end-of-month close, starting with the first one following the date entered in the 'START FISCAL PERIOD' field until the 'END FISCAL PERIOD' if a period is specified in setup.
Note: A fiscal period is defined as a period within a fiscal year (between 1 and 12, inclusively). The end-of-month process compares the selected fiscal periods to the fiscal period being closed. This ensures that that a recurring charge that is set up with a start date for March gets applied during the March end-of-month close even if the February close process does not start until after midnight on March 1st.
The next incremented Recurring Charge number is applied for each Recurring Charge and is tracked with the transaction for display, reporting, and customer statement output.
Unpaid recurring charges will age following all other debit aging.
If not paid before the next end-of-month close, Recurring Charges will qualify for a late payment finance charge.
Customer Statements
Recurring Charges print on the customer statements during the end-of-month close and are included in the 'AMOUNT DUE' and the 'CURRENT' buckets on the statement. For example:
![]()
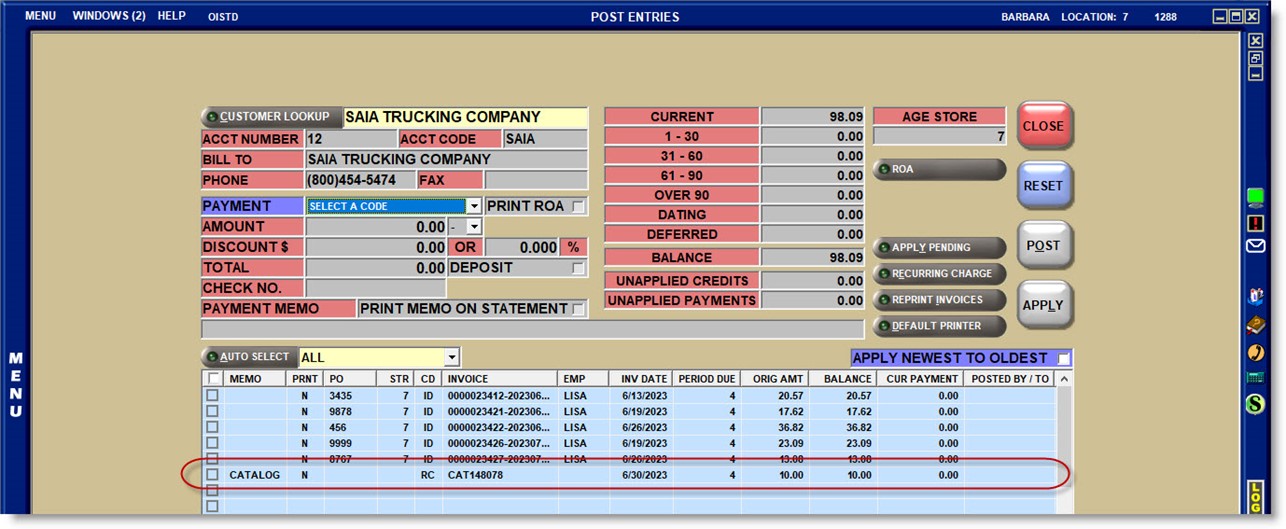
Post Entries Screen
The 'RC' Recurring Charge posting code identifies Recurring Charges on the POST ENTRIES and VIEW ENTRIES screens, as well as on the customer statements and reports.
Recurring Charges are always applied by the program and are not available from the 'PAYMENT' field on the POST ENTRIES screen for manual entry.
The 'MEMO' field displays the Recurring Charge name. If the full value does not display, widen the column using existing grid functionality.
The 'INVOICE' field displays the Recurring Charge prefix and 'RC #'.
The 'ORIG AMT', 'BALANCE', and 'CUR PAYMENT' fields are used following the same functionality used for all debit entries.
The 'PO', 'POSTED BY / TO DEFERRED', and 'NET' columns are blank for Recurring Charges.
Recurring charges can be reported from both the ACCOUNT TRANSACTIONS REPORT and the AGING REPORT screens.