Mode 2 Setup
Mode 2 FAQ Sheet - Frequently Asked Questions - 3 pages
- 1 Check the LAN
- 2 Check Each PC
- 3 Primary PC Setup
- 4 Change the Windows Share File
- 5 Disable Primary PC Sleep Setting
- 6 Secondary Terminal Setup
- 7 Mode 2 Data Center Setup
- 8 Initiate Download
- 9 Check Setup
- 10 Post Setup Maintenance
Advanced User Guide: Mode 2 - 17 pages
About Mode 2
Mode 2 is a process that enables the store to continue limited Point-of-Sale operations when the data center resources are not available causing the terminals to be ‘offline’.
Since Invoicing is the only selection available from the menu in Mode 2, the counter is able to continue to create, validate and finalize sales orders even when connectivity to the data center is lost. When the connection is restored, the terminals are then considered back ‘online’.
Typically, one PC in the store is designated as a Primary and all other PCs in the store are designated as Secondary terminals. The Primary’s role is to pull the latest data from the data center each night at a designated time and store it in a local file to share with all other POS terminals in the Primary/Secondary work group.
Should a PC or store lose connection to the data center, each POS terminal will be prompted to enter Mode 2 and invoicing sale and return transactions can continue to be created. No other work can be done.
While in Mode 2, PartsWatch continually checks for re-connection and when available, prompts each terminal to go back online.
When reconnected, invoices are uploaded to the data center server, assigned reference numbers and, if finalized in Mode 2, invoice numbers.
PartsWatch ensure the Mode 2 transactions are uploaded in a timely basis and are reflected in the appropriate daily or monthly reports.
Invoices and cash slips printed in Mode 2 are distinguished from those printed when the system is back online, by printing ‘M2’ / ‘MODE 2’ on invoices and the ‘MODE 2’ on cash slips.
Mode 2 Processes Available
Invoicing is the only menu option and limited invoicing is available in order to allow sales and returns to continue at the counter when offline and operating in Mode 2.

Mode 2 User Securities
The following USER SECURITY procs are available to:
-
'LAST DOWNLOAD' – Allow/deny access to the 'MODE 2 MONITOR' button on the MODE 2 DATA CENTER SETUP screen used to open the MODE 2 MONITOR screen.
-
'DOWNLOAD SETUP' – Allow/deny access to the 'MODE 2 SETUP' button on the MODE 2 MONITOR screen used to open the MODE 2 SETUP screen.
-
'TEST MODE 2' – Allow/deny access to the 'HELP' menu item 'TEST MODE 2' that allows access to the Mode 2 test functionality.
-
'DENY MODE 2 MONITOR STORES' – Allow/deny access to the ‘Select Locations’ section of the MODE 2 MONITOR screen used to select different locations to monitor.
Mode 2 Setup Instructions
Mode 2 is a chargeable option and must be enabled by PartsWatch Support.
Once subscribed to, Mode 2 must first be enabled by PartsWatch Support, and then, in order to set up Mode 2 per store, follow these steps in this order:
Step 1: Check the LAN
- In order to update the Mode 2 files, all PCs in the Primary / Secondary group must be on the same local area network (LAN) To make sure: from the 'HELP' icon, select ‘About PartsWatch’ and make sure the IP address for all PCs in the group start with the same 3 numbers. For example, if a PC’s IP address is 32.02.31.313, then the IP address for all PC’s in the work group must start with 32.0.
- Any outside the LAN, such as a laptop used as a Point-of-Sale workstation, must be set up as a Primary since it is not networked with other computers.
Step 2: Check each PC
- All PCs in the Primary / Secondary group should be running on the same version of Windows. To make sure, open the Windows File Explorer and click ‘This PC’ from the list and then click ‘Properties’. On the About window, look for the ‘Windows specifications’ section and the ‘Edition’. If the PCs are not all running on the same version, update each if possible.
- And while we’re here, look for the ‘Device name’ and compare it to the 'TERMINAL NAME' on PW. They must be identical and cannot have numbers or special characters. If necessary, click the ‘Rename this PC’ button and rename the PC. Then, when you first log back into PartsWatch, the system will not find a valid Terminal Record. So, click ‘Replace’ and a list of terminals will open. Select your terminal and click 'OK'.
- All PCs in the Primary / Secondary group should be running on the same version of PartsWatch. To make sure, at login, look for the 'RELEASE' number; or from the 'HELP' menu click ‘About PartsWatch’ and look for the Release Number. Update any on a different version.
- Check for a Windows Firewall or one set up by the anti-virus software because it may prevent the terminals from getting to the Mode 2 files for data sharing.
To see if a firewall is enabled, in the ‘Type here to search’ field (In the lower left of the screen, to the right of the Windows ‘start’ icon), type "firewall". If there is one enabled and Mode 2 is not working when setup is done, the firewall might be the reason.
Step 3: PRIMARY PC Setup - Menu Path: PC Setup, Terminal Setup, TERMINAL SETUP screen
- Designate one terminal one the same LAN as the Primary PC. All additional PCs will then be Secondary.
In the EDIT mode, check the 'PRIMARY' field and depending on the files already created pn the PC, a value may display 'MODE2WORKMOD'. - Whether they are or not, make sure the Mode 2 fields are populated in capital letters:
'WORKING DIRECTORY' - 'MODE2WORK'
'POST DIRECTORY' - 'MODE2POST'
'SHARE DIRECTORY' - 'MODE2SHARE'
Note: Do not use the small button to the right of the fields, if displayed, to find the file path. Enter the field values exactly as shown here. - Click the 'RECHECK' button and the setup will be tested.
- Click 'OK' and the blue section will report whether the files already exist correctly, or not. One or more prompts may open depending on whether or not the files already exist on the terminal being set up.
- If the 'WORKING DIRECTORY' file does not exist, click the 'UPD' button and the system will prompt to create it.
Answer ‘YES’ and if the 'POST DIRECTORY' is missing, you’ll be prompted to add that file also.
Answer ‘YES’ and if the 'SHARE DIRECTORY' is missing, the system will prompt to enter that file also.
Click ‘OK’ and the prompt closes.
Click the 'RECHECK' button to provide more information about the windows share file:
Step 4: Change the Windows Share File
- Open Windows File Explorer and follow the designated path: Local Disk (C:)\ProgramData\PartsWatch
- Highlight the MODE2POST file, right click and select ‘Properties’, Click the ‘Sharing’ tab, Click the ‘Advanced Sharing’ button.
- In the 'Advanced Sharing' window, check the ‘Share this folder’ checkbox, Change the ‘Share name’ to 'MODE2SHARE' , click 'Apply', click 'OK'.
Note: Previous versions of Windows may present the Share window other than represented here. - Once the Windows file share has been created, go back and click the 'RECHECK' button and the system should indicate that the setup is correct. Click the 'UPD' button to save the changes.
Step 5: Disable Primary PC Sleep Setting
- Open Windows File Explorer, right click on ‘This PC’, select ‘Properties’ and select, ‘Power & Sleep’ from the About screen menu.
- Set both ‘On battery power, PC goes to sleep after’ and ‘When plugged in, PC goes to sleep after’ to ‘Never’ under the ‘Sleep’ setting.
Step 6: Secondary Terminal Setup - Menu Path: PC Setup, Terminal Setup, TERMINAL SETUP screen
- Once the 'PRIMARY' has been set up, then set up each 'SECONDARY' terminal. In the EDIT mode:
Enter ‘MODE2WORK’ in the 'WORKING DIRECTORY' field. The 'POST DIRECTORY' and 'SHARE DIRECTORY' will be grayed out and unavailable.
Click the 'RECHECK' button and click 'UPD' if successful.
Terminal Setup Screen
Per PC, the TERMINAL SETUP screen is used to configure each Point-of-Sale workstation for Mode 2 processing.
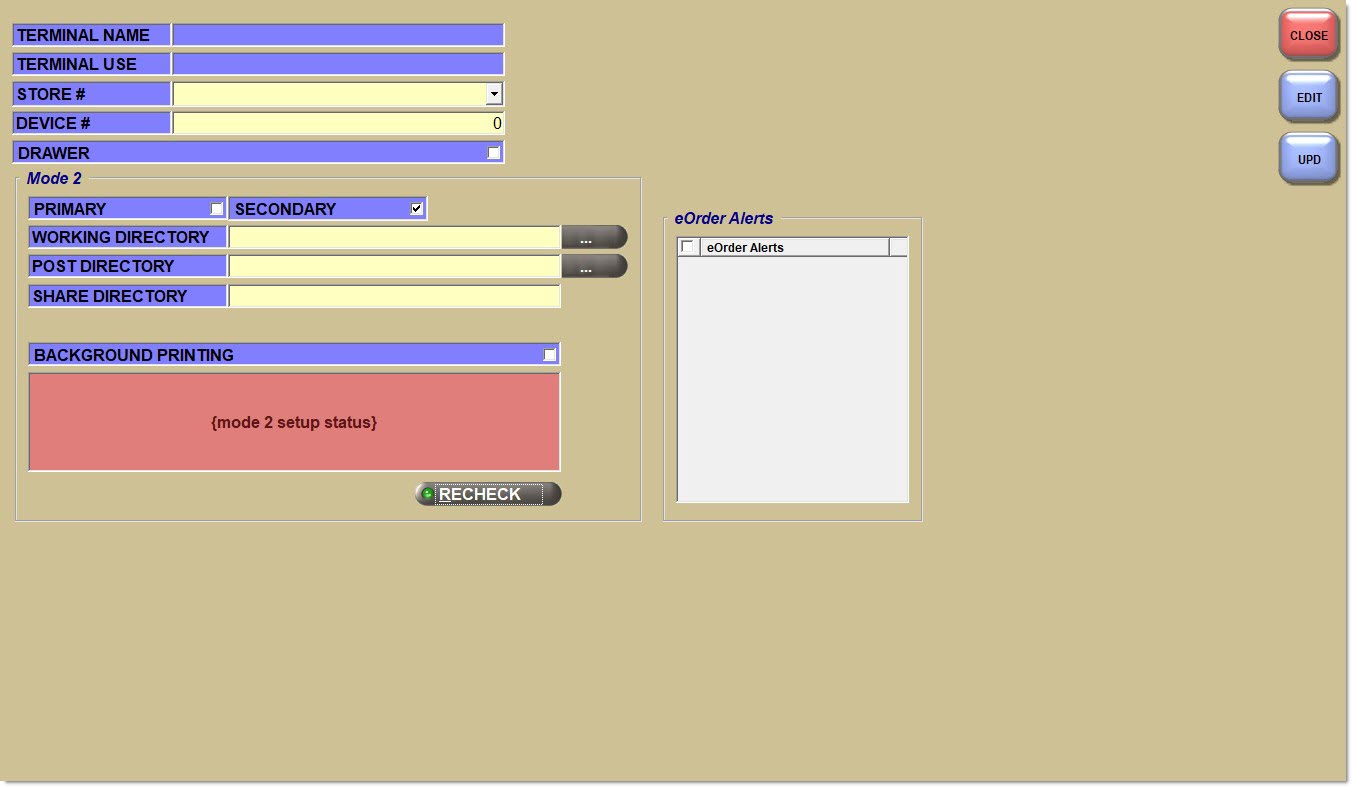
Menu Path: PC Setup, Terminal Setup, TERMINAL SETUP screen
- 'PRIMARY' – When checked the PC is designated as a "Primary".
- 'SECONDARY' – (default) When checked the PC is designated as a "Secondary".
- 'WORKING DIRECTORY' – Identifies the Mode 2 database file on the local PC for both Primary and Secondary terminals.
- 'POST DIRECTORY' – Identifies the shared file name on the Primary.
- 'SHARE DIRECTORY' – Identifies the Windows share path to the Primary.
- 'RECHECK' – The button is clicked to provide information needed for additional or successful setup. When clicked, the system will test Mode 2 setup and will return any comments on the status in the lower blue (success) or red (attention needed) information section.
On the Primary PC, the 'WORKING DIRECTORY' receives the nightly download from the database. This download is then copied to the 'POST DIRECTORY' and made available to the Secondary PCs.
On the Primary PC, files move to a 'SHARE DIRECTORY' when a download successfully completes. Each Secondary PC copies the data from this 'SHARE DIRECTORY' on the Primary PC and stores the retrieved data on its local working directory.
Step 7: Mode 2 Data Center Setup - Menu Path: Controls, System, Mode 2, Mode 2 Setup, MODE 2 DATA CENTER SETUP screen
- The MODE 2 DATA CENTER SETUP screen settings control when and how often the PCs will attempt to download the nightly extracts.
- A beginning and ending time, which is used by both Primary and Secondary PCs, must be defined, making sure that it does not interfere with business hours or any other processes within the Data Center (such as backups).
- Either enter and edit the time for each store or click the 'AUTO POPULATE' button for automatic setup.
- The number of attempts to detect the Data Center and the wait time between each retry prior to opening Mode 2 for offline invoicing must also be defined.
Mode 2 Data Center Setup
Menu Path: Controls, System, Mode 2, Mode 2 Setup, MODE 2 DATA CENTER SETUP screen
The MODE 2 DATA CENTER SETUP screen is used to configure the number of times to attempt to reconnect to the database before switching to Mode 2 and the waiting time between re-connection attempts. The screen is also used to set the download times for each store.
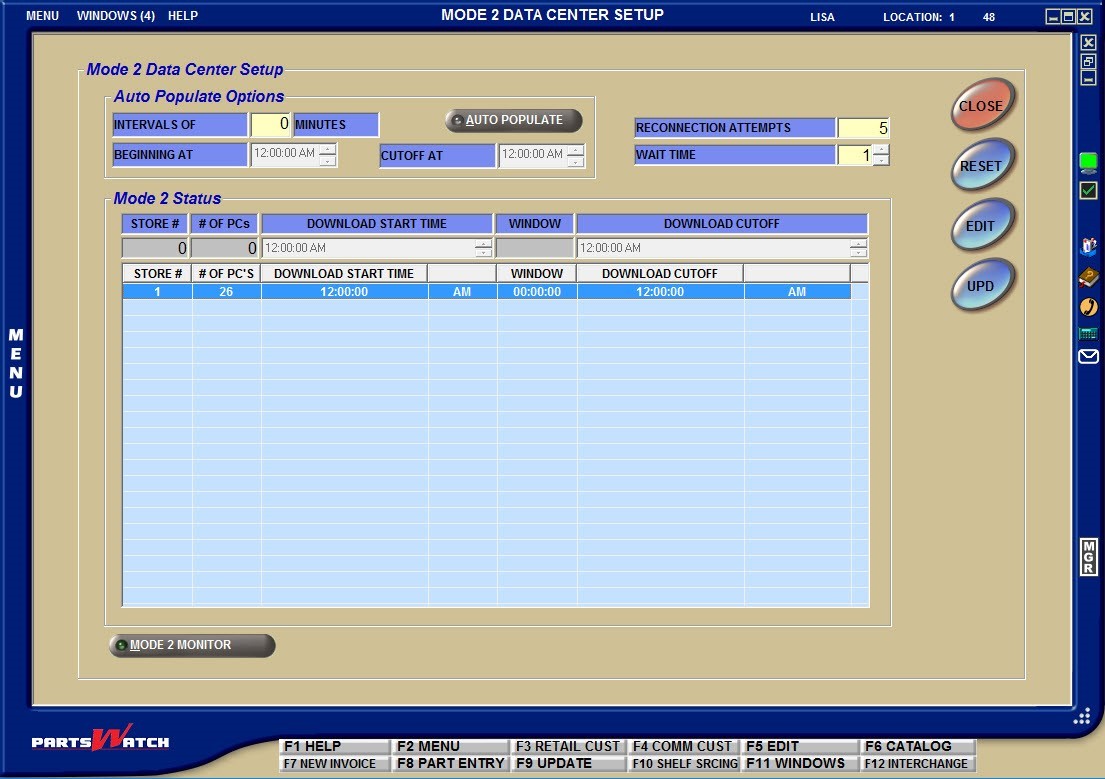
For multi-store, Mode 2 download time must be configured separately for each store. The Mode 2 process uses each of the setup fields in the Auto Populate Options section to determine:
INTERVALS OF / MINUTES
The number of minutes, up to '999', between the time each Primary terminal per store requests the Mode 2 file download from the data center. This prevents the data server from receiving numerous requests at the same time. For example, for single store setup, enter ‘5’ and for multi-store, enter ‘10’.
BEGINNING AT
The time that the Primary will start a request for Mode 2 files from the data center. Defaults to 12:00 a.m. Used as the 'DOWNLOAD START TIME' in the 'Mode 2 Status' grid.
CUTOFF AT
The time that the Primary will no longer download or attempt to download the Mode 2 files. Used as the 'DOWNLOAD CUTOFF' time in the 'Mode 2 Status' grid. Defaults to '12:00 A.M.'
RECONNECTION ATTEMPTS
The number of times, up to '99999', that the system will try to reconnect to the data center while offline.
WAIT TIME
The length of time, in seconds, up to '99', that the Primary will wait before trying to reconnect to the data center while offline.
The 'Mode 2 Status' grid is used to set up the download times for each store. To set up the Mode 2 Data Center , follow the steps below:
- From the Menu, select Controls, System, Mode 2, Mode 2 Setup and the MODE 2 DATA CENTER SETUP screen displays.
- Enter a value in each of the fields in the 'Auto Populate Options' section and in EDIT mode either:
Manually enter a value in each of the 'Auto Populate Options' fields as well as a 'DOWNLOAD START TIME' and 'DOWNLOAD CUTOFF' per store.
Click the 'AUTO POPULATE' button and the system will automatically set up all stores. - Click 'UPD' and the setups are saved.
The Mode 2 process calculates the 24-hour period, divided by the # OF PCs per STORE, to determine the length of time allowed for the download per store. The 'WINDOW' of time as well as the 'DOWNLOAD START TIME' and 'DOWNLOAD CUTOFF' time allowed for each, display in the 'Mode 2 Status' grid.
Within the 'DOWNLOAD START TIME' and 'DOWNLOAD CUTOFF TIME', Secondary terminals check the Primary for updated data every five minutes. Once the updated data is received, the Secondary terminals continue to check the Primary every hour up to the designated 'DOWNLOAD CUTOFF TIME'. The download attempt resumes when the designated 'DOWNLOAD START TIME' and 'DOWNLOAD CUTOFF TIME' window re-initiates.
Step 8: Initiate Download
After Mode 2 setup is finished, contact PartsWatch Support to enable the functionality and to initiate the first Primary PC download.
Once the initial download has been successfully accomplished, if the download fails for any reason, or if adding a new PC or swapping out an old one, here’s a way to restart it manually:
- Open Task Manager (Ctrl + Alt + Delete), highlight PW Business Mode2, and click the 'End Task' button to stop Mode 2.
- Open the Windows File Explorer and go to:
Local Disk (C:) > Program Files (x86) > PartsWatch Solutions > PartsWatch
Look for PW Business Mode2 and double-click it to restart Mode 2. - The system will look at the 'DOWNLOAD START TIME' and 'DOWNLOAD CUTOFF' set up on the MODE 2 DATA CENTER SETUP screen and if it is within the 'WINDOW':
The Primary PC will check the data center for a new download file and if one is found, will start the download.
Each Secondary PC will check the Primary PC for a new download file and if one is found, will start the download.
- If the 'DOWNLOAD START TIME' and 'DOWNLOAD CUTOFF' set up on the MODE 2 DATA CENTER SETUP screen is not within the 'WINDOW', both the Primary and the Secondary PCs will "sleep" until the next predetermined time.
Step 9: Check Setup
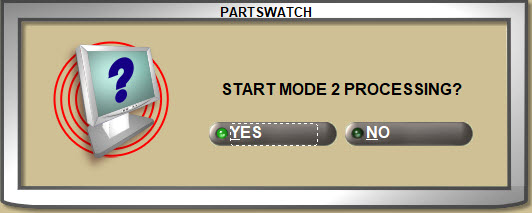
1. Test Mode 2
Menu Path: HELP, Test Mode 2
In order to find out if Mode 2 is working or to find out whether or not a process works in Mode 2, click the HELP icon in the upper left border and select ‘Test Mode 2’ from the menu.
PartsWatch will be disconnected from the database and the terminal will be put in Mode 2. The small screen icon on the right border will change from green  to red
  .
.
- If available, the system will prompt, ‘START MODE 2 PROCESSING?’ Answer ‘Yes’ and the 'M2' icon displays above the terminal icon to indicate Mode 2 is working. This is also a way to work off line if internet service is intermittent or to try a process to see if it is available in Mode 2.
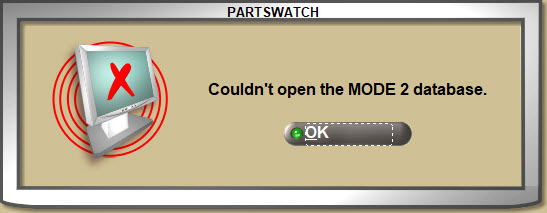
- If Mode 2 is not available, the system will prompt, "Couldn't open the MODE2 database." One or more additional pop-ups may display as PartsWatch attempts to access cached data.
- If Mode 2 is not enabled, the system will prompt, “Mode 2 is not valid for the currently connected application database. Mode2 will not be available from this terminal.”
When done, uncheck ‘Test Mode 2’ on the Help menu and Mode 2 will prompt to close and PartsWatch will re-connect to the data center. The 'M2' icon will no longer display and the terminal icon will return to green to indicate connection is re-established.
2. Check the Mode 2 Download
After testing Mode 2 check to make sure the Primary download was successful, and if the Secondary PCs retrieved the current data from the Primary, on PartsWatch, either open the:
MODE 2 MONITOR screen to view or report the Mode 2 Status.
Menu Path: Controls, System, Mode 2, Mode 2 Monitor, MODE 2 MONITOR screen
or the:
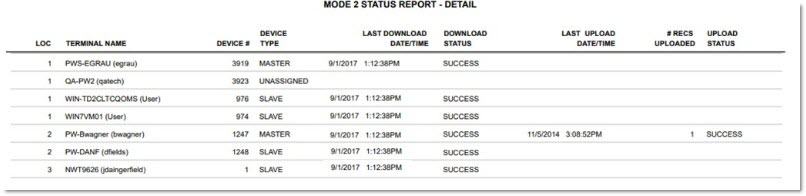
SYSTEM REPORTS screen and run the 'MODE 2 STATUS DETAIL' report. The 'LAST DOWNLOAD' field reports the 'DATE'/'TIME' of the last download and success/fail status.
Mode 2 Status Detail/Summary Report
Menu Path: Reports, System Reports, SYSTEM REPORTS screen
The Mode 2 Status Detail Report is used to view the download and upload status of each PC setup for Mode 2. The Mode 2 Status Summary Report can be used for a quick view of the Mode 2 status for each store.
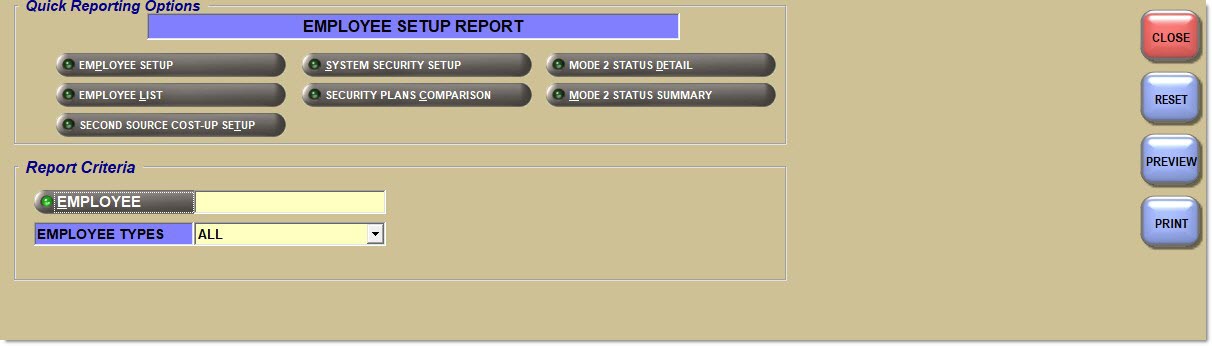
Click the 'MODE 2 STATUS DETAIL' 'Quick Reporting Options' button to output Mode 2 download dates, times and status of each terminal per store.
For multi-stores, enter a location number or click the 'LOCATION' button to open the 'BROWSE LOCATIONS' pop-up to section one or more locations to output in the report.
Select the terminals to output:
- 'ALL' terminals (primary and secondary)
- 'PRIMARY' only
- 'SECONDARY' only
Select the order the data will be sorted by:
- 'LOC, TERMINAL NAME' – Sorted by the Windows terminal name and for multi-stores, by Location.
- 'LOC, DEVICE TYPE' – Sorted by the device type (primary, secondary, unassigned) and for multi-stores, by location.
- Checked - Both successful and failed downloads are reported.
- Unchecked - Only failed downloads are reported.
Example Output of the Mode 2 Status Report - Detail:
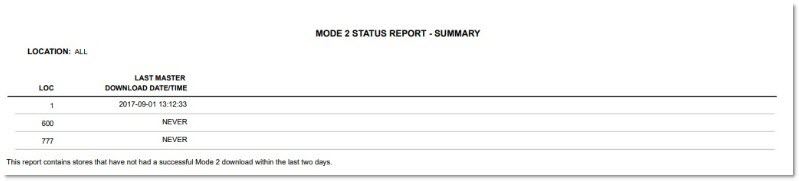
Click the 'MODE 2 STATUS SUMMARY' 'Quick Reporting Options' button to output the date, time and status of the last Mode 2 download.
For multi-stores, enter a location number or click the 'LOCATION' button to open the 'BROWSE LOCATIONS' pop-up to section one or more locations to output in the report.
Example Output of the Mode 2 Status Report - Summary:
Check the Mode 2 Download (Cont.)
If either the Primary or Secondary download was not successful, ensure that the PC was turned on with the Windows user logged in during the download window time set up in the MODE 2 SETUP screen.
- If it was, follow Step 8: Initiate Download to stop and restart the download.
- Try to "ping" the Primary from the Secondary. Open a command window, type "cmd" and at the command prompt type "ping" and the Primary PC’s IP address. If successful, the Secondary is accessing the Primary.
- Since there are a number of reasons why a download might fail, the last download log can be helpful to determine what went wrong with the nightly download opened using Windows File Explorer:
- Local Disk (C:) \ Users\username per pc \ AppData \ Local \ PartsWatch \ system \ log
- Double-click Mode2.log and the log file opens in Notepad. Scroll to the bottom and look for success or reason for failure. For example, success may show “Processed 10000 rows.” Failure may report attempted date and wait duration.
Most businesses will not experience this problem; however, should a Primary download successfully start, but then fail, it may be due to a very large file. Since the software used for the download has a limit of 2 GB, large tables like parts or customer pricing may exceed the size limit. Delete unnecessary parts or customer pricing records to reduce the size of the files. If the download still fails, contact customer support.
Step 10: Post Mode 2 Setup Maintenance
- Once Mode 2 setup is successful, do not turn off the Primary terminal at night and instead, designate a day and time each week to reboot it. If turned off, the Primary is not able to "pull" the files from the data center at the designated time and as a result, the data needed for invoicing will become stale.
- The Secondary PC downloads only take a few minutes, so they can be turned off at night as long as they are running at the designated time to "pull" the data from the Primary so data needed for invoicing stays current.
- After each reboot repeat Step 9 to Test Mode 2 for connection in order to be assured that its ready when needed and then check the 'LAST DOWNLOAD' on the MODE 2 MONITOR screen or run the Mode 2 Status Report from the SYSTEM REPORTS screen and make sure it’s current and the 'STATUS' is successful.
Should it be necessary to create invoices in Mode 2, after the system has uploaded them to the data center, for peace of mind, check the MODE 2 MONITOR screen or status report and make sure the 'LAST UPLOAD STATUS' is successful.
Validate Mode 2 Upload
After re-connection and upload to the database, Mode 2 transactions can be validated as follows:
- MODE 2 MONITOR screen: Check 'LAST UPLOAD STATUS' for success.
- LISA TRANSACTIONS screen: check for the invoices created while in Mode 2.
- Invoice Point of Sale screen: click 'INVOICE IMAGE' and select an invoice created while in Mode 2 and verify that the invoice has been given a "real" invoice number.
- PART LEDGER REPORT screen: check for the parts sold while in Mode 2.
- Account Entry screen: verify that the available credit changed by the price of the parts sold to the account while in Mode 2.
- Part Entry screen: enter the number of the part sold while in Mode 2 and check if the Part Quantity Available changed.
- INVOICE JOURNAL: check for invoices created while in Mode 2.
Offline Processing
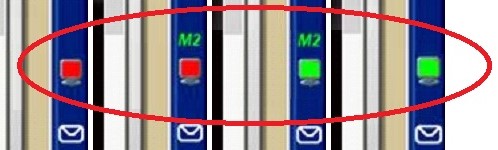
The terminal icon on the right screen border indicating online / offline conditions is also used for Mode 2 indicating:
- Solid red – Off-line but not in Mode 2
- Red and M2 – In Mode 2 and connected to the Mode 2 database
- Green and M2 – Back on line but invoices have not yet been loaded
- Sold green – Mode 2 invoices uploaded
To start Mode 2 Processing:
- When the database connection is lost, a ‘Start Mode 2 Processing?’ prompt displays. Answer ‘Yes’ and a prompt displays stating, "Mode 2 processing is ready, your active screens have been closed".
- Click ‘OK’ and all open screens are closed, including invoices with unreserved items. All unsaved work is lost. The terminal icon in the right screen border turns red to indicate the database connection has been lost and ‘M2’ displays in green indicating the terminal is in Mode 2.
- A message may display, depending on the work being done at the time the terminal goes into Mode 2 stating "The system is unable to complete the task".
- If the last action was to open a new Invoice Point of Sale screen, the screen displays. In all other cases, the SYSTEM NEWS screen opens.
- Invoicing, Invoicing Screen is the only Menu selection available in Mode 2.
- Sales and returns can be created, as usual, within the constraints of Mode 2 functionality. A pop-up displays when attempting to access a screen or process that is not available during Mode 2.
- The 'REF' button is available to view invoices (both finalized and open) created in Mode 2 while still in Mode 2. 'INVOICE IMAGE' button is not available in Mode 2.
- PartsWatch checks for connections to the database based on the Re-connection Attempts and Wait Time set up in the MODE 2 DATA CENTER SETUP screen.
- When connection is re-established but the program is still in Mode 2, a message displays stating, "Your database connection has been re-established. Would you like to upload Mode 2 data?"
- Answer ‘Yes’ and a progress indicator displays until the upload is finished. Work cannot continue until the upload is completed. When done, the date and time of the successful completion is logged for each PC and the system prompts, “You are back on line."
- Answer ‘No’ and the system prompts, “You are back on line." The upload is not initiated until Logout or PartsWatch is closed.
Note: A hidden application switch determines whether a prompt opens asking to upload the Mode 2 data now, or waits to upload at Logout or exit without prompting.