Kit Setup Tab
The 'Kit Setup' tab is used to view and edit all KIT or BOM information, (e.g. Pricing Rule and the list of components) as well as to package and unpackage BOMs.
The Kit Setup screen has several tabs:
- Kit Setup Screen - Kit List Tab
- Kit Setup Screen - Kit Setup Tab
- Kit Setup Screen - Kit Classes Tab
- Kit Setup Screen - Sales Class Margins Tab
Menu Path: Inventory, Kit Setup, KIT SETUP screen, 'Kit Setup' tab
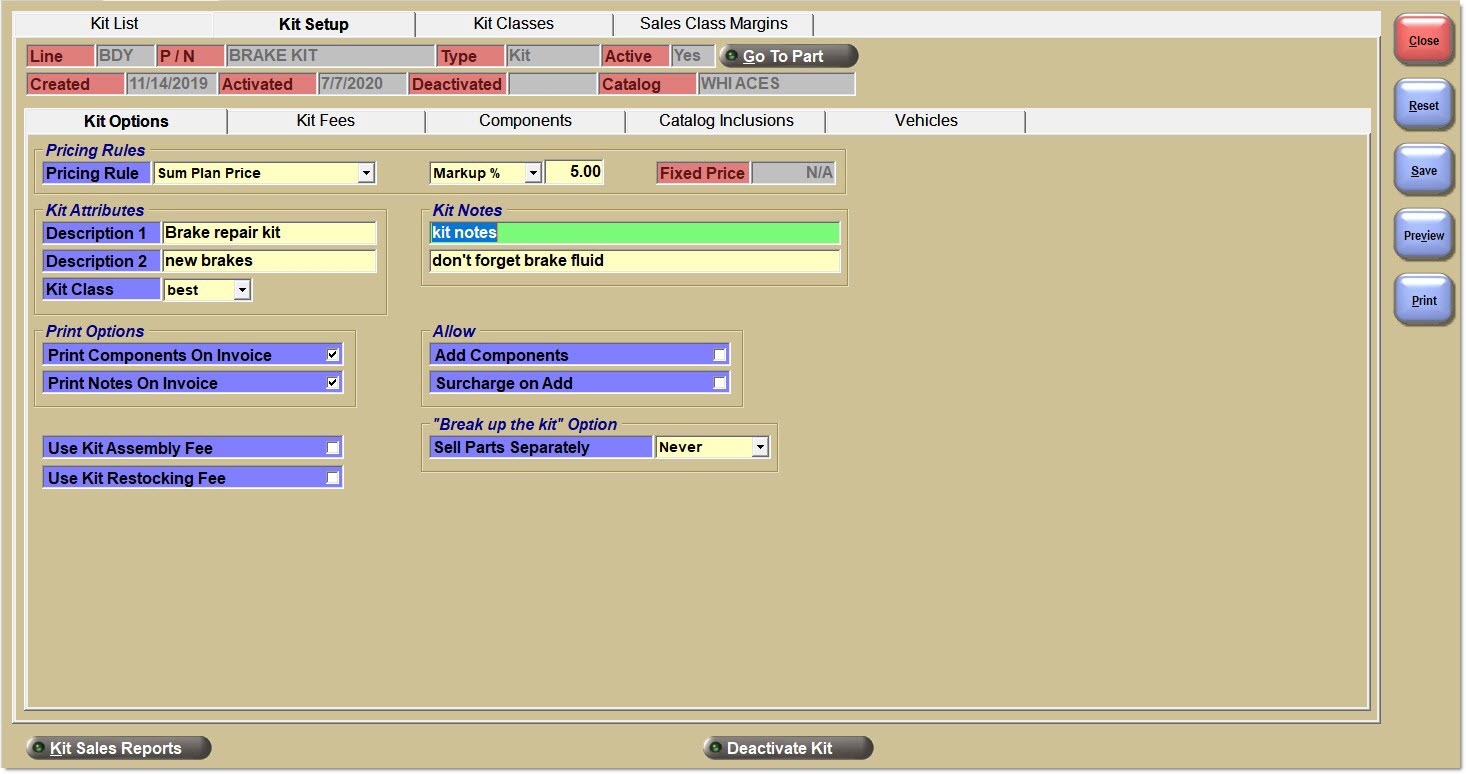
Kit Setup
Click to test to see if a kit passes all validation rules to be sold at Point-of-Sale.
Click to activate a kit and make it available for sale at Point-of-Sale.
Click to deactivate a kit and make it unavailable for sale at Point-of-Sale.
Non-Editable Fields
The following are non-editable fields that populate the information from the 'Add Kit' pop-up from the 'Kit List' tab. They appear on the top of every tab.
Line
Displays the kit's line code.
P/N
Displays the kit's part number.
Type
Displays the kit's type, 'BOM' or 'Kit'.
Active
Displays the kit's status, 'WIP', 'Test', 'Yes', or 'No'.
Created
Displays the date the kit was created.
Activated
Displays the date the kit was activated, if at all.
Deactivated
Displays the date the kit was deactivated, if at all.
Catalog
Displays the Catalog the kit is sold from.
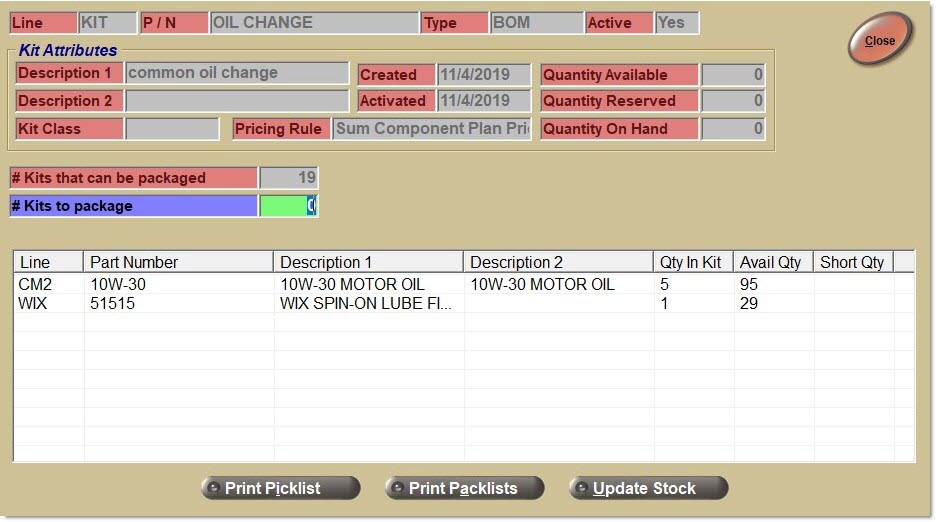
Procedure to Package a BOM
This function aids in assembling new BOMs. It allows you to specify how many BOMs are to be packaged. Any number of packaged BOMs can be included in another packaged BOM. It provides an optional picklist that will assist in pulling the component parts off the shelf. It provides an optional pack list for including in the assembled package. Stock for the BOM part will increase, and stock for the component parts will decrease upon clicking the 'Update Stock' button.
The 'Package Kit' button is disabled (on the 'Kit Setup' tab) until both the 'Test' and 'Activate Kit' buttons have been clicked. Note: This ensures that the packaging function is working with a stable list of parts and kit quantities because component parts for a BOM cannot be altered after the 'Activate' button is clicked.
The 'Unpackage Kit' button is disabled until the kit has been packaged and has a quantity available greater than zero.
Note: The "packaging" function only applies to parts within the current store. If there are multiple stores, each store must "package" their own BOM parts and components.
-
Click the 'Package Kit' button and the 'Package Kit' pop-up opens.
-
Only one BOM part number can be packaged at a time.
-
The following view-only information displays: 'Line', 'P/N', 'Type', 'Active', 'Description 1', 'Description 2', 'Kit Class', 'Created' (date), 'Activated' (date), 'Pricing Rule', 'Quantity Available', 'Quantity Reserved', and 'Quantity On Hand'. Note: As a warning, if any part has a negative 'Avail Qty', a 'Short Qty' value will also be displayed (in red) that matches the 'Avail Qty'.
-
A view-only text indicating the '# Kits that can be packaged' displays. This amount indicates to the user how many full BOMs can be "packaged" based on the current available quantities and 'Qty In Kit' quantities of all of the components.
-
Enter the '# Kits to package'. This amount specifies how many BOMs to package. This amount must be the same or less than the amount for the '# Kits that can be packaged'. If an amount is specified that is more BOMs than can be built and the 'Enter' key is pressed, the 'Short Qty' column (displayed in red) is populated indicating how much more of each component is needed to build the desired number of kits.
-
The application displays the list of component parts, and their 'Line', 'P/N', 'Description 1', 'Description 2', 'Qty In Kit', and 'Avail Qty'. Note: If the 'Avail Qty' is zero, the part may be a NIF part in that store.
-
If the pop-up is closed, it can be re-opened later. However, it is necessary to re-enter a value in '# Kits to package', and component 'Avail Qty' values may have changed.
-
The application displays a 'Print Picklist' button. The button is only enabled if the '# Kits to package' has a non-zero value. Click this button and print a picklist even if there is a 'Short Qty' stock on any component. Note: This is so that the picker can pick parts where the system was short but the item is actually on the shelf or an inbound pallet.
-
Printing a Picklist is optional. It is possible to click the 'Update Stock' button without printing a picklist.
-
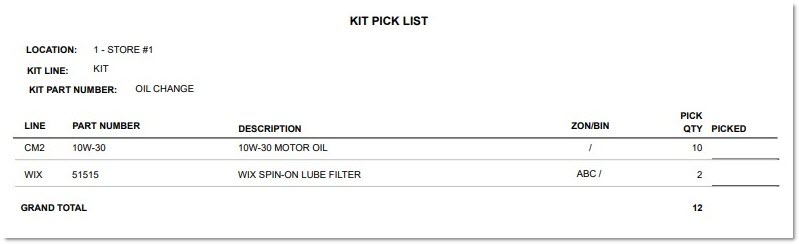
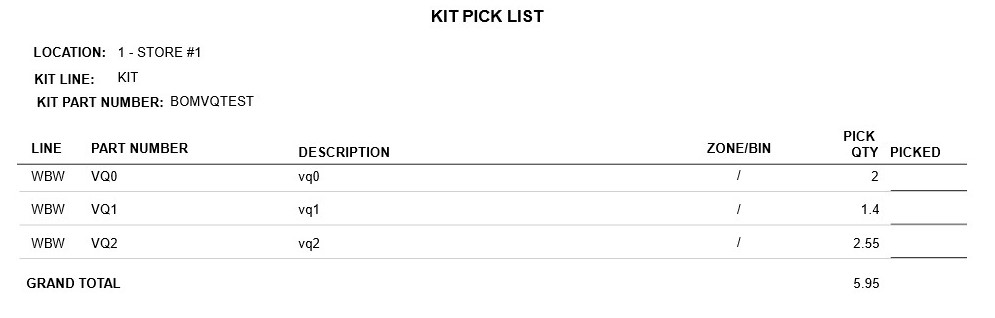
The report, 'KIT PICK LIST', contains the following information:
-
In the header section of the report: 'LOCATION', 'KIT LINE', and 'KIT PART NUMBER'.
-
In the detail section of the report: (component) 'LINE', 'PART NUMBER', 'DESCRIPTION', 'ZONE/BIN', 'PICK QTY', and 'PICKED'.
-
A grand total of the number of units "to be picked" at the bottom of the report.
-
Note: The 'PICK QTY' on the report is the total number of units required for each component to assemble the total number of BOM parts being "packaged". In the example above, two BOM parts are being "packaged" as there are five units required for Component 1 and one unit required for Component 2 to assemble one BOM; so the report displays ten and two respectively.
-
-
After the picklist prints (to the default assigned printer), the application returns control to the 'Package Kit' pop-up.
-
After printing the picklist, while pulling stock it was realized there was not enough stock to build the specified number of BOMs, it is still possible to reduce the '# Kits to package' quantity.
-
If any of the components in the kit contain fractional selling units, the application displays those units with their respective decimal precision, and displays the appropriate grand total.
-
A 'Print Pack' lists button displays. The button is only enabled if the '# Kits to package' has a non-zero value. Click this button to print a separate pack list for each package (determined by the '# Kits to package' amount). Note: A pack list document placed inside the "package" provides a components list (and the number of pieces in the package) when selling or returning a BOM; especially useful when the components list is not printed on the invoice.
-
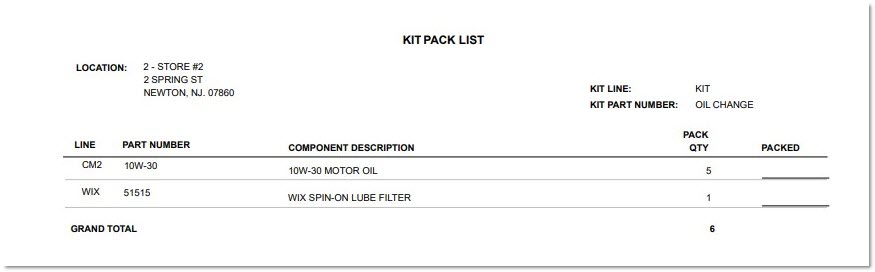
The report, 'KIT PACK LIST', contains the following information:
-
In the header section of the report: 'LOCATION', (store address including address line 1, address line 2, city, state/province and zip/postal code), 'KIT LINE', and 'KIT PART NUMBER'.
-
In the detail section of the report: (component) 'LINE', 'PART NUMBER', 'COMPONENT DESCRIPTION', 'PACK QTY', and 'PACKED'.
-
A grand total of the number of units "to be packed" at the bottom of the report
-
If any of the components in the kit contain fractional selling units, the application displays those units with their respective decimal precision, and displays the appropriate grand total.
-
Note: The 'PACK QTY' on the report is the number of units required for each component to assemble one BOM part being "packaged". In the example above, for one BOM part that is being "packaged," there are five units required for Component 1 and one unit required for Component 2.
-
-
After the pack list prints (to the default assigned printer), the application returns control to the 'Package Kit' pop-up.
-
An 'Update Stock' button is displayed. The button is only enabled if the '# Kits to package' has a non-zero value and there is no 'Short Qty' amount for any component. After pulling stock, as long as there are no parts with a 'Short Qty', click the 'Update Stock' button when ready to assemble the BOM.
-
If the 'Update Stock' button is clicked, the application performs the following:
-
Decrement the available quantity amount for all component parts.
-
Increment the available quantity amount for the BOM part.
-
Calculate the current cost for the BOM part. Sum-total the costs for all component parts using the 'COST AT POS 'field to determine if current or average components costs are used.
-
Note: The current cost of the BOM part is editable by the user on the Part Entry screen. Regardless, the current cost of the BOM part will be re-calculated and updated each time the kit is packaged and the 'Update Stock' button is clicked.
-
Note: Component costs can change over time so the BOM part's current cost can be different each time the kit is "packaged".
-
Note: The BOM part's cost is used on the Inventory Cost Report and all inventory extracts. However, at Point-of-Sale, the sum-total of all component costs is used to calculate the BOM part's cost.
-
-
Calculate the core cost of the BOM part. Sum-total the core costs for all component parts. Re-calculate and update the core cost each time the kit is packaged and the 'Update Stock' button is clicked.
-
Note: The BOM part's core cost is used on the Inventory Cost Report and all inventory extracts. However, at Point-of-Sale, the sum-total of all component core costs is used to calculate the BOM part's cost.
-
-
Calculate the average cost for the BOM part. Use the following formula:
-
Cost of components being packaged = sum-total the costs for all component parts using the 'COST AT POS' field to determine if current or average components costs are used.
-
BOM part average cost = (Current BOM part QOH * Current BOM part average cost) + (# Kits to package * Cost of components being packaged) / (Current BOM part QOH + # Kits to package).
-
-
Calculate the average core cost for the BOM part. Use the following formula:
-
Core Cost of components being packaged = sum-total the core costs for all component parts using the 'CORE COST AT POS' field to determine if current or average components core costs are used.
-
BOM core average cost = (Current BOM part QOH * Current BOM part average core cost) + (# Kits to package * Core cost of components being packaged) / (Current BOM part QOH + # Kits to package).
-
-
Update the Part Ledger for all component parts and the BOM part.

-
Decrease the '# Kits that can be packaged' by the # Kits packaged. In the example below, the '# Kits that can be packaged' is decreased from 19 to 17 because 2 BOMs were packaged.
-
Write a record to the Audit Report.
-
Set the '# Kits to package' back to zero.
-
Procedure to Unpackage a BOM
This function aids in breaking apart BOMs and re-shelving the components (which can be other BOM parts). It allows the specification of how many kits are to be unpackaged and provides a picklist that will assist in both pulling the parts out of the BOM and returning the parts to the shelves. Stock for the BOM part will decrease, and stock for the component parts will increase upon the 'Update Stock' button being clicked.
The 'Unpackage Kit' button is disabled until the kit has been packaged and has a quantity available greater than zero.
Note: The "un-packaging" function only applies to parts within the current store. If there are multiple stores, each store must "un-package" its own BOM parts and components.
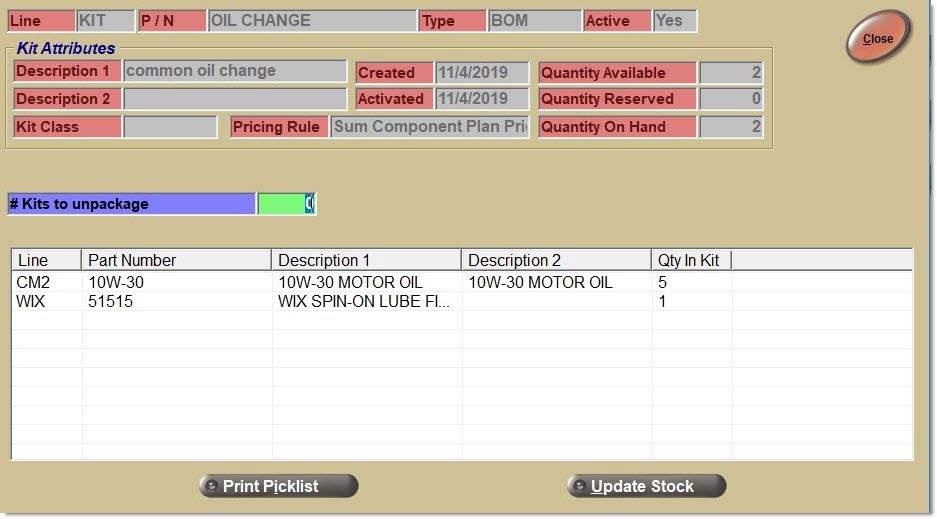
When the 'Unpackage Kit' button is clicked, the 'Unpackage Kit' pop-up opens.
-
Only one BOM part number can be "un-packaged" at a time.
-
The following view-only information is displayed: 'Line', 'P/N', 'Type', 'Active', 'Description 1', 'Description 2', 'Kit Class', 'Created' (date), 'Activated' (date), 'Pricing Rule', 'Quantity Available', 'Quantity Reserved', and 'Quantity On Hand'.
-
Enter a value for '# Kits to unpackage'. This amount allows the specification of how many kits to unpackage. If an amount that is more than the Avail quantity is specified and the Update Stock button is clicked, the application displays a prompt with a message "There is insufficient stock quantity of the kit part".
-
The application displays the list of component parts and their 'Line', 'P/N', 'Description 1', 'Description 2', and 'Qty In Kit'.
-
The application displays a 'Close' button. If the pop-up is closed, it can be re-opened later. However, it will be necessary to re-enter a value in '# Kits to unpackage', and the Avail quantity value may have changed.
-
The application displays a 'Print Picklist' button. The button is only enabled if the '# Kits to unpackage' has a non-zero value.
-
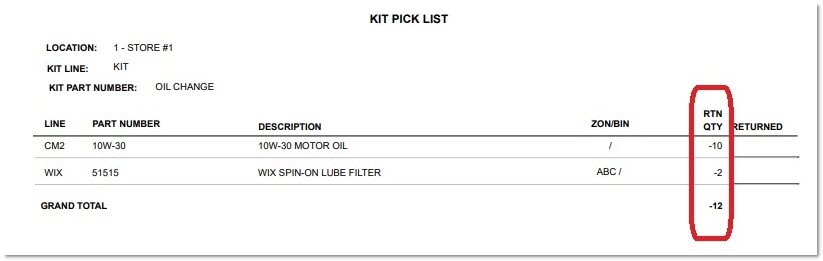
The report, 'KIT PICK LIST', contains the following information:
-
In the header section of the report: 'LOCATION', 'KIT LINE', and 'KIT PART NUMBER'.
-
In the detail section of the report: (component) 'LINE', 'PART NUMBER', 'DESCRIPTION', 'ZONE/BIN', 'RTN QTY' (with negative values), and 'RETURNED'.
-
A grand total of the number of units "to be returned to the shelves" at the bottom of the report.
-
-
After the picklist prints (to the default assigned printer), the application returns control to the 'Unpackage Kit' pop-up.
-
Note: The 'Print Picklist' button prints a similar pick used for building BOMs except the document type will indicate it is for "un-packaging".
-
Printing a picklist is optional. Optionally click the 'Update Stock' button without printing a picklist.
-
The application displays an 'Update Stock' button. Enable the button only if the '# Kits to unpackage' and the 'Quantity Available' for the BOM part both have non-zero values.
-
Click the 'Update Stock' button and the application performs the following:
-
Increment the available quantity amount for all component parts.
-
Decrement the available quantity amount for the BOM part.
-
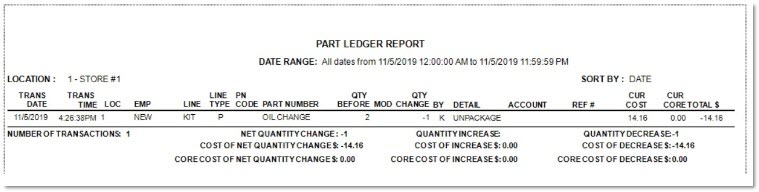
Update the Part Ledger for all component parts and the BOM part.
-
Write a record to the Audit Report.
-
On the pop-up, set the '# Kits to package' back to zero.
-
-
If one or more of the packaged BOMs gets sold at Point-of-Sale, or otherwise has its quantity reduced after the pop-up is loaded, when the 'Update Stock' button is clicked, the application displays a prompt indicating "There is insufficient stock quantity of the kit part". Reduce the '# Kits to unpackage' and click the 'Update Stock' button again.
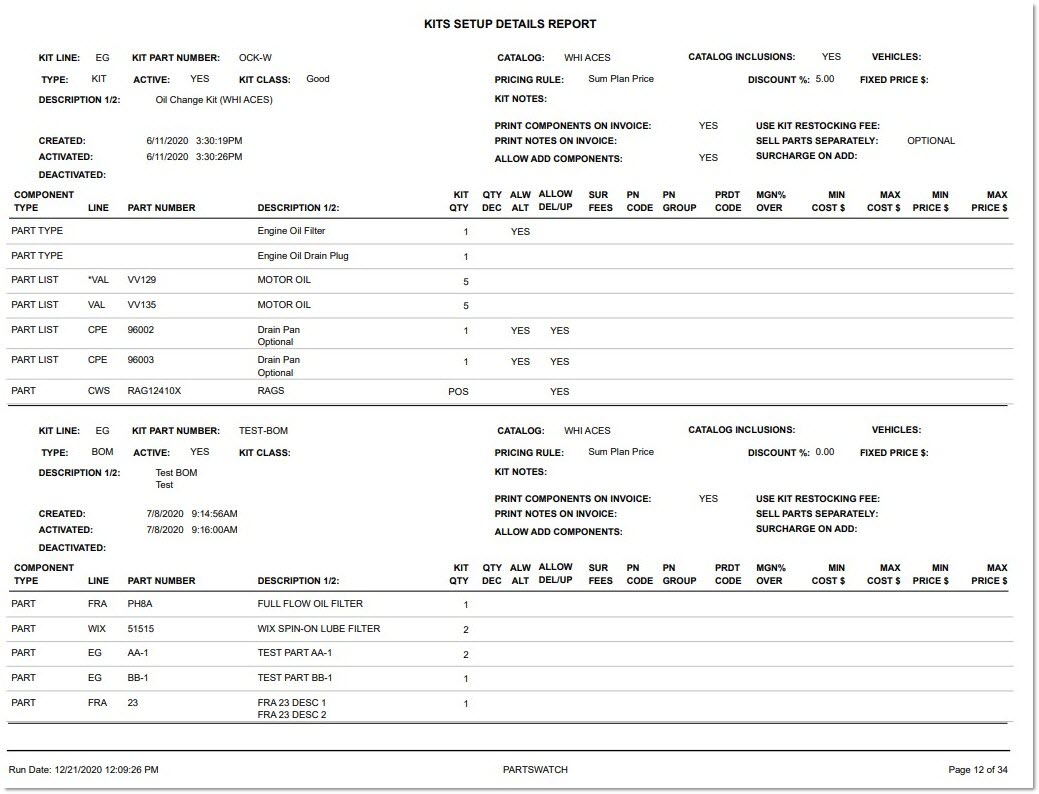
Kit Setup Details Report
Click the 'Preview' or 'Print' button to display or print the report.
The output is broken up into two sections: kit information and kit component information.
For kit information, the following attributes are displayed on the first row:
'Kit Line', 'Kit Part Number', 'Catalog' ('ACES', 'Epicor', 'TecAlliance', or 'NONE'), 'Catalog Inclusions?' ('YES' or blank), and 'Vehicles' (numeric count or blank).
Note: 'Catalog Inclusions' and 'Vehicles' only display a 'YES' or numeric count value if there is at least one 'Part Type' or one vehicle entered in the list of catalog inclusions or vehicles respectively.
For kit component information, the following attributes are displayed on the second row:
'Type' ('KIT' or 'BOM'), 'Active' ('WIP', 'TEST', 'YES', or 'NO'), 'Kit Class' (name if assigned to a class or blank), 'Pricing Rule' (with 'Discount %', 'Markup %', 'Margin %', or 'Fixed Price $'). Zero values are only displayed if appropriate.
Kit Options Tab
Pricing Rules
See the Pricing Rule Calculations section for more information.
Pricing Rule
Each kit can be set up with one of the following Pricing Rules:
- 'Sum Plan Price' - Different kit sell price per customer (based upon regular price plans).
- 'Sum Cost' - Can be the same kit sell price for all customers (in each or across all stores).
- 'Sum Sales Class Margins' - Can be the same kit sell price for all customers (across all stores)
- 'Kit Fixed Price' - The same kit sell price for all customers (across all stores).
- 'Kit Plan Price' - Different kit sell price per customer or store (based upon regular price plans).
The Pricing Rule setup is used to calculate the kit's sell price used at Point-of-Sale.
The application uses a sum-total of all of the component's list price, cost, core cost, and core sell prices to calculate the kit's list price, cost, core cost, and core sell price used at Point-of-Sale.
It is possible to change the Pricing Rule on the 'Kit Options' tab for any kit at any time regardless of the kit's status: 'WIP', 'Test', 'Yes', or 'No'.
Note: The default for every kit is 'Sum Plan Price'.
Discount % / Margin % / Markup %
Enter a discount percent, margin percent, or markup percent value for the kit. The value is numeric and can have up to two decimal places.
Note: Even if no discount is entered, margin or markup percentage, creating the kit still offers an "up-selling" opportunity of selling more parts at regular prices to a customer.
Note: While a 'Margin %' or 'Markup %' is allowed, be warned that customers may notice or question why purchasing the parts as a kit results in a kit sell price that is higher than if the component parts were purchased separately. Unless the markup is for labor or assembly that is not itemized separately on the invoice.
Fixed Price
Enter a fixed price for a kit with up to two decimal places.
Kit Attributes
Description 1
Enter up to 255-characters to help differentiate between different kits.
The value is displayed if entered in the 'Add Kit' pop-up.
Description 2
Enter a secondary description of up to 255-characters to help differentiate between different kits.
The value is displayed if entered in the 'Add Kit' pop-up.
Kit Class
Enter a value that was set up in the 'Kit Classes' tab.
Kit Notes
Kit Notes Textbox
Enter any helpful notes about the kit. Each textbox can contain 255 characters.
Print Options
Print Components on Invoice
Checkbox that determines whether or not components are printed on an invoice.
For a Kit:
- Checked (default) - The components print on the invoice and can be helpful in identifying parts to pick off the shelf for the kit.
- Unchecked - Only the Kit part will print on the invoice.
For a BOM:
- Checked - The components will print on the invoice, but the list of parts is already included in the assembled package.
- Unchecked (default) - Only the BOM part will print on the invoice.
Print Notes on Invoice
Checkbox that determines whether or not the 'Kit Notes' will be printed on the invoice for this kit.
- Checked - 'Kit Notes' will print on the invoice.
- Unchecked - 'Kit Notes' will not print on the invoice.
Allow
Checkbox that determines whether or not components can be added to a kit.
For a BOM, the option is always unchecked and unavailable.
For a Kit: (Only enabled when the 'Pricing Rule' is 'Sum Plan Price', 'Sum Cost', or 'Sum Sales Class Margin'. Automatically unchecks if the 'Pricing Rule' is changed to 'Kit Fixed Price' or 'Kit Plan Price.')
- Checked - Component parts can be added on the 'Kit' pop-up at Point-of-Sale.
- Unchecked (default) - Component parts cannot be added on the 'Kit' pop-up at Point-of-Sale.
Checkbox that determines whether or not there is a fee associated with adding components to a kit.
For a BOM, the option is always unchecked and unavailable.
For a Kit: (Only enabled when the 'Pricing Rule' is 'Sum Plan Price', 'Sum Cost', or 'Sum Sales Class Margin'. Automatically unchecks if the 'Pricing Rule' is changed to 'Kit Fixed Price' or 'Kit Plan Price.')
- Checked - A surcharge is applied when a component part is added on the 'Kit' pop-up at Point-of-Sale.
- Unchecked (default) - does not apply a surcharge when a component part is added on the 'Kit' pop-up at Point-of-Sale.
Note: This option can only be checked if the 'Add Components' option is checked first.
Use Kit Assembly Fee
Checkbox that determines whether the Kit's assembly fees set up on the 'Kit Fees' tab will be used, when a Kit part is displayed at Point-of-Sale, even for a BOM where the kit is "assembled" and packaged before Point-of-Sale.
- Checked - When a Kit part is displayed at Point-of-Sale, assembly fees are displayed.
- Unchecked - When a Kit part is displayed at Point-of-Sale, assembly fees are not displayed.
Use Kit Restocking Fee
Checkbox that determines whether or not the kit's restocking fees are applied when a Kit component part is returned.
- Checked - The kit's restocking fees, set up on the 'Kit Fees' tab, in addition to any store restocking fees, are applied when a Kit component part is returned.
- Unchecked – The kit's restocking fees, set up on the 'Kit Fees' tab are not applied when a Kit component part is returned. Does not affect the store's restocking fees.
"Break up the kit" Option
Drop-down that determines if a kit can be broken up so the parts can be sold separately:
- 'Never' (default) - Prevents a KIT from being "broken up".
- 'Always' - This option will only allow the selling of all parts separately using regular customer pricing for all parts and ignoring the KIT's 'Pricing Rule'. When selected, the system applies all taxes and fees to the sales order based upon each part instead of using only the KIT part.
- 'Optional' - A prompt displays with the following text "If the kit is broken up, all components will be sold as separate parts using regular customer pricing. The kit Pricing Rule will be ignored. Do you want to continue?", and 'OK' and 'CANCEL' buttons.
Pricing Rule Calculations
Sum Plan Price
-
Enter a percentage discount, margin, or markup.
-
The system obtains the regular sell price (a.k.a. Plan Price or 'EACH' Price) for each component using existing customer regular price plan rules.
-
Then, the system calculates the adjusted regular sell price by applying the Discount/Margin/Markup % to the regular sell price of each component.
-
Afterwards, the system calculates the extended kit price of each component; by multiplying the adjusted regular sell price by the 'Qty in Kit' for each component.
-
Finally, the system sums the extended kit prices for all components to calculate the Kit Price.
-
Note: Although the printed invoice only displays the 'EACH' price for the kit part, the 'EACH' price for all components is still calculated and stored in LISA for possible use on a return invoice.
Sum Cost
-
Enter a percentage discount, margin, or markup.
-
The system obtains the part cost for each component using the 'COST AT POS' setting on the STORE INVOICE OPTIONS screen, 'Standard' tab. This switch determines if current costs or average costs are used.
-
The system calculates the adjusted part cost by applying the 'Margin/Markup %' to the part cost of each component. Use the 'Margin/Markup %' on the 'Kit Options' tab unless a component has a 'Margin Override %' on one of the Component Setup tabs.
-
The system calculates the extended kit price of each component by multiplying the adjusted part cost by the 'Qty in Kit' for each component.
-
Finally, the system sums the extended kit prices for all components to calculate the Kit Price.
Sum Sales Class Margin
-
First, the system obtains the part cost for each component using the 'COST AT POS' setting on the STORE INVOICE OPTIONS screen, 'Standard' tab. This switch determines if current costs or average costs are used.
-
Then, the system calculates the adjusted part cost by applying the 'Margin %' to the part cost of each component.
-
The system obtains each component part's 'Margin % Override', and if one exists, applies that percentage to the component part's part cost to calculate the component part's adjusted part cost.
-
If any component part's 'Margin % Override' does not exist, the system obtains that component part's 'Sales Class 1' value from the Part Entry screen.
-
If a component part does not have a 'Sales Class 1' value on the Part Entry screen, The system obtains the 'Default Margin %' on the 'Sales Class Margins' tab, and applies that percentage to the component part's part cost to calculate the component part's adjusted part cost.
-
If a component part has a 'Sales Class 1' value on the Part Entry screen, the system obtains the "matching" 'Sales Class 1' value from the list on the 'Sales Class Margins' tab, and if found, applies the Margin percentage (on the list for that 'Sales Class 1' value) to the component part's part cost to calculate the component part's adjusted part cost.
-
If a component part has a 'Sales Class 1' value on the Part Entry screen, and there is no "matching" 'Sales Class 1' value on the list on the 'Sales Class Margins' tab, the application obtains the 'Default Margin %' on the 'Sales Class Margins' tab, and applies that percentage to the component part's part cost to calculate the component part's adjusted part cost.
-
-
If there is no 'Default Margin %' on the 'Sales Class Margins' tab, and all of the above rules could not calculate the component part's adjusted part cost, then the component part's part cost is used "as is" to calculate the component part's adjusted part cost.
-
-
The system calculates the extended kit price of each component by multiplying the adjusted part cost by the 'Qty in Kit' for each component.
-
Finally, the system sums the extended kit prices for all components to calculate the Kit Price.
Kit Fixed Price
- Below is the calculation using an example of a kit that has a Kit Fixed Price of $166.08:

-
Total Reg. Price = 170.34 (117.36 + 52.98)
-
Kit Price = 166.08
-
'You Saved' amount = 4.26 (170.34 - 4.26)
-
If the 'You Saved' amount is zero because the Kit Price is the same amount as the Total Reg. Price, the application skips the adjusting of the 'EACH' price for each component. Note: The possibility of this occurring is very rare.
-
The system calculates a kit "pricing percent multiplier":
-
Kit Price / Total Reg. Price = Kit Pricing Percent Multiplier
-
166.08 / 170.34 = 0.97499
-
-
For each component, the system uses the kit pricing percent multiplier to calculate the kit component 'EACH' price, rounded down to the penny:
-
Reg. Price * Kit Pricing Percent Multiplier = Kit Component EACH Price
-

-
The system sums the components after applying the kit pricing percent multiplier:
-
(2 * 57.21 = 114.42) + (1 * 51.65 = 51.65)
-
Total Kit Component Prices = 166.07
-
-
The system calculates the number of remaining pennies to allocate across the components:
-
Kit Price - Total Kit Component Prices = Pennies to Allocate
-
166.08 - 166.07 = 0.01
-
For each component, the system allocates 1 penny to the 'EACH' price (if possible) until no pennies are remaining.
-

- In this example, there are not enough pennies to allocate to component Part A, so allocate the remaining penny to component Part B.
Kit Plan Price
Note: There are three methods for setting up this pricing rule. All methods require additional setup on the PRICE PLAN SETUP screen. The first and second methods also involve setting up a sell price on the kit part in the inventory.
Regardless of the method used, once a Kit Price is determined, the calculation for the 'EACH' price of each component will use the same calculation as the 'Pricing Rule' of 'Kit Fixed Price'.
Method 1:
-
The 'SELL LEVEL' must be entered. A 'LINE ITEM PRICING %' can be optionally entered.
-
The 'SELL LEVEL' entered must also have a sell price for that sell level on the kit part.
Method 2:
-
The kit 'LINE' and kit 'PART NUMBER' must be entered in the grid; this will disable or ignore any discounts for 'PN CODE', 'GROUP', and 'CLASS'.
-
The system updates the 'LVL' field with a number that represents a 'SELL LEVEL'. The 'SELL LEVEL' entered must also have a sell price for that sell level on the kit part.
-
Enter a non-zero amount in the '+/- %1' field to indicate the discount or markup percentage.
Method 3:
-
The kit 'LINE' and kit 'PART NUMBER' must be entered; this will disable or ignore any discounts for 'PN CODE', 'GROUP', and 'CLASS'.
-
The system leaves the 'LVL' field at the default value of zero.
-
Enter a non-zero amount in the '+/-AMT' field.
Kit Fees Tab
The 'Kit Fees' tab is used to optionally define surcharge fees for adding, upgrading or deleting components. The 'Kit Fees' tab is also used to optionally define restocking fees for new re-sellable kit component parts returned. Apply surcharge fees to any KIT and restocking fees to any KIT or BOM.
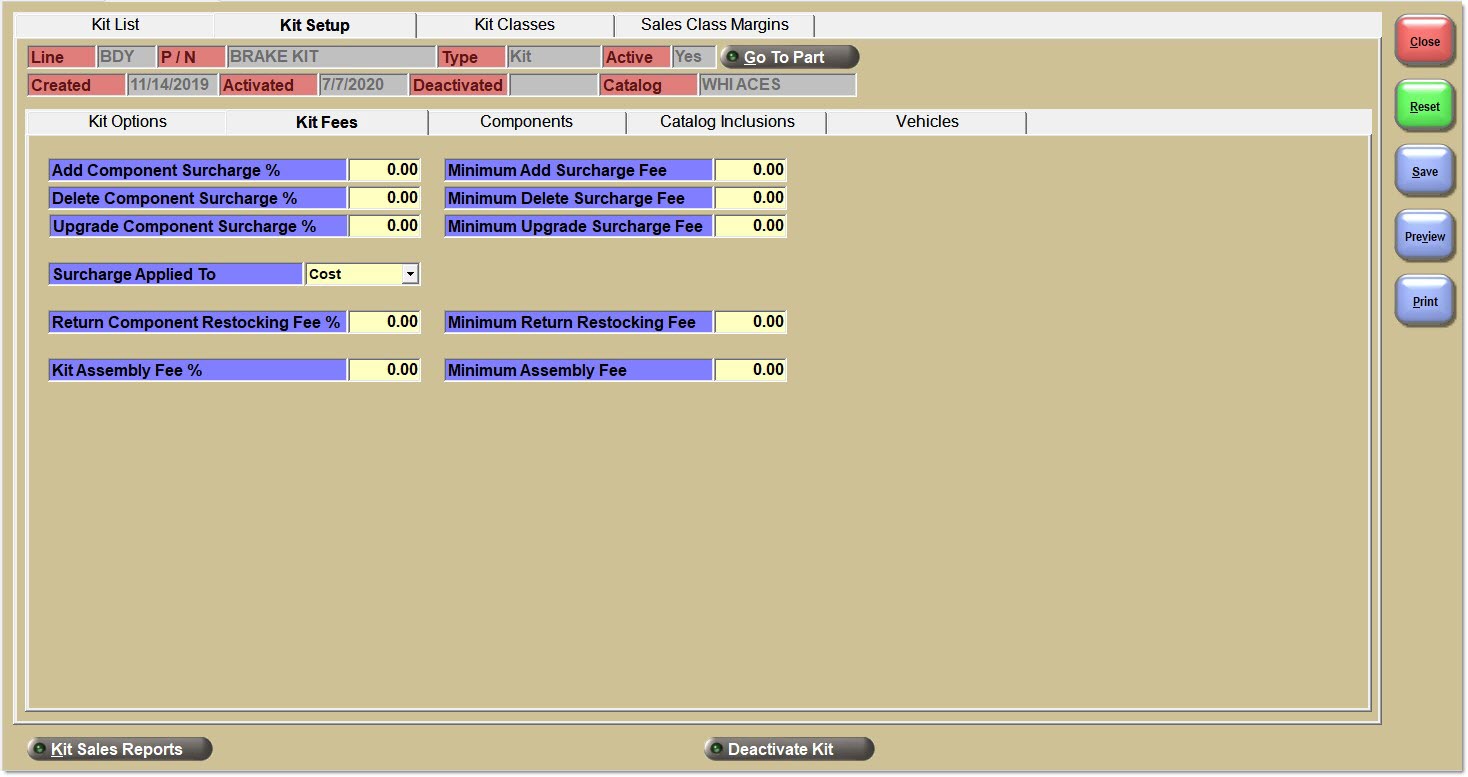
Add Component Surcharge %
Enter a percent value from 0.00 to 99.99.
When a component is added to a kit (with the 'Surcharge on Add' checkbox selected for that kit), a fee amount may be included with the sell price for the added component based on the percentage entered in the textbox.
Delete Component Surcharge %
Enter a percent value from 0.00 to 99.99.
When a component is deleted from a kit (with the 'Surcharge on Delete' checkbox selected for that component), a fee amount may be included with the kit sell price for the deleted component based on the percentage entered in the textbox.
Upgrade Component Surcharge %
Enter a percent value from 0.00 to 99.99.
When a component is upgraded with a different part (with the 'Surcharge on Upgrade' checkbox selected for that component), a fee amount may be included with the sell price for the upgraded component part based on the percentage entered in the textbox.
Surcharge Applied To
Drop-down that determines where the surcharge is applied:
-
'Cost' (default) - The surcharge percentage is applied to the component's cost value.
-
'Price' - The surcharge percentage is applied to the component's price value.
Return Component Restocking Fee %
Enter a percent value from 0.00 to 99.99.
When the customer attempts to return a new re-sellable kit component, and the 'Use Restocking Fee' checkbox is selected for that kit (on the 'Kit Options' tab), a restocking fee amount may reduce the sell price credited for the returned component based on the percent value entered in the textbox. If the 'Use Restocking Fee' checkbox is unchecked for the kit, existing store restocking fees will still apply to the returned kit component. If both the kit and store restocking fees are enabled, then if a customer returns a new re-sellable kit component that was sourced, both kit and store restocking fees will be applied to the credit invoice.
Minimum Add Surcharge Fee
Enter a minimum fee value from 0.00 to 99.99.
When a component is added to a kit (with the 'Surcharge on Add' checkbox selected for that kit), a fee amount may be included with the sell price for the added component based on the minimum fee value entered in the textbox.
Minimum Delete Surcharge Fee
Enter a minimum fee value from 0.00 to 99.99.
When a component is deleted from a kit (with the 'Surcharge on Delete' checkbox selected for that component), a fee amount may be included with the kit sell price for the deleted component based on the minimum fee value entered in the textbox.
Minimum Upgrade Surcharge Fee
Enter a minimum fee value from 0.00 to 99.99.
When a component is upgraded with a different part (with the 'Surcharge on Upgrade' checkbox selected for that component), a fee amount may be included with the sell price for the upgraded component part based on the minimum fee value entered in the textbox.
Minimum Return Restocking Fee
Enter a minimum fee value from 0.00 to 99.99.
When the customer attempts to return a new re-sellable kit component, and the 'Use Restocking Fee' checkbox is selected for that kit (on the 'Kit Options' tab), a restocking fee amount may reduce the sell price credited for the returned component based on the minimum fee value entered in the textbox. If the 'Use Restocking Fee' checkbox is unchecked for the kit, existing store restocking fees will still apply to the returned kit component. If both the kit and store restocking fees are enabled, then if a customer returns a new re-sellable kit component that was sourced, both kit and store restocking fees will be applied to the credit invoice.
Kit Assembly Fee %
Enter a value from 0.00 to 99.99 to add a fee on the final price of a Kit based on a percentage of the kit's price.
When a kit is displayed at Point-of-Sale (with the 'Kit Assembly Fee %' or a 'Minimum Kit Assembly Fee' amount entered at setup), and the 'Use Assembly Fee' checkbox is also selected on the 'Kit Options' tab at setup, a fee amount will be included with the sell price for the kit.
Minimum Assembly Fee
Enter a value from 0.00 to 99.99 to add a minimum based fee on the final price of a kit based on a set dollar amount on top of the Kit's price.
When a kit is displayed at Point-of-Sale (with the 'Kit Assembly Fee %' or a 'Minimum Kit Assembly Fee' amount entered at setup), and the 'Use Assembly Fee' checkbox is also selected on the 'Kit Options' tab at setup, a fee amount will be included with the sell price for the kit.
Components Tab
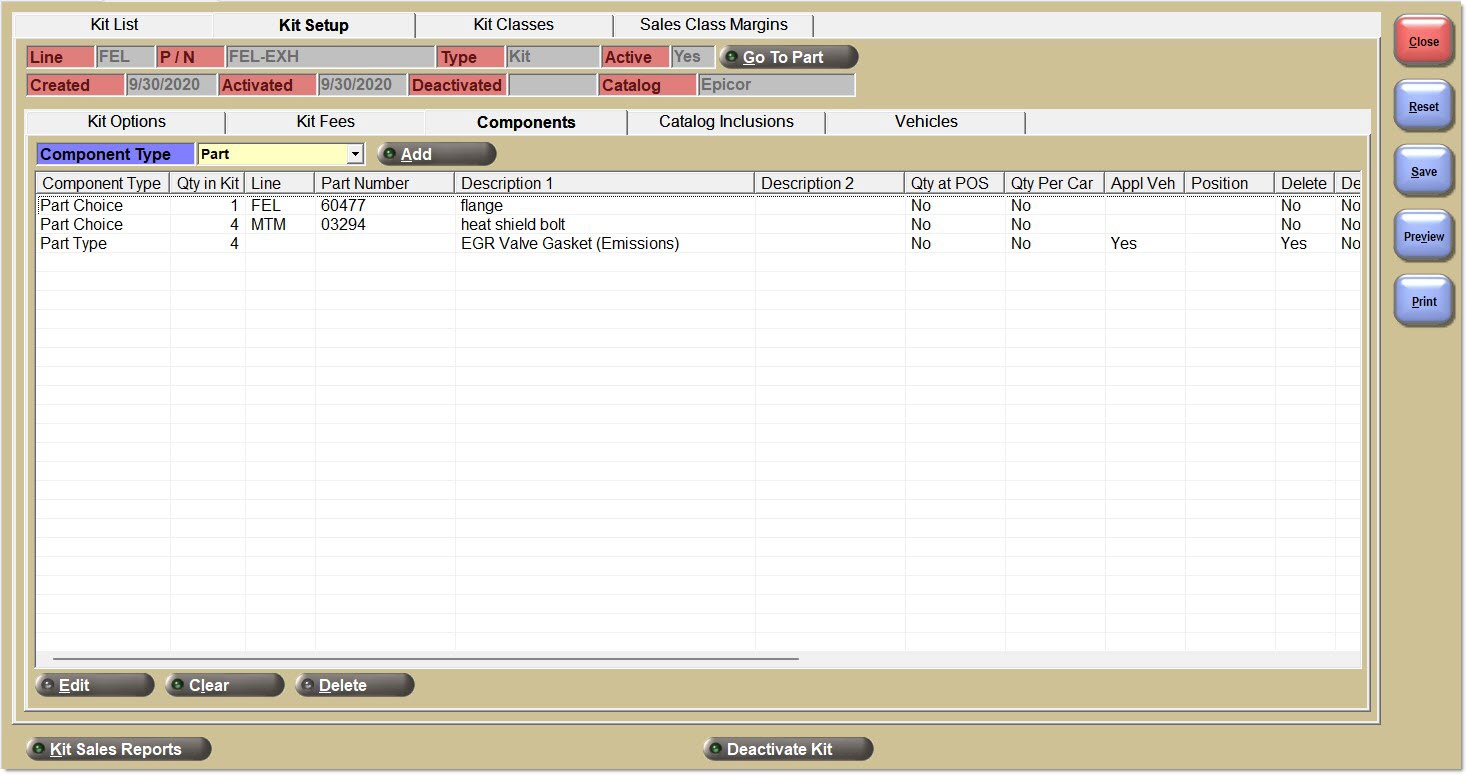
Drop-down That determines what the 'Component Type' will be when adding a new component to the grid.
For a Kit:
- 'Part' - A line code/part number
- 'Part Choice' - A set of criteria that defines a "dynamic" list of line code/part numbers
- 'Part List' - A "static" list of line code/part numbers
- 'Part Type' - Only displays if using an ACES, Epicor, or TecAlliance catalog
- 'Kit Components' - Ability to insert all components into a primary kit from another secondary kit. After the insert, the relationship between the two kits is "disconnected". Any further changes to the secondary kit will not appear in the primary kit. Instead, when a KIT part is used as a Part component in another KIT, the relationship between the two kits stays "connected". Therefore, whenever new components are added to the secondary KIT, these new KIT components always appear in the primary KIT at Point-of-Sale.
For a BOM:
- 'Part' - A line code/part number
- 'Kit Components' - Ability to insert all components into a kit from another kit. After the insert, the relationship is broken between the two kits.
For a Kit, click to add a component at any time, regardless of the Kit's 'Status'.
For a BOM, click to add a component when the status is 'WIP' or 'Test'. The 'Add' button is disabled for BOMs when the BOM's 'Status' is 'Yes'.
When adding new components, the only mandatory values that must be entered are the component and the "Qty in Kit" for that component. All other values are optional.
Different windows will open based on the value of the 'Component Type'.
Click to open the same pop-up used to add a component to the grid, but with the selected component's information already populated to allow editing.
Components Tab Grid
Enter components one at a time by selecting a 'Component Type' and clicking the 'Add' button. When any of the column headers are clicked, the application sorts the components in the list by that column. It is possible to add the same component to the kit more than once.
Component Type
Displays the component type as set up on the KIT SETUP screen.
Line
Displays the line code of the component.
Part Number
Displays the part number of the component
Description 1
Displays the description 1 value of the component as set up on the Part Entry screen.
Description 2
Displays the description 2 value of the component as set up on the Part Entry screen.
Qty in Kit
Displays the quantity of the component in the kit, as set up on the KIT SETUP screen.
Qty at Point-of-Sale
Displays the quantity at Point-of-Sale for the component in the kit, as set up on the KIT SETUP screen.
Qty Per Car
Displays the quantity of the component per vehicle, as set up on the KIT SETUP screen.
Delete
Displays the whether or not a component can be deleted from a kit as set up on the KIT SETUP screen.
Del Fee
Displays whether or not there is a fee for deleting the component from the kit, as set up on the KIT SETUP screen, 'Kit Fees' tab.
Upgrade
Displays the whether or not a component can be upgraded from a kit as set up on the KIT SETUP screen.
Upg Fee
Displays whether or not there is a fee for upgrading the component from the kit, as set up on the KIT SETUP screen, 'Kit Fees' tab.
Position
Displays the position in the vehicle of the component part as set up on the KIT SETUP screen.
PN Code
Displays the part number code as set up on the KIT SETUP screen.
PN Group
Displays the part number group as set up on the KIT SETUP screen.
Prdt Code
Displays the product code as set up on the KIT SETUP screen.
Margin
Displays the margin % as set up on the KIT SETUP screen.
Min Cost
Displays the minimum cost of the component as set up on the KIT SETUP screen.
Max Cost
Displays the maximum cost of the component as set up on the KIT SETUP screen.
Min Price
Displays the minimum price of the component as set up on the KIT SETUP screen.
Max Price
Displays the maximum price of the component as set up on the KIT SETUP screen.
Right-Click Menu
With a component selected/highlighted, right-click to open a menu.
-
If the 'Component Type' is a 'Part', the menu displays the 'Go To Line' and 'Go To Part' menu items.
-
For all 'Component Types':
-
The menu displays a 'View/Edit Component' menu item. Select the 'View/Edit Component' menu item, and the system opens the same pop-up used when adding a new component.
-
Click the 'Delete Component' menu option to delete the selected component.
-
Click the 'Clear all Components' menu option to clear the entire grid of components.
-
Add Kit (Kits and BOMs)
-
If the 'Component Type' is 'Kit Components', and the 'Add' button is clicked, the 'Find Kit' pop-up opens:
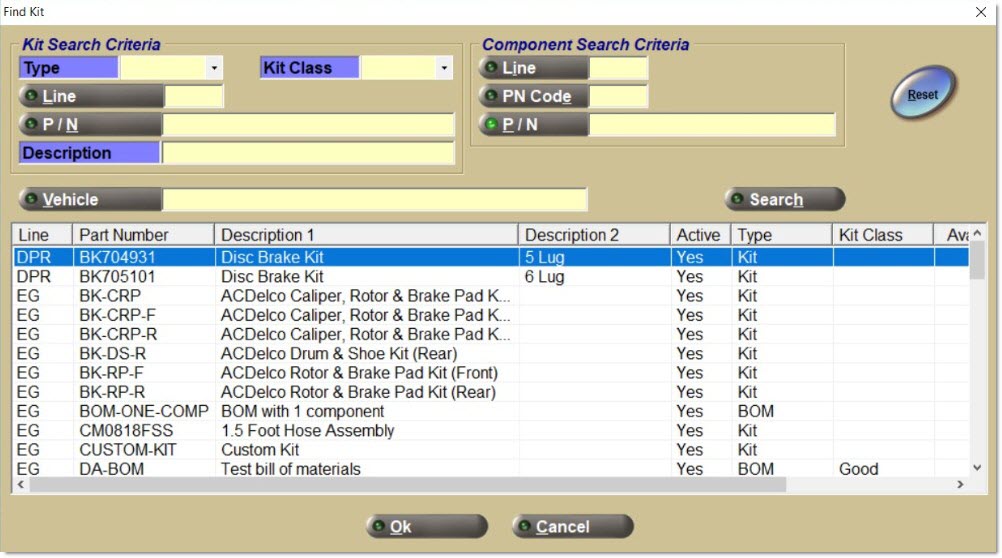
-
Note: For a BOM, the 'Add' button is disabled when the 'Active' 'Status' is 'Yes'.
-
The top of the pop-up displays all of the same kit and component search criteria displayed at the top of the 'Kit List' tab. When the 'Search' button is clicked, the application attempts to find kits using all of the criteria entered.
-
For a KIT, it is allowed to select either 'Kit' or 'BOM' in the 'Type' drop-down. This is because a KIT can use any 'Component Type' of 'Part', 'Part List', 'Part Choice', or 'Part Type' from the other kit.
-
For a BOM, the application sets the 'Type' to 'BOM' and disables the drop-down. This is because a BOM can only use a 'Component Type' of 'Part' from the other kit.
-
-
It is also possible to scroll to find a kit. Double-click a kit to select it, or click a kit and then click the 'Ok' button to select it. Once the kit is selected, a confirmation pop-up titled 'Confirm Adding Components from Kit' opens and displays all of the components from the selected kit that will be copied into the working kit.
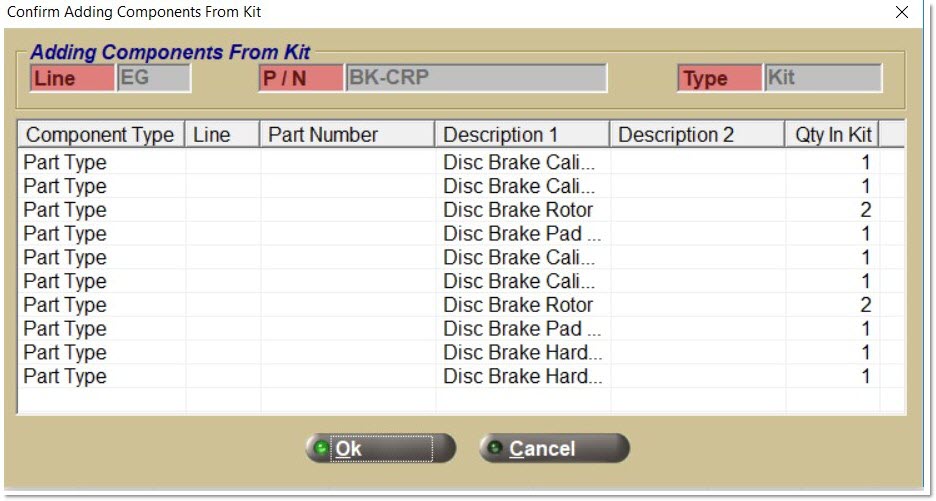
-
When the 'Ok' button is clicked, all of the components from the selected kit (with their 'Qty In Kit' values) are added to the working kit. Note: Click the 'Save' button to save the changes to the working kit.
-
Note: After adding components from one kit to another, there is no relationship between the two kits and their respective components.
Add Part (Kits and BOMs)
-
If the 'Component Type' is 'Part', and the 'Add' button is clicked, the system opens the following Setup Kit Part Components pop-up:

-
Note: For a BOM, the 'Add' button is disabled when the 'Active' 'Status' is 'Yes'.
-
When the pop-up opens, the 'Cancel' button is enabled but the 'OK' button is only enabled after all three values are entered.
-
Click the 'Cancel' button, to return to the 'Components' tab.
-
Enter a 'Line', 'P/N', and 'Qty in Kit' value for a 'Component Type' of 'Part'.
-
If the 'Line' or 'P/N' buttons are clicked while searching for a part to add, the system opens the 'BROWSE LINE CODES' or 'FIND PART' pop-ups.
-
If the 'OK' button is clicked, the system performs the following validations below, and if all validations are successful, adds the part to the kit and returns to the 'Components' tab.
-
The line code/part number must exist in the store's inventory or virtual inventory (nonsku file). It is not possible to add a NIF part to a kit. If this is attempted, the system displays a "Part Not Found" pop-up.
-
The line code for the part can have a 'Line Type' of 'Labor' or 'Freight'. However, after adding the item to the kit, the item is added to the invoice as if the item's line code had a 'Line Type' of 'Part'. Note: If labor or freight should be subtotaled separately on the invoice, add the labor item to the invoice separately outside of the kit.
-
The line code cannot have a 'Line Type' of 'Gift Card'. If a part within a line code with a 'Line Type' of 'Gift Card' is selected, the system displays a prompt with the message "Gift Card cannot be a kit component part".
-
Enter a 'Qty in Kit' value between 1 and 999999999 (9 digits).
-
-
Enable and display the "toggle" 'More >>' button.
-
For a KIT, if the 'More >>' button is clicked, the size of the pop-up expands and displays more attributes that can optionally be updated for this component.

-
Note: The 'Margin % Override' attribute is enabled when the kit's 'Pricing Rule' is 'Sum Cost' or 'Sum Sales Class Margins'.
-
Click the '<< Less' button, while the pop-up size is larger, the size of the pop-up reduces and hides the optional attributes.
-
For a BOM, if the 'More >>' button is clicked, the size of the pop-up expands and displays more attributes that can optionally be updated for this component.

-
Important Note: Once the 'More >>' button is clicked for any component, for the remainder of the session while the KIT SETUP screen is open, if viewing/editing any other component is attempted, the 'More >>' button is automatically clicked for the other component. Once the '<< Less' button is clicked for any component, for the remainder of the session while the KIT SETUP screen is open, if viewing/editing any other component is attempted, the '<< Less' button is automatically clicked for the other component.
-
The following additional attributes can be entered:
-
Quantity Decimals (for both KITs and BOMs). The default value is zero; which is to sell the component in whole units (e.g. 1). Optional values are 1 or 2 if users desire to sell this component in fractional units (e.g. 1.5 or 1.25).
-
Quantity Decimals are only visible if the hidden schema switch 'EnableQuantityDecimals' is set to 'TRUE'.
-
The schema switch default is 'FALSE' for all customers.
-
Note: Each customer will have to contact Customer Support to turn on this feature.
-
Important Notes:
-
When the schema switch is TRUE, the capability to sell a part outside of a kit using fractional selling units is available. To do this, set the 'Quantity Decimals' value for the part on the PART PRICE ENTRY screen. The default value is zero, and can be overridden to a value of 1 or 2.
-
To sell a kit component with fractional selling units, the Quantity Decimals value must be set on two screens (in any sequence); 1) on the PART PRICE ENTRY screen for the part, and on the KIT SETUP screen ('Setup Component' pop-up) for the kit component.
-
Set the same 'Quantity Decimals' value on both screens. Meaning, a part is set to two decimals (e.g. 1.25) whether outside of a kit or as a kit component. However, the 'Quantity Decimals' value can be different on the two screens.
-
The rule that must be followed to successfully sell a kit with kit components with fractional units is that the 'Quantity Decimals' value set for any kit component must be equal to or have "less" decimal precision than the 'Quantity Decimals' value set for the part outside of the kit:
-
-
The kit component 'Quantity Decimals' value can be set to 0 when the part sold outside of the kit is set to a 'Quantity Decimals' value of 0, 1, or 2.
-
The kit component 'Quantity Decimals' value can be set to 1 when the part sold outside of the kit is set to a 'Quantity Decimals' value of 1 or 2.
-
The kit component 'Quantity Decimals' value can be set to 2 when the part sold outside of the kit is set to a 'Quantity Decimals' value of 2.
-
-
Enter 'Qty in Kit' at Point-of-Sale (for KITS only and not for BOMs, even when assembled at Point-of-Sale).
-
When unchecked (the default), it is not possible to enter the component's 'Qty in Kit' at Point-of-Sale, and the 'Qty in Kit' value cannot be zero.
-
When checked, it is possible to edit the component's 'Qty in Kit' value at Point-of-Sale. When this checkbox is selected, enter a value of zero for the 'Qty in Kit'. If zero is entered, the 'Qty in Kit' value displays "Enter" instead of a number at Point-of-Sale. Note: Decide if they want a default initial 'Qty in Kit' numerical value displayed at Point-of-Sale that can be changed, or whether they just want the text "Enter" displayed.
-
-
'Margin % Override' (for both KITs and BOMs).
-
Enter a percentage between 0.00 and 99.99. The system uses this percentage to calculate the components' sell price (to calculate the kit price) when the kit's 'Pricing Rule' is 'Sum Cost' or 'Sum Sales Class Margins'.
-
The system retains this value even if the 'Pricing Rule' is changed to 'Sum Plan Price', 'Kit Plan Price', or 'Kit Fixed Price'. Remove this component percentage manually when changing the 'Pricing Rule' of the kit. Note: This component percentage will not be used to calculate the kit price with these other rules.
-
-
'Min Cost', 'Max Cost', 'Min Price', and 'Max Price' (for KITs only and not for BOMs).
-
All of these options are "honored" at Point-of-Sale regardless of the Pricing Rule of the KIT.
-
When any of these options are entered at setup, the system "filters" the parts that appear on the 'Kit' pop-up or the 'Change Component' pop-up at Point-of-Sale using these options.
-
These options can be set to provide more direct control of what parts can be included in a KIT; especially when the KIT's 'Pricing Rule' is set to 'Kit Fixed Price' or 'Kit Plan Price'.
-
All of these options support price or cost amounts up to two decimal places.
-
Set any combination of minimum and/or maximum limits on each component's cost or regular sell price to control the parts chosen for each component within the overall KIT.
-
For any customer, if there are no parts for any component, that meet "component limits" criteria, then the Kit cannot be sold to that customer.
-
-
Compare both the 'Min Price' and 'Max Price' fields to the part's regular customer sell price at Point-of-Sale. If the part's regular sell price value is outside the 'Min Price' and 'Max Price' range entered, the system does not allow the part to be viewed/added to the KIT on the 'Kit' pop-up or 'Change Component' pop-up at Point-of-Sale. Note: This might result in the customer not being able to buy an "incomplete" KIT.
-
Compare both the 'Min Cost' and 'Max Cost' fields to the part's cost field set on the STORE INVOICE OPTIONS screen, 'COST AT POS' (Current or Average Cost at Point-of-Sale). If the part's cost value is outside the 'Min Cost' and 'Max Cost' range entered, the system does not allow the part to be viewed/added to the KIT on the 'Kit' pop-up or 'Change Component' pop-up at Point-of-Sale. Note: This might result in the customer not being able to buy an "incomplete" KIT.
-
-
Allow Alternates, Supersedes, and VCO (for KITs only and not for BOMs).
-
All of these options are "honored" at Point-of-Sale regardless of the 'Pricing Rule' of the KIT.
-
When any of these options is checked, change the component within the KIT at Point-of-Sale.
-
Note: If the KIT's 'Pricing Rule' is 'Sum Plan Price', 'Sum Cost', or 'Sum Sales Class Margins', then switching the part of a component at Point-of-Sale will result in changing the kit's sell price but will have no negative impact on the kit's "profit margin".
-
However, if the KIT's 'Pricing Rule' is 'Kit Fixed Price' or 'Kit Plan Price', then switching the part of a component at Point-of-Sale can negatively change the KIT's "profit margin" (unless surcharges are used). Therefore, verify the costs and/or prices of their alternates, or other "allowed" options, and review the KIT sufficiently after testing/activating the KIT, and before selling the KIT.
-
-
When all of these options are unchecked (the default), it is not possible to change the component within the kit at Point-of-Sale.
-
-
Allow Delete Component (for KITs only and not for BOMs).
-
When unchecked (the default), it is not possible to delete the component from the KIT at Point-of-Sale.
-
When checked, it is possible to delete the component from the KIT at Point-of-Sale.
-
Note: If the 'Pricing Rule' of the Kit is 'Sum Plan Price', 'Sum Cost', or 'Sum Margins', deleting components at Point-of-Sale will lower the kit's sell price but will have no negative impact on the kit's "profit margin".
-
Note: If the 'Pricing Rule' of the Kit is 'Kit Fixed Price' or 'Kit Plan Price', deleting components at Point-of-Sale will lower the kit's sell price and will harm the kit's "profit margin"; unless deletion surcharges are applied.
-
-
-
Allow Surcharge on Delete (for KITs only and not for BOMs).
-
When unchecked (the default), there is no fee applied to the KIT when the component is deleted from the KIT at Point-of-Sale.
-
When checked, a fee may be applied to the KIT (depending upon settings on the Kit Fees tab), when the component is deleted from the KIT at Point-of-Sale.
-
-
Allow Upgrade Component (for KITs only and not for BOMs).
-
When unchecked (the default), it is not possible to upgrade the component in the KIT at Point-of-Sale.
-
When checked, it is possible to upgrade the component in the KIT at Point-of-Sale.
-
-
Allow Surcharge on Upgrade (for KITs only and not for BOMs).
-
When unchecked (the default), there is no fee applied to the KIT when the component in the KIT is upgraded at Point-of-Sale.
-
When checked, a fee may be applied to the KIT (depending upon settings on the 'Kit Fees' tab), when the component is upgraded in the KIT at Point-of-Sale.
-
Add Part Choice (Kits Only)
-
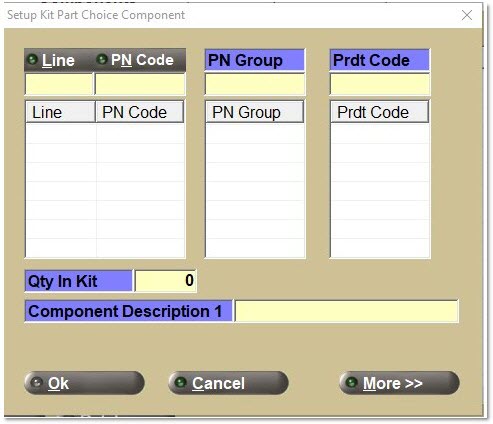
If the 'Component Type' is 'Part Choice', and the 'Add' button is clicked, the following 'Setup Kit Part Choice Component' pop-up opens:
-
When the pop-up opens, the 'Cancel' and 'More >>' buttons are enabled, but the 'OK' button is only enabled at least one value for 'Line Code', 'Line Code' / 'PN Code', 'PN Group' or 'Prdt Code', a 'Qty in Kit' value, and a 'Component Description 1' value are entered.
-
Note: A 'Component Description 1' value is required because this is the only value displayed on the 'Kit' pop-up at Point-of-Sale for this component. Users will need to know what parts could be used for this KIT component. For example, the 'Component Description 1' value might be "WIX Oil Filters only" or "Any Bosch Brake Pad". Since this type of component can have a list of 'Line Codes', 'Line Code' / 'PN Code' combinations, 'PN Groups', or 'Prdt Codes', any part's 'Part Description 1' cannot represent the entire list of available parts for this component.
-
-
Click the 'Cancel' button to return to the 'Components' tab.
-
Enter an unlimited list of additional 'Line Codes'. Note: Try to enter as short a list of 'Line Codes' as possible to keep the list of available parts for this component as limited as possible so at Point-of-Sale it is easy to select a part as quickly as possible.
-
Select/highlight and right-click a line in the list (grid) to display a menu item, 'Delete line code'. If selected, the application displays an "Are you sure?" prompt before deleting the line.
-
Select/highlight and right-click a line in the list (grid) to display a menu item; 'Clear all Line / PN Codes'. If selected, the application displays an "Are you sure?" prompt before removing all rows from the list.
-
-
Enter an unlimited list of 'Line Code' / 'PN Code' combinations. Enter just 'Line Codes' (without any 'PN Code') or a 'Line Code' / 'PN Code' combination on the same list.
-
Type in a 'Line Code' value into the textbox, or select a 'Line Code' value from a list; by clicking the 'Line' button to open the 'BROWSE LINE CODES' pop-up. Then press the 'Enter' key to navigate to the 'PN Code' textbox.
-
Press the 'Enter' key to add the 'Line Code' (without 'PN Code') into the list, or type in a 'PN Code' value into the textbox, or select a 'PN Code' value from a list; by clicking the 'PN Code' button to open the 'BROWSE PN CODES' pop-up. Then press the 'Enter' key to add the 'Line Code' / 'PN Code' combination into the list.
-
Select/highlight and right-click a 'Line' / 'PN Code' in the list (grid) to display a menu item, 'Delete Line / PN Code'. If selected, the application displays an "Are you sure?" prompt before deleting the 'Line' / 'PN Code'.
-
Select/highlight and right-click a line in the list (grid) to display a menu item; 'Clear all Line / PN Codes'. If selected, the application displays an "Are you sure?" prompt before removing all rows from the list.
-
The system validates to ensure a 'Line' code cannot be added with a 'PN Code' and without a 'PN Code' on the same list. If attempted, the application displays the following prompt: "Cannot mix Line Code without PN Code and Line Code with PN Code."
-
Note: The values entered into the list will determine which parts are available that can be selected at Point-of-Sale.
-
-
Enter an unlimited list of 'PN Groups'.
-
Select/highlight and right-click a line in the list (grid) to display a menu item, 'Delete PN Group'. If selected, the application displays an "Are you sure?" prompt before deleting the 'PN Group'.
-
Select/highlight and right-click a line in the list (grid) to display a menu item;, 'Clear all PN Groups'. If selected, the application displays an "Are you sure?" prompt before removing all rows from the list.
-
-
Enter an unlimited list of 'Prdt Codes'.
-
Select/highlight and right-click a line in the list (grid) to display a menu item, 'Delete Prdt Code If selected, the application displays an "Are you sure?" prompt before deleting the 'Prdt Code'.
-
Select/highlight and right-click a line in the list (grid) to display a menu item;, 'Clear all Prdt Codes'. If selected, the application displays an "Are you sure?" prompt before removing all rows from the list.
-
-
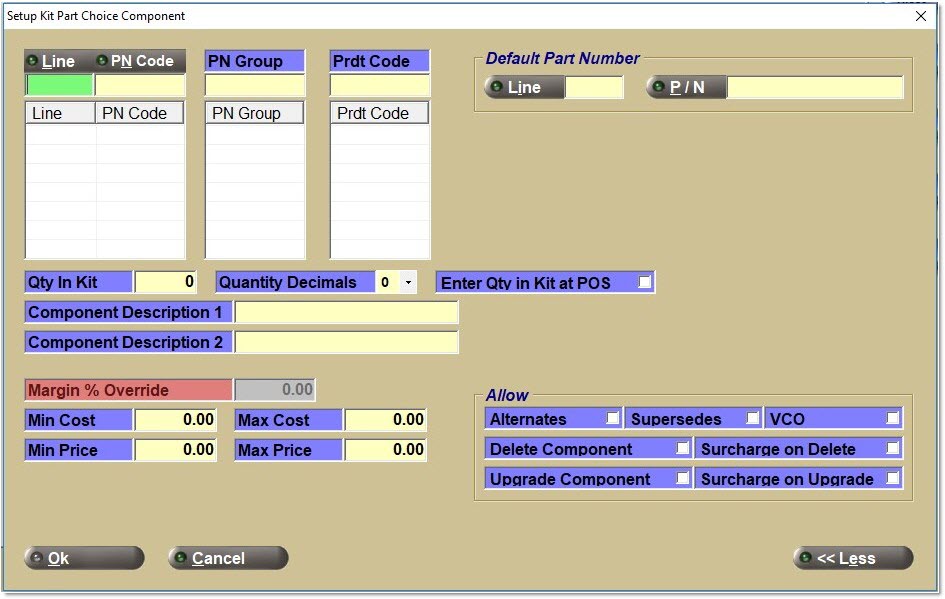
Click the 'More >>' button to expand the size of the pop-up, and display more attributes that can optionally be updated for this component.
-
When the 'More >>' button is clicked, the application displays the same additional attributes that are editable for a 'Component Type' of 'Part List'. They are 'Quantity Decimals', 'Enter Qty in Kit at POS', 'Component Description 2', 'Margin % Override', 'Min Cost', 'Max Cost', 'Min Price', 'Max Price', 'Allow Alternates', 'Allow Supersedes', 'Allow VCO', 'Allow Delete Component', 'Allow Surcharge on Delete', 'Allow Upgrade Component', and 'Allow Surcharge on Upgrade'.
-
If the Allow Alternates, Supersedes or VCO option is selected, then allow at Point-of-Sale selection of a replacement part on the 'Change Component' pop-up that is not within the allowed 'Lines', 'PN Codes', 'PN Groups', or 'Prdt Codes' defined at setup.
-
Important Note: The system denies users from selecting the same alternate or supersede part number on the 'Kit' pop-up, although the system will allow users to select the alternate or supersede part number on the 'Change Component' pop-up.
-
-
Furthermore, the system displays a 'Default Part Number' section, with two editable attributes: 'Line' and 'P/N'.
-
The system uses the same validation rules for entering the 'Line' and 'P/N' as when a 'Line' and 'P/N' are entered for a 'Component Type' of 'Part' or 'Part List'. The one exception is that a KIT part cannot be used as the default part number because a KIT part can contain multiple parts.
-
When the Line or P/N buttons is clicked while searching for a default part number to add to this component, the application opens the 'BROWSE LINE CODES' or 'FIND PART' pop-ups.
-
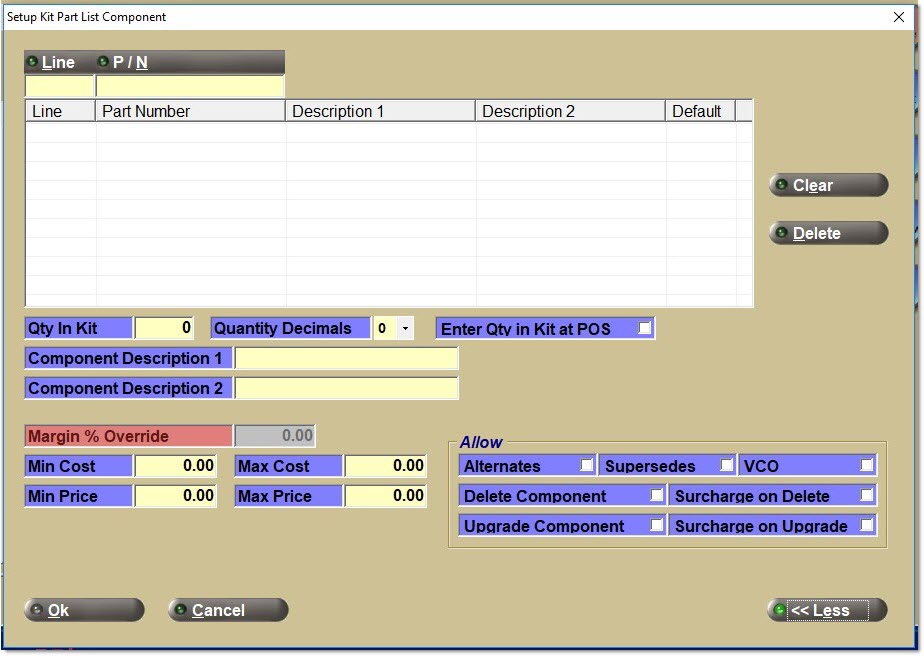
Add Part Lists (Kits Only)
-
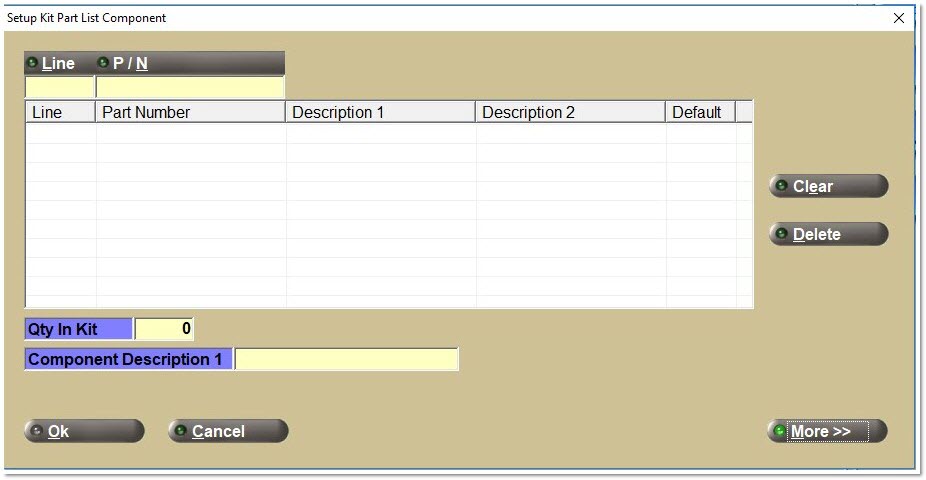
If the 'Component Type' is 'Part List', and the 'Add' button is clicked, the following 'Setup Kit Part List Component' pop-up opens:
-
Enter only at least one 'Line' and 'P/N', along with a 'Qty in Kit' value for a 'Component Type' of 'Part List'.
-
Optionally enter a 'Component Description 1'.
-
When the first part number in the list is entered, the system copies that part's 'Description 1' value into the 'Component Description 1' value. Optionally edit the value.
-
Note: This field enables the setting of the the 'Component Description 1' value to a more meaningful value instead of using the actual 'Part Description 1' from any of the parts in the list.
-
The application displays the 'Component Description 1' value on the 'Kit' pop-up at Point-of-Sale if there is no part default selected. If there is a part default selected, the application displays that part's 'Description 1' value on the 'Kit' pop-up at Point-of-Sale.
-
Note: If a 'Part List' component is added to a sales order, the application always displays the part's 'Description'.
-
-
Any part in the list cannot be a KIT part.
-
When the pop-up opens, the 'Cancel' and 'More >>' buttons are enabled but the OK button is only enabled after at least one part in the list is entered and a has a 'Qty in Kit' value (used for all parts in the list).
-
Click the 'Cancel' button to return to the 'Components' tab.
-
Add parts to the list by entering a 'Line' and 'P/N' and press the 'Enter' key. The application performs part validation before adding a part to the list, using the same validation rules when adding a 'Component Type' of 'Part'.
-
Change the display order of the parts in the list using a mouse by selecting a part and then "dragging and dropping" that part above or below another part in the list.
-
Delete a part from the list by clicking the 'Delete' button. When the 'Delete' button is clicked, the application displays an "Are you sure?" prompt before removing the part from the list. It is also possible to delete a part using the right-click menu item, 'Delete part'.
-
Remove all parts from the list by clicking the 'Clear' button. When the 'Clear' button is clicked, the application displays an "Are you sure?" prompt before removing all parts from the list. it is also possible to remove all parts from the list using the right-click menu item, 'Clear all parts'.
-
Within the list of parts entered, check the last column 'Default' for one of the parts in the list. If a second part is checked, the first part is unchecked.
-
The application displays the checked part number in the KIT on the 'Kit' pop-up at Point-of-Sale.
-
If no 'Default' is specified, and more than a single part number has been entered, no default part number displays in the KIT on the 'Kit' pop-up at Point-of-Sale. Manually select a part from the list at Point-of-Sale.
-
All checkboxes are unchecked by default.
-
Note: If only one part is entered in the list, it is not needed to check the 'Default' checkbox. The part will display in the KIT on the 'Kit' pop-up at Point-of-Sale.
-
-
Click the 'More >>' button to expand the size of the pop-up and display more attributes that can optionally be updated for this component.
-
When the 'More >>' button is clicked, the application displays the same additional attributes that are editable for a 'Component Type' of 'Part'. They are 'Quantity Decimals', 'Enter Qty in Kit at POS', 'Margin % Override', 'Min Cost', 'Max Cost', 'Min Price', 'Max Price', 'Allow Alternates', 'Allow Supersedes', 'Allow VCO', 'Allow Delete Component', 'Allow Surcharge on Delete', 'Allow Upgrade Component', and 'Allow Surcharge on Upgrade'.
-
Furthermore, the application displays an additional editable attribute: 'Component Description 2'.
-
When the first part number in the list is entered, the application copies that part's 'Description 2' value into the 'Component Description 2' value.
-
The 'Component Description 2' value is displayed on the 'Kit' pop-up at Point-of-Sale if there is no part default selected. If there is a part default selected, the application displays that part's 'Description 2' value on the 'Kit' pop-up at Point-of-Sale.
-
-
If it is later decided to add more parts to the list, either right-click in the 'Components' list on the 'Components' tab and select 'View/Edit Component' menu selection, or double-click the component in the 'Components' list, or select the component and click the 'Edit' button.
Add Part Types (Kits Only)
-
Entering 'Part Types' is only available for the ACES, Epicor, or the TecAlliance Catalogs.
-
When the 'Component Type' is 'Part Type', and the 'Add' button is clicked, the following 'Setup Kit Part Type Component' pop-up opens:
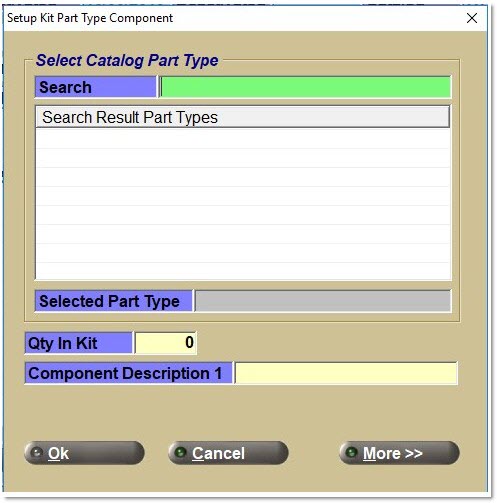
-
When the pop-up opens, the 'Cancel' and 'More >>' buttons are enabled, but the 'OK' button is only enabled after a 'Selected Part Type', 'Qty in Kit', and 'Component Description 1' are entered.
-
The application updates the 'Component Description 1' with the same value as the 'Selected Part Type' when a 'Part Type' is chosen.
-
To select a 'Part Type', the user must enter some text in the 'Search' field and press the 'Enter' key.
-
Enter any full or partial portion of text, for example, "oil filter".
-
The 'Search Results Part Types' displays a list of available 'Part Types' to select one. Note: Since there is no vehicle specified, and the search applies to all vehicles, the list might be much longer than a similar list displayed on the CATALOG screen for only one vehicle.
-
When a 'Part Type' is selected, that value is displayed in the 'Selected Part Type' field (above the 'Qty in Kit'), and also populates the 'Component Description 1'.
-
-
Click the 'OK' button to add the 'Part Type' to the Kit and return to the 'Components' tab.
-
Click the 'Cancel' button to return to the 'Components' tab.
-
Click the 'More >>' button to expand the size of the pop-up, and display more attributes that can optionally be updated for this component.
-
-
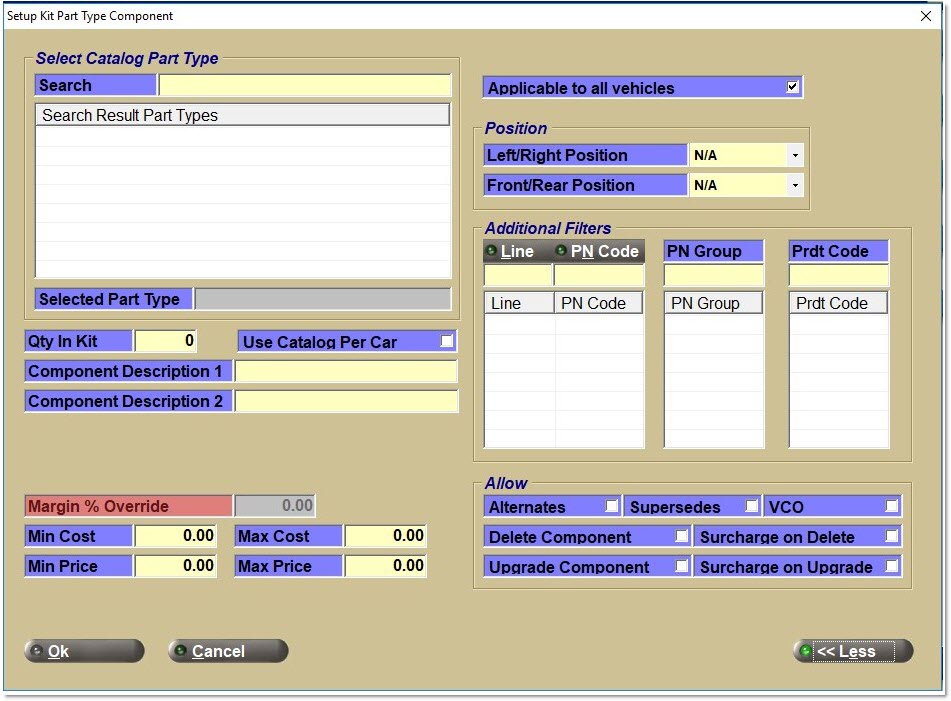
When the 'More >>' button is clicked, the application displays a similar list of additional attributes that are editable for a 'Component Type' of 'Part List' or 'Part Choice'. They are 'Component Description 2', 'Margin % Override', 'Min Cost', 'Max Cost', 'Min Price', 'Max Price', 'Allow Alternates', 'Allow Supersedes', 'Allow VCO', 'Allow Delete Component', 'Allow Surcharge on Delete', 'Allow Upgrade Component', and 'Allow Surcharge on Upgrade Component'.
-
The 'Quantity Decimals' attribute is not available for a 'Part Type' component because a catalog cannot sell a part with fractional units.
-
There are eight additional attributes and the first four only apply to a 'Part Type' component. The purpose of most of these attributes is to "filter" the list of parts that will display on the 'Kit' pop-up at Point-of-Sale.
-
The first attribute is the 'Use Catalog Per Car' checkbox, which can be used instead of entering a 'Qty in Kit' at setup time or Point-of-Sale.
-
When unchecked (the default), the component's 'Qty in KIT' is obtained from the entered 'Qty in Kit' at setup.
-
When checked, the application obtains the component's 'Qty in KIT' from the catalog data's "per car" quantity for any part selected for this component.
-
When this checkbox is selected, the application updates the 'Qty in Kit' value to zero (even if a non-zero value was entered previously).
-
Note: This option is only enabled for catalogs that contain a 'Per Car' Quantity: the ACES and Epicor catalogs only.
-
-
The next filter, 'Applicable to all vehicles' (default checked), can be used for a kit with multiple 'Part Types' where some components are only applicable on certain vehicles and other components apply to all vehicles.
-
If checked, it is mandatory to select a part for this component to sell the KIT.
-
If there are no parts available to select because this component does not apply to a vehicle selected for this customer, then this KIT cannot be sold to that customer.
-
If there are only NIF parts available for this component, then this KIT cannot be sold to that customer.
-
-
If unchecked, it is not always needed to select a part for this component.
-
The application does not display the component on the 'Kit' pop-up at Point-of-Sale if there are no parts available for selection, and no NIF parts.
-
Note: Use this option to create a generic kit with a list of components where most of the components apply to all vehicles but one or more components are only applicable to a few vehicles. This option should be unchecked for those components that do not apply to all vehicles.
-
-
-
The next two filters ('Left/Right Position' and 'Front/Rear Position') limit which parts can be viewed/selected for a 'Part Type' on the 'Kit' pop-up at Point-of-Sale, where the car's "position" is involved. For example, a brake kit that might only apply to the front or rear brakes.
-
The Left/Right Position defaults to 'N/A' and can be set to 'Left' or 'Right'.
-
The Front/Rear Position defaults to 'N/A' and can be set to 'Front' or 'Rear'.
-
-
The last four filters ('Line', 'PNCode', 'PN Group', and 'Prdt Code') limit which parts can be viewed/selected for a 'Part Type' on the 'Kit' pop-up and 'Change Component' pop-up at Point-of-Sale, based upon the values in the three setup lists (grids).
-
Note: These filters can assist with creating KITs using different price grades. For example, the higher grade might be limited to one 'Line' or 'Line/PNCode' combination and the lower grade might be limited to another 'Line' or 'Line/PNCode'. To set higher and lower pricing grades across multiple Lines, use the 'PN Group' or 'Prdt Code' options instead of 'Line' or 'Line/PNCode', as long as all of the appropriate parts are marked accordingly.
-
The validation rules for entering and removing 'Lines', 'Line/PNCodes', 'PN Groups', or 'Prdt Codes' are the same rules used for entering and removing 'Lines', 'Line/PNCodes', 'PN Groups', or 'Prdt Codes' with a 'Part Choice' 'Component Type'.
Add None (Kits Only)
-
Set up a KIT with no components.
-
To do that, the "select" the 'Allow Add Components' option on the 'Kit Options' tab. The KIT should also be defined with a 'Pricing Rule' of 'Sum Plan Price' plus a discount %, or 'Sum Cost' plus a markup or margin %, or 'Sum Sales Class Margins'.
-
Note: This setup will allow the "assembly" of any group of parts at Point-of-Sale and sell the group as a KIT.
Catalog Inclusions Tab
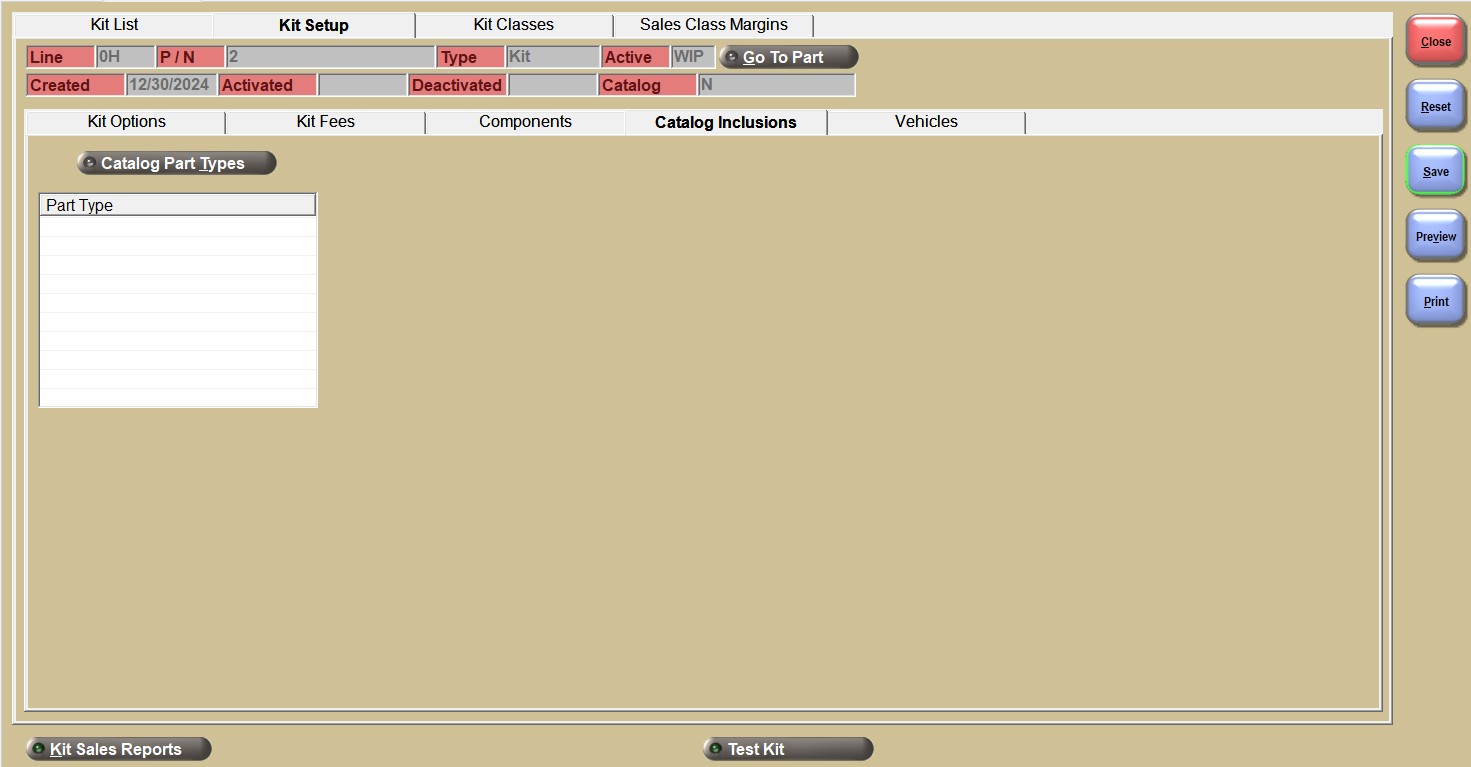
Opens the 'Manage Kit Catalog Part Types' pop-up so that it is possible to 'Add', 'Clear', and 'Delete' 'Part Types' from the grid on the 'Catalog Inclusions' tab.
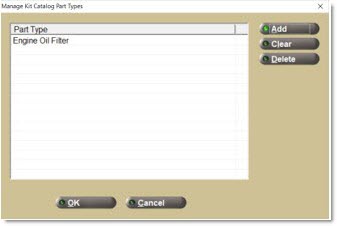
Click the 'Clear' button to clear all 'Part Types' from the list.
Click the 'Delete' button to clear the selected 'Part Type' from the list.
Click the 'Add' button to open the 'Part Type Search' pop-up.
Click 'Ok' to save the changes, and click 'Cancel' to discard the changes.

Check multiple boxes for desired 'Part Types' and click the 'Ok' button to add the selected parts to the inclusion grid. Click 'Cancel' to ignore all selections.
Add or remove 'Part Types' from the inclusion list by clicking the 'Catalog Part Types' button. This opens the 'Manage Kit Catalog Part Types' pop-up.
Part Type
Displays the list of 'Part Types' to be included in the Catalog lookup results.
Control if you want your available created KITs to be displayed with a 'Sell' button at the top of the catalog part result set in a section called 'Related Kits' on the CATALOG screen (if using the ACES, Epicor, or TecAlliance Catalogs) when a search of specific 'Part Types' for any vehicle is selected.
Vehicles Tab
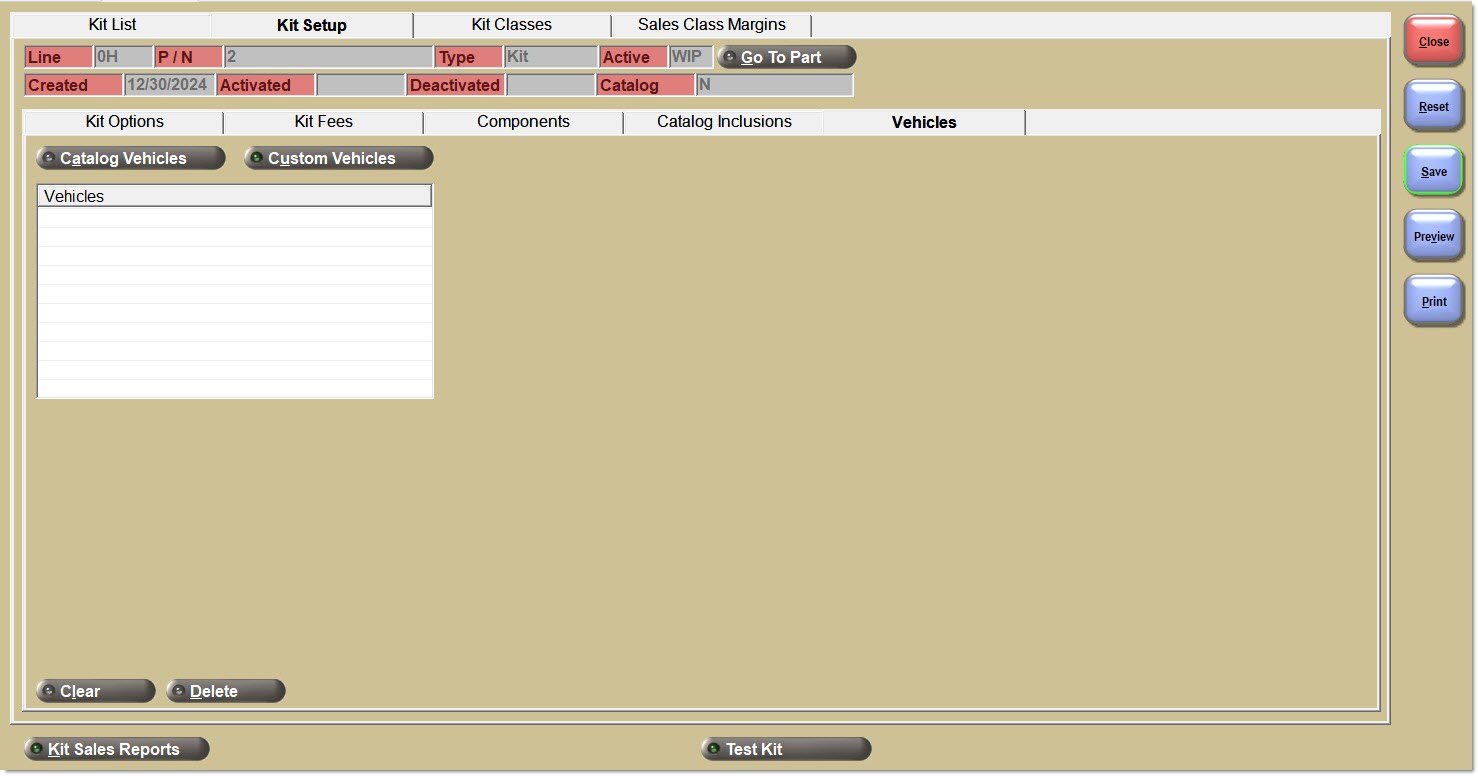
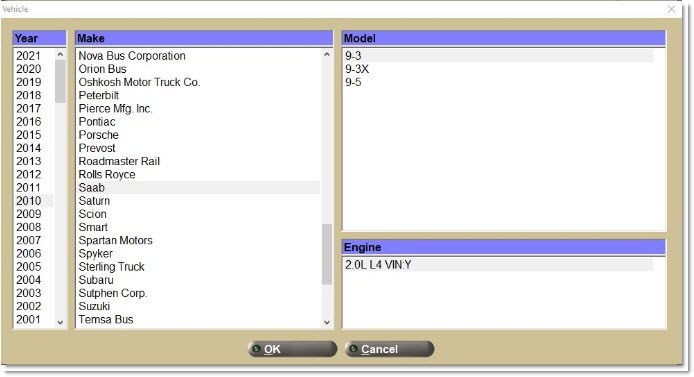
Opens the Vehicle pop-up so that it is possible to select and add catalog structured vehicles (with 'Year', 'Make', 'Model', and 'Engine' pre-filled) to the list.
Opens the 'Setup Kit Custom Vehicle' pop-up so that it is possible to create a vehicle to be used in the catalog results screen, by entering the 'Year', 'Make', 'Model', and 'Engine'.

Note: The system cannot compare the custom vehicles setup on this tab with vehicles searched for on the CATALOG screen. However, these custom vehicles can be used on the 'Find Kit' pop-up at Point-of-Sale.
Note: The custom vehicles setup on this tab enables kits to be applied to vehicles without using the ACES, Epicor, or TecAlliance catalogs. Even if using these three catalogs, these custom vehicles can be set up for use to sell kits at Point-of-Sale on the 'Find Kit' pop-up.
Control if you want your available created KITs to be displayed with a 'Sell' button at the top of the catalog part result set in a section called 'Related Kits' on the CATALOG screen (if using the ACES, Epicor, or TecAlliance Catalogs) when a search of any 'Part Types' for a specific vehicle is selected.
Vehicles
Displays the list of vehicles to be included so that when a specific part from a specific vehicle is searched for, the kit with that part is shown at the top of the catalog results screen.
Clear
Click to clear the entire grid of vehicle inclusions.
Alternatively, right-click the grid and select 'Clear all Vehicles' for the same result.
Delete
Click to delete the selected singular vehicle from the grid.
Alternatively, right-click the grid and select 'Delete Vehicle' for the same result.
Quantities Tab (BOMs Only)
The 'Quantities' tab shows the 'Quantity Available', 'Quantity Reserved', and 'Quantity On Hand' for the BOM part, also displayed on the Part Entry screen.
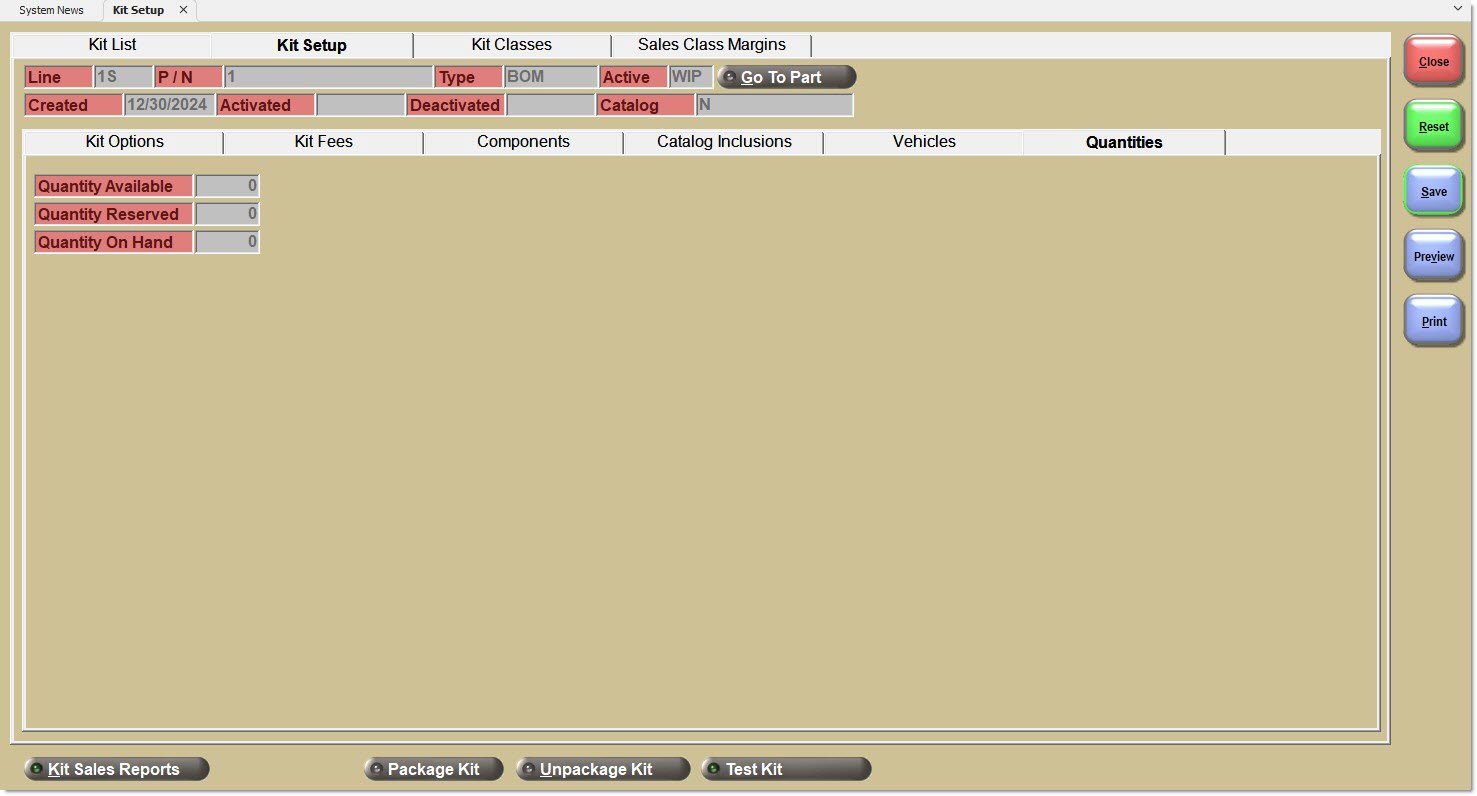
Quantity Available
View-only value of the quantity available of the packaged BOM to be sold at Point-of-Sale, also displayed on the Part Entry screen.
Quantity Reserved
View-only value of the quantity reserved of the packaged BOM that has been put aside to be sold at Point-of-Sale, also displayed on the Part Entry screen.
Quantity on Hand
View-only value of the total quantity on hand of the packaged BOM, also displayed on the Part Entry screen.