Purchase Order Screen
The Purchase Order screen is used to view a purchase order, and edit purchase order details before sending to the vendor, if needed.
To edit, double-click on a field and type in the new value. Once data is entered, the 'Enter' key moves the cursor to the right. Use the arrow keys to move the cursor up, down, left, or right.
Menu Path: Purchasing, Purchasing Dashboard. The Purchasing Dashboard screen displays listing all purchase orders. Double-click on the purchase order, or single-click and press 'Enter', or right-click and select 'Edit PO' from the right-click menu. The Purchase Order screen displays.
The screen title displays either Purchase Order or Return Order based on the type of order selected, and then the order number. At the end, it also shows the location number. For example: Purchase Order - S0001-175231-12.
The grids on the Purchase Order screen are PartsWatch Grids. For more information on the functionality of these grids, see The PartsWatch Grid help.
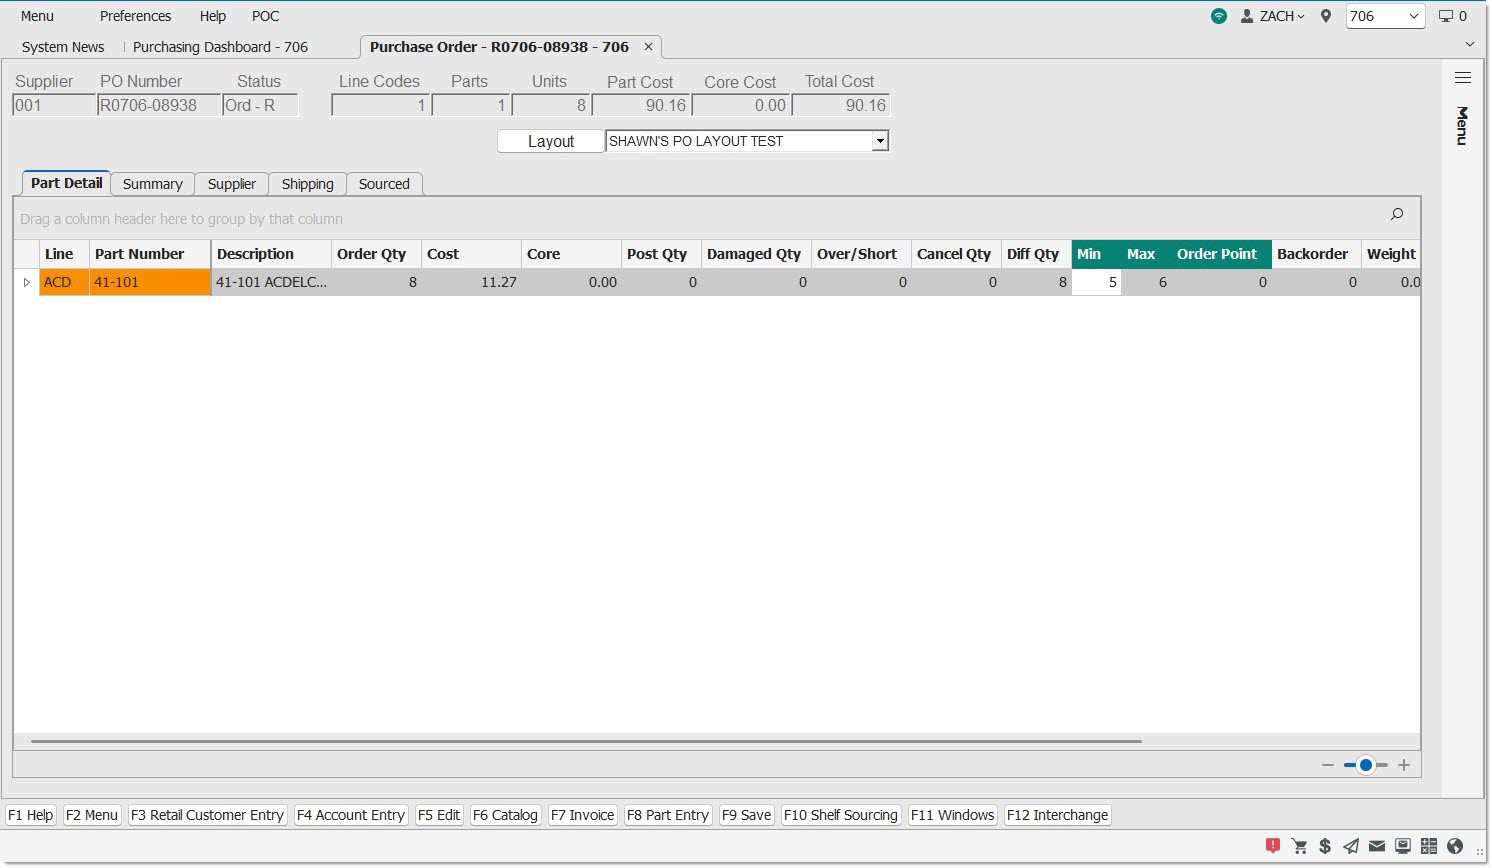
Read-Only Summary Data at the Top of Every Tab
The following read-only data displays at the top of every tab in the Purchase Order screen:
Supplier
Displays the supplier code for the supplier of the order.
PO Number / RO Number
Displays the order number.
Status
Displays the status of the order ('New', 'WIP', etc.)
Line Codes
Displays the total number of line codes on the order.
Parts
Displays the total number of parts on the order.
Units
Displays the total number of units on the order.
Part Cost
Displays the sum of all part costs on the order. Note: Displayed or hidden based on User Security Setups.
Core Cost
Displays the sum of all core costs on the order. Note: Displayed or hidden based on User Security Setups.
Total Cost
Displays the sum of all part costs plus all core costs plus all delivery related costs on the order. Note: Displayed or hidden based on User Security Setups.
Minimums not met!
Displays only when the parts on the order do not meet the minimum thresholds set up for the Vendor. If all threshold have been met, the area displays blank.
Layout
Button and drop-down that control what columns display in the grid on the 'Part Detail' tab. Click the button to display the PO Edit Layout Setup screen to create a new layout, or choose one of the created layouts from the drop-down selection list.
The chosen layout determines the columns displayed in the 'Part Detail' tab.
If there is a default layout configured on the Employee Setup screen, the system displays the order using the columns of that layout.
If there is no user-default layout configured on the Employee Setup screen, the system displays the order using the columns of the second layout listed in the drop-down. This will be the layout most recently added or updated.
If there are no existing layouts that you have access to, the system displays the layout 'Edit Layout 1'. This is considered the system default layout.
The chosen 'Layout' remains consistent across all tabs on the screen.
Screen-Level Menu
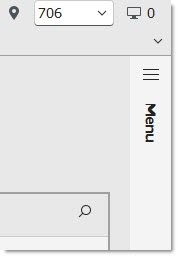
In the upper-right corner of the screen, there is a slide-out 'Menu' with a hamburger icon.
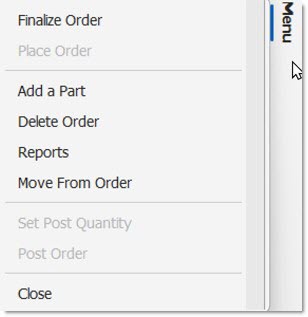
Click the 'Menu' text and an overlay menu with the screen-level functions appears. Choosing a menu item collapses the menu.
Click the hamburger icon to slide the menu out from the right. The menu remains visible until it is manually collapsed, by clicking the hamburger icon once more. Furthermore, clicking on the text 'Menu' or the up-arrow icon collapses the menu, but keeps the inline menu background visible. Click o the 'Menu' text again, or the down-arrow icon and the menu contents re-display.
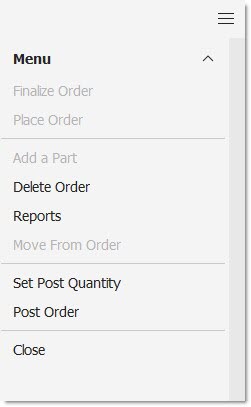
Once the menu is displayed, you can use the left, right, up, and down arrow keys to navigate the menu, and use to 'Enter' key to choose one of the options.
Menu options that are not available are disabled and grayed-out. Hover-over the grayed-out menu item and a tooltip appears to explain why the item is disabled.
Opens the "Finalize this order?" pop-up.
Opens the 'Setup eTrans' pop-up.
Click the 'Place Order' button from the menu list to transmit the PO to the vendor if transmission setups have been established for the vendor in the Supplier XMIT Setup screen. 'Place Order' can only be used once the PO has been finalized. If an XMIT record does not exist for the Vendor, the 'Setup eTrans' window displays to enter transmission information.
![]()
Displays the system-generated vendor code.
Reference Number
Displays the system-generated reference number.
Available XMIT Configurations Grid
Double-click to choose a configuration.

Purpose
Indicates the purpose of the transmission.
Description
Indicates a description for the supplier. Required to display the supplier on the sourcing grid.
Service Code
Indicates the Account # of the selling location.
Server Login
Indicates the user's FTP User ID.
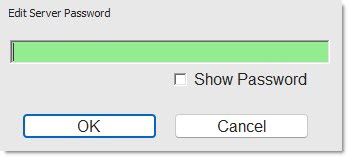
Server Password
Indicates the user's FTP password.
Displays the 'Edit Server Password' pop-up, when clicked, to enter the user's password.
Transmit Code
Indicates the Location ID of the buyer that correlates to the 'Buy From Store'.
Bill To Account
Indicates the account that is billed to the buyer.
Bill To Passwd
Indicates the Internet password of the account that is billed to the buyer.
URL / Email Address
Indicates the Server IP address. Provided by PWS Customer Support.
Phone (When Dialup)
Indicates the telephone number used to connect for dialup transmissions.
Contact Name
Indicates the person to contact regarding the transmission.
Namspace or DTD
Specifies the correct formatting of all XML transmissions through AConneX. DTD (Document Type Definition)
Process Type
Indicates the process types supported by PartsWatch and is dependent upon the specific type of transmission. All subsequent setups depend upon this selection.
Transmit Type
Indicates the method of transmission. eTrans Information is dependent upon the 'Transmit Type' and changes according to which 'Transmit Type' is selected.
Buy From State
Indicates the store from which the user is buying from.
Identifies the special code. These are also known as XMIT codes.
Description
Identifies the description of the special code.
Add
Adds a special code, when clicked.
Process
Processes the purchase order based on the setup.
When clicked and required setup values are blank for the vendor, a pop-up displays stating, "The <field name> cannot be blank. Enter the field value and click the PROCESS button to transmit the PO; or contact Support for assistance." The pop-up displays for each missing field until the order can be successfully transmitted.
Screen-Level Menu (cont.)
Opens the 'Add a Part' pop-up.
Delete Order
Opens the "Delete this order?" message prompt.
Reports
Opens the PO Reports window to generate the 'History Report', 'Purchase Order Report', 'Receiving Report', and 'Supplier Discount Report'. The 'Receiving Report' is used once received quantities are entered but before the purchase order is transferred to stock. The 'Purchase Order Report' is generally printed immediately after the order is created to assist with the editing procedure.
Move From Order (Split Order for Return Orders)
Opens either the 'Move From Order' or 'Split Order' pop-ups.
Consolidate
This option only displays in multi-location environments. Opens the 'Consolidate' message prompt.
Set Post Quantity
Opens the 'Set Post Quantity' window. See the Set Post Quantity help for more information.
Click the 'Set Post Qty' button from the menu list to display the 'Edit Purchase Order' window.
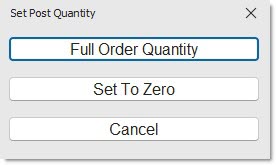
Click 'Full Order Quantity' when more parts from the PO are received than not received to set the received quantity for the entire order to the full order quantity. The amount in the 'Post' field automatically changes to the full amount of the order. Manually edit the received amount.
Click 'Set to Zero' when more parts from the PO are not received than Click 'Set to Zero' when more parts from the PO are not received than are received to set the 'Post' field to zero for all parts and manually enter the received quantity on the received items. The amount in the 'Post' field changes to zero and the field becomes editable. Manually enter the received amount.
Note: When selecting a Purchase Order in ASN status, and clicking the 'Set Post Qty' button in the Purchase Order screen, the first button on the pop-up is changed to allow the user to set the posted quantity based on the ASN quantity.
Click 'Use ASN Ship Quantity' to set the receive quantity to the ship quantity indicated by the ASNs that were selected for this Purchase Order. The ASN quantity may be different from the 'Inbound' quantity which is the ship quantity from all ASNs that were electronically applied to the Purchase Order, regardless of whether they were selected for this Purchase Order receipt session.
After the 'Set Post Qty' function is initiated and the 'Full Order Quantity' is accepted, the quantities required for each store are applied and any extra part quantity ordered as a result of a buy quantity rule is assigned to the ordering (central buying) store.
When the 'Edit Purchase Order' pop-up is launched, the extra quantity will be displayed in the 'Post' quantity for the ordering store.
Click 'Cancel' to cancel the operation.
If the 'Use ASNs to Set Post Quantity' option in the Store Purchasing Setup, 'Purchasing' tab screen is set to 'Prompt', the 'Select ASNs' pop-up is presented to the user when loading a Purchase Order in ASN status.
The fields at the top of the pop-up allow the user to optionally filter the list by 'BOL / Inv #', 'ASN', 'ASN Create' date, 'Due Date', or 'PO Number'.
To select no ASNs, uncheck all checkboxes and click 'OK'. The Purchase Order screen will display without any ASN detail being passed to that screen.
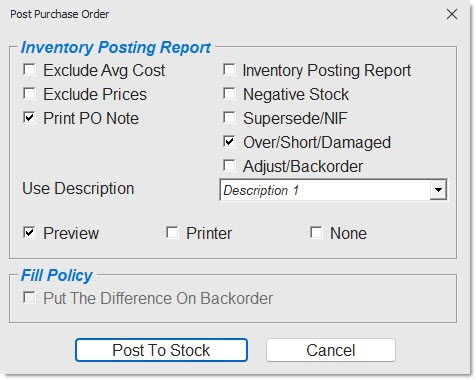
Opens either the 'Post Purchase Order' or 'Post Return Order' window.
Click the 'Post' button from the menu list to display the 'Post PO' window to post the order into stock and optionally print a 'Posting Report', which reports posted purchase orders.
Post Order - With ASNs Selected
Closes the screen.
Part Detail Tab
For orders with 1,000 parts or more, a progress meter appears at the bottom of the grid to indicate the loading progress of the order. If any of the following actions are attempted before the order fully loads, a prompt opens stating: "Please wait until all data is loaded before attempting to add parts." with an 'Ok' button to close the prompt:
-
Add a Part
-
Remove a Part
-
Expand All (for multi-store distributed orders)
-
Add a Location (for multi-store distributed orders)
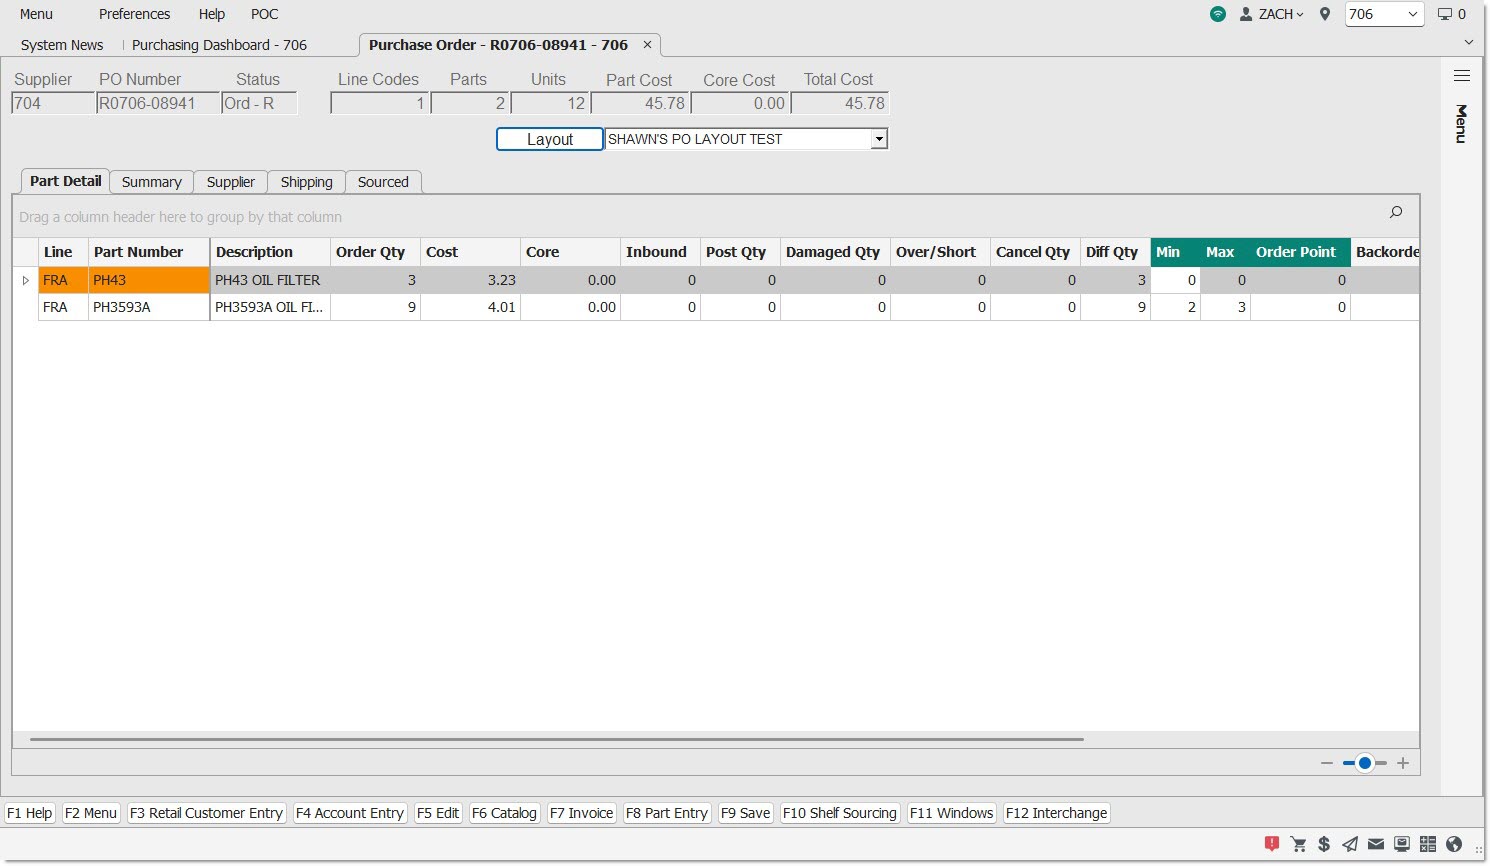
The grid on the 'Part Detail' tab displays in the 'Layout' selected. If no 'Layout' was elected in the drop-down, the default 'Edit Layout 1' displays. The chosen 'Layout' remains consistent across all tabs on the screen.
Editable fields display in green. Parts with an associated part (supersedes, alternates, etc.) are displayed in orange. For a multi-location environment, if the part has an associated parts in any of the locations on the order, the cell is shaded orange in the Master Row.
The following columns are always displayed. Furthermore, they cannot be hidden by using the grid's 'Hide This Column' feature.
Line
Displays the line code of the part on the order. This column is frozen, and always visible even after scrolling to the right.
Part Number
Displays the part number of the part on the order. This column is frozen, and always visible even after scrolling to the right.
Description
Displays the 'Description 1' value of the part on the order.
Order Qty / Return Qty
Displays the number of parts ordered (or returned, for a Return Order. Return Order quantities to be returned have a (-) in front of the quantity).
Cost
Displays the part cost of the parts ordered.
Core
Displays the core cost of the parts ordered.
Inbound
Displays the total in bound quantity of the part from an ASN if an ASN has arrived.
Post Qty
Displays '0' (zero) unless the field is set to 'Full Order Quantity' from the Set Recv Qty functionality or if the received quantity or 0 (zero) are manually entered. If the field is manually edited during PO receipt, ASN quantities are lost.
Damaged Qty
Displays the quantity that was posted as damaged during the receipt process.
Over/Short
Displays the quantity of the differences between what was ordered and what was received. An ‘Over’ displays a positive number, and a 'Short' displays a negative number.
Displays the quantity that has been indicated as a ‘Cancel’ on an ASN. Canceled quantities are not shipped and are canceled instead.
Diff Qty
Displays '0' (zero) or the quantity for each part identified as a back order.
Automatically populates from the ASN and is not editable. A Backorder is typically only sent with the ASN for parts where the quantity shipped is not equal to the quantity ordered; however, the vendor will be sending the balance on the ordered quantity on another ASN. When the PO is received, the quantity is put on a backorder PO.
The 'BKO Cancel' field on the ASN identifies back orders when set to a value other than 'C' (Cancel).
The 'Edit Save Backorder Flag' User Security proc, located in the User Security Setup screen under 'Purchasing', 'Purchasing Main Menu', determines whether or not the flag can be edited.
-
When set to 'Not Visible', the 'Save Backorder' flag is hidden in the Purchase Order screen.
-
When set to 'View Only', the 'Save Backorder' flag displays but is unavailable to edit in the Purchase Order detail screen.
-
When set to 'Allow Edit', the 'Save Backorder' flag in the Purchase Order screen is available for edit.
Note: Regardless of the value of the 'Save Backorder' flag, the 'Put The Difference On Backorder' flag in the 'Receive PO' window is unavailable and not editable.
Row-Level Right-Click Menu
The following options are available on the 'Part Detail' tab when a row is right-clicked in the grid. These options appear for both purchase and return orders unless otherwise specified.
Summary Tab
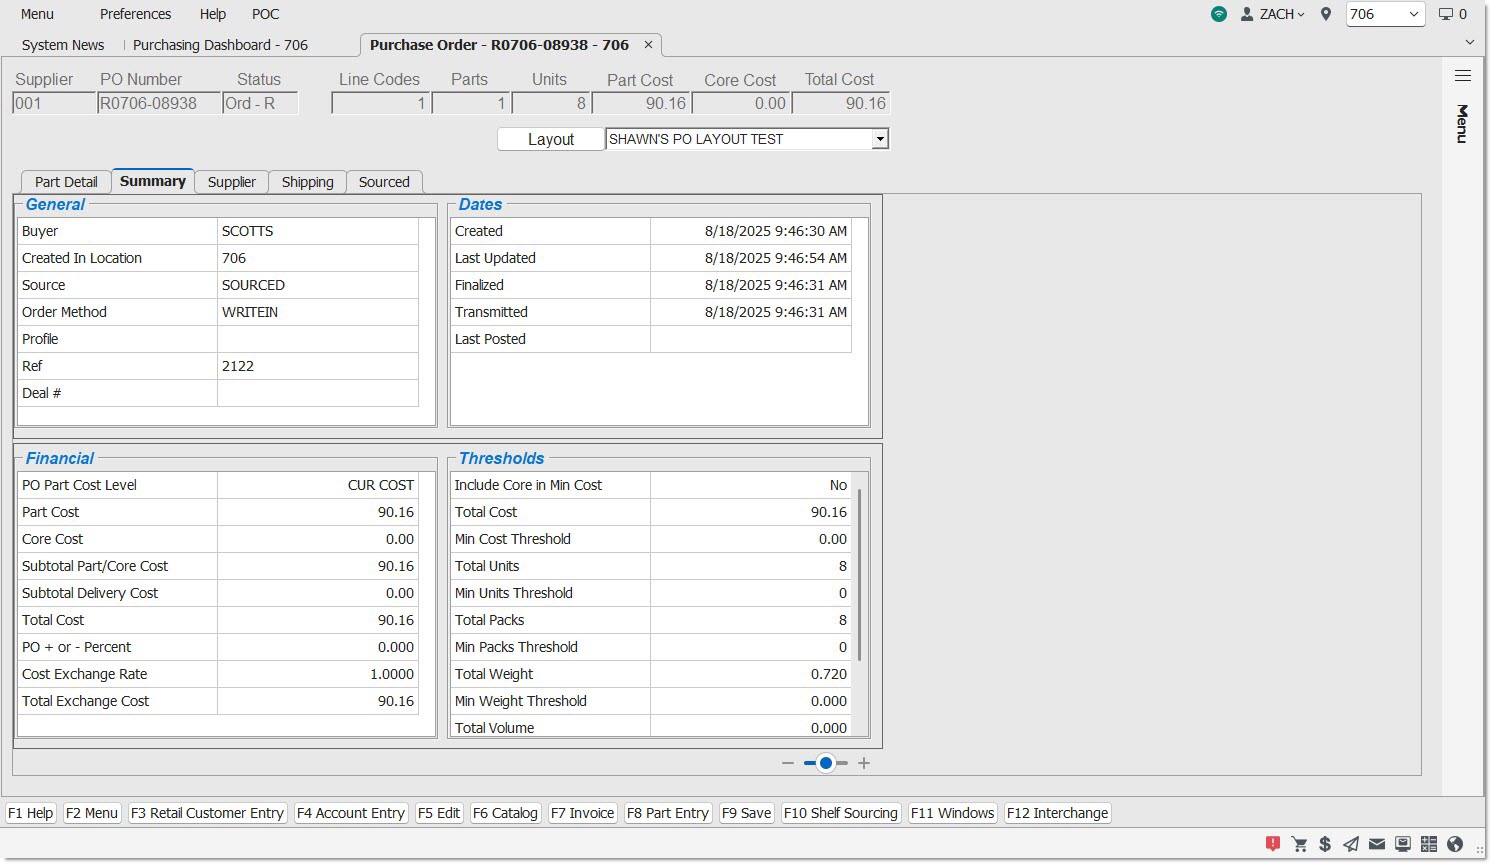
The 'Summary' tab contains four sections with read-only fields that contain summary information about the selected Purchase or Return order.
It is possible to use the horizontal bar in between the top and bottom sections of the screen to resize the top and bottom grids.
Buyer
Displays the user ID (employee code) of who created the purchase order manually or who created the Time Order.
Created in Location
Displays the location in which the order was created.
Source
Displays the order mode used to create the order.
Order Method
Displays the method used to create the order.
Profile
Displays the profile used to create the order from the Order Create screen or the Time Orders Queue. If no profile was used, the field displays blank.
Ref
Displays the PW order reference number generated when the order is created.
Deal #
Displays a brand-specific deal number. May display 'Vendor PO' based on a hidden switch.
Financial Section
Note: The fields in this section are refreshed or recalculated if associated cost changes are made on other tabs.
PO Part Cost Level
Displays the pricing level used and defined on the Field Name Setup screen and used in the order. This could be from:
-
'PO Part Cost Level' on the Supplier Order Setup screen.
-
'Sourcing Cost Level' on the Supplier Order Setup screen.
-
'PO Part Cost Level Override' on the Order Create screen.
Part Cost
Displays the sum of all part costs on the order, excluding core costs.
Core Cost
Displays the sum of all core costs on the order.
Subtotal Part/Core Cost
Displays the sum of the 'Part Cost' and 'Core Cost' fields.
Subtotal Delivery Cost
Displays the sum of the shipping, handling, other, freight, and duty costs.
Total Cost
Displays the sum of the 'Subtotal Part/Core Cost' and 'Subtotal Delivery Cost' fields.
PO + or – Percent
Displays the value that was used to create the order which may be the supplier default or the value provided when creating the order. This read-only field is the supplier discount that originates on the Supplier Order Setup screen and may be overridden on the Create Purchase Order screen.
Cost Exchange Rate
Displays the value used to create the order which may be the supplier default or the value provided when creating the order. This read-only field displays the cost exchange rate that originates on the Supplier Order Setup screen and may be overridden on the Create Purchase Order screen.
Total Exchange Cost
Displays the total of the 'Cost Exchange Rate' multiplied by the order's total cost.
Dates Section
Note: For all dates, the application displays the date and timestamp using the system-defined format. If no date exists, the fields are left blank.
Created
Displays the date and time the order was created.
Last Updated
Displays the last date and time that a change was made to the order.
Finalized
Displays the date and time the order was finalized.
Transmitted
Displays the date and time the order was transmitted.
Last Posted
Displays the most recent posted date and time for the order.
Last ASN Applied
Displays the most recent date and time that an ASN was applied to the Purchase Order. This row does not display for vendors that do not use ASNs.
Last ASN Posted
Displays the most recent date and time that an ASN was posted. This row does not display for vendors that do not use ASNs.
Thresholds Section
Note: The following fields are set from the Supplier Order Setup screen or overridden on the Create Purchase Order screen. For any numeric values not set, the field displays as “0.00” (the application follows the system setting for the number of decimal places to display).
Note: For any minimum not met, the cell containing the threshold value displays in the safe color for the grid. (The color depends on which UI is chosen).
Include Core in Min Cost
Indicates if the Core is included in the 'Min Cost'. 'Yes' displays if it is, 'No' displays if it is not.
Total Cost
Displays the total cost of the Parts and Cores on the order.
Min Cost Threshold
Displays the corresponding value for minimum cost taken from the Supplier Order Setup screen or overridden on the Order Create screen when the order was created.
Total Units
Displays the total number of aggregated units on the order.
Min Units Threshold
Displays the corresponding value for minimum units taken from the Supplier Order Setup screen or overridden on the Order Create screen when the order was created.
Total Packs
Displays the total number of packs on the order.
Min Packs Threshold
Displays the corresponding value for minimum packs taken from the Supplier Order Setup screen or overridden on the Order Create screen when the order was created.
Total Weight
Displays the total weight of the parts on the order.
Min Weight Threshold
Displays the corresponding value for minimum weight taken from the Supplier Order Setup screen or overridden on the Order Create screen when the order was created.
Total Volume
Displays the total volume of the parts on the order.
Min Volume Threshold
Displays the corresponding value for minimum volume taken from the Supplier Order Setup screen or overridden on the Order Create screen when the order was created.
Supplier Tab
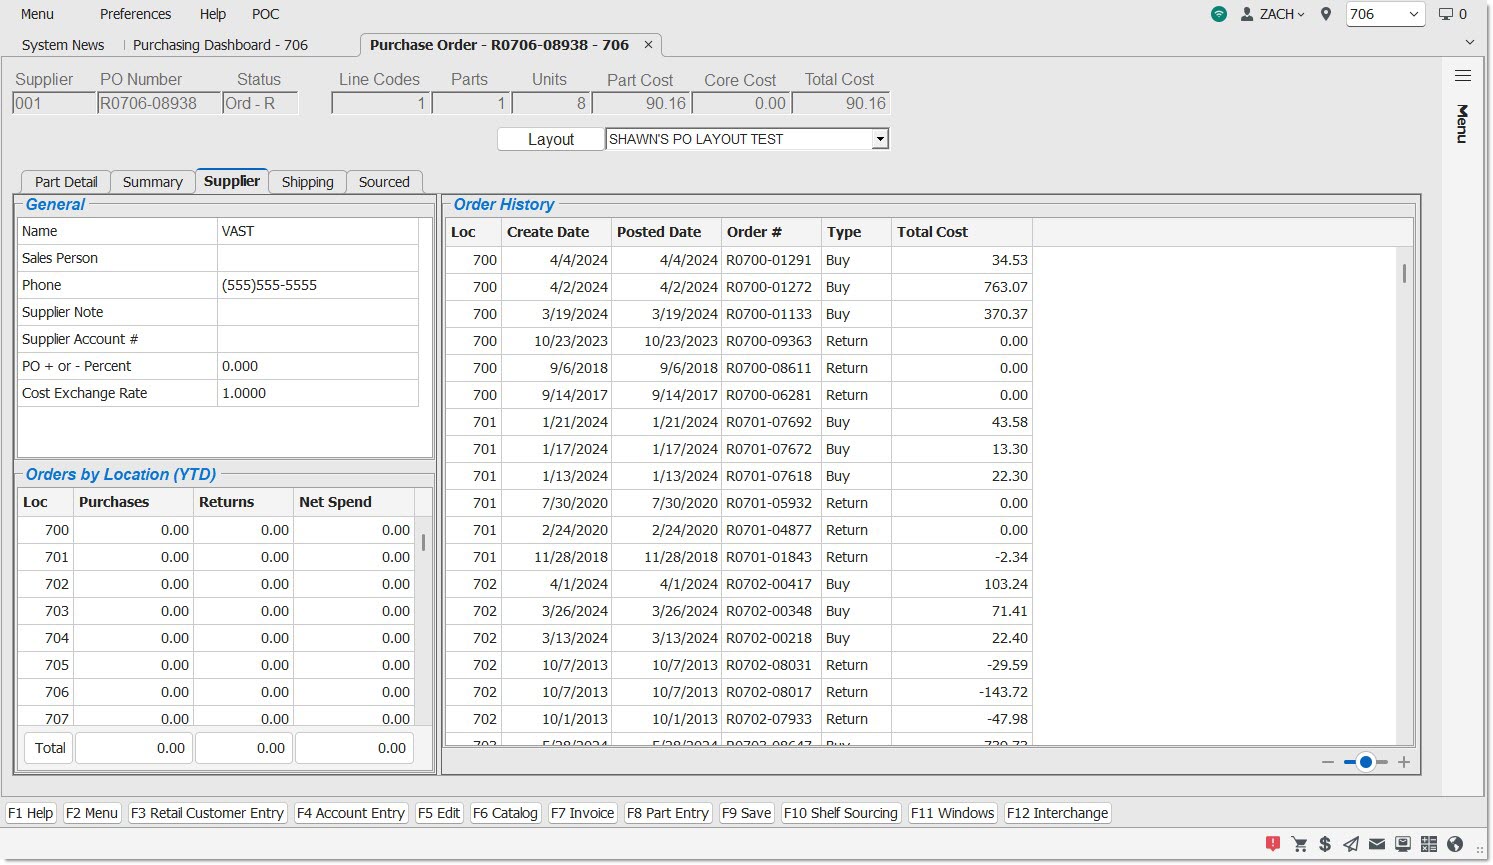
Note: The fields on the 'Supplier' tab are read-only unless otherwise specified.
Note: The 'Order History' and 'Orders by Location' grids only display stores that the logged-in user has permission to see based on their assigned store group.
Name
Displays the supplier business name from the Supplier Entry screen.
Sales Person
Displays the name of the salesperson at the supplier as found on the Supplier Entry screen.
Phone
Displays the phone number of the supplier from the Supplier Entry screen.
Supplier Note
Displays the 'Supplier Note' from the Supplier Entry screen at the time the order was created. Note: If the note text is longer than the width of the column, the entire note displays when hovered-over with the cursor.
Supplier Acct #
Displays the 'Vendor Acct #' from the Supplier Entry screen at the time the order was created.
PO + or – Percent
Displays the supplier discount that originates on the Supplier Order Setup screen and may be overridden on the Create Purchase Order screen. Displays the value from the Supplier Order Setup screen.
Cost Exchange Rate
Displays the cost exchange rate that originates on the Supplier Order Setup screen and may be overridden on the Create Purchase Order screen. Displays the value from the Supplier Order Setup screen.
Orders by Location (YTD) Section
Note: Orders sourced through FDO+ will display additional information in the 'Supplier' tab.
Loc
Displays a list of all locations in the installation.
Purchases
Displays a total sum of all posted purchase orders for this supplier, per location, for year-to-date. This includes orders up to the current date.
Returns
Displays a total sum of all posted return orders for this supplier, per location, for year-to-date. This includes orders up to the current date.
Net Spend
Displays the value of the difference between the 'Purchases' and 'Returns' columns.
Total
Displays a total sum of all the columns in the grid.
Order History Section
Note: This section displays the last three purchase and return orders from this supplier.
Loc
Displays the location of the order.
Create Date
Displays the date the order was created.
Posted Date
Displays the date the order was first posted.
Order #
Displays the number of the order.
Type
Displays 'Buy' for purchase orders or 'Return' for return orders.
Total Cost
Displays the total cost of the order.
Shipping Tab
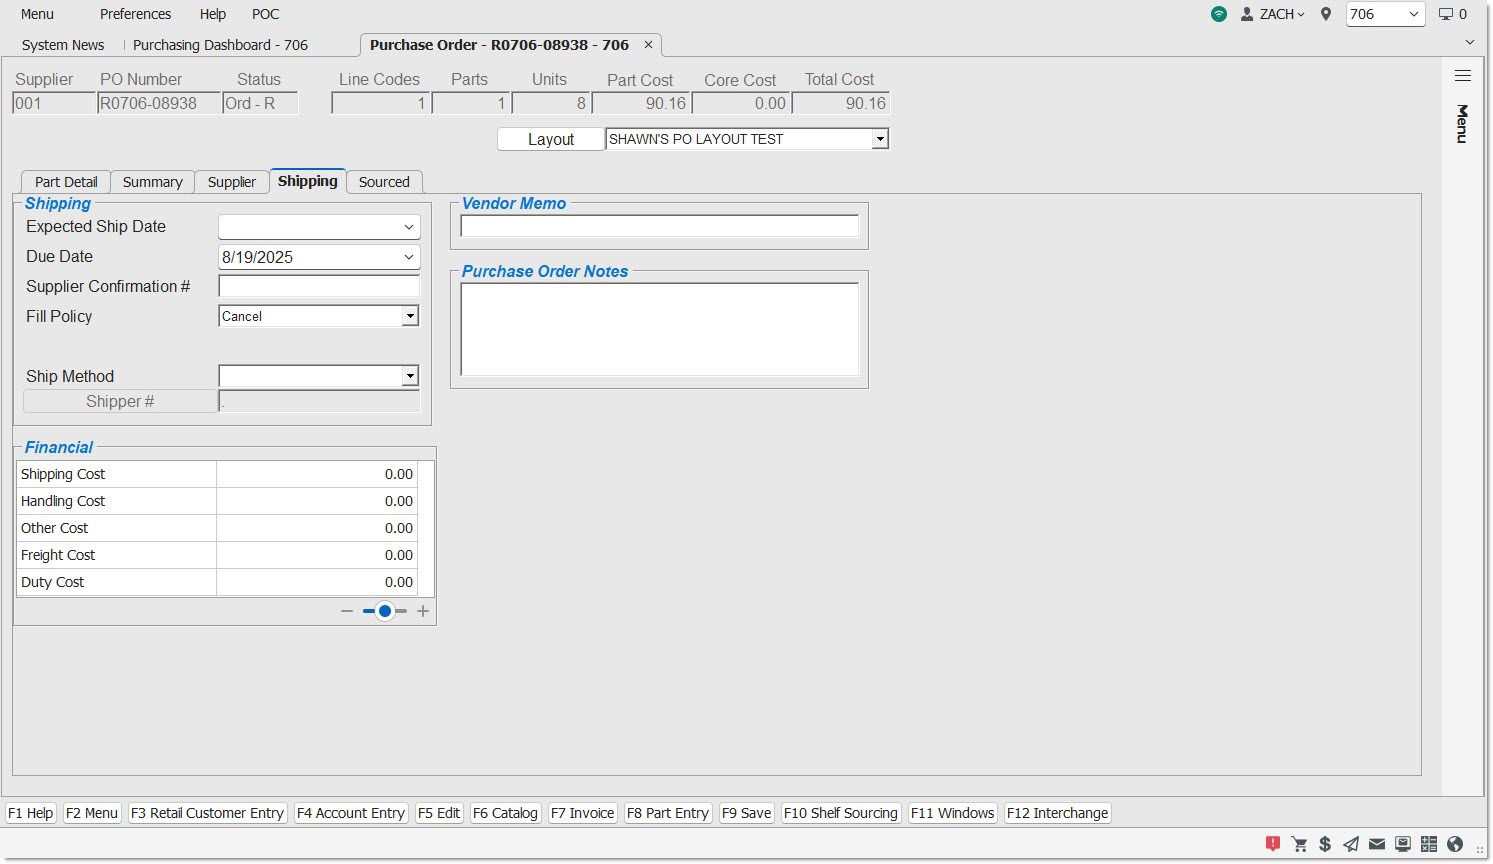
Date selector field that can be entered for informational purposes. Until a date is entered, the field remains blank.
Due Date
Defaults to the system-calculated due date based on the 'Delivery Days' setting found on the Supplier Order Setup screen and possibly overridden on the Create Purchase Order screen. This is a date selector that may be modified. If it is modified, the Purchasing Dashboard also reflects this updated date. If 'Delivery Days' is zero, the 'Due Date' will be blank.
Supplier Confirmation #
Text field that may be edited for informational purposes. The default is blank. In the case of a shelf sourced order to a sister store, this field will be populated with the sales order reference number created at the store who sourced the order.
Fill Policy
Drop-down that displays the Fill Policy of the Supplier as defined on the Supplier Order Setup screen or overridden on the Create Purchase Order screen at the time of order creation.
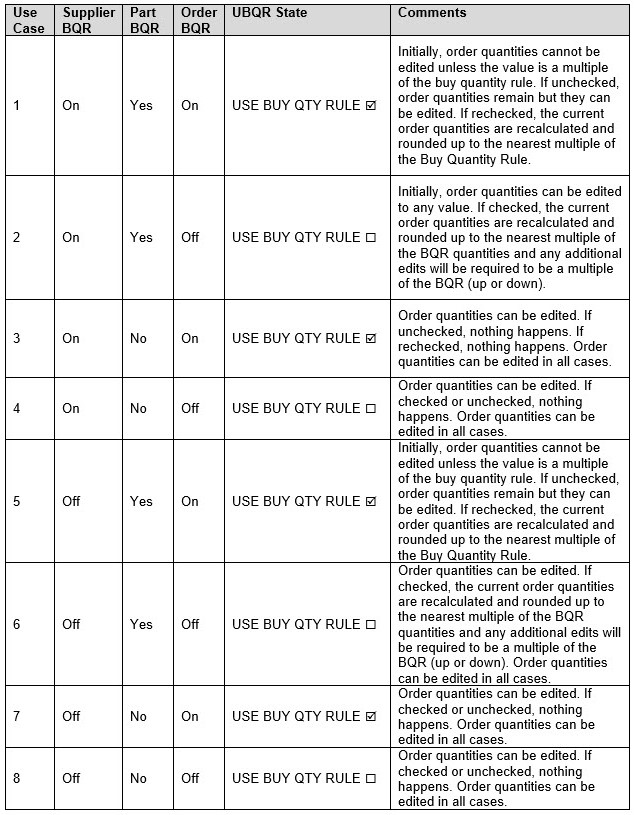
Use Buy Qty Rule
By default, displays the 'Use Buy Qty Rule' setting as defined on the Supplier Order Setup screen or overridden on the Create Purchase Order screen at the time of order creation. Note: This checkbox is visible only if the 'Show Use Buy Qty Rule Checkbox' is checked on the Store Purchasing Setup screen.
The table below identifies the behavior of these checkboxes, both for purchases and returns.
- The "Supplier BQR" column refers to the setting 'Use Buy Qty Rule' set on the Supplier Order Setup screen. This setting identifies whether a supplier enforces buy quantity rules or not. (For returns, the setting is 'Rtn Full Packs Only' on the same screen.)
- The "Part BQR" is set on the part record by Vendor on the Part Entry screen.
- The 'Use Buy Qty Rule' is set on the 'Options' tab of the Order Create screen for the purchase order. This setting can be modified on an order by order basis.
- The "UBQR State" refers to the state of the 'Use Buy Qty Rule' checkbox on the Purchase Order screen when it is initially created.
Ship Method
Drop-down which includes the supplier's ship method as defined on the Supplier Order Setup screen; if no 'Ship Method' is defined for the supplier, the field will be blank. The user may select a ship method from the drop-down. These are defined on the Controls, System, System Source Setup screen.
Shipper #
This button is enabled only if a 'Ship Method' is selected. Click to display the 'Browse Shipper #s' window to assign a 'Shipper #' to a source. Shipper #s are set up on the System Source Setup screen, 'Ship Methods Setup' tab.
Shipping Cost
Displays the shipping cost of the order.
Handling Cost
Displays the handling cost of the order.
Other Cost
Displays any miscellaneous costs of the order.
Freight Cost
Displays the cost of the freight on the order. Taken from the Supplier Order Setup screen, it can be represented by a flat amount or a percentage.
Duty Cost
Displays the cost of the duty on the order. Taken from the Supplier Order Setup screen, it can be represented by a flat amount or a percentage.
Vendor Memo Section
Editable field that can be modified when the order is in any status. Enter any information about the supplier that will be important to remember.
Purchase Order Notes Section
Editable field that may be modified until the order is transmitted. Enter a note about the purchase order. Note: The text in this note can be printed on the order if 'Print PO Note' is checked on the 'PO Reports' pop-up.
Sourced Tab
This tab only appears for sourced orders.
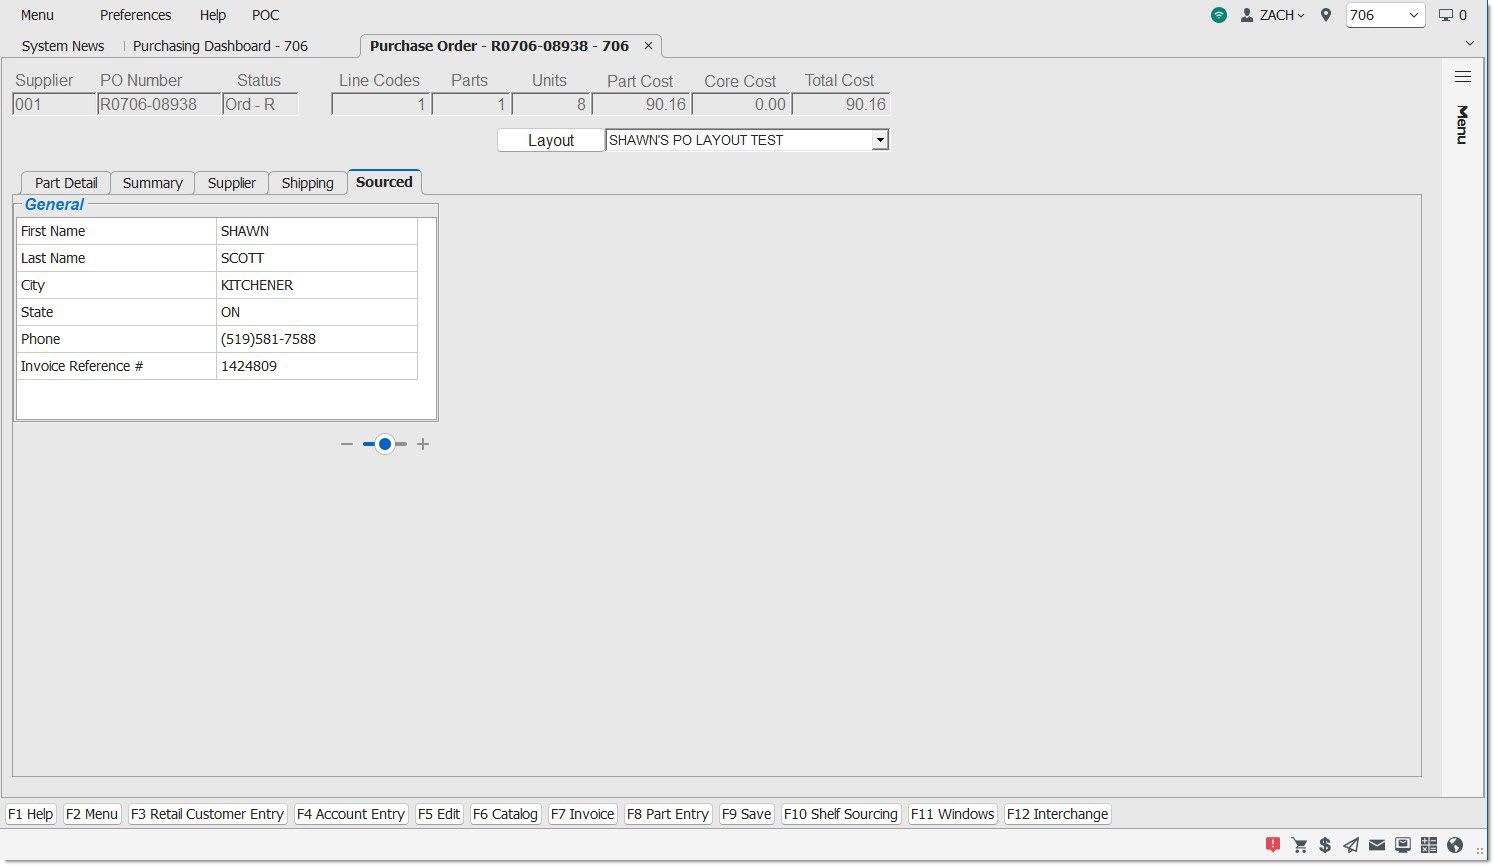
Business Name
Displays the business name of the supplier.
Address 1
Displays the first address line for the business.
Address 2
Displays the second address line for the business. Does not display if there is no ‘Address 2’ value.
City
Displays the city where the business address is located.
State
Displays the state where the business address is located.
Zip Code
Displays the zip code of the business address.
Phone
Displays the phone number of the business.
Invoice Reference #
Displays the Invoice Reference number of the order that spawned this sourced Purchase Order.
Multi-Store Tab
This tab only appears for multi-store consolidated or distributed orders.
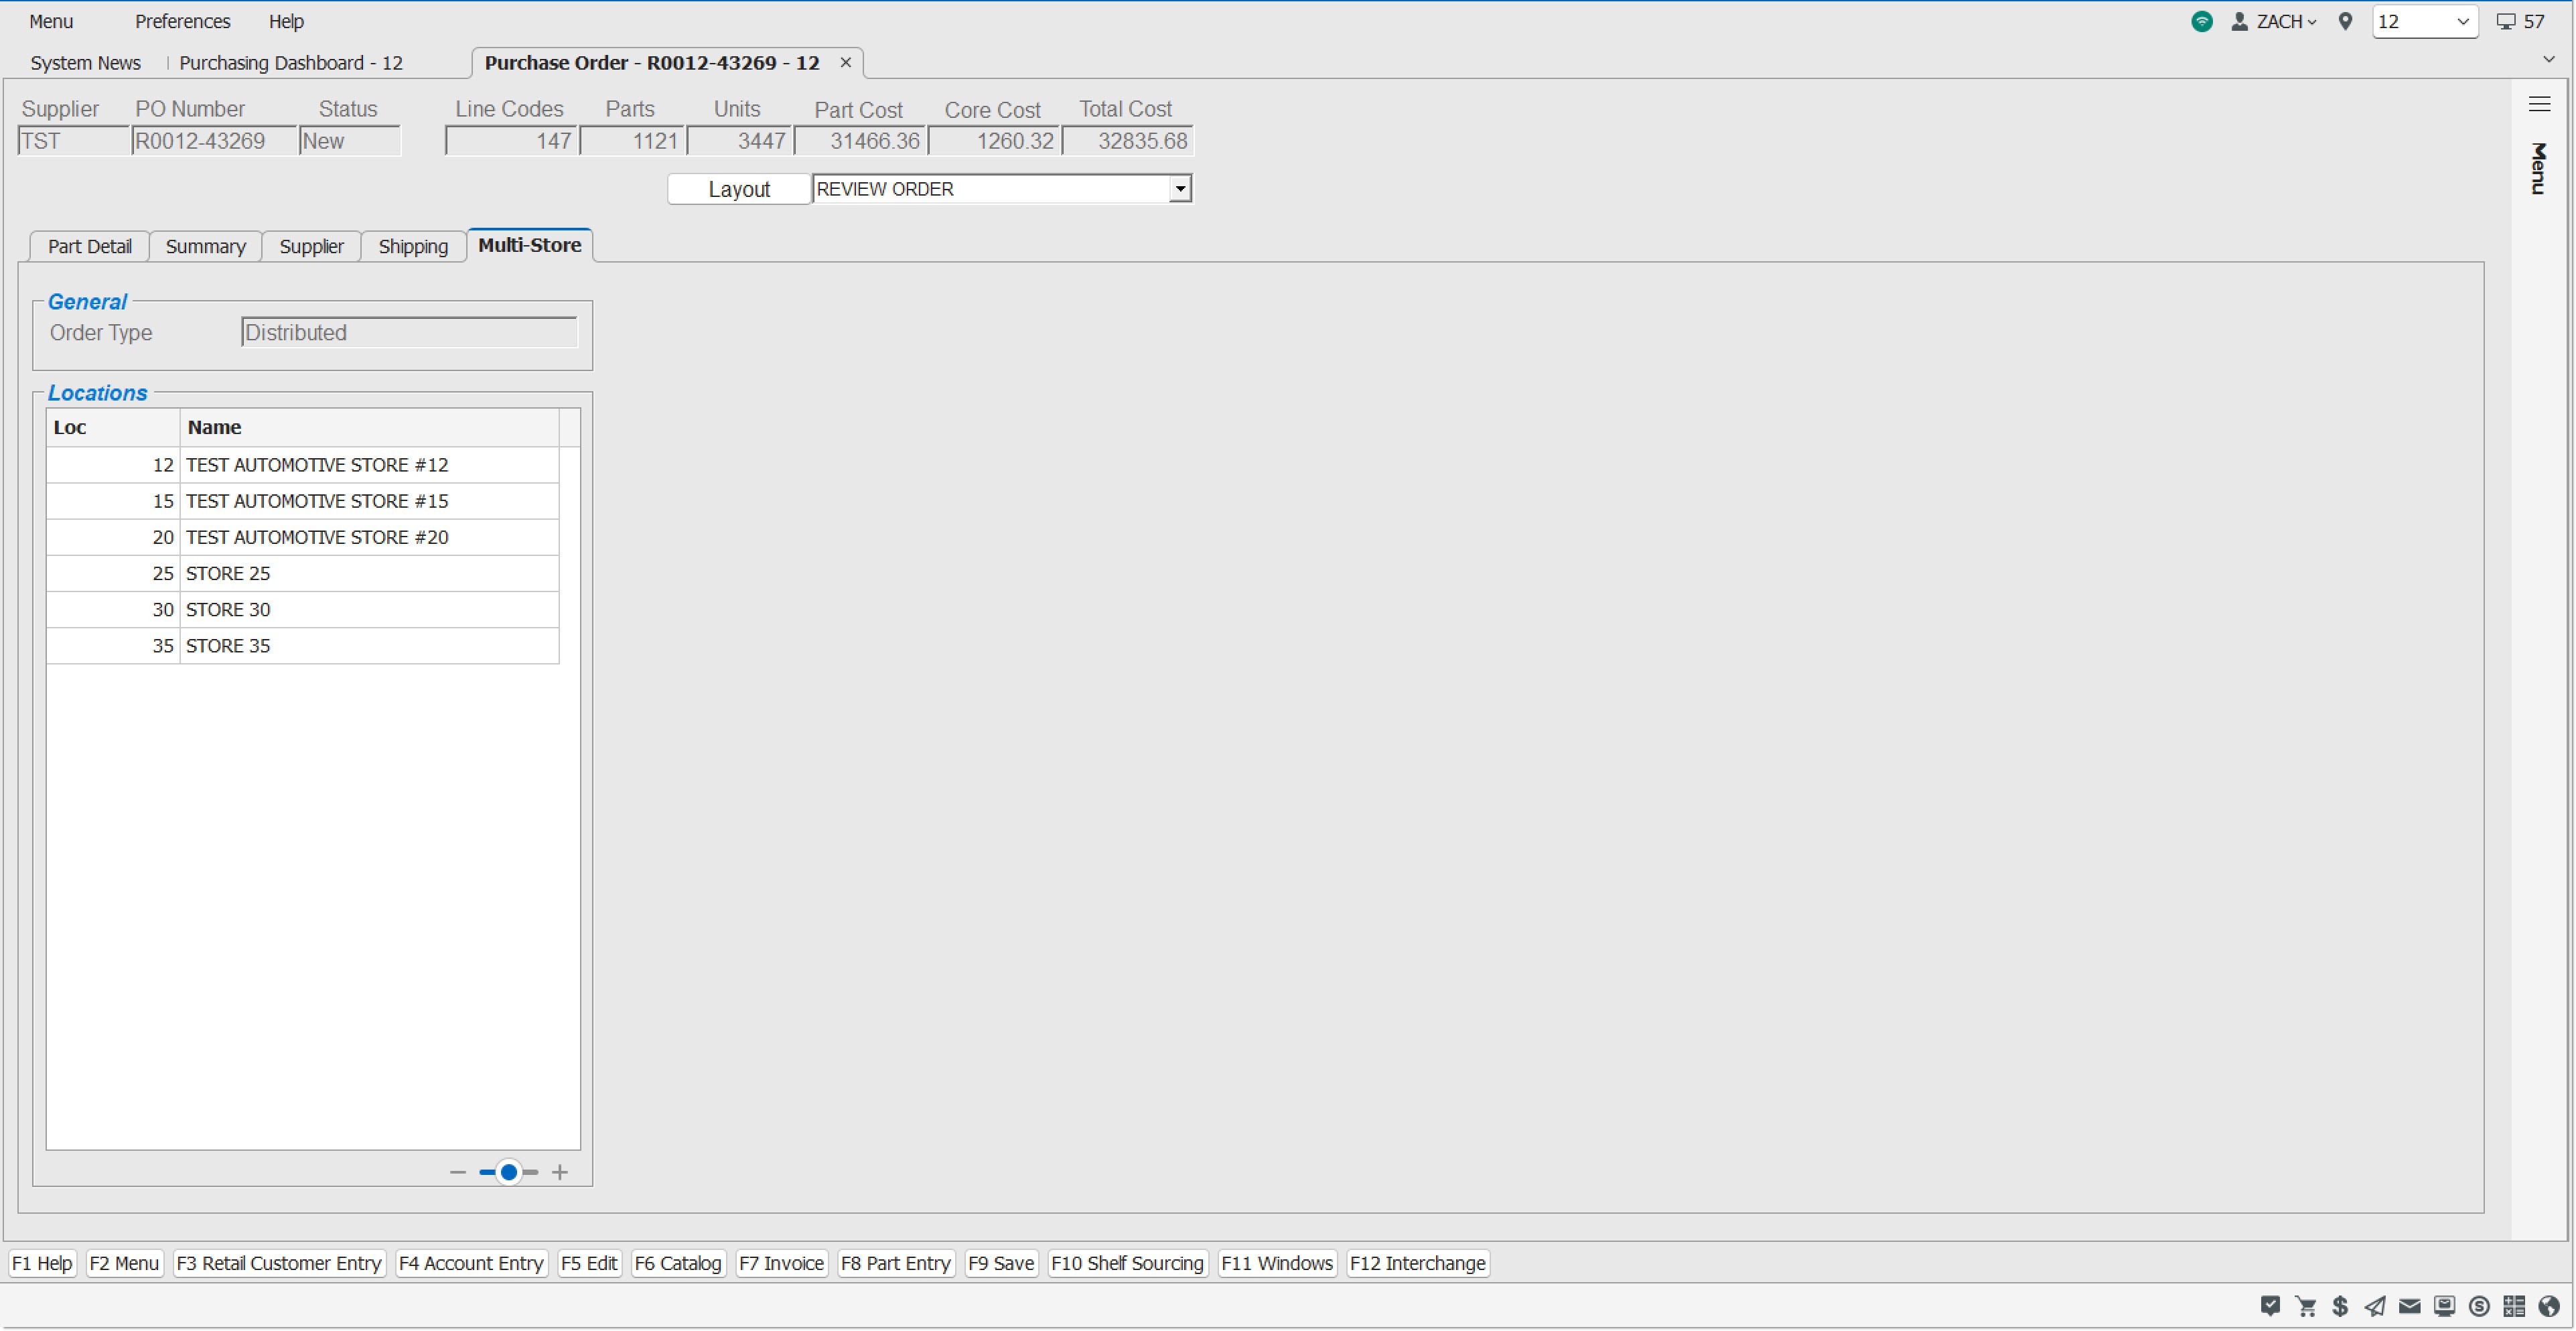
Displays the read-only order type, either 'Consolidated' or 'Distributed'.
Displays a list of all stores/locations that have order quantity on this order. This could be different from the list of stores selected during the order create process. Displays the 'Loc' (location number) and 'Name' (store name) in each column.
Multi-Store Functionality
Additional functionality that applies only to multi-store orders is listed below.
Multi-Store Part Detail Tab
The 'Part Detail' tab displays as follows for multi-store distributed orders:
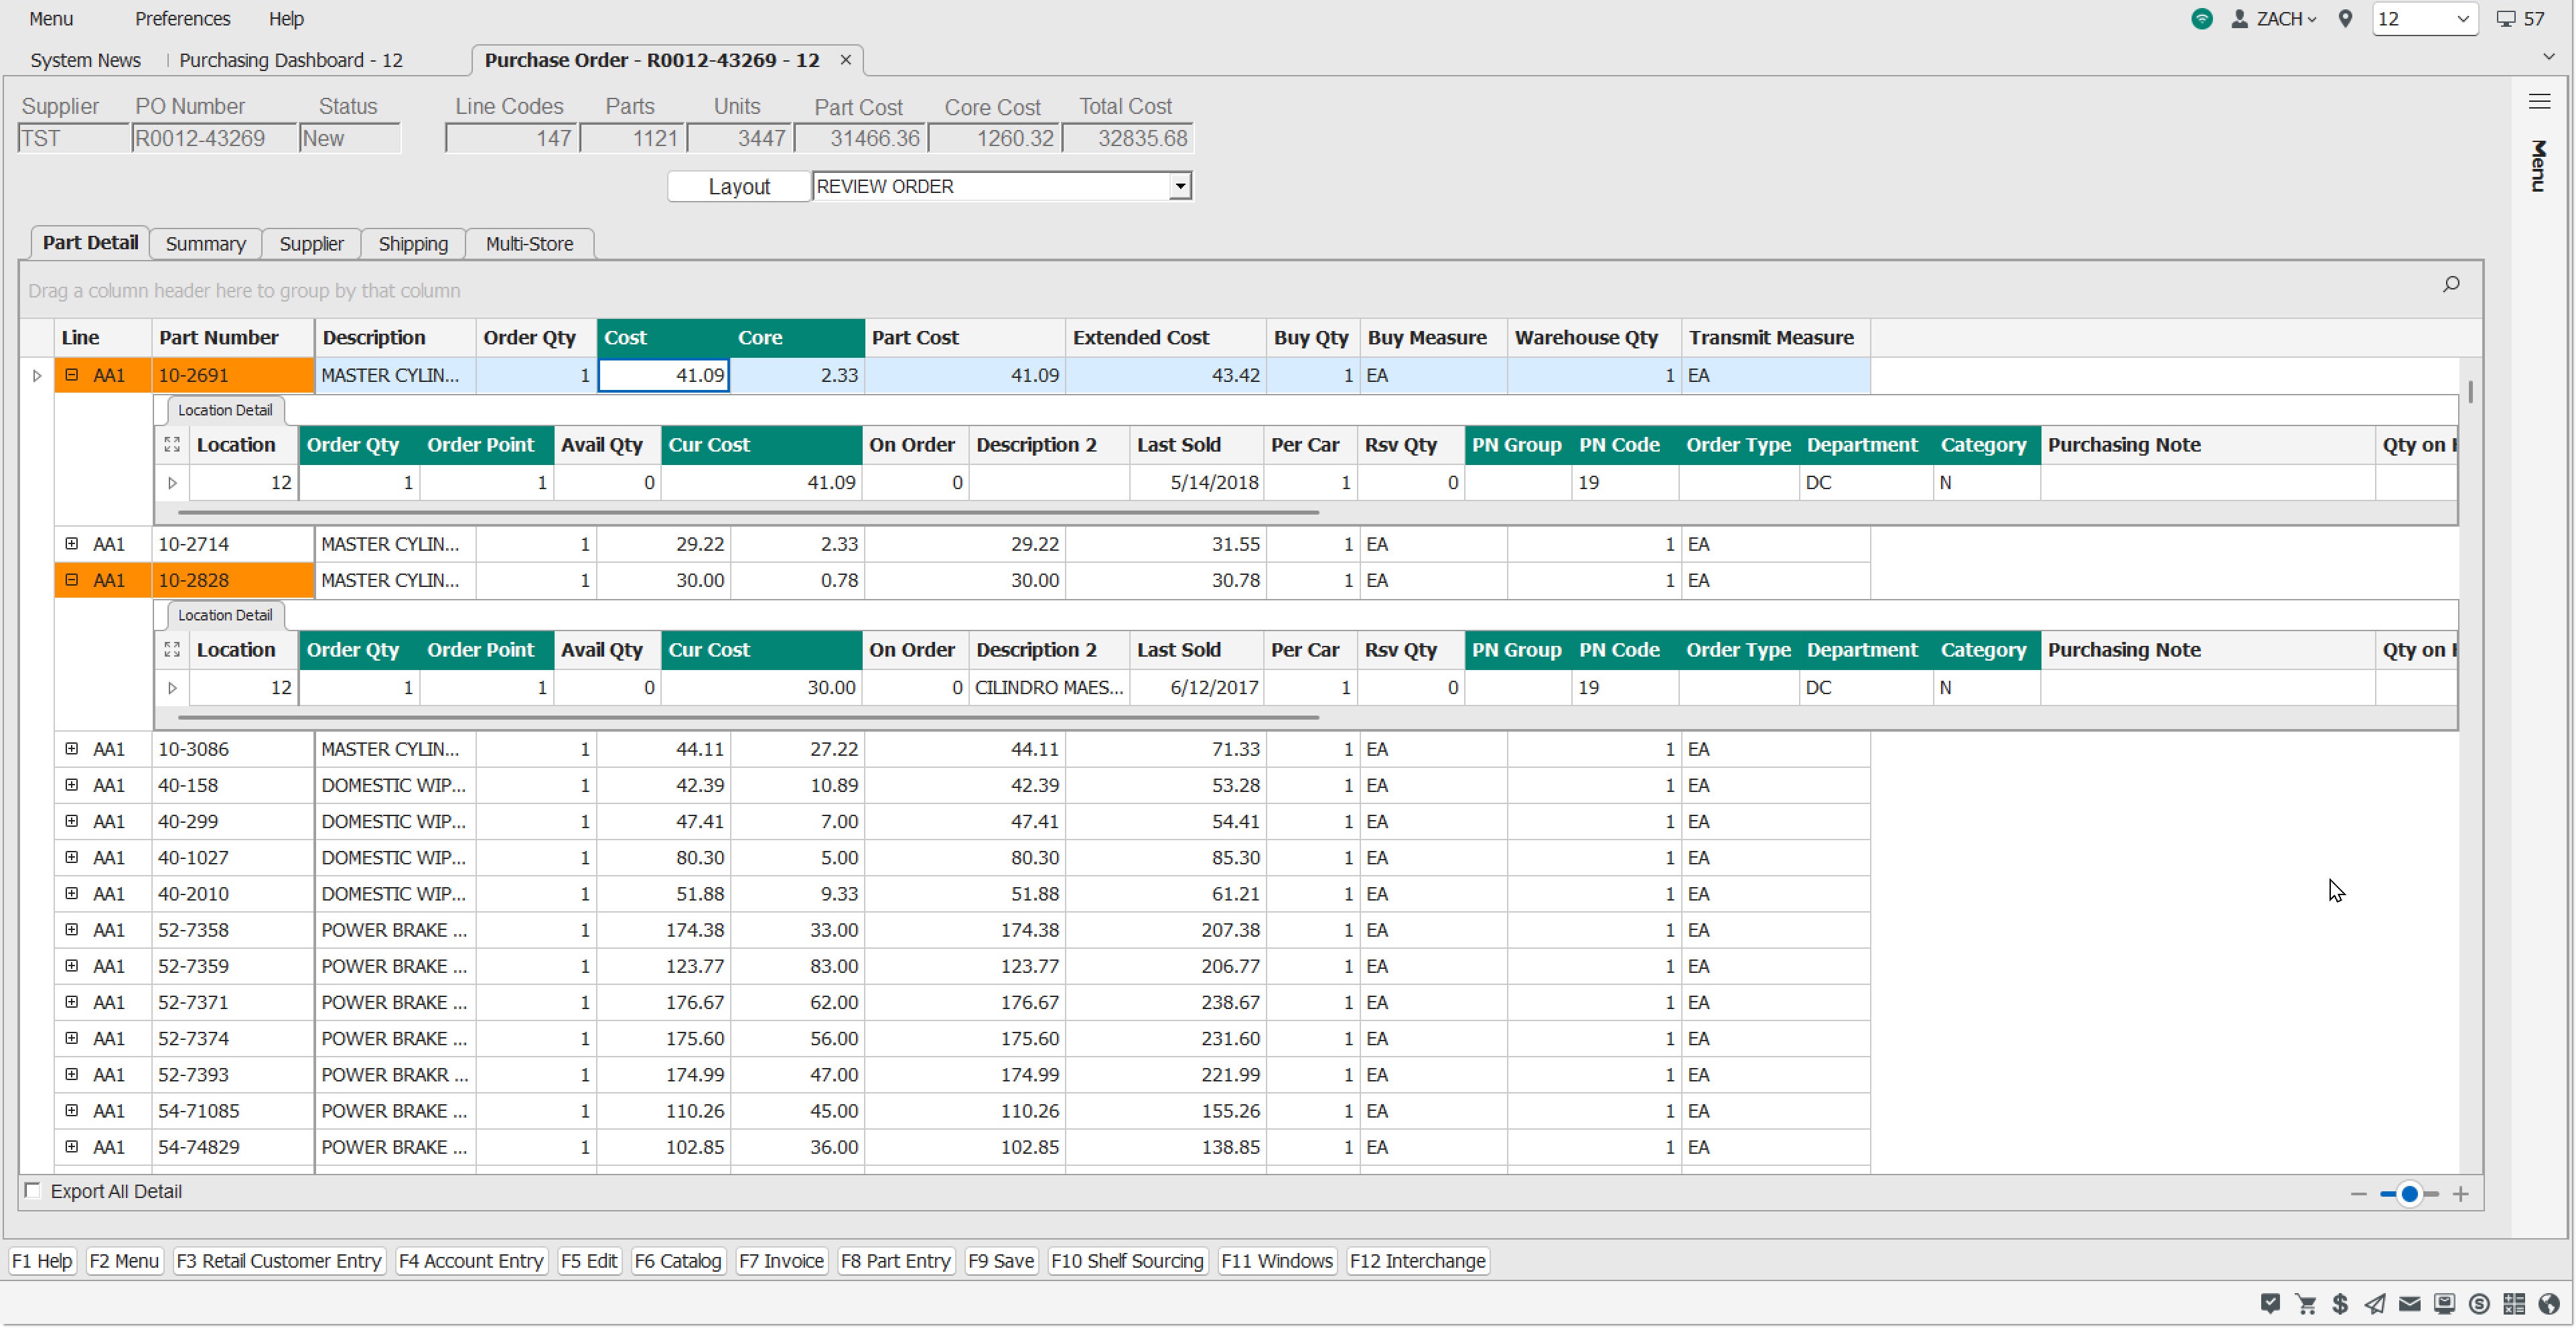
The master rows contain general part information while the detail rows contain part attributes and information specific to each location.
The master row's 'Order Qty' is the sum of all order quantities on the locations in the detail rows below it.
The master row always contains the following columns:
Line
The line code for the part on the order.
Part Number
The part number for the part on the order.
Description
The 'Description 1' value for the part on the order.
Order Qty
The sum of all order quantities on the locations in the detail rows below it for the order.
Cost
This field inherits the value of the 'PO Part Cost Level' field as set on the Supplier's Supplier Order Setup screen of the buying store. If it is changed here, only this order is affected. The part record is not updated.
Core
This field inherits the value of the 'Core Cost' field from the part record of the buying store. If it is changed here, only this order is affected. The part record is not updated.
The detail row always contains the following columns:
Location
Displays the read-only store number.
Order Qty
Displays the editable quantity of the part on the order heading to the specified location in the same row.
The remaining columns of both the master and detail rows are displayed as defined in the layout selected. The column appears on the master or detail row based upon the data contained. For instance, 'Avg Cost' and 'Cur Cost' appear on a detail row since those values could be different by location. 'Extended Cost' appears on the master row since it is a calculated field.
The first column of the grid master row displays the expand/collapse icon (“plus” or “minus” sign icon), regardless of the column name.
To expand the highlighted master row using the keyboard, press the 'Ctrl' and '+' keys. To collapse the row, press the 'Ctrl' and '-' keys.
Detail rows may be maximized by clicking the maximize icon  adjacent to the first column of the detail section. Once the detail is maximized, the close icon
  may be clicked to return to the main view.
Export All Data
Checkbox that determines what is displayed when the 'Preview Grid' option is selected.
When checked, all detail rows are displayed in the preview.
When unchecked, only those detail rows that are already expanded are displayed in the preview.
Multi-Store Screen-Level Menu
For multi-store distributed orders, a new screen-level menu option is available.
Consolidate
When clicked, the application issues a warning prompt asking: "Are you sure you want to consolidate this distributed order?"
Click 'Yes' to convert the order from a multi-store distributed order into a multi-store consolidated order.
Click 'No' to close the prompt and do nothing.
Note: This option is available to orders with the following statuses: 'New', 'WIP', 'Fin', 'Ord', or 'ASN'. If the order is in OBK or ASN-XX status, the option will not be visible.
Note: The only time a Multi-Store Distributed Order cannot be converted to a Consolidated order is when the fill policy is Backorder and it has been posted at least once.
Multi-Store Row-Level Right-Click Menu
Right-click on a master row and the following extra right-click options are available:
Add a Location
Click to open the 'Add a Location' pop-up.
In the event that a part has order quantities for all locations in the system and the 'Add a Location' is selected for that part, the 'Add a Location' pop-up opens with the 'Show All Locations' checked and a message prompt is displayed with the text: "This part has been ordered for all available locations. You cannot add a location." With an 'OK' button. Click the 'OK' button close the prompt and the 'Add a Location' pop-up.
Click to collapse all parts for all master rows displaying the detail records for all locations.
Expand All
Click to expand all parts for all master rows displaying the detail records for all locations. This may be time-consuming for a large order. A pop-up with a progress meter appears to indicate the progress of the expansion. Click 'Cancel' in the pop-up to abort the expansion of the grid rows and report the number of rows that were expanded. A message displays stating "Expand All canceled. ### of ##### rows have been expanded."
Right-click on a detail row and the following extra right-click options are available:
Add a Location
See the 'Add a Location' help for the master row above for more information.
Remove a Location
Removing a location via the right-click menu opens a warning prompt asking: "Are you sure you want to remove the following locations from this part?” and details the 'Line', 'Part Number', and 'Location'.
Click 'Yes' to remove the part for the selected location from the order.
Click 'No' to close the message, nothing is removed.
Multi-Store Column Header Right-Click Menu
Right-click on a master row’s column header and the following extra right-click options are available:
Collapse All
Click to collapse all parts for all master rows displaying the detail records for all locations.
Expand All
Click to expand all parts for all master rows displaying the detail records for all locations. This may be time-consuming for a large order. A pop-up with a progress meter appears to indicate the progress of the expansion. Click 'Cancel' in the pop-up to abort the expansion of the grid rows and report the number of rows that were expanded. A message displays stating "Expand All canceled. ### of ##### rows have been expanded."
Multi-Store Right-Click Group By Box
Collapse All
Click to collapse all parts for all master rows displaying the detail records for all locations.
Expand All
Click to expand all parts for all master rows displaying the detail records for all locations. This may be time-consuming for a large order. A pop-up with a progress meter appears to indicate the progress of the expansion. Click 'Cancel' in the pop-up to abort the expansion of the grid rows and report the number of rows that were expanded. A message displays stating "Expand All canceled. ### of ##### rows have been expanded."
Multi-Store 'Add a Part' Pop-up
Line
Displays the line code of the selected part from the right-click menu in the location.
Part Number
Displays the part number of the selected part from the right-click menu in the location.
Order Qty
Displays the order quantity of the selected part from the right-click menu in the location.
Cost Each
Displays the cost of each of the selected part from the right-click menu in the location.
Core Each
Displays the cost of the core of each of the selected part from the right-click menu in the location.
Description
Displays the 'Description 1' and 'Description 2' read-only values from the Part Entry screen in the current location.
Supplier
Displays the read-only supplier code.
Buy Qty
Displays the read-only buy quantity value.
Buy MSR
Displays the read-only buy measure value.
Sales Class
Displays the 'Sales Class 1' and 'Sales Class 2' read-only values.
Min/Max/Order Point
Dynamically displays the stocking level with the read-only value under the corresponding label. The stocking level is set on the System Purchasing Setup screen. If a dual stocking level is selected, both fields are displayed.
Show All Locations
Checkbox that determines whether or not all Locations in the enterprise are shown. When checked, all locations in the enterprise are shown. When unchecked, only the location selected from the right-click menu is shown.
Location
Displays the location number from the selected right-click row.
Location Name
Displays the location name from the selected right-click row.
Order Qty
Displays the order quantity for the part in the selected location. It is possible to edit this order quantity. As values are entered for 'Order Qty' in the grid, the 'Order Qty' field at the top of the pop-up updates with the sum of the 'Order Qty' column on this pop-up. It will not reflect any 'Order Qtys' that might already be applied to other locations not on the pop-up (but on the underlying grid).
When a line and part number combination that is already on the order is entered, a pop-up displays stating: "This part already appears on the order. Do you want to edit the part?"
Click 'Yes' to close the message prompt and the pop-up. The 'Part Detail' tab displays, the row with the part is selected, the cursor is positioned in the 'Order Qty' cell in order to edit the quantity.
Click 'No' to close the message prompt and clear the 'Add a Part' pop-up. Close the pop-up or enter another part.
Available Qty
Displays the available quantity of the part from the Part Entry screen.
On Order Qty
Displays the "on order" quantity of the part from the Part Entry screen.
The on order quantity is not reflected in the part file until the purchase order is finalized. However, other fields that are edited, such as cost, min, and max, affect the part file immediately regardless of PO status.
Inbound Qty
Displays the inbound quantity of the part from the Part Entry screen.
Stocking Level
Displays the chosen stocking level for the part. If two are chosen, both display.
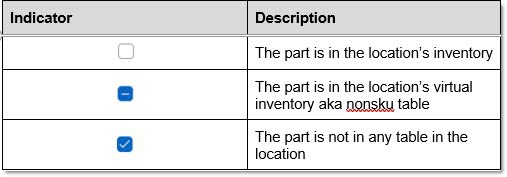
NIF
Indicates the NIF status of the parts in all displayed locations. For informational purposes only. See the chart below on how to read the column:
For NIF parts, it is possible to enter the 'Order Qty' (within the grid per location), and above the grid: 'Cost Each', 'Core Each', 'Description 1', and 'Description 2' only. Other fields are disabled following the behavior for adding NIF parts on single-store orders.
If a NIF part is entered:
- and the 'Allow NIF Parts on Purchase Orders' (or Return Orders), is unchecked on the System Purchasing Setup screen, the 'Add to Order' button is not enabled.
- and the 'Allow NIF Parts on Purchase Orders' (or Return Orders), is checked on the System Purchasing Setup screen, the following fields are enabled for editing:
- 'Line'
- 'Part Number'
- 'Cost Each'
- 'Core Each'
- 'Descriptions'
- 'Order Qty' column in the grid for all locations
When a NIF part is added to the order, the part will be added immediately to the locations with 'Order Qty' > 0 as well as the buying store (even if the buying store's 'Order Qty' = 0).
When a detail record contains a NIF part, the values (other than 'Order Qty') will initially be blank or zero. For editable columns, enter values that will be saved in the location specified.
Add to Order
Click to add the part, quantity, and cost to the order (purchase or return).
If a part:
- That was previously deleted
- Had its 'Order Qty' set to zero
- Or was fully posted to the order
Is attempted to be added to the order, a message prompt displays stating: "This part was previously removed from this order. Do you want to add it again?"
Click 'Yes' to insert the part into the grid with the associated 'Order Qty', 'Costs', and other data. The 'Add a Part' pop-up displays with the 'Line' and 'Part Number' cleared.
Click 'No' to close the message prompt and the pop-up.
Clear Entry
Click to clear the pop-up of any data entered.
Close
Click to close the pop-up.
Add a Part Pop-up
When the pop-up is opened from the screen-level menu, the pop-up is blank.
When the pop-up is opened via the right-click menu, the pop-up displays with the 'Line' pre-populated from the clicked row.
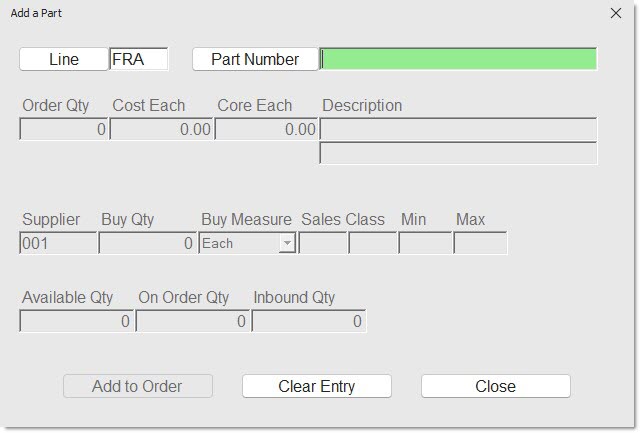
Line
Enter the line directly in the text-entry field or use the 'Line' button to open the 'Browse Line Codes' pop-up to select a line from the list.
Part Number
Enter the part number directly in the text-entry field or use the 'Part Number' button to open the 'Find Part' pop-up to select a part from the list. When a “Not-in-File” part is selected, the text 'Not In File Part' displays in red.
When a line and part number combination that is already on the order is entered, a pop-up displays stating: “This part already appears on the order. Do you want to edit the part?”
Click 'Yes' to close the message prompt and the pop-up. The 'Part Detail' tab displays, the row with the part is selected, the cursor is positioned in the 'Order Qty' cell in order to edit the quantity.
Click 'No' to close the message prompt and clear the 'Add a Part' pop-up. Close the pop-up or enter another part.
If the part is not yet on the order, the application populates the pop-up with the following:
-
'Order Qty' is editable and set to 1
-
'Cost Each' is editable and set to the cost on the part record
-
'Core Each' is editable and set to the cost on the part record
-
'Description' is non-editable and set to the corresponding field for the part
-
'Supplier' is non-editable and set to the supplier for the order
-
'Buy Qty' is non-editable and set to the corresponding field for the part
-
'Buy MSR' is non-editable and set to the corresponding field for the part
-
'Sales Class' is non-editable and set to the corresponding field(s) for the part
-
'Stocking Level' is non-editable and set to the corresponding field for the part
-
'Available Qty' is non-editable and set to the corresponding field for the part
-
'On Order Qty' is non-editable and set to the corresponding field for the part
-
'Inbound Qty' is non-editable and set to the corresponding field for the part
If the part entered is a NIF part and the 'Allow NIF Parts on Purchase Orders' (or Return Orders), is unchecked on the System Purchasing Setup screen, the 'Add to Order' button will not be enabled.
Order Qty
Enter the number of parts to order. Once a 'Line' and 'Part Number' are chosen, the field defaults to 1.
Cost Each
When a part is entered, the cost for the part from the current location is displayed, and the values can be modified. Modifying these costs affect this purchase order only.
Core Each
When a part is entered, the cost for the core from the current location is displayed, and the values can be modified. Modifying these costs affect this purchase order only.
Description
Displays the 'Description 1' and 'Description 2' read-only values from the Part Entry screen in the current location.
Supplier
Displays the read-only supplier code.
Buy Qty
Displays the read-only buy quantity value.
Buy MSR
Displays the read-only buy measure value.
Sales Class
Displays the 'Sales Class 1' and 'Sales Class 2' read-only values.
Min/Max/Order Point
Dynamically displays the stocking level with the read-only value under the corresponding label. The stocking level is set on the System Purchasing Setup screen. If a dual stocking level is selected, both fields are displayed.
Available Qty
Displays the available quantity of the part from the Part Entry screen.
On Order Qty
Displays the “on order” quantity of the part from the Part Entry screen.
The on order quantity is not reflected in the part file until the purchase order is finalized. However, other fields that are edited, such as cost, min, and max, affect the part file immediately regardless of PO status.
Inbound Qty
Displays the inbound quantity of the part from the Part Entry screen.
Add to Order
Click to add the part, quantity, and cost to the order (purchase or return).
If a part:
-
That was previously deleted
-
Had its 'Order Qty' set to zero
-
Or was fully posted to the order
Is attempted to be added to the order, a message prompt displays stating: “This part was previously removed from this order. Do you want to add it again?”
Click 'Yes' to insert the part into the grid with the associated 'Order Qty', 'Costs', and other data. The 'Add a Part' pop-up displays with the 'Line' and 'Part Number' cleared.
Click 'No' to close the message prompt and the pop-up.
Clear Entry
Click to clear the pop-up of any data entered.
Close
Click to close the pop-up.
Replacement Parts Pop-up
From the 'Part Detail' tab grid, right-click a part with a replacement (indicated by the safe color shading in the 'Line' and 'Part Number' cells and click the 'Replacement Parts' selection to open the 'Replacements Parts' pop-up.
For multi-store environments creating a multi-store distributed order, the following exceptions are made to the pop-up:
-
The right-click menu option is only available from the master row of the part.
-
The pop-up contains a 'Show All Locations' pop-up to filter in all locations in the installation.
-
The grid contains a 'Location' column to show what location the part is in.
-
When the pop-up opens, all replacement parts defined for the buying store and all stores currently on the order are displayed.
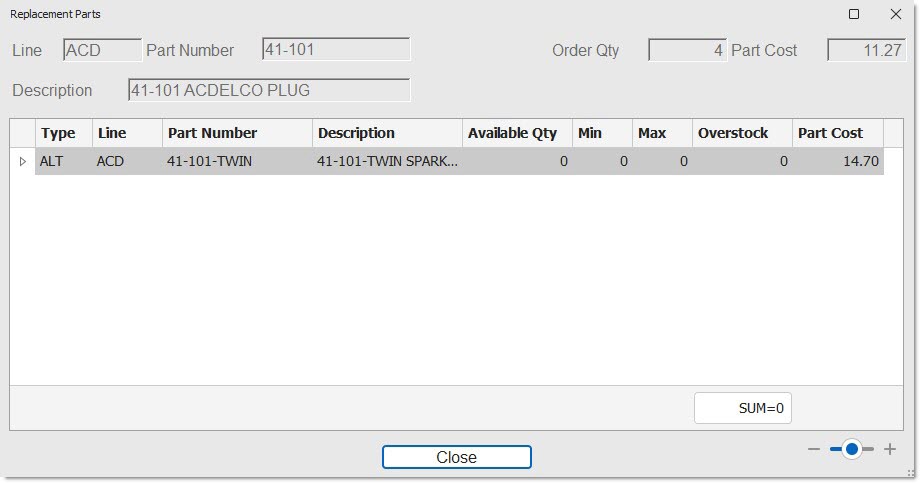
Line
Read-only field at the top of the pop-up that displays the line code of the part to be replaced.
Part Number
Read-only field at the top of the pop-up that displays the part number of the part to be replaced.
Order Qty
Read-only field at the top of the pop-up that displays the order quantity of the part to be replaced.
Part Cost
Read-only field at the top of the pop-up that displays the part cost of the part to be replaced.
Description
Read-only field at the top of the pop-up that displays the 'Description 1' of the part to be replaced.
Grid
The grid in the 'Replacement Parts' pop-up is read-only.
Type
Displays the type of replacement part. Values are:
-
'ASC' – for association
-
'SUP' – for supersede part
-
'VCO' – for vendor changeover part
-
'ALT' – for alternate part
-
'SUB' – for substitution part
Line
Displays the line code of the replacement part.
Part Number
Displays the part number of the replacement part.
Description
Displays the 'Description 1' of the replacement part.
Available Quantity
Displays the quantity available of the replacement part.
Stocking Level
Displays the stocking level dynamically (i.e. 'Min', 'Max', 'Order Point') as defined on the System Purchasing Setup screen and uses that text as the column header label. Displays two columns if the stocking level is 'Min/Max' or 'Min/Order Point'.
Overstock
Displays the difference between the 'Available Qty' and the 'Stocking Level'. Negative values are displayed as a 0.
-
If the stocking level is 'Min/Max', the calculation is the difference between the 'Available Qty' and 'Max'.
-
If the stocking level is 'Min/Order Point', the calculation is the difference between the 'Available Qty' and 'Order Point'.
Part Cost
Displays the cost of the replacement part.
Split Parts From Order
Clicking the 'SPLIT' button opens the 'Split Parts From Order' pop-up, see example below:
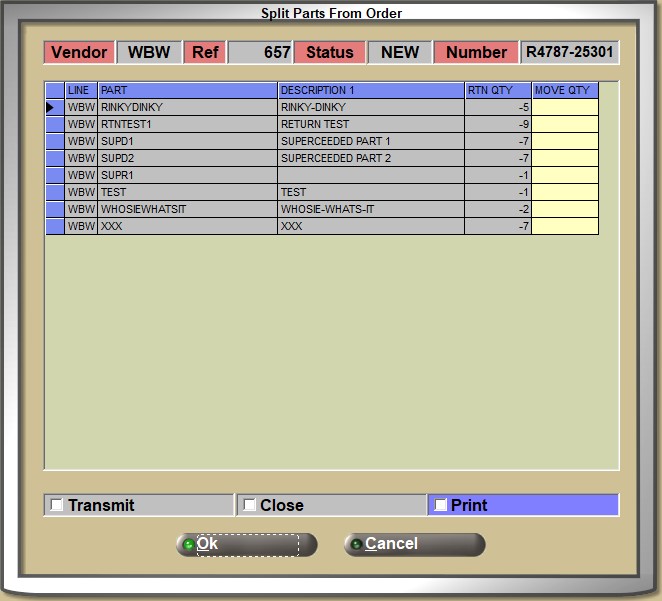
Vendor
Displays the vendor that the selected parts are being returned to.
Ref
Displays the reference number for the order that the parts were a part of.
Status
Displays the status of the order that the parts were included in.
Number
Displays the order number for the selected parts that are being split.
Line
Displays the Line Code for the selected parts to be split.
Part
Displays the Part Number for the selected parts to be split.
Description 1
Displays the value from the 'DESCRIPTION 1' field from the Part Entry screen for the selected parts to be split.
Rtn Qty
Displays the quantity to be returned for the selected parts being split.
Move Qty
The 'MOVE QTY' textbox auto-populates with the value of the 'RTN QTY' to enable the moving the entire 'RTN QTY' amount, or edit that amount to a lesser amount.
Any value above 0 in this textbox indicates that the part will be split and will participate in the move.
Transmit
When checked, electronically transmits the new return order to the selected vendor.
When unchecked, does not transmit the new return order.
This checkbox is disabled if there is no XMIT record for this vendor.
Close
When checked, closes the return order.
When unchecked, does not automatically close the return order.
Print
When checked, prints a return order report for the new return order.
When unchecked, does not print a return order report for the new return order.
Ok
When the 'Ok' button, a new return order is created, the chosen parts are split from the original return order to the new return order, the return order is finalized, the "post-splitting" actions are performed based on the user's choices for 'Transmit', 'Close', or 'Print', a pop-up displays indicating the success of the split, and the system returns to the PURCHASING DASHBOARD screen.
Cancel
When the 'Cancel' button, a new return order is not created, no parts are split from the original return order, no "post-splitting" actions such as 'Transmit', 'Close', or 'Print' are performed, and the system returns to the PURCHASING DASHBOARD screen.
Move Parts from Purchase Order
This pop-up allows for the Move function, so that some or all parts from an existing purchase order can be moved to a new or existing purchase order.
-
The 'SOURCE' of the original purchase order can only be 'SHELF'.
-
The original purchase order can be in any status prior to moving any parts. However, the PO must be in an editable state in order to move parts.
-
The destination PO, if existing, can be in any status. However, the destination PO must be in an editable state in order to accept moved parts.
-
If parts are moved to a new PO, that PO should be in 'WIP' status.
-
The destination PO can be for the same or different supplier.
-
If 100% of the Order Qty of a part is moved from one PO to another, the part is removed from the original PO (since its Order Qty is now zero).
-
-
Parts with remaining Order Qty > 0 remain on the original PO.
-
If 100% of the Order Qty of all parts are moved from one PO to another, the entire original PO is deleted.
-
There is no validation that the destination PO supplier actually supports the parts that are moved to their PO.
-
If the supplier's minimum thresholds on the destination PO are not met, the purchase order will not be created.
-
Moving parts from one PO to another could result in the originating PO no longer meeting supplier thresholds. If so, these will be highlighted in orange on the original PO as per existing functionality.
-
If the supplier has a Buy Quantity Rule, the move quantity on the destination PO will be adjusted accordingly to meet that BQR.
-
If a part attempting to be moved has any on order quantity for a customer backorder, no quantity of that part can be moved. The move is denied and a message prompt displayed with the text: "You may not move a part ordered for automatic back order filling. Part <Line> <PN> has been ordered for a customer back order." with an 'OK' button to clear the message.
Multi-Store Purchase Orders are handled differently:
-
When the source PO is a multi-store purchase order and a new purchase order is selected as the destination PO, the destination purchase order should be a single store purchase order. It should use the central buying store for the new order.
-
When moving parts to an existing destination PO that is a multi-store distributed order, all order quantity is placed in the central buying store for all parts moved. Users can redistribute quantities across stores after the move is complete using existing functionality.
-
When the source PO is a multi-store distributed order:
-
If 100% of the order quantity of a part is moved, the order quantity of the part on the source PO is set to zero and it is removed from all stores on the original order.
-
If <100% of the order quantity of a part is moved, the application reduces the order quantity by 1 unit from each child store order quantity of the part in a ‘round-robin’ manner until the move quantity is satisfied.
-
If <100% of the order quantity of a part is moved, and the part is ordered using a buy quantity rule, and the move quantity is greater than or equal to the sum of all of the child store order quantities but is less than the total order quantity of a part (due to rounding up for BQR) the requested move quantity is moved to the destination purchase order and the order quantity for the part on the source purchase order is set to zero.
-
-
If the PO is created and then part quantities are moved to another PO for the same vendor and the move quantity is, for example 6 or less, the destination PO will have an order quantity of 8, to meet the BQR, and the order quantities on the original PO will be set to zero, since it no longer supports the part’s BQR.
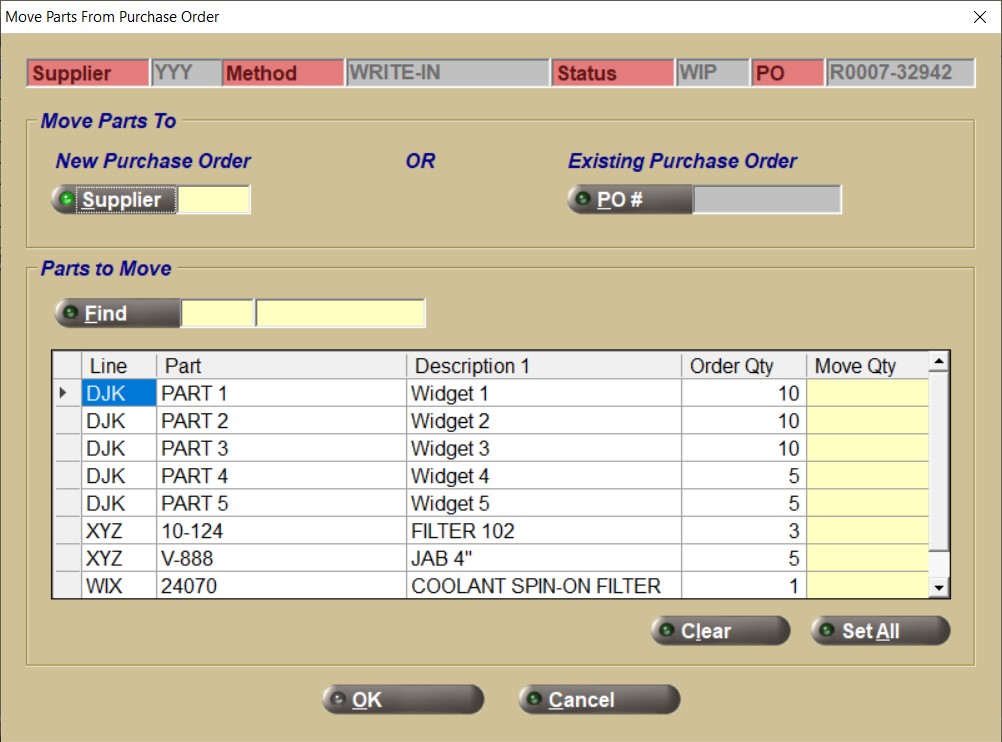
Supplier
Displays the supplier code for the PO that was selected.
Method
Displays the method for the current PO (for example, Write-In)
Status
Displays the status of the current PO.
PO
Displays the existing PO #.
Move Parts To
Identifies the destination PO for the move.
New Purchase Order
Supplier
Used when a new purchase order is desired to move the parts to. Click the 'Supplier' button to open the 'Browse Suppliers' pop-up to make a selection. Otherwise the Supplier code must be typed into the text box directly and the 'Enter' key must be pressed to accept the entry.
Existing Purchase Order
PO #
Used when an existing purchase order is desired to move the parts to.
Click the 'PO #' button to open the 'Browse Purchase Orders' pop-up to make a selection.
Parts to Move
Identifies the parts to be moved and their quantities.
Find
Searches the list of parts on the order. When clicked, the 'Find Part' pop-up displays allowing for selection from all parts.
If the selected part is found, the row is made visible (if it wasn't already) and the system highlights the 'Move Qty' cell. Enter a quantity in this field.
If the selected part is not on the purchase order, the system issues a message prompt with the text: "<part number> was not found on the purchase order." and an 'OK' button to clear the pop-up.
Grid
If a cell in the grid is clicked, the row is considered selected. A triangle icon appears in the first column of that row to indicate the selection.
If a column heading in the grid is clicked, sort the grid alphanumerically by that column in ascending order. If the same column heading is clicked again, reverse the sort. In both cases, display an up or down triangle in the column heading adjacent to the heading text to indicate by which column the grid is sorted and in what order.
Line
Displays the line of the part.
Part
Displays the part number of the part.
Description 1
Displays the description of the part.
Order Qty
Displays the amount of units on the current purchase order.
Move Qty
Displays the amount of units to be moved to the destination purchase order. The ‘Move Qty’ column is yellow to indicate it is editable.
Cells in the 'Move Qty' column:
- Accept numeric values only. If a non-numeric character is entered, issue a message prompt with the text: "Invalid entry. Numeric required!" and an 'OK' button to clear the pop-up.
- Accept quantities from 1 to the amount in the adjacent 'Order Qty' field. For instance, if the 'Order Qty' is 10 and 11 is entered, issue a message prompt with the text: "The value must be between 1 and 10." and an 'OK' button to clear the pop-up.
- If 0 is entered it is cleared by the application.
Clear
Removes all entries from the 'Move Qty' column.
Set All
Copies all values in the 'Order Qty' column to the 'Move Qty' column. Users may continue to edit quantities in the 'Move Qty' column.
OK
Processes the move request.
If the request is processed successfully, the system issues a message prompt with the text: "N parts moved to order <PO_number>." and an 'OK' button to clears the pop–up.
Cancel
Closes the pop-up and does not move any parts.
Move Parts from Another PO
To move parts from another purchase order, follow the steps below:
-
When the purchase order to be moved is displayed in the PURCHASE ORDER screen and the 'MOVE' button is clicked, the application opens a new pop-up, 'Move Parts From Purchase Order'.
-
Decide whether you would like to:
-
Move parts to a new purchase order for the same or different supplier,
-
Or, move parts to an existing purchase order for the same or different supplier.
-
-
To move parts to a new purchase order, type in the supplier code next to the 'Supplier' lookup button, or click the 'Supplier' lookup button to select the supplier from the supplier list.
-
Note: If the new purchase order is for the same supplier, it must be still selected/entered in this field.
-
The resulting new purchase order will be in 'WIP' status and have a method of 'Write-In'.
-
-
To move parts to an existing purchase order, the user should click the ‘PO#’ lookup button to display the ‘Browse Purchase Orders’ pop-up.
-
The list may be filtered using any of the yellow fields adjacent to the column headings.
-
All open purchase orders should be displayed.
-
The destination purchase order must be in an editable state. If it is not and has already been transmitted and is selected, issue a message prompt with the text: "This PO has been transmitted to the vendor." and an 'OK' button to clear the pop-up.
-
The destination purchase order will retain its status (e.g. 'FIN') and its method (e.g. 'MAX').
-
-
Next, specify the part(s) to be moved to the destination purchase order by entering a value in the 'Move Qty' field. One, multiple or all parts may be moved.
-
Parts displayed in the grid include all parts from the selected purchase order where the 'Ord Qty' is greater than zero and the 'INBOUND QTY' equals zero.
-
Optionally edit the 'Move Qty' amount to any amount between one and less than or equal to the value in the 'Order Qty' field.
-
If the 'Move Qty' amount is set to a value between 1 and the value equal to the 'Ord Qty', move the part and 'Ord Qty' to the destination purchase order and decrease the 'Ord Qty' for the part on this purchase order by the 'Move Qty' amount.
-
For example, if the 'Ord Qty' is 28 and the 'Move Qty' is 8, the destination 'Ord Qty' will be 8 for the part and the 'Ord Qty' on the source PO will be updated to 20.
-
-
If the 'Move Qty' amount is set equal to the value in the 'Ord Qty' field, the part will be moved to the destination purchase order and removed entirely from this (the source) purchase order.
-
If the 'Move Qty' amount is set to a value greater than the current 'Ord Qty', a message prompt will be displayed.
-
-
Once parts and quantities are selected, click 'OK'.
-
If successful, a confirmation message prompt appears with the text: "<x> parts moved to order <purchase_order_number>." Click 'OK' to clear the message.
-
The screen should refresh and display destination PO in the PURCHASE ORDER screen.
Reports
Click the 'REPORTS' button from the menu list to display the 'PO REPORTS' window. Click 'HISTORY REPORT', 'PURCHASE ORDER', 'INV POSTING REPORT', or 'SUPPLIER ALIAS'.
History Report
Reports historical purchase orders based on the selected criteria.
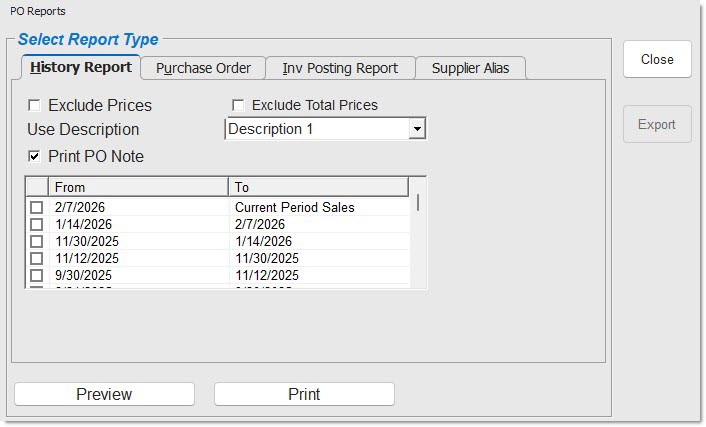
EXCLUDE PRICES
Excludes reporting the prices on the report, when checked.
EXCLUDE TOTAL PRICES
Determines whether or not the pricing totals are displayed on the report.
- Checked - The 'PO COST TOTAL $' label and amount are hidden from the 'PO TOTALS' box at the bottom of the report.
- Unchecked (default) - Does not hide any totals on the report.
Note: If the 'EXCLUDE PRICES' checkbox is checked, the entire 'EXT COST $' column is hidden, including the grand total of that column. If the 'EXCLUDE PRICES' checkbox is unchecked, and the 'EXCLUDE TOTAL PRICES' checkbox is checked, only the grand totals are hidden.
Note: If the security proc 'PO COST TOTALS' is set to 'NOT VISIBLE', the setting for the 'EXCLUDE TOTAL PRICES' checkbox is ignored.
PRINT PO NOTE
Includes the PO Note, when checked.
USE DESCRIPTION
Includes the selected description, 'Description 1' or 'Description 2'.
Grid
[Checkbox]
Identifies the date(s) to include in the report, when checked.
FROM
Indicates the invoice date to start with when printing the report.
TO
Indicates the invoice date to end with when printing the report.
PREVIEW
Displays a preview of the system-generated report.
PRINT
Prints a hard copy of the report.
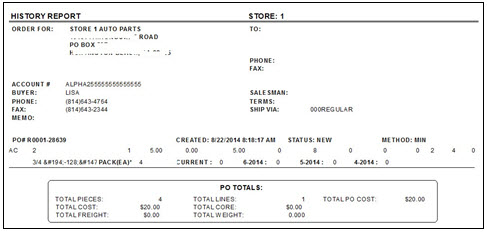
The following is an example of the 'HISTORY REPORT':
Purchase Order Report
Reports purchase orders.
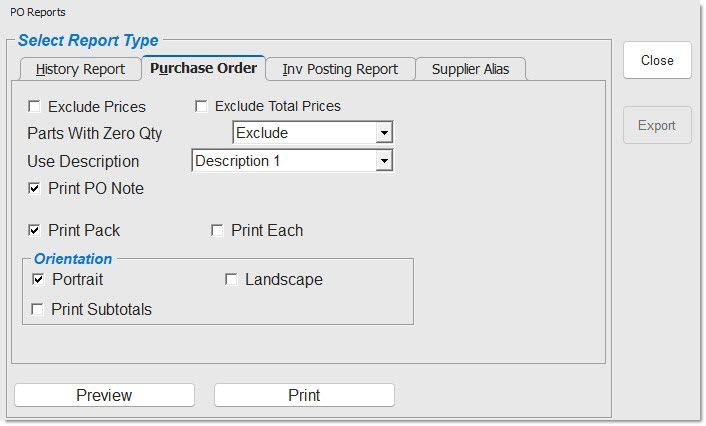
EXCLUDE PRICES
Excludes reporting the prices, when checked.
EXCLUDE TOTAL PRICES
Determines whether or not the pricing totals are displayed on the report.
- Checked - The 'GRAND TOTAL' amount for the 'TOTAL $' column is hidden and the 'PO COST TOTAL $' label and amount are hidden in the totals box at the bottom of the report.
- Unchecked (default) – Does not hide any totals on the report.
Note: If the 'EXCLUDE PRICES' checkbox is checked, the entire 'EXT COST $' column is hidden, including the grand total of that column. If the 'EXCLUDE PRICES' checkbox is unchecked, and the 'EXCLUDE TOTAL PRICES' checkbox is checked, only the grand totals are hidden.
Note: If the security proc 'PO COST TOTALS' is set to 'NOT VISIBLE', the setting for the 'EXCLUDE TOTAL PRICES' checkbox is ignored.
PARTS WITH ZERO QTY
Determines whether parts with zero quantities ordered on a non-finalized purchase order display on the Purchase Order Report.
Options are:
- 'EXCLUDE' (Default) - Excludes parts where the quantity ordered has been zeroed out on the Purchase Order Report.
- 'INCLUDE' - Includes parts where the quantity ordered was zeroed out on the Purchase Order Report.
- 'ONLY' - Only reports parts where the quantity ordered has been zeroed out on the Purchase Order Report.
Displays for a purchase order that has not yet been finalized only. Does not display when purchase order has been finalized. Finalized purchase orders always exclude parts with zero quantities.
USE DESCRIPTION
Includes the selected description, 'Description 1' or 'Description 2'.
PRINT PO NOTE
Includes the PO Note, when checked.
PRINT SOURCED PO VENDOR NOTE
Includes the Sourced Purchase Order Vendor note, when checked. (Default is unchecked).
PRINT PACK
Reports the 'BUY MEASURE' and 'BUY QTY' (for parts with a Buy Quantity Rule) in the 'MEAS' field, when checked. For example: *EA (2) for parts with a 'BUY QTY' of 2 and a 'BUY MEASURE' of 'EA'. Either the 'PRINT PACK' or 'PRINT EACH' flag can be checked. Defaults to 'PRINT PACK'.
PRINT EACH
Does not report the 'MEAS' field and reports the Each quantity but shows an asterisk (*) that a BQR exists.
Orientation
PORTRAIT
Outputs the Purchase Order Report in portrait orientation. (Default)
LANDSCAPE
Outputs the Purchase Order Report in landscape orientation.
PRINT SUBTOTALS
Outputs the Purchase Order Report with Subtotals and is totaled at the end in the 'GRAND TOTAL', when checked.
Outputs the Purchase Order Report without Subtotals and is totaled at the end in the 'GRAND TOTAL' only, when unchecked. (Default)
Available only when the 'PORTRAIT' field is checked.
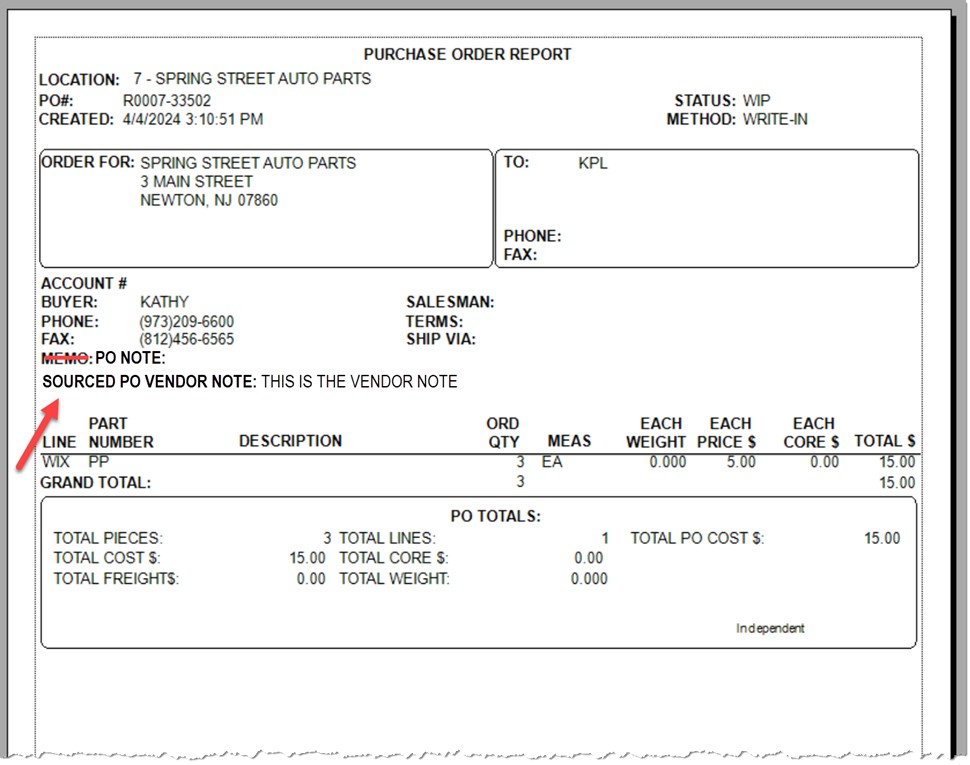
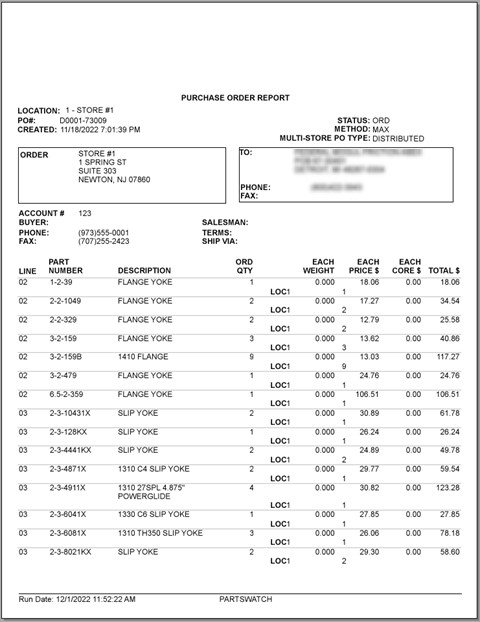
The following is an example of the 'PURCHASE ORDER REPORT' with 'PRINT SUBTOTALS' checked, and with the 'PRINT PO NOTE' and 'PRINT SOURCED PO VENDOR NOTE' checkboxes checked:
Inventory Posting Report
Reports posted purchase orders.
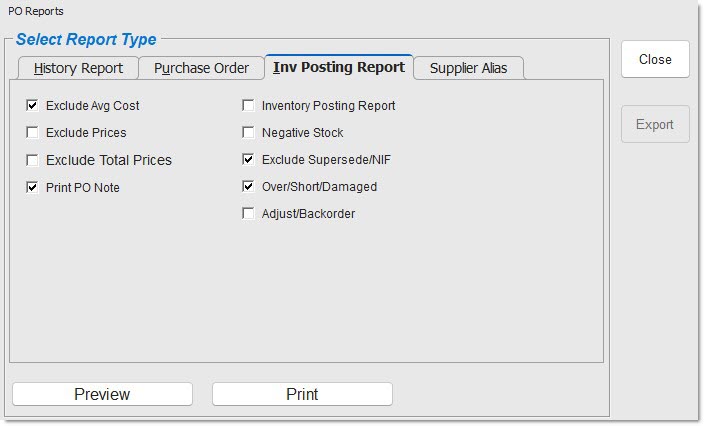
EXCLUDE AVG COST
Excludes reporting the average cost, when checked.
EXCLUDE PRICES
Excludes reporting the prices, when checked.
EXCLUDE TOTAL PRICES
Determines whether or not the pricing totals are displayed on the report.
- Checked - the 'EXT COST $' grand totals are hidden and the 'TOTAL PO COST $' is hidden from the summary box at the bottom of the report.
- Unchecked (default) - Does not hide any totals on the report.
Note: If the 'EXCLUDE PRICES' checkbox is checked, the entire 'EXT COST $' column is hidden, including the grand total of that column. If the 'EXCLUDE PRICES' checkbox is unchecked, and the 'EXCLUDE TOTAL PRICES' checkbox is checked, only the grand totals are hidden.
Note: If the security proc 'PO COST TOTALS' is set to 'NOT VISIBLE', the setting for the 'EXCLUDE TOTAL PRICES' checkbox is ignored.
PRINT PO NOTE
Includes the PO Note, when checked.
RECEIVING REPORT
Prints the 'PO POSTING REPORT', when checked. Flag default is controlled by the value of the 'POSTING REPORT' flag in the SYSTEM PURCHASING SETUP screen, but can be edited at the time of printing.
NEGATIVE STOCK
Prints the 'NEGATIVE STOCK' section of the 'EXCEPTIONS REPORT', when checked. Flag default is controlled by the value of the 'NEGATIVE STOCK' flag in the SYSTEM PURCHASING SETUP screen, but can be edited at the time of printing.
SUPERSEDE/NIF
Prints the 'SUPERSEDE/NIF REPORT' section of the 'EXCEPTIONS REPORT', when checked. Flag default is controlled by the value of the 'SUPERSEDE/NIF' flag in the SYSTEM PURCHASING SETUP screen, but can be edited at the time of printing.
OVER/SHORT/DAMAGED
Prints the 'OVER/SHORT/DAMAGED REPORT' section of the 'EXCEPTIONS REPORT', when checked. Flag default is controlled by the value of the 'OVER/SHORT/DAMAGED' flag in the SYSTEM PURCHASING SETUP screen, but can be edited at the time of printing.
ADJUST/BACK ORDER
Prints the 'ADJUST / BACK ORDER REPORT' section of the 'EXCEPTIONS REPORT', when checked. Flag default is controlled by the value of the 'ADJUST/BACK ORDER' flag in the SYSTEM PURCHASING SETUP screen, but can be edited at the time of printing.
Note: A Vendor Order Adjustment is a communication sent by Corporate that adjusts order quantities either up or down without impacting inbound. There are several types of vendor order adjustments. A negative adjustment would be sent for a part that has been ordered by the store, but cannot be delivered for some reason. A positive adjustment could be sent for a corporate-created order on behalf of the store to increase order quantities due to minimum or pack quantities, or other reasons.
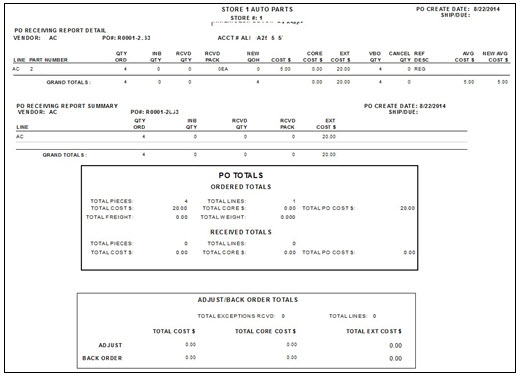
The following is an example of the 'INVENTORY POSTING REPORT'.
The example includes the 'ADJUST/BACK ORDER REPORT' section. When more than one Vendor Order Adjustment is sent on the ASN for the same part on the same PO, the 'ADJUST/BACK ORDER REPORT' displays each 'ADJ Qty' / 'ADJ Code' on a separate row. Only the 'LINE' and 'PART NUMBER' print for all rows.
Note: The application determines if a part is from a Ghost Order based on the expected arrival date sent on the ASN. When a part is not received within a predetermined number of days after the expected date of arrival, the part is flagged as Ghost Order ('Y' for 'YES'). The default number of days is 30. When the part has been received, the field is blank (for 'NO'). If the 'EXP ARRIVE DATE' field is blank, the 'GHOST ORDER' field is blank.
Supplier Alias Report
Reports purchase order for buy or return with changes for supplier alias.
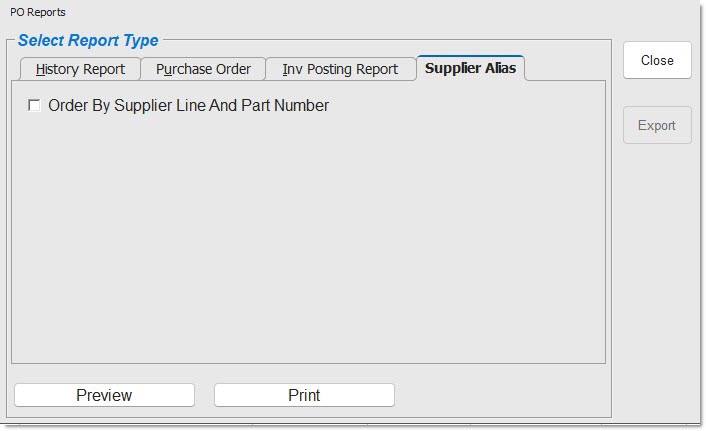
EXCLUDE PRICES
Excludes reporting the prices, when checked.
PARTS WITH ZERO QTY
Determines whether parts with zero quantities ordered on a non-finalized purchase order display on the Purchase Order Report.
Options are:
- 'EXCLUDE' (Default) - Excludes parts where the quantity ordered has been zeroed out on the Purchase Order Report.
- 'INCLUDE' - Includes parts where the quantity ordered was zeroed out on the Purchase Order Report.
- 'ONLY' - Only reports parts where the quantity ordered has been zeroed out on the Purchase Order Report.
Displays for a purchase order that has not yet been finalized only. Does not display when purchase order has been finalized. Finalized purchase orders always exclude parts with zero quantities.
USE DESCRIPTION
Includes the selected description, 'Description 1' or 'Description 2'.
PRINT PO NOTE
Includes the PO Note, when checked.
PRINT PACK
Reports the 'BUY MEASURE' and 'BUY QTY' (for parts with a Buy Quantity Rule) in the 'MEAS' field, when checked. For example: *EA (2) for parts with a 'BUY QTY' of 2 and a 'BUY MEASURE' of 'EA'. Either the 'PRINT PACK' or 'PRINT EACH' flag can be checked. Defaults to 'PRINT PACK'.
PRINT EACH
Does not report the 'MEAS' field and reports the 'Each' quantity but shows an asterisk (*) that a BQR exists.
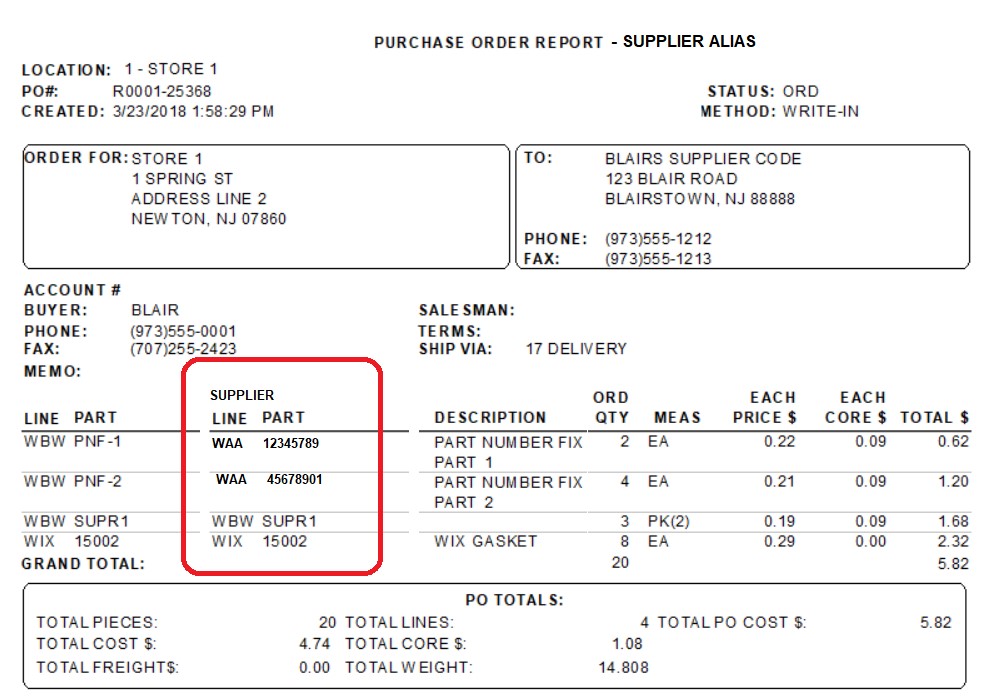
The following is an example of the 'PURCHASE ORDER REPORT - SUPPLIER ALIAS'.
Multi-Store Report
Reports Purchase Order details for multi-store "combination" POs.
SORT BY
Reports PO details by specified sort.
Options are:
- 'LINE / PART' - Sorts items by Line and Part, and within each part shows a total 'ORD QTY' and quantities for each store.
- 'STORE' - First sorts all parts by Store/Location number, then by Line, and then by Part Number.
The following is an example where the parts for LOC1 comprised the entire first page. After location, the list is sorted by 'LINE' and 'PART NUMBER'.
The remaining parts for LOC1 appear on the next page.
And the next location is started on a new page after a page break.
SHOW 0 ORDERED STORES
Determines if parts are reported for a store even if user zeroed order quantity.
Options are:
- 'EXCLUDE' - Excludes part for a store if user zeroed order quantity for that store.
- 'INCLUDE' - Includes parts for a store even if user zeroed order quantity for that store, along with parts/stores that had a quantity.
- 'ONLY' - Only reports parts for which user zeroed order quantity.
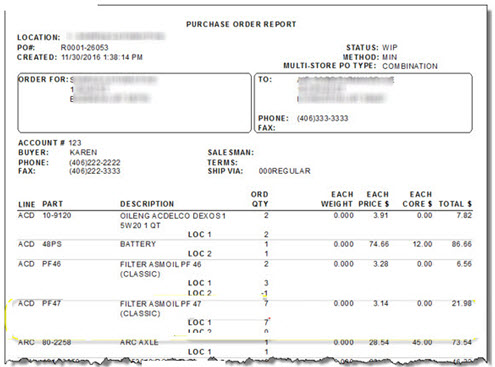
The following is an example of the Multi Store 'PURCHASE ORDER REPORT – MULTI-STORE PO TYPE: COMBINATION'.
Note: 'COMBINATION' indicates that the 'AUTOMATICALLY DISTRIBUTE MULTISTORE ORDERS' flag is checked in the STORE PURCHASING SETUP screen, 'PURCHASING' tab.
The following is an example of the Multi Store 'PURCHASE ORDER REPORT – MULTI-STORE PO TYPE: CONSOLIDATED'.
Note: 'CONSOLIDATED' indicates that the 'AUTOMATICALLY DISTRIBUTE MULTISTORE ORDERS' flag is unchecked in the STORE PURCHASING SETUP screen, 'PURCHASING' tab.
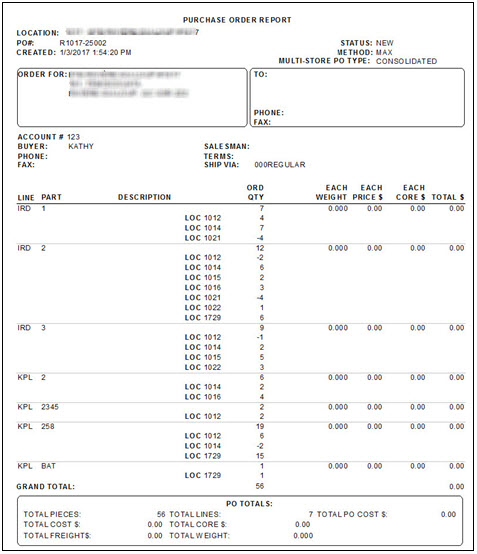
The 'GRAND TOTAL' includes the 'ORD QTY' for all items, whether reported or not due to filtering.
The 'PO TOTALS' section includes totals for items/stores included on the report.
Locked PO
When PO detail screen is open on a user's screen, the PO is considered "locked" and cannot be accessed by another user until closed.
The 'PO DETAIL SCREEN INACTIVITY MINUTES' field in the System Purchasing Setup screen enables the you to set the number of minutes that a PO can remain open on a user's screen and inactive before being automatically closed. When a PO is left open beyond the pre-set time, a pop-up displays to inform when the PO will close. Close the PO or keep the PO open. Once closed, the PO is available for another user to open.

If an ASN attempts to apply to a PO and the PO is locked, the ASN is not able to apply to the PO. By default, it attempts to re-apply for 24 hours. This default can be changed by PWS Support. If the number of retries exceeds the time limit, a message is recorded to the SYSTEM MESSAGES screen, and application of the ASN is canceled.